

Add Account
The Add Account page is where you connect a new channel to Replyco: a marketplace or webstore, a mailbox, an order management system, or a social media or phone account. Administrators open it with + Add Account in the top bar, select the channel’s tile and follow the dialog; depending on the channel you sign in to it, paste API keys, or set up email forwarding. Every account you connect then appears on AdminAccounts.
Availability: needs the Admin permission, which also shows + Add Account; see User permissions and roles. Every plan includes every channel; Aircall needs the Calls feature and WhatsApp the WhatsApp feature, both part of every plan, though companies on an older plan may not have them. The eBay v2 tile appears only when beta features are switched on for your company. See What each plan includes.
What you can do here
Section titled “What you can do here”- Choose the channel to connect. Four groups of tiles: marketplaces and webstores, mailboxes, order management systems, and social media and phone accounts; a number on a tile counts the accounts of that channel you already have. Choose a channel · Accounts and integrations.
- Connect by signing in to the channel. Most marketplaces, Gmail, Outlook, order management systems and messengers open their own sign-in in a new tab and send you back to Replyco. Connect by signing in to the channel · eBay · Linnworks.
- Connect with API keys or a password. WooCommerce, BigCommerce, Magento, Fruugo, Kaufland, Billbee and Telegram take keys you create in the channel and paste into Replyco. Connect with API keys or a password · Billbee.
- Connect a mailbox. Forward mail to an address Replyco creates, connect your own mail servers, or sign in to Gmail or Outlook. Connect a mailbox · Mailbox by forwarding · Mailbox with IMAP and SMTP · Gmail · Outlook and Microsoft 365.
- Finish on the page the channel returns you to. Most sign-in channels save the account on their own return page and show the last step there; Gmail and ShopLine save it at the first Authorize, and their return page completes it. Finish on the return page.
- Know when your plan’s accounts are used up. Replyco refuses to save an account beyond your plan’s number; delete an account you no longer use or change your plan. When your plan’s accounts are used up · Billing.
The screen at a glance
Section titled “The screen at a glance”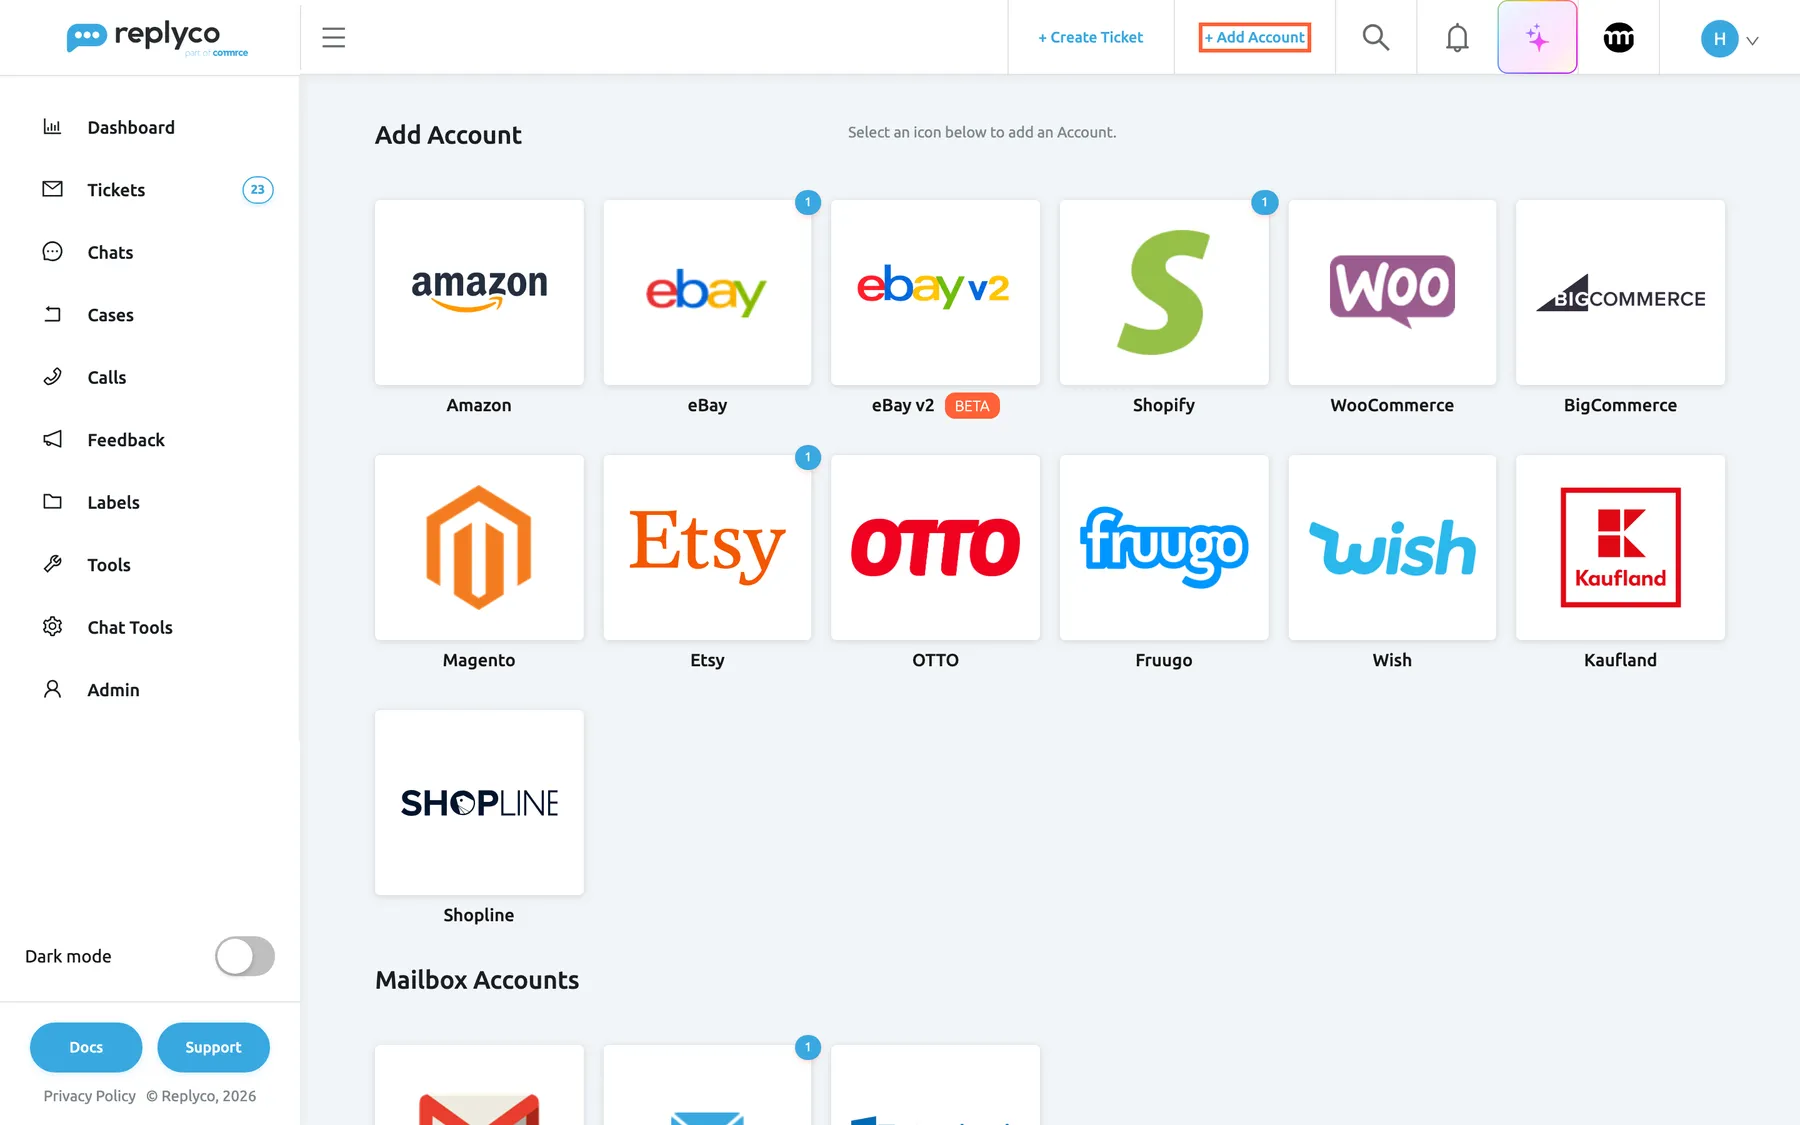
What this screenshot shows
- Screen
- Add Account (/integrations/add)
- Highlighted
- link “+ Add Account”, top-bar-right, enabled. opens this page
- Also visible
- 13 marketplace and webstore tiles; BETA label on eBay v2; count badges 1 on eBay, Shopify, Etsy; Mailbox Accounts heading
- Purpose
- the picker as it opens
| Region | What it shows | What you do there |
|---|---|---|
| Top bar, right | + Add Account | Open this page from any screen |
| Heading | Add Account and Select an icon below to add an Account. | Orient yourself |
| First group | Marketplaces and webstores: Amazon to Shopline | Select a tile to connect it |
| Mailbox Accounts | Gmail, Email, Outlook | Connect a mailbox |
| Order Management System Accounts | Linnworks, ChannelAdvisor, Veeqo, Katana, Billbee, Brightpearl | Connect an order management system |
| Social Media and Phone Accounts | Telegram, Facebook, Instagram, TikTok, Aircall, WhatsApp | Connect a messenger or your phone system |
| A tile | The channel’s logo and name, BETA for a beta connection, and a number for accounts you already have | Select it to open the channel’s connection dialog |
Choose a channel
Section titled “Choose a channel”-
Select + Add Account in the top bar.
-
Find the channel in its group. Scroll down for Mailbox Accounts, Order Management System Accounts and Social Media and Phone Accounts.
-
Select the channel’s tile. A dialog titled after the channel opens with a step bar, such as AUTHORIZE and FINISH.
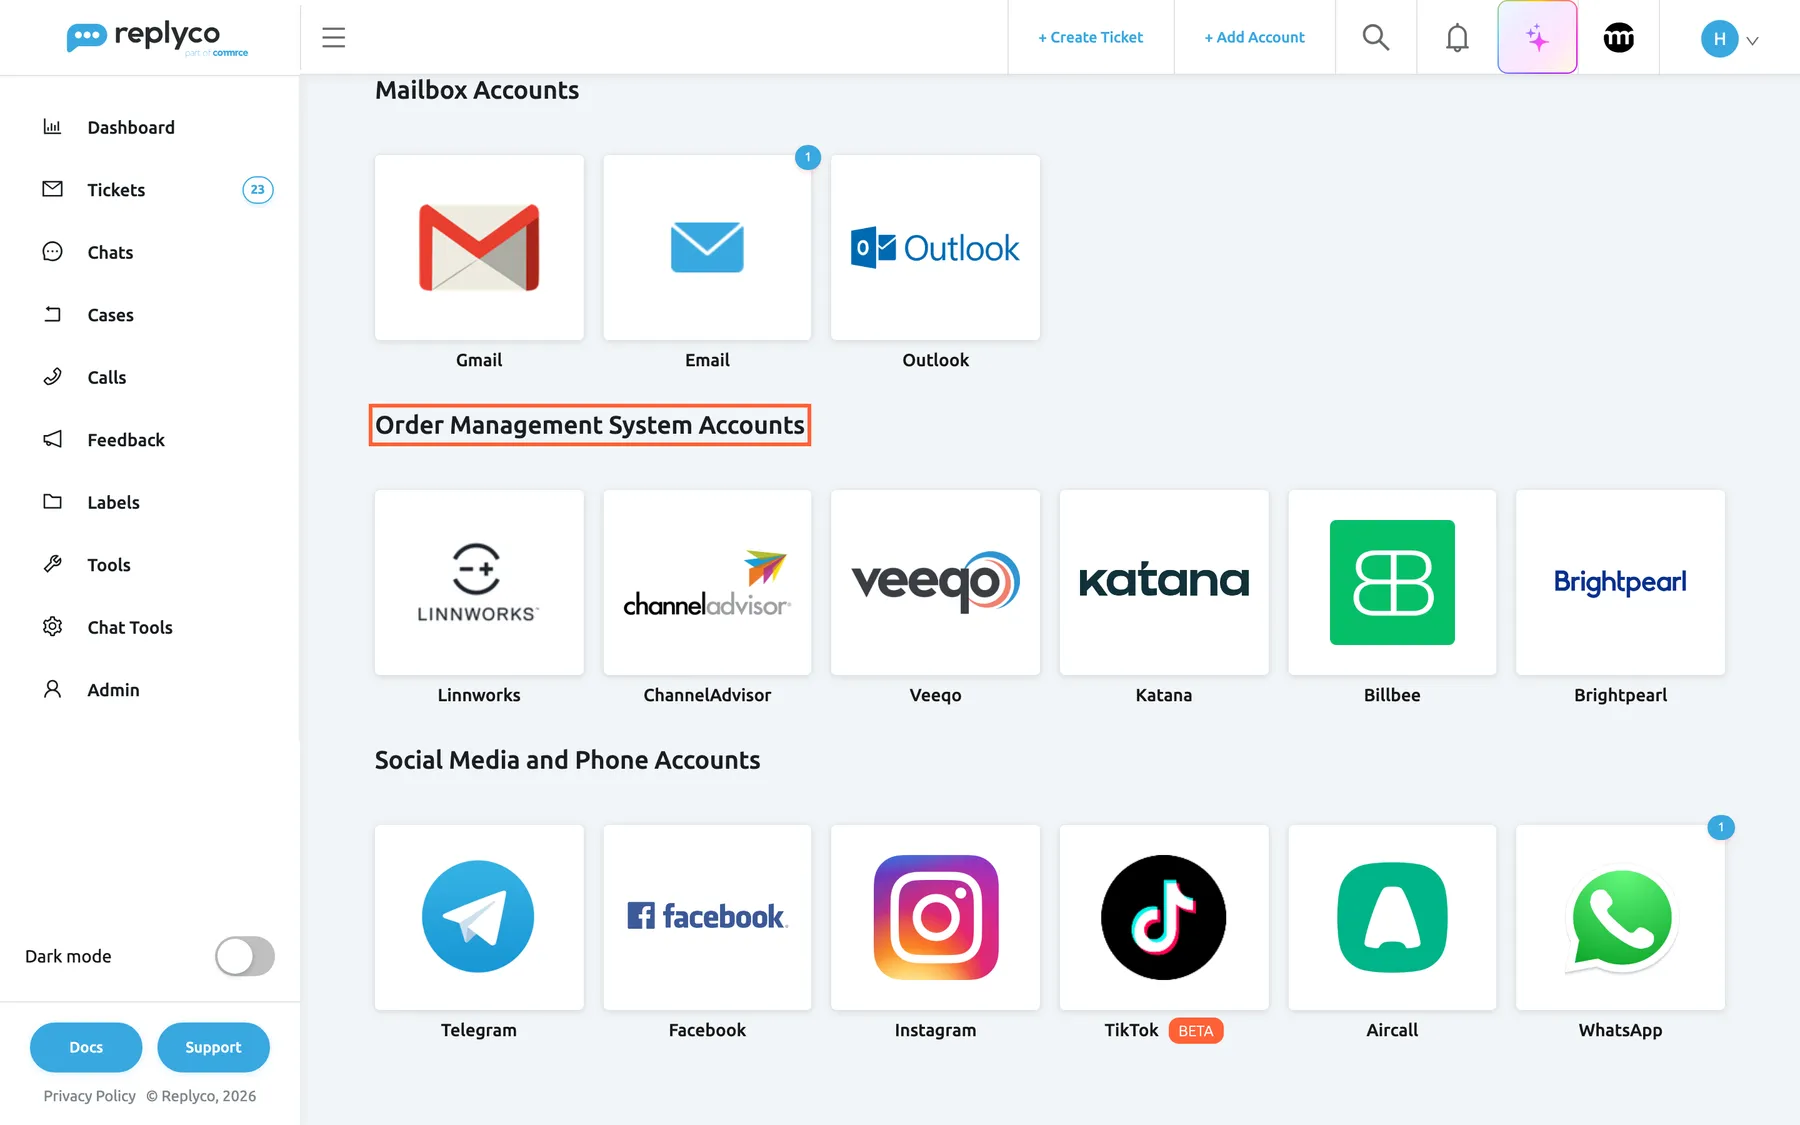
What this screenshot shows
- Screen
- Add Account (/integrations/add)
- Highlighted
- “”, oms-group-heading, shown. none
- Also visible
- Gmail, Email, Outlook; Linnworks, ChannelAdvisor, Veeqo, Katana, Billbee, Brightpearl; Telegram, Facebook, Instagram, TikTok (BETA), Aircall, WhatsApp
- Purpose
- every channel group of the picker
Every tile, how its connection starts, and the guide with its steps:
| Tile | How it connects | Guide |
|---|---|---|
| Amazon | Choose the shop country, sign in to Seller Central, then give Amazon the Replyco address | Connect Amazon |
| eBay | Sign in to eBay, then choose the shop country on the return page | eBay |
| eBay v2 (BETA) | The same sign-in as eBay, in a beta version of the eBay connection | eBay |
| Shopify | Name the account, then install Replyco from the Shopify App Store | Connect Shopify |
| WooCommerce | Consumer Key, Consumer Secret and Store URL, then email forwarding | Connect WooCommerce |
| BigCommerce | Access Token, Client ID and API Path, then email forwarding | Connect BigCommerce |
| Magento | Token and API URL, then email forwarding | Connect Magento |
| Etsy | Name the account, then sign in to Etsy | Connect Etsy |
| Otto | Name the account, then install Replyco in OTTO | Connect OTTO |
| Fruugo | Username and Password of your Fruugo account, then email forwarding | Connect Fruugo |
| Wish | Sign in to Wish | Connect Wish |
| Kaufland | Client Key and Secret Key | Connect Kaufland |
| Shopline | Name the account and enter its Shop URL, then sign in to Shopline | Connect Shopline |
| Gmail | Name the account, then sign in with Google and choose the folders to sync | Gmail |
| Forwarding to a Replyco address, or your own mail servers | Mailbox by forwarding · Mailbox with IMAP and SMTP | |
| Outlook | Sign in with Microsoft, then choose the folders to sync | Outlook and Microsoft 365 |
| Linnworks | Authorise Replyco in Linnworks, then enter the value Linnworks gives you in Token | Linnworks |
| ChannelAdvisor | Sign in to ChannelAdvisor | Connect ChannelAdvisor |
| Veeqo | Sign in to Veeqo | Connect Veeqo |
| Katana | Sign in to Katana | Connect Katana |
| Billbee | Username and API Password | Billbee |
| Brightpearl | Send support your Brightpearl company email and company ID first, then sign in to Brightpearl | Connect Brightpearl |
| Telegram | Create a bot with Telegram’s BotFather and paste its token into HTTP API | Connect Telegram |
| Sign in with Facebook | Connect Facebook Messenger | |
| Connect Instagram to a public Facebook page, then sign in with Facebook | Connect Instagram | |
| TikTok (BETA) | Sign in to TikTok Shop | Connect TikTok Shop |
| Aircall | Sign in to Aircall | Connect Aircall |
| Meta’s sign-up window opens over Replyco | Connect WhatsApp |
The groups have their own overviews: Marketplaces, Webstores, Mailboxes, Order management systems and Social media and phone accounts.
Connect by signing in to the channel
Section titled “Connect by signing in to the channel”Channels you sign in to never give Replyco your password: you approve Replyco at the channel, and the channel sends Replyco a permission.
-
On Add Account, select the channel’s tile, for example Veeqo.
-
If the dialog starts at INFO, enter what it asks, such as Account Name, and select Authorize. Etsy, OTTO, Shopify, Shopline and Gmail start here. For Gmail and Shopline, this Authorize already saves the account, and the sign-in completes it. For Amazon, choose the shop country first.
-
At AUTHORIZE, select Authorize. The channel’s sign-in opens in a new browser tab.
-
Sign in with a login that has admin rights for the store, and approve Replyco.
-
The channel returns you to Replyco’s return page for that channel, which saves the account, or for Gmail and Shopline completes it; finish the steps it shows.
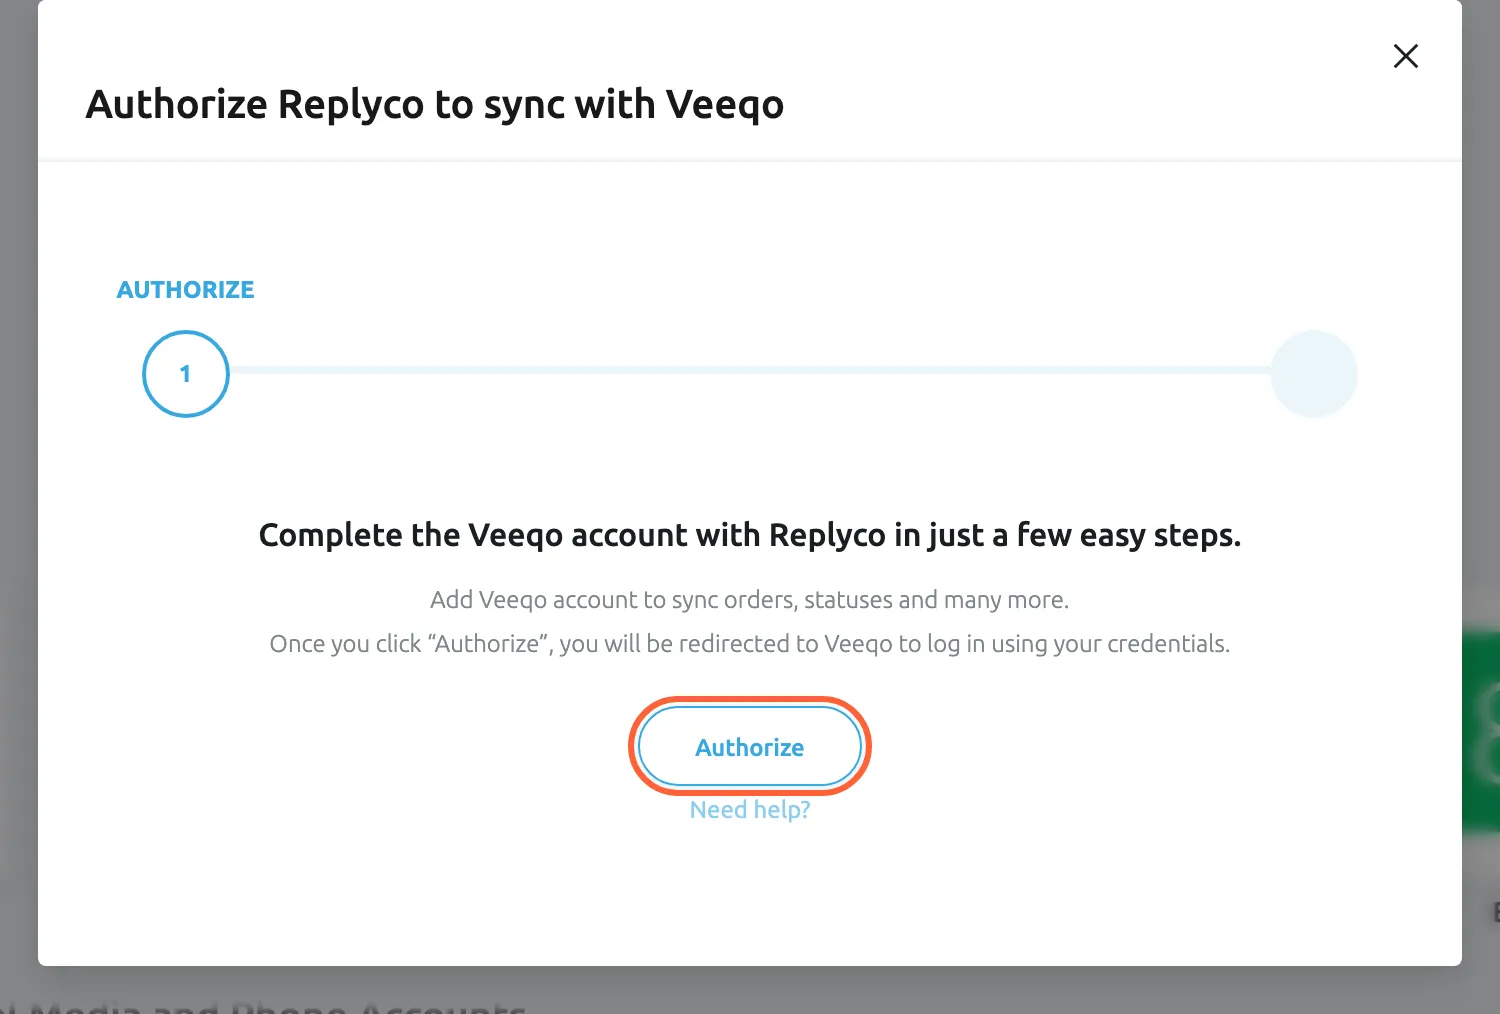
What this screenshot shows
- Screen
- Add Account (/integrations/add)
- Highlighted
- button “Authorize”, dialog, enabled. opens the Veeqo sign-in in a new tab
- Also visible
- step AUTHORIZE of 2; Need help? link
- Purpose
- start a sign-in (OAuth) connection
For example, Northwind Electronics connects Veeqo: Hannah selects the Veeqo tile and Authorize, signs in to Veeqo in the new tab and approves Replyco, and Veeqo sends her to the return page, where Your Veeqo account is now ready. confirms the new account. For Brightpearl, send support your Brightpearl company email and company ID before you start, as the dialog explains; without that step the connection cannot be completed.
Connect with API keys or a password
Section titled “Connect with API keys or a password”WooCommerce, BigCommerce, Magento, Fruugo, Kaufland, Billbee and Telegram connect with keys or a password you create in the channel.
-
Create the keys in the channel, as the channel’s guide describes, for example Connect Kaufland.
-
On Add Account, select the channel’s tile and then Authorize. The dialog moves to INFO.
-
Fill in every field. Only Send Name as may stay empty.
-
Select Authorize. Replyco checks the keys with the channel and saves the account.
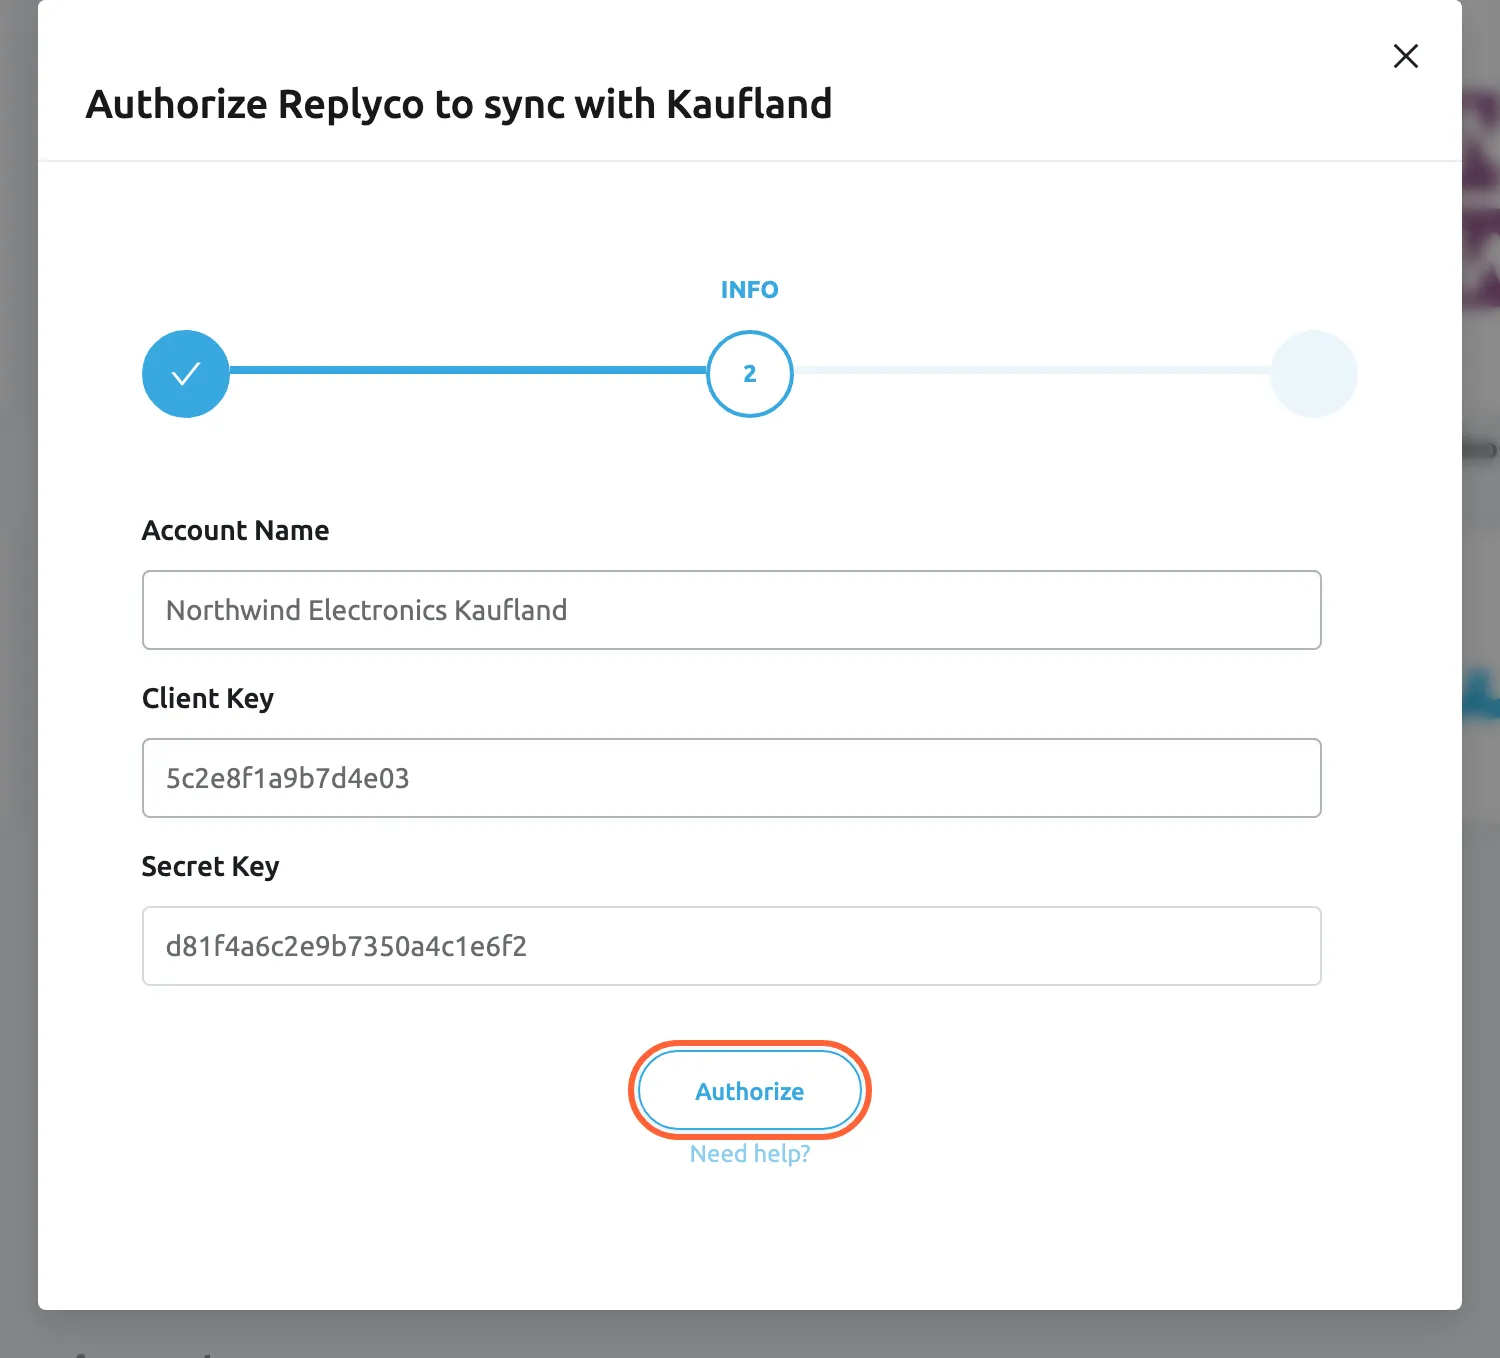
What this screenshot shows
- Screen
- Add Account (/integrations/add)
- Highlighted
- button “Authorize”, dialog-bottom, enabled. checks the keys and saves the account
- Also visible
- step INFO; Account Name: Northwind Electronics Kaufland; Client Key and Secret Key filled
- Purpose
- connect a channel with API keys
Replyco shows Account successfully saved. when the account is saved. WooCommerce, BigCommerce, Magento and Fruugo continue with EMAIL, where you copy the Replyco address your store’s email should go to, and DOMAIN AUTH, where you can authenticate your domain; see Mailbox by forwarding. Kaufland, Billbee and Telegram go straight to FINISH.
Replyco checks what you typed before it saves. An empty field shows You must complete ALL FIELDS in order to save this account!; an address in Display Email that is not an email address shows Email is invalid; a store address that does not start with “http” shows The address must start with "http".. The channel itself refuses keys that are wrong or lack permissions, and Replyco refuses a store that is already connected.
Connect a mailbox
Section titled “Connect a mailbox”The Mailbox Accounts group offers three ways in: Gmail and Outlook sign in, and the Email tile works with any other mailbox.
-
On Add Account, select the Email tile.
-
Choose Setup Forwarding to forward mail to an address Replyco creates, or Setup Custom SMTP to connect your own mail servers.
-
Enter the mailbox’s E-mail address and Sender Name, or your server settings, and select Authorize.
-
For forwarding, copy the Replyco address at EMAIL and set up forwarding in your mail provider, then set up or skip domain authentication.
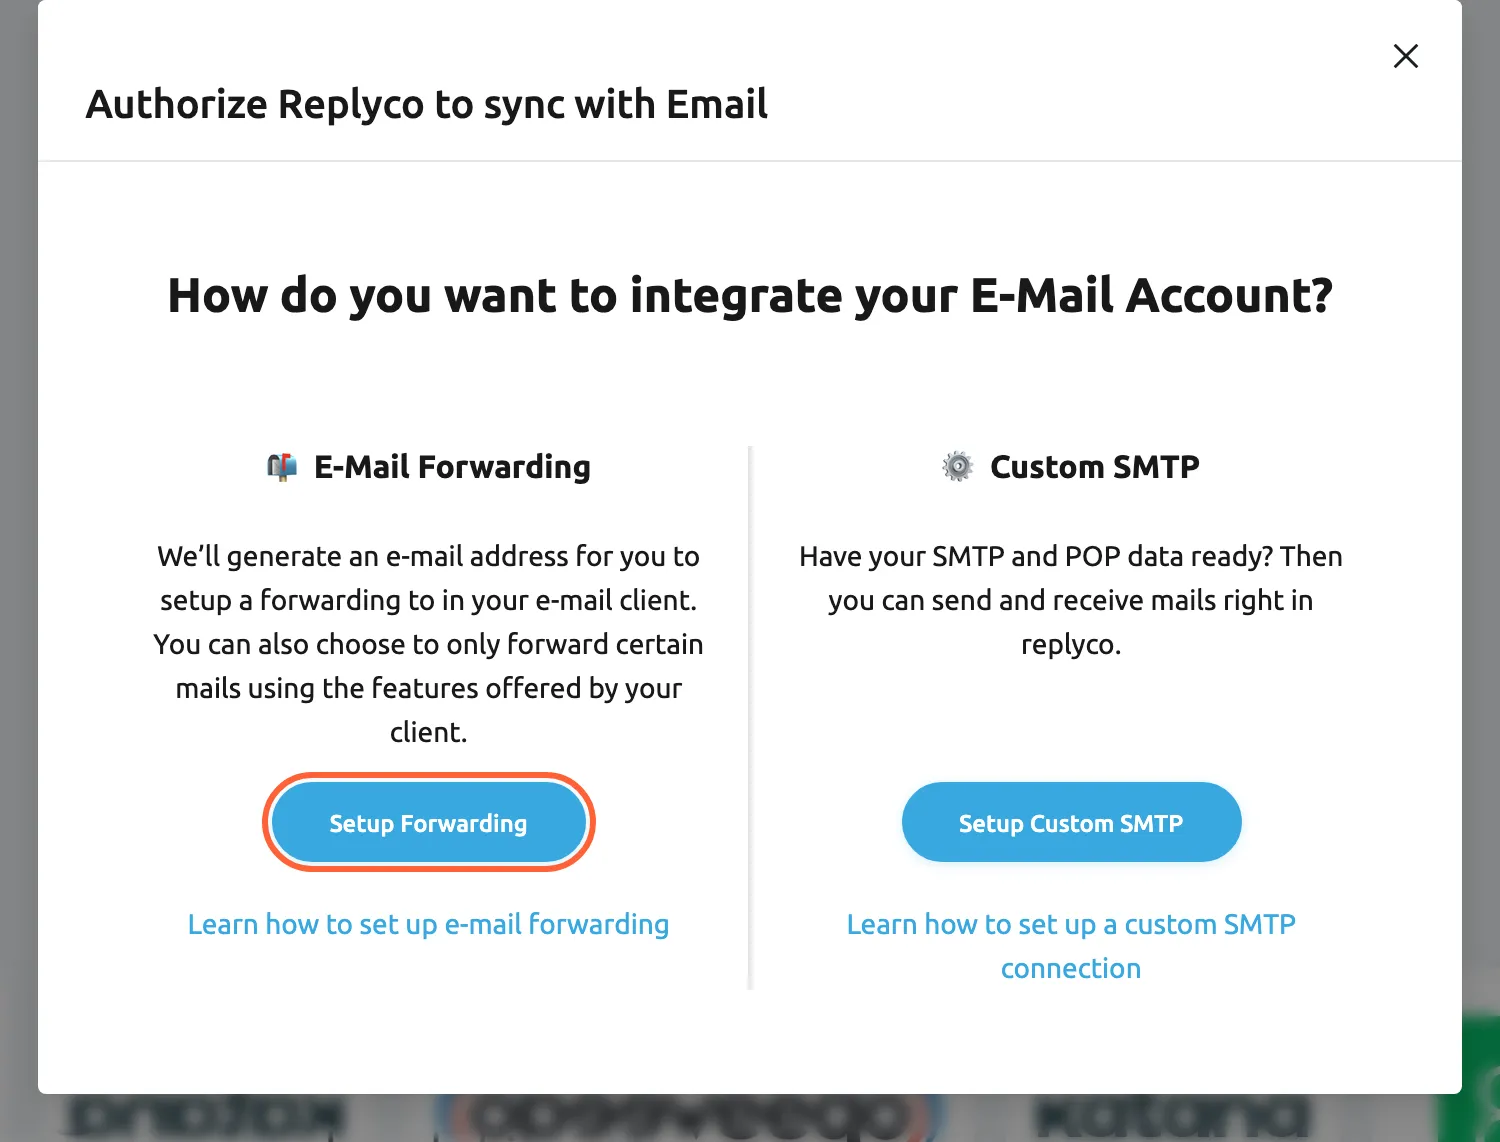
What this screenshot shows
- Screen
- Add Account (/integrations/add)
- Highlighted
- button “Setup Forwarding”, dialog-left, enabled. continues with forwarding
- Also visible
- E-Mail Forwarding column; Custom SMTP column with Setup Custom SMTP
- Purpose
- choose how a mailbox connects
Forwarding keeps your mailbox where it is and sends copies to Replyco; your own servers let Replyco fetch and send mail directly. For the forwarding rules and domain authentication, see Mailbox by forwarding; for server names, ports and folders, see Mailbox with IMAP and SMTP. Gmail and Outlook connect by signing in; see Gmail and Outlook and Microsoft 365.
The marketplaces and webstores that receive buyer email, such as Shopify, WooCommerce and Etsy, show Custom SMTP Configuration at INFO. Tick it to send and receive that account’s email through your own mail server instead of a Replyco address.
Finish on the return page
Section titled “Finish on the return page”The channels you sign in to in a new tab send you back to a return page of Replyco. For most of them the return page saves the account. Gmail and Shopline save it at the first Authorize, and their return page completes it: until then a Gmail account shows Blocked and a Shopline account’s order data is blocked. WhatsApp has no return page: Meta’s sign-up window opens over Replyco, and the account is saved when you finish there. Stay on the return page until it is done: leaving while it saves asks Are you sure you want to leave this page? You have some unsaved changes.. The page shows a spinner with Please do not leave the page until the validation and data storage is complete...almost there., or the dialog Almost done... with the last step.
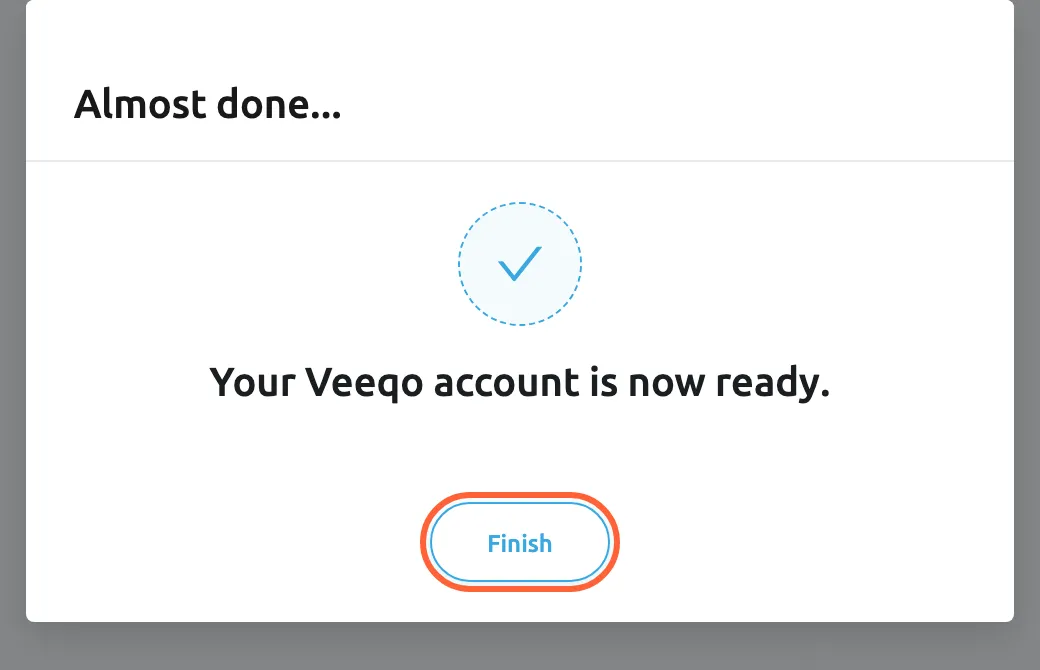
What this screenshot shows
- Screen
- Almost done... (/integrations/veeqo/success)
- Highlighted
- button “Finish”, dialog-bottom, enabled. goes to the home page
- Also visible
- Your Veeqo account is now ready.; check mark
- Purpose
- the result of a sign-in connection
| Return page | Channel | What it asks | Then |
|---|---|---|---|
/integrations/amazon/success | Amazon | Account Name, Send Name as and Custom SMTP Configuration | Copy the Replyco address for Seller Central, or choose the folders of your own mailbox |
/integrations/ebay/success | eBay and eBay v2 | The shop country | Replyco saves the account and opens the home page |
/integrations/etsy/success | Etsy | Nothing | Copy the Replyco address, or choose the folders of your own mailbox |
/integrations/otto/success | OTTO | Nothing | Copy the Replyco address, or choose the folders of your own mailbox |
/integrations/wish/success | Wish | Nothing | Home page |
/integrations/shopify/success | Shopify | Nothing | Copy the Replyco address, or choose the folders of your own mailbox |
/integrations/shopline/success | Shopline | Nothing | Copy the Replyco address, or choose the folders of your own mailbox |
/integrations/gmail/success | Gmail | Nothing | Choose the folders to sync |
/integrations/outlook/success | Outlook | Nothing | Choose the folders to sync |
/integrations/veeqo/success | Veeqo | Nothing | Your Veeqo account is now ready. and Finish |
/integrations/channeladvisor/success | ChannelAdvisor | Nothing | Your ChannelAdvisor account is now ready. and Finish |
/integrations/katana/success | Katana | Nothing | Your Katana account is now ready. and Finish |
/integrations/brightpearl/success | Brightpearl | Nothing | Your Brightpearl account is now ready. and Finish |
/integrations/facebook/success | Nothing | Home page | |
/integrations/instagram/success | Nothing | Home page | |
/integrations/tiktok/success | TikTok | Nothing | Home page |
/integrations/aircall/success | Aircall | Nothing | Home page |
A return page opened without the channel’s answer, for example from a bookmark, goes to the home page and saves nothing; start again from the tile. When Facebook sends back no permission, the page shows Adding integration failed and We have not received requested permissions., and returns to the home page after five seconds.
When your plan’s accounts are used up
Section titled “When your plan’s accounts are used up”When your company has a set number of accounts, + Add Account disappears from the top bar once the number is reached, and Replyco refuses to save another account with “You reached your current plan maximum integrations count. Contact support for more info.” The dialog stays open with what you entered.
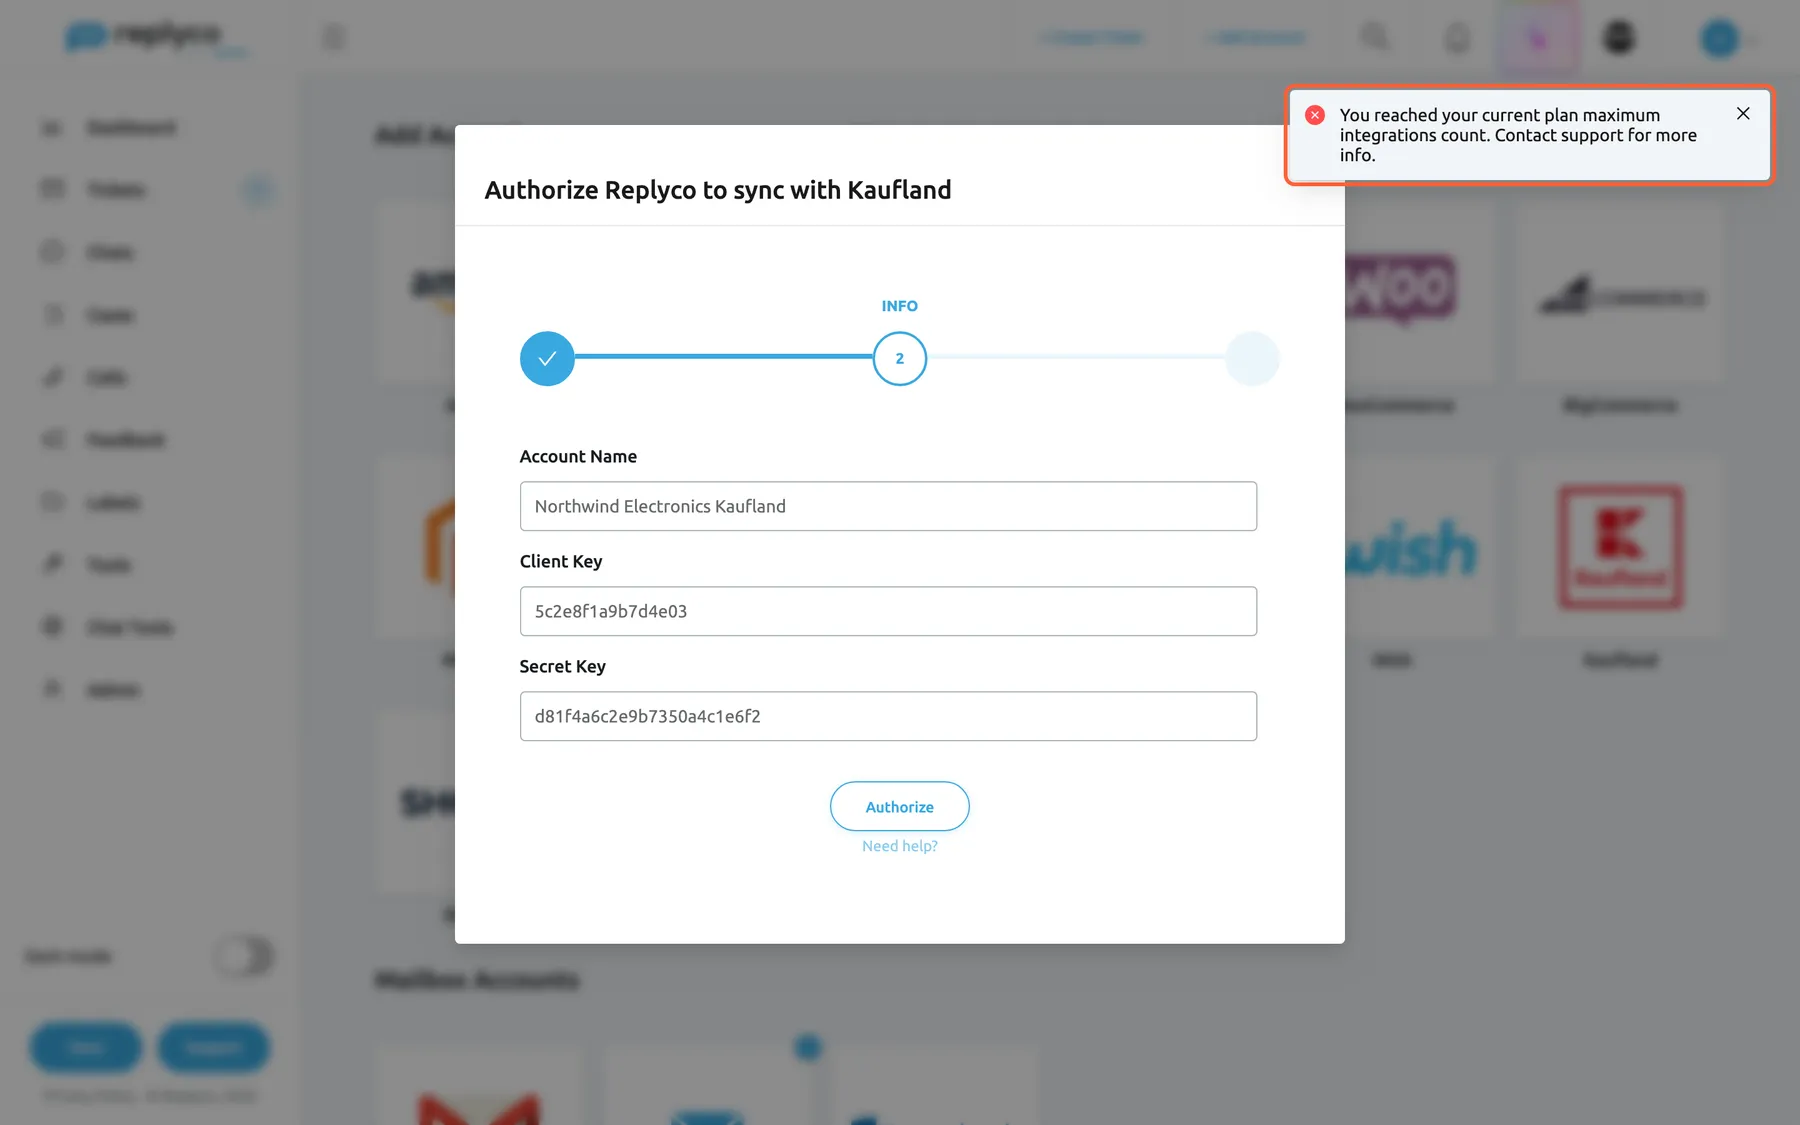
What this screenshot shows
- Screen
- Add Account (/integrations/add)
- Highlighted
- “”, top-right-toast, shown. none
- Also visible
- Kaufland dialog, step INFO, fields filled; server message in the page's language
- Purpose
- the account limit of the plan
During a trial there is no limit on accounts. To connect another account, delete an account you no longer use on AdminAccounts, or change your plan; see Billing. As the message says, support can tell you more; see Help and support. An account that is already over the number after a plan change is a different case: it is blocked, and support lifts the block; see Accounts.
Every control, explained
Section titled “Every control, explained”The page and the connection dialog, in the order you meet them.
+ Add Account
Section titled “+ Add Account”Top bar, right, on every screen, for users with the Admin permission while your company has accounts left on its plan.
Opens Add Account. During a trial it is always shown.
Start connecting a channel from wherever you are.
Channel tiles
Section titled “Channel tiles”| Part | What it shows or does | Why |
|---|---|---|
| Logo and name | The channel; selecting the tile opens its connection dialog | Find your channel |
| BETA | The connection is in beta: eBay v2 and TikTok | Know which connections are still being finished |
| Number | How many accounts of this channel you already have | Avoid connecting the same channel twice by mistake |
| Group heading | Mailbox Accounts, Order Management System Accounts or Social Media and Phone Accounts; the first group has no heading | Find a channel by its kind |
Step bar
Section titled “Step bar”| Step | What happens there | Why |
|---|---|---|
| AUTHORIZE | Explains the connection; Authorize opens the channel’s sign-in or moves on to the fields | Start the connection |
| INFO | The fields the channel needs: name, keys, addresses | Tell Replyco which store and how to reach it |
| INSERT DETAILS | Telegram only: the bot token | Connect your Telegram bot |
| The Replyco address to forward email to, with a copy box | Route customer email to Replyco | |
| DOMAIN AUTH | Domain authentication for your own domain; you can skip it | Get replies delivered from your domain |
| FINISH | The confirmation and Finish | Close the dialog |
Authorize
Section titled “Authorize”Connection dialog, below the step’s text or fields.
At AUTHORIZE: opens the channel’s sign-in in a new tab, or moves on to INFO. At INFO: checks the fields and saves the account, or continues to the sign-in.
Nothing is connected until you authorise it.
Custom SMTP Configuration
Section titled “Custom SMTP Configuration”Connection dialog, INFO, for Amazon, Shopify, WooCommerce, BigCommerce, Magento, Etsy, OTTO, Fruugo and Shopline.
Ticked: the account’s email is sent and received through your own mail server, and the dialog shows the server fields. Cleared: Replyco gives the account its own address to forward email to.
Keep buyer email in your own mailbox; see Mailbox with IMAP and SMTP.
Setup Forwarding and Setup Custom SMTP
Section titled “Setup Forwarding and Setup Custom SMTP”Connection dialog of the Email tile, the first thing it shows.
The first continues with a mailbox that forwards mail to a Replyco address; the second with your own incoming and outgoing mail servers. Each has a help link below it.
Forwarding needs no server settings; your own servers let Replyco send from your mailbox directly.
Finish
Section titled “Finish”Last step of the dialog, or the dialog Almost done... on a return page.
Closes the dialog; on a return page it opens the home page.
The account is saved and appears on AdminAccounts.
Need help?
Section titled “Need help?”Connection dialog, below Authorize.
Opens the Replyco help for the channel in a new tab.
Keep the steps open while you work in the channel.
Who sees what
Section titled “Who sees what”| Part | Shown when |
|---|---|
| + Add Account and this page | The user has the Admin permission; see User permissions and roles |
| + Add Account in the top bar | The company has accounts left on its plan, or is on a trial |
| eBay v2 tile | Beta features are switched on for the company |
| Aircall tile | The Calls feature, part of every plan |
| WhatsApp tile | The WhatsApp feature, part of every plan |
| Shopify tile | The company is not billed through Shopify |
| Custom SMTP Configuration | A marketplace or webstore that receives buyer email |
What you need to know
Section titled “What you need to know”| Topic | Fact |
|---|---|
| Who gets access | Every user of your company can see a new account’s tickets; limit it per user in User permissions and roles. |
| First sync | A new account is synced first, ahead of the regular schedule; how far back messages and orders go depends on the channel. |
| Same channel twice | You can connect several accounts of one marketplace or webstore, each under its own name; the same store cannot be connected twice. |
| Order management systems | Linnworks, ChannelAdvisor, Veeqo, Katana, Billbee and Brightpearl connect once per company. |
| Checks | Keys and passwords are checked with the channel before the account is saved. |
| Return pages | Stay on the page until it finishes; opened without the channel’s answer, it goes to the home page. |
| Plan limit | No limit during a trial; beyond your plan’s number, Replyco saves no new account until you delete one or change your plan. |
Frequently asked questions
Section titled “Frequently asked questions”General
Section titled “General”Where do I add a new marketplace or mailbox?
Section titled “Where do I add a new marketplace or mailbox?”Select + Add Account in the top bar, on any screen. The page Add Account shows one tile per channel, grouped into marketplaces and webstores, Mailbox Accounts, Order Management System Accounts and Social Media and Phone Accounts. Select the channel’s tile and follow its dialog. You need the Admin permission.
Why is a channel missing from the Add Account page?
Section titled “Why is a channel missing from the Add Account page?”Some tiles depend on your company. eBay v2 appears only when beta features are switched on for your company; Aircall needs the Calls feature and WhatsApp the WhatsApp feature, both part of every plan, though companies on an older plan may not have them; Shopify is hidden when your subscription is billed through Shopify. See What each plan includes.
What does the number on a tile mean?
Section titled “What does the number on a tile mean?”The number on a tile of Add Account counts the accounts of that channel your company already has, for example 1 on the eBay tile when one eBay account is connected. Tiles without a number have no account yet. All accounts are listed on AdminAccounts; see Accounts.
What does BETA on a tile mean?
Section titled “What does BETA on a tile mean?”BETA marks a connection that is still in beta: the eBay v2 tile and the TikTok tile on Add Account. You connect them in the same way as other channels. For eBay, the eBay tile is the standard connection; see eBay and Connect TikTok Shop.
Connecting
Section titled “Connecting”Which channels connect by signing in, and which with keys?
Section titled “Which channels connect by signing in, and which with keys?”On Add Account, Amazon, eBay, eBay v2, Shopify, Etsy, OTTO, Wish, Shopline, Gmail, Outlook, ChannelAdvisor, Veeqo, Katana, Brightpearl, Facebook, Instagram, TikTok, Aircall and WhatsApp connect by signing in. WooCommerce, BigCommerce, Magento, Fruugo, Kaufland, Billbee and Telegram take keys or a password; Linnworks asks for a value from Linnworks after you authorise Replyco there; the Email tile uses forwarding or your own mail servers.
What happens after I approve Replyco at the channel?
Section titled “What happens after I approve Replyco at the channel?”The channel sends you back to Replyco’s return page for that channel, which saves the account; for Gmail and Shopline, which saved the account at the first Authorize, it completes it. Depending on the channel it asks for the shop country, shows the Replyco address to copy, lets you choose mail folders, or confirms that the account is ready. Stay on the page until it finishes; the account then appears on AdminAccounts.
Why does Replyco say I must complete all fields?
Section titled “Why does Replyco say I must complete all fields?”The INFO step of a connection dialog saves only when every field is filled; otherwise Replyco shows You must complete ALL FIELDS in order to save this account!. Only Send Name as may stay empty. Also check that Display Email holds a full email address and that a store address starts with “http”.
Can I connect two accounts of the same channel?
Section titled “Can I connect two accounts of the same channel?”Yes for marketplaces and webstores: connect each store from its tile on Add Account and give each account its own name. The same store cannot be connected twice. Linnworks, ChannelAdvisor, Veeqo, Katana, Billbee and Brightpearl connect once per company.
What is Custom SMTP Configuration for?
Section titled “What is Custom SMTP Configuration for?”Custom SMTP Configuration at the INFO step of a marketplace or webstore sends and receives that account’s email through your own mail server instead of a Replyco address. Tick it and fill in the server fields. See Mailbox with IMAP and SMTP.
Should I connect my mailbox by forwarding or with my own servers?
Section titled “Should I connect my mailbox by forwarding or with my own servers?”Choose Setup Forwarding on the Email tile when you want to keep your mailbox as it is and send copies to Replyco. Choose Setup Custom SMTP when you have your server names and ports and want Replyco to fetch and send directly. See Mailbox by forwarding and Mailbox with IMAP and SMTP.
Who can see the tickets of an account I just connected?
Section titled “Who can see the tickets of an account I just connected?”Every user of your company gets access to a new account and sees its tickets in their ticket lists. To limit which users see an account, change their access in User permissions and roles. To reply only from some accounts in templates, see Templates.
What if I close the dialog halfway?
Section titled “What if I close the dialog halfway?”Closing the connection dialog before the step that saves leaves nothing behind; start again from the tile on Add Account. For WooCommerce, BigCommerce, Magento, Fruugo and the Email tile, the account is saved at INFO; if you close afterwards, copy the Replyco address from the account’s details on AdminAccounts. Gmail and Shopline save the account at the first Authorize. If you stop before the sign-in, a Gmail account stays Blocked: delete it and add Gmail again; see Gmail. A Shopline account’s order data stays blocked until you finish with Re-login; see Connect Shopline.
Limits
Section titled “Limits”Why can’t I add another account?
Section titled “Why can’t I add another account?”When your company has a set number of accounts and has reached it, + Add Account disappears from the top bar and Replyco refuses a new account with “You reached your current plan maximum integrations count. Contact support for more info.” Delete an account you no longer use on AdminAccounts, or change your plan; see Billing. As the message says, support can tell you more; see Help and support.
Is there a limit on accounts during the trial?
Section titled “Is there a limit on accounts during the trial?”No. During a trial, + Add Account is always shown and Replyco saves every account you connect. After the trial, your plan’s number of accounts applies; see What each plan includes and, for accounts over the number, Accounts.
Troubleshooting
Section titled “Troubleshooting”| Symptom | What to check |
|---|---|
| You must complete ALL FIELDS in order to save this account! | Every field is filled; only Send Name as may stay empty |
| Email is invalid | Display Email holds a full email address |
| The address must start with "http". | The store address starts with “http”, for example https://shop.northwind-electronics.example.com |
| Please select Shop Country to continue. | For Amazon, a country is chosen before Authorize; see Connect Amazon |
| You must enter a token to save account! | The bot’s token is pasted into HTTP API; see Connect Telegram |
| “Integration with this name already exists” | Another account of the same channel has that name; choose another |
| “You reached your current plan maximum integrations count.” | Your plan’s accounts are used up; delete an account you no longer use, or change your plan on AdminBilling |
| A tile is missing | See Who sees what |
| The return page opens the home page at once | It was opened without the channel’s answer; start again from the tile |