

Create Ticket
Create Ticket is where you start a conversation yourself: a shipping update for a Shopify customer, a question to an eBay buyer about their order, a message to someone who has never written to you, or a customer’s message passed on to your warehouse. You write the message once, choose who gets it and which of your accounts sends it, and Replyco sends it and opens it as a new ticket. It is for agents and team leads who write first; open it with + Create Ticket in the top bar, or with the forward arrow on a message in a ticket.
Availability: the screen needs ticket creation for your company. During a trial, ticket creation stays off until Replyco has verified your company; until then Replyco hides + Create Ticket and the forward arrow, and refuses to create tickets. Companies that signed up in Replyco’s German region can create tickets from the start. Confirming your email address does not switch ticket creation on. Every plan includes everything on the screen, including templates limited to the sender’s account, snippets, Translate, Assistant and AI Draft. Companies on an older plan may not have some of these; see What each plan includes.
What you can do here
Section titled “What you can do here”- Start a conversation with a customer. Choose the recipient, the sending account and a subject, write the text and select Create; the new ticket opens straight away. Write to a customer
- Find the recipient among your contacts. The list searches every contact with an email address, and eBay buyers, and shows the account each one came from. Choose the recipient · Customers
- Write to someone new. Enter a name and an email address and Replyco saves the person as a contact when you send. Write to someone who is not a contact yet
- Send from the right account. Mailboxes, webstores and email-based marketplaces such as Amazon and Etsy can start a conversation; the list shows only those. Choose the account you send from
- Message an eBay or Kaufland buyer. These marketplaces need an order and a message type, and eBay limits the text to 4000 characters. Write to an eBay or Kaufland buyer
- Start from a template, insert snippets and placeholders. Templates,
/for snippets and#for placeholders work as in a reply; the full rules have their own guides. Write the message · Reply templates · Snippets and placeholders - Attach files and send copies. Add files, and up to 4 CC and 4 BCC addresses. Add files and copies
- Decide who owns the ticket. Assign it to a colleague, and resolve or archive it as soon as the message is out. Assign, resolve or archive the new ticket
- Send later, translated, or save the text as a template. The arrow next to Create offers a delay and saving as a template; Translate sends the message in the customer’s language. Send later, translate or save as a template · Delayed sending · Translations
- Know why nothing was sent. Replyco names the first missing field in a message at the top right. When Replyco does not create the ticket
- Know where the new ticket is. It opens at once, and the message goes out in the next sending round, usually within two minutes. What happens after you send
- Forward a message. The same form opens with the message and its header in the text box, and the new ticket is linked to the original. Forward a message · The ticket screen
The screen at a glance
Section titled “The screen at a glance”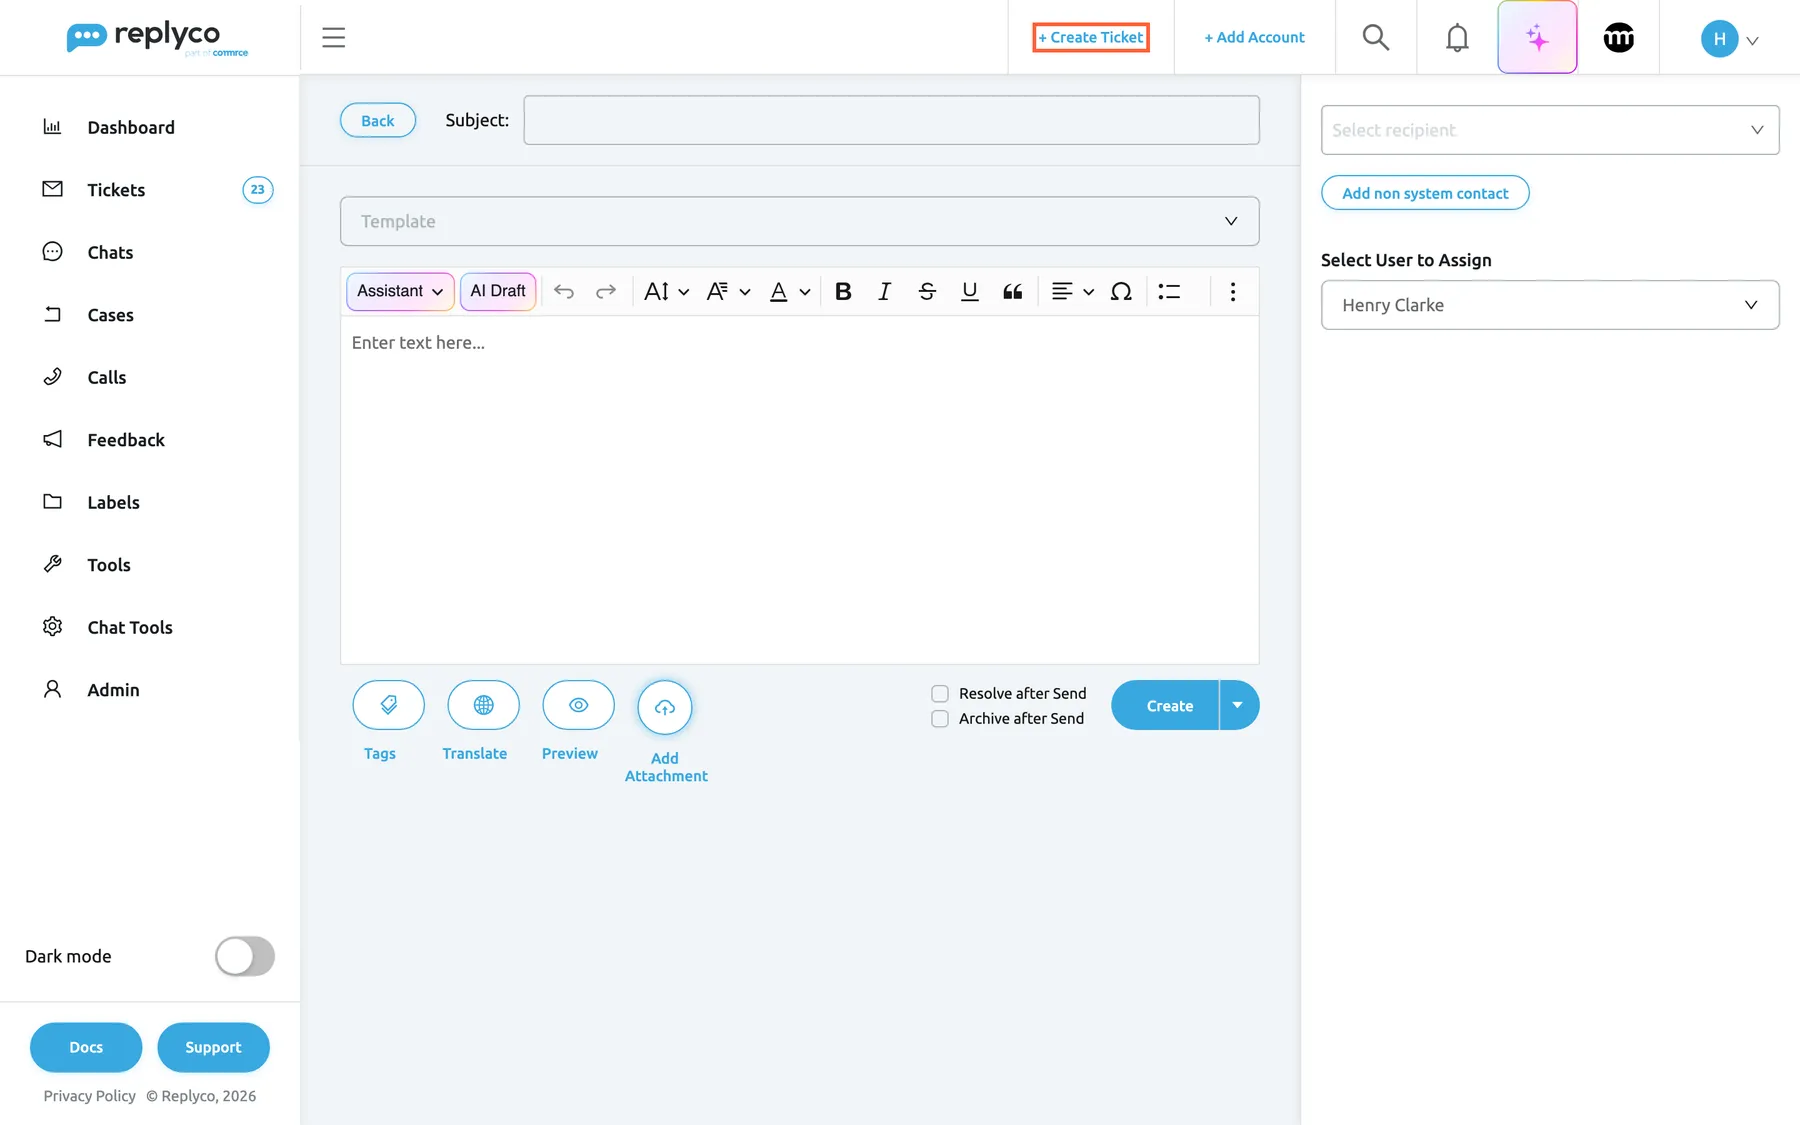
What this screenshot shows
- Screen
- + Create Ticket (/createTicket)
- Highlighted
- link “+ Create Ticket”, top-bar-right, enabled. opens the Create Ticket form
- Also visible
- Back and an empty Subject field; Template drop-down, editor toolbar, empty text box; Tags, Translate, Preview, Add Attachment; Resolve after Send, Archive after Send, Create; Select recipient, Add non system contact, Select User to Assign
- Purpose
- entry point and first view of Create Ticket
| Region | What it shows | What you do there |
|---|---|---|
| Top bar | + Create Ticket next to + Add Account | Open an empty form from any screen |
| Header, top left | Back and the Subject field | Leave without sending, or enter the subject |
| Editor, middle | Template, the toolbar with Assistant and AI Draft, the text box | Pick a template and write the message |
| Buttons under the text box | Tags, Translate, Preview, Add Attachment | Insert placeholders, translate, check, attach |
| Bottom right | Resolve after Send, Archive after Send, Create with its arrow | Decide the ticket’s state and send |
| Right column | Select recipient, Add non system contact, then CC, BCC, the sender, marketplace fields and Select User to Assign | Say who receives the message, from which account, and who owns the ticket |
The sender list and the CC and BCC buttons appear only after you choose a recipient. The order fields appear only for eBay and Kaufland buyers.
Open Create Ticket
Section titled “Open Create Ticket”Create Ticket opens in four ways, and three of them fill in part of the form for you:
| From | What is filled in |
|---|---|
| + Create Ticket in the top bar | Nothing; an empty form |
| A customer’s email address in a ticket’s Customer Details, in an order’s details or under ToolsCustomers | The recipient, and from a ticket or an order also the account that sends |
| Transform Into a Ticket in a chat’s transcript panel | The transcript’s subject and account, the chat customer’s email and the chat as text |
| The forward arrow on a message in a ticket | The subject with Fwd:, the message with its header, and its files; see Forward a message |
A customer’s email address is a link wherever Replyco shows it, so you can write to the customer of a ticket without copying the address. Transcripts are chat templates that turn a chat into an email; see Transcripts.
Write to a customer
Section titled “Write to a customer”Writing to a customer takes a recipient, a sending account, a subject and a text.
- Select + Create Ticket in the top bar. The empty form opens.
- In the right column, open Select recipient and pick the customer, or type part of the name or email address to search. The account the customer belongs to is filled in as the sender.
- (Optional) Open the sender list under the recipient and pick another account. Picking a sender loads that account’s templates and your signature for it.
- Enter the subject under Subject.
- Pick a template under Template, or write the text in the text box. Type
/for a snippet and#for a placeholder. - (Optional) Change the user under Select User to Assign; it starts with you.
- Select Create.
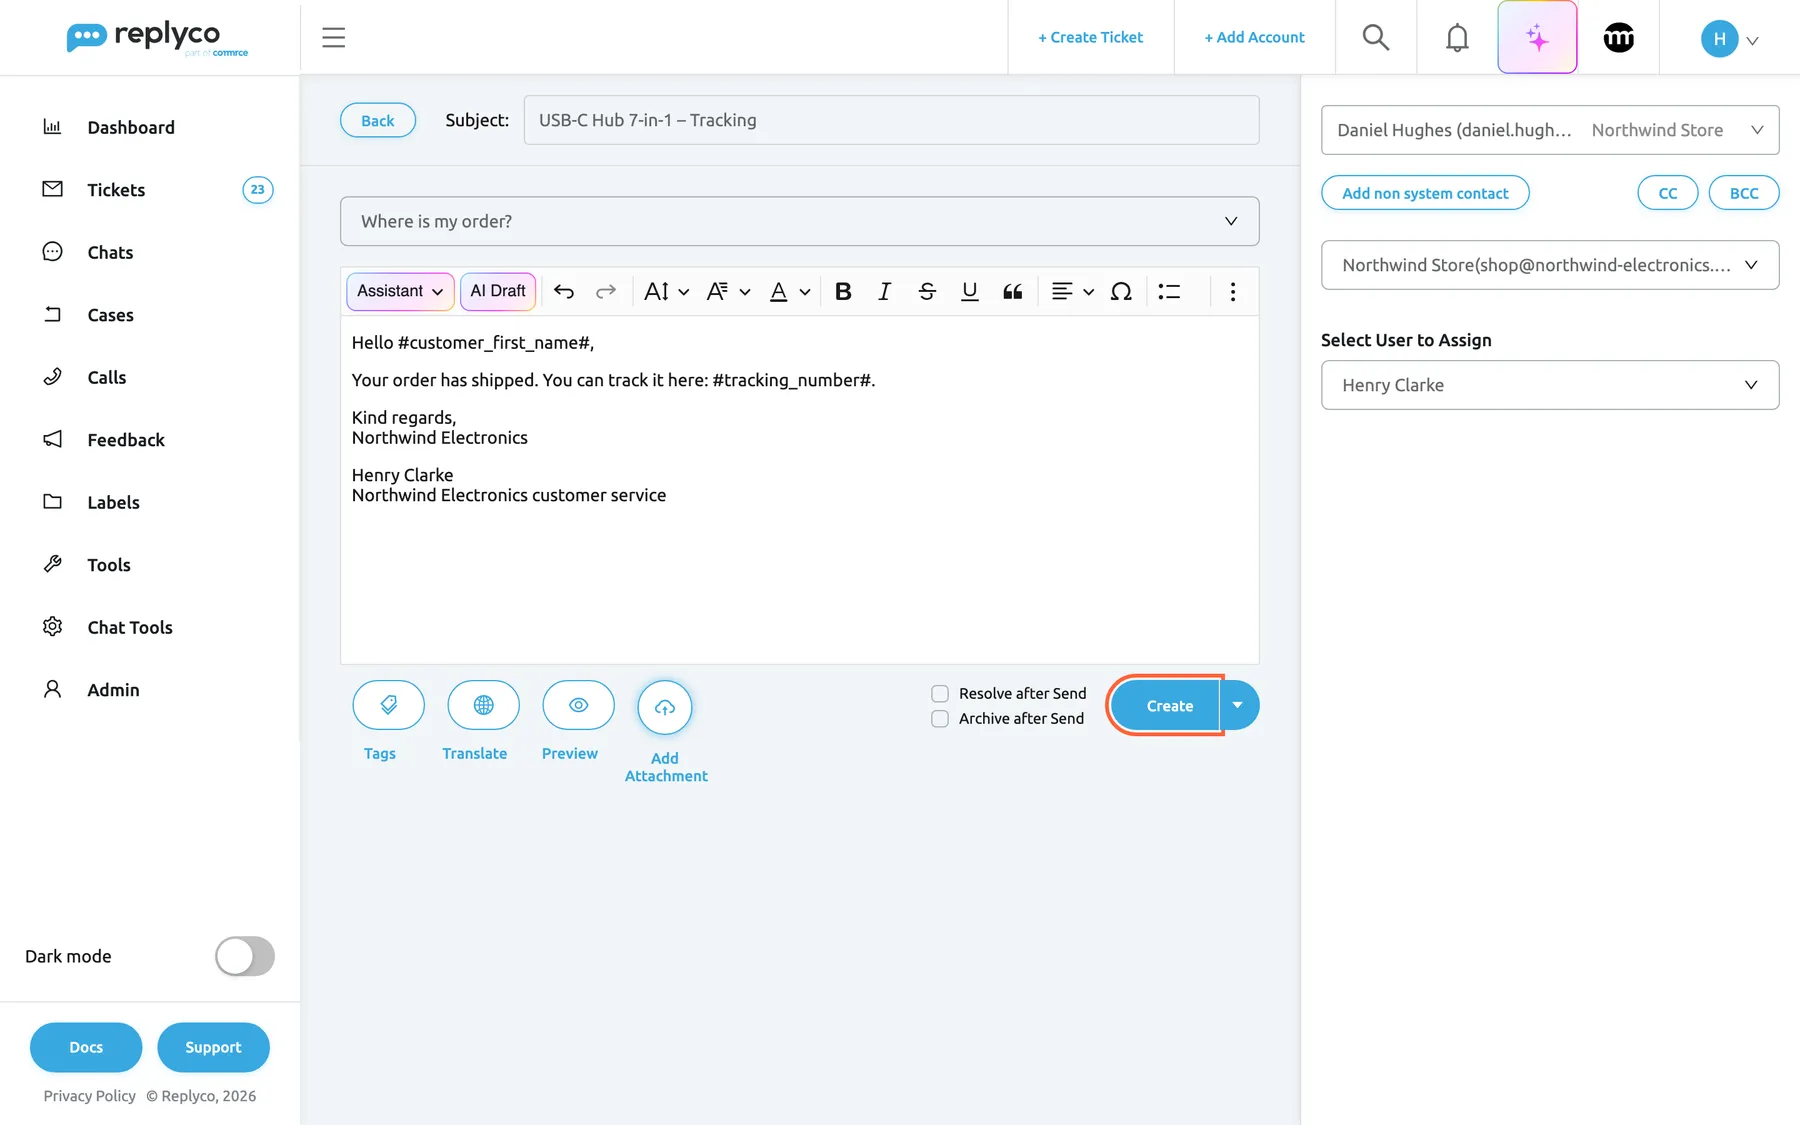
What this screenshot shows
- Screen
- + Create Ticket (/createTicket)
- Highlighted
- button “Create”, editor-bottom-right, enabled. creates the ticket and sends the first message
- Also visible
- Subject filled; Template: Where is my order?; template text with #customer_first_name# and #tracking_number#; signature under the text; recipient, sender Northwind Store, assignee Henry Clarke
- Purpose
- the form filled with realistic values before sending
Example: Henry from Northwind Electronics tells Daniel Hughes that his USB-C hub is on its way. He picks Daniel Hughes, whose contact belongs to the Shopify store Northwind Store, keeps Northwind Store as the sender, enters USB-C Hub 7-in-1 – Tracking and picks the template Where is my order?. The text box shows the template with #customer_first_name# and #tracking_number#, followed by his signature. Replyco replaces the placeholders when it creates the ticket: Daniel reads Hello Daniel.
Placeholders are filled from the new ticket, not from a ticket you looked at before. The new ticket knows the recipient, so #customer_first_name# works. Order placeholders such as #tracking_number# are filled from the order linked to the new ticket; when there is none, Replyco uses the fallback text set under Fallbacks, or nothing. When you are not sure the ticket will have an order, type the tracking number yourself.
Choose the recipient
Section titled “Choose the recipient”Select recipient searches your contacts: everyone with an email address, and eBay buyers Replyco knows by their eBay ID. The list loads 10 contacts at a time and more as you scroll. Each line shows the name, the email address in brackets and, in grey on the right, the account the contact came from.
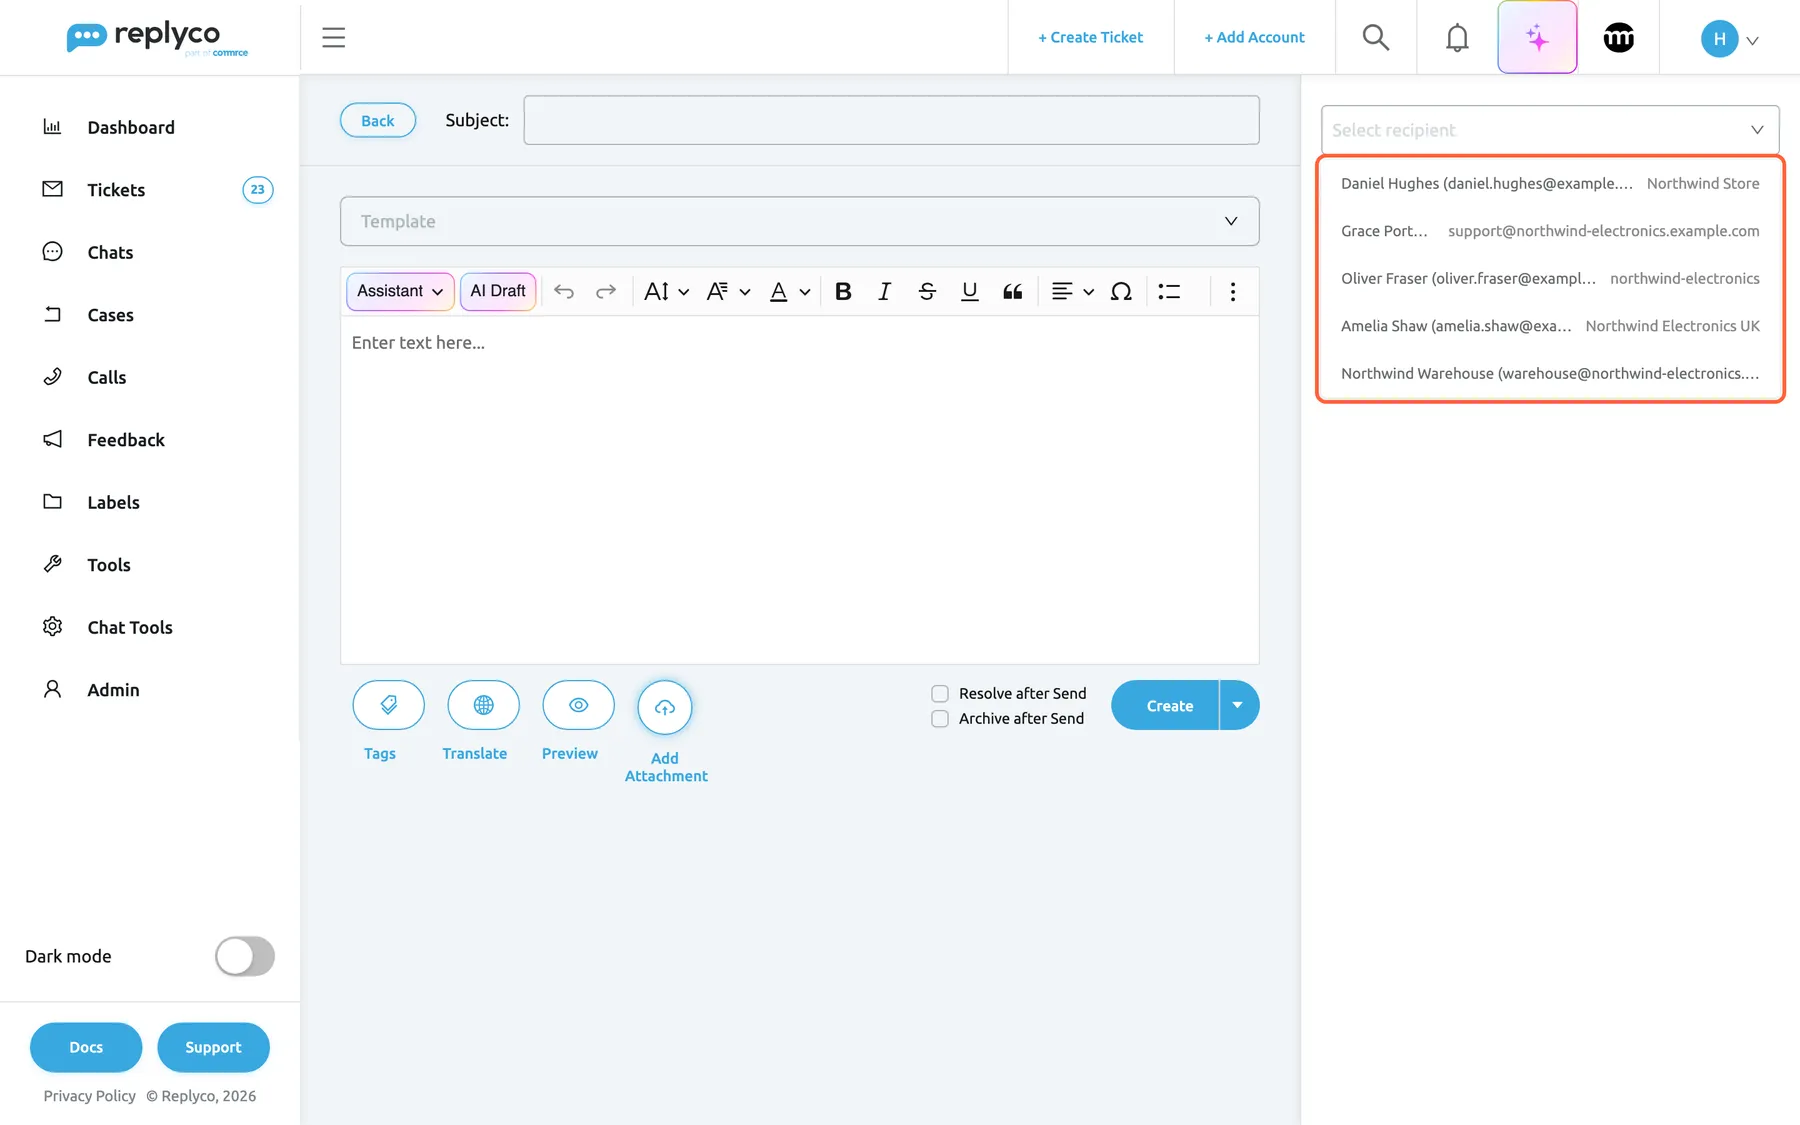
What this screenshot shows
- Screen
- + Create Ticket (/createTicket)
- Highlighted
- listbox “Select recipient”, right-column-top, open. picks the recipient and fills in the sender
- Also visible
- 5 contacts with name, email and account; Add non system contact button; empty message form on the left
- Purpose
- choose who receives the new ticket
Choosing a contact does two things: it sets the recipient, and it fills in the sender with the contact’s own account, so a Shopify customer is answered from your Shopify store and an Amazon buyer from your Amazon account. A contact with no account, such as a supplier you added by hand, leaves the sender as it was.
The contacts are the ones under Customers; the list is the same for everyone in your company. If you type an email address that is not in the list and choose it, Replyco switches to a new contact with that address filled in.
Write to someone who is not a contact yet
Section titled “Write to someone who is not a contact yet”- Select Add non system contact under the recipient field.
- Enter the name under Recipient Name and the email address under Recipient Email. The line A New Contact will be created. appears in red.
- Pick the sender under From, then write and send as usual.
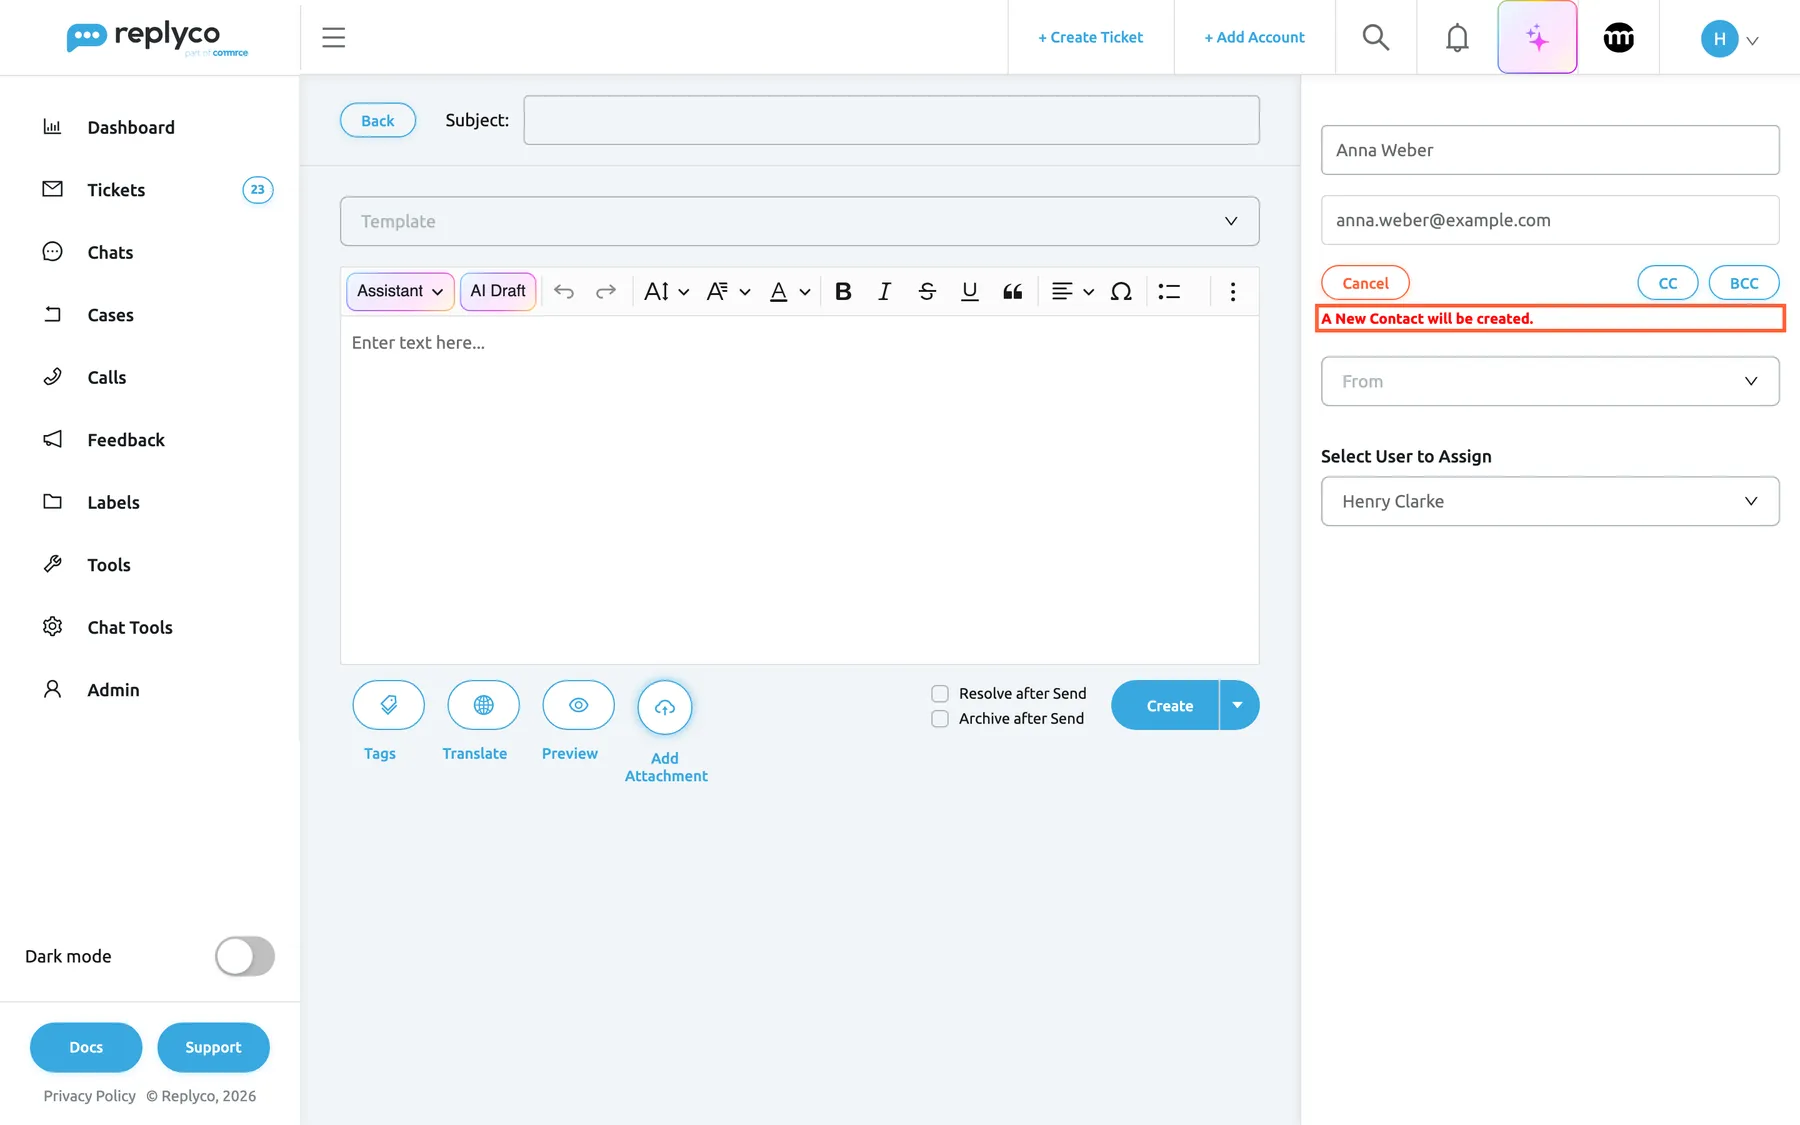
What this screenshot shows
- Screen
- + Create Ticket (/createTicket)
- Highlighted
- heading “A New Contact will be created.”, right-column, shown. announces that a contact will be created
- Also visible
- Recipient Name: Anna Weber; Recipient Email: anna.weber@example.com; Cancel, CC, BCC; empty From drop-down; Select User to Assign: Henry Clarke
- Purpose
- write to a new person
When you select Create, Replyco first saves the person as an email contact of the sending account, then creates the ticket for that contact. Both fields are required, and the address must be a valid email address. Cancel in red returns to the contact search and clears both fields.
A new contact can only be written to by email: eBay and Kaufland accounts are not offered as senders, because those marketplaces only deliver messages to their own buyers.
Choose the account you send from
Section titled “Choose the account you send from”The sender list, marked From while it is empty, appears once a recipient is chosen. It lists the accounts of your company that can start a conversation, each with its name and login.
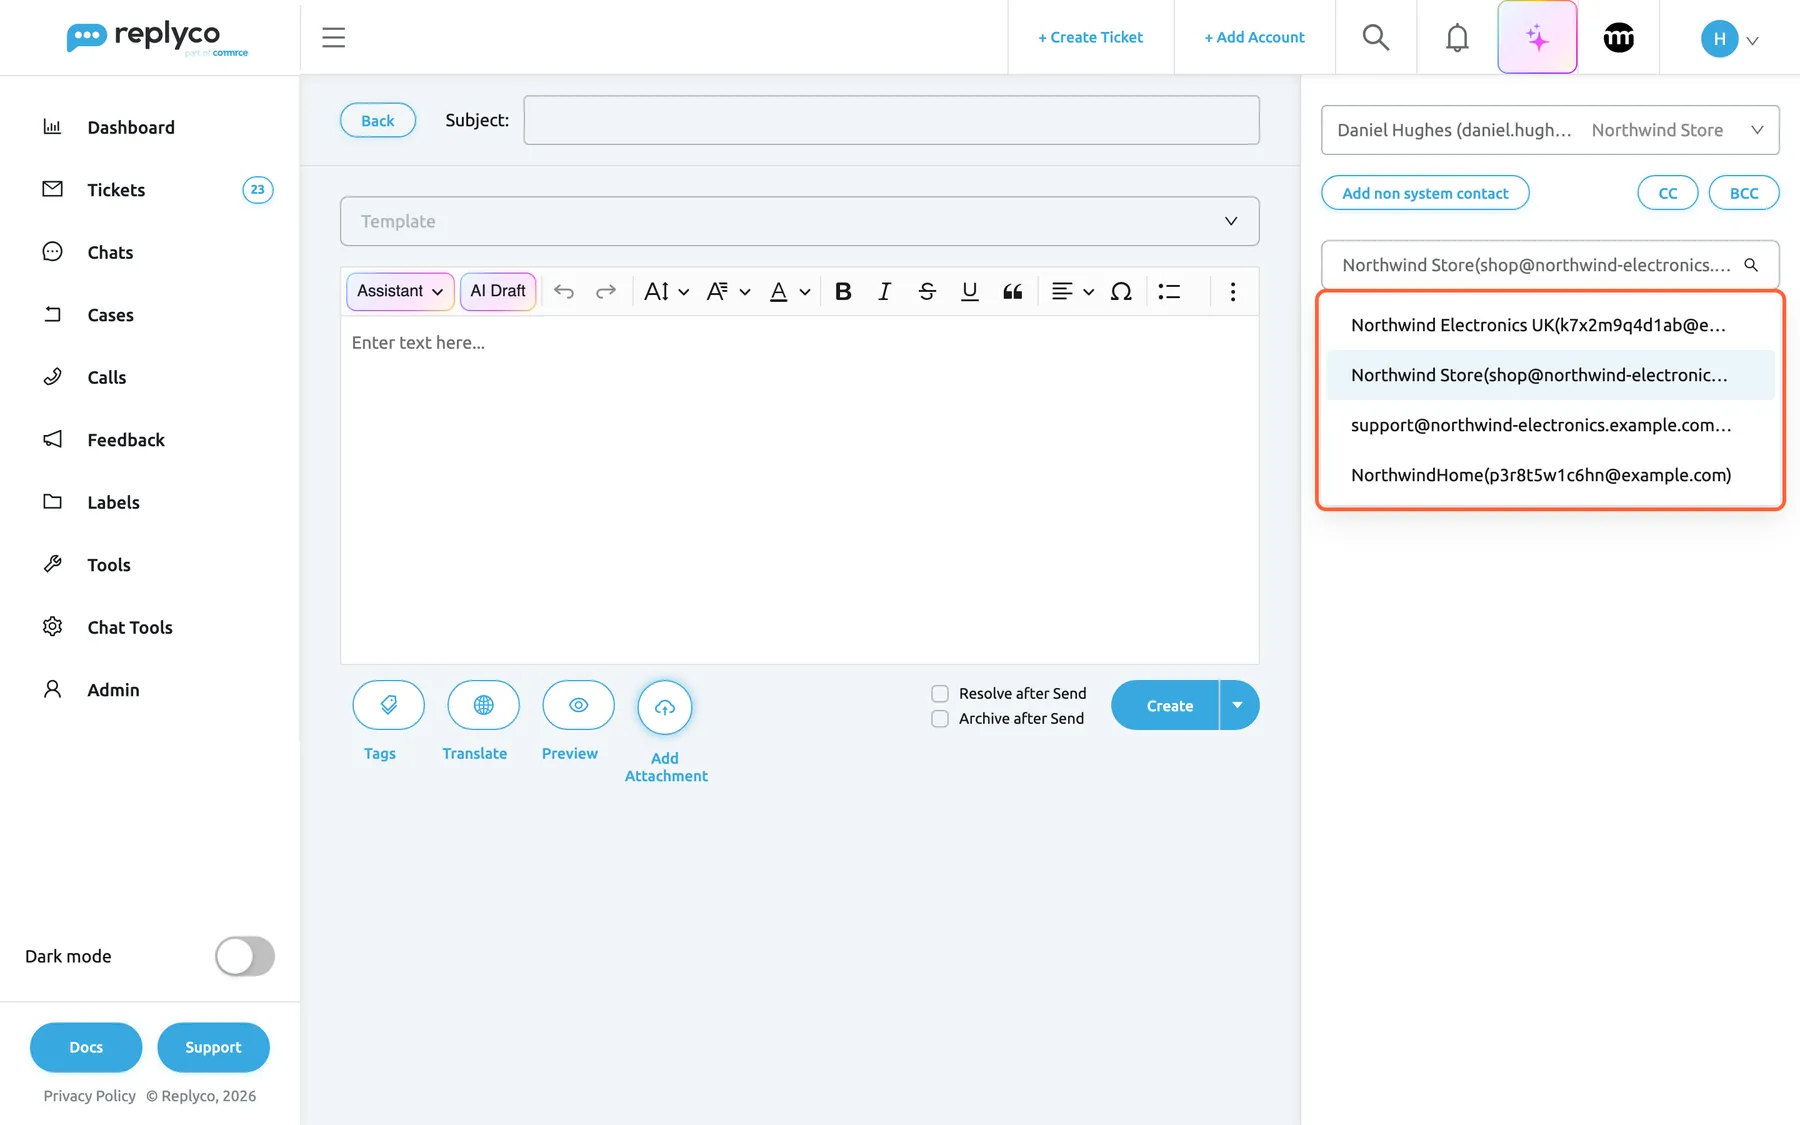
What this screenshot shows
- Screen
- + Create Ticket (/createTicket)
- Highlighted
- combobox “From”, right-column, open. chooses the account the ticket is sent from
- Also visible
- recipient Daniel Hughes with Northwind Store; CC and BCC buttons; 4 sender accounts: Amazon, Shopify, mailbox, Etsy
- Purpose
- choose the sending account
Which channels can start a conversation:
| Channel | Can start a conversation? | How the message travels |
|---|---|---|
| Mailboxes (IMAP, Gmail, Outlook) | Yes, to anyone with an email address | As an email from the mailbox |
| Webstores such as Shopify, WooCommerce, BigCommerce, Magento and ShopLine | Yes, to anyone with an email address | As an email from the store account |
| Amazon, Etsy, Fruugo and Otto | Yes | As an email from the account to the buyer’s address |
| eBay | Only to an eBay buyer already in your contacts, with one of their orders | As an eBay message about the order’s listing |
| Kaufland | Only to a Kaufland buyer already in your contacts, with one of their orders | As a new Kaufland ticket with the reason you pick |
| WhatsApp, Facebook, Instagram, Telegram, TikTok and live chat | No | These are chats, not tickets; answer them under Chats |
For an ordinary recipient or a new contact, the list offers every account from the first three rows. For an eBay or Kaufland buyer it offers only the buyer’s own account; when an eBay buyer’s account is not connected any more, the column reads No available senders for this customer instead.
An account that is blocked or needs a new login appears as Blocked followed by its name, in red. You can pick it, but Create then shows Unblock the account to restore the ability to send the message. To fix the account, see Fix a blocked or silent account.
Your signatures and the accounts they belong to are set under Account Signatures.
Write to an eBay or Kaufland buyer
Section titled “Write to an eBay or Kaufland buyer”eBay and Kaufland let you contact a buyer only about something they bought. Replyco therefore asks for the order and a message type before it sends.
- Pick the buyer under Select recipient. The sender is fixed to the buyer’s eBay or Kaufland account.
- Under Select Order, pick one of the buyer’s orders on that account.
- For Kaufland only, pick the item under Select Order Unit.
- Under Select Message Type, pick the type.
- Write the text and select Create.
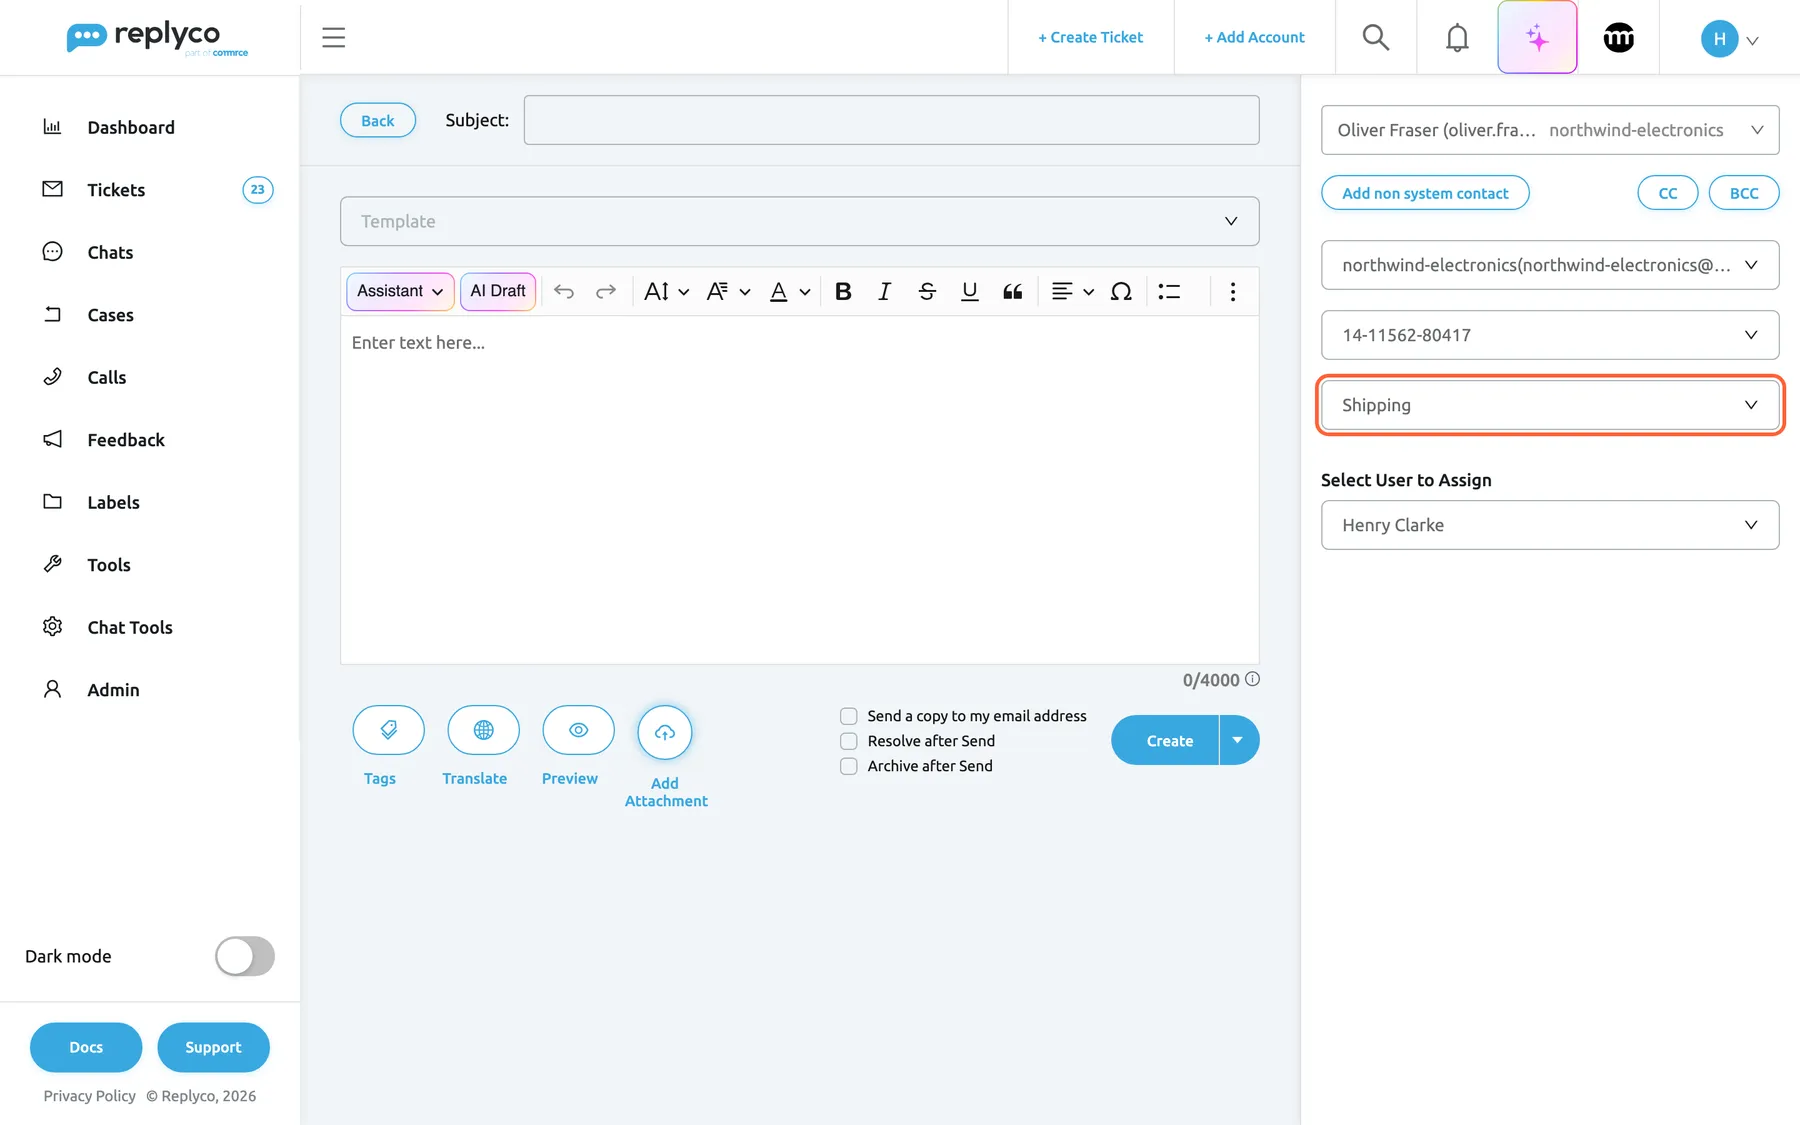
What this screenshot shows
- Screen
- + Create Ticket (/createTicket)
- Highlighted
- combobox “Select Message Type”, right-column, Shipping selected. sets the eBay question type
- Also visible
- recipient: eBay buyer with northwind-electronics; sender fixed to northwind-electronics; Select Order: 14-11562-80417; character counter 0/4000; Send a copy to my email address check box
- Purpose
- the extra fields for an eBay buyer
| Marketplace | Message types |
|---|---|
| eBay | None, Customized Subject, General, Multiple Item Shipping, Payment, Shipping |
| Kaufland | Product not as described, Product defect, Product not delivered, Product return, Other/Contact |
Without an order or a type, Create shows Please select Order and Message Type.
eBay needs the listing the order was for. When an order has no eBay item in Replyco, picking it opens the dialog Order is not synced with eBay. Select Sync Order and Replyco fetches the order from eBay and selects it. If the order still has no item, Replyco shows The order still has no eBay item. Please sync the order from eBay and try again.; pick another order of the same buyer.
eBay rules apply to the text as they do to replies:
- At most 4000 characters. The counter under the text box shows how many you used; over 4000, Create stays greyed out.
- No personal information. eBay does not allow phone numbers, email addresses or links to other sites. Replyco creates the ticket, but marks such a message as failed with the reason eBay does not allow sharing personal information such as phone numbers, email addresses, or external links in messages. Please remove this information and try again.
- Images only, at most 5. Attach up to 5 images; PDF files only when the eBay attachment converter is on in your account settings.
For an eBay sender, the check box Send a copy to my email address appears above the other check boxes. Tick it to have eBay email you a copy of the message, as with eBay replies.
Write the message: templates, snippets and placeholders
Section titled “Write the message: templates, snippets and placeholders”The editor is the one you know from replies, with the same toolbar, templates, snippets and placeholders.
- Template lists your switched-on templates. As soon as you pick a sender, the list shows only the templates linked to that account; before that, it shows all switched-on templates. Picking a template replaces the text box with the template’s text and your signature, and adds the template’s files. To write templates or link them to accounts, see Reply templates and the Templates screen.
- Snippets: type
/and a snippet’s name to insert it. They are kept under Snippets. - Placeholders: type
#for the list, or select Tags under the text box and pick a chip. They stay as#…#in the editor and are filled in when Replyco creates the ticket.#username#becomes your full name. For every placeholder and its fallback text, see Snippets and placeholders. - Your signature for the sending account is added under the text when you pick the sender.
- Assistant rewrites the text you have: shorter, longer, more formal, spelling corrected and more. It works here as in a ticket; see The ticket screen.
Preview shows the message as HTML, but cannot fill in placeholders on Create Ticket, because the ticket does not exist yet: they appear as #…#, except #username#. The customer still receives them filled in.
Add files and copies
Section titled “Add files and copies”- Files: select Add Attachment, or drag files onto the text box. Each file appears in a list under the buttons with a button to remove it. A forwarded message’s files join the same list; a template’s files are listed separately and cannot be removed there.
- Channel limits: Replyco checks the files you add against the sending account: eBay takes at most 5 images, Amazon at most 6 MB of files per message, and Replyco warns with You have uploaded too many files. Ebay limit is 5 files. or The message can't exceed 6 MB (including attachments)..
- Copies: CC and BCC appear next to the recipient once you have chosen one. Each opens a field that searches your contacts and accepts any typed address; each field keeps up to 4 addresses, and a fifth is not added. A mistyped address stops the ticket with Please enter valid CC or Please enter valid BCC.
Assign, resolve or archive the new ticket
Section titled “Assign, resolve or archive the new ticket”Select User to Assign starts with your own name and cannot be left empty. Pick a colleague to hand the conversation over: the new ticket is assigned to them, and they get a notification that a ticket was assigned to them. When you keep yourself, nobody is notified.
Resolve after Send creates the ticket as resolved, for a message that needs no answer, such as a dispatch notice. Archive after Send creates it archived. Both boxes start ticked or unticked according to Resolve Tickets After Reply and Archive Tickets After Reply in your account settings. A resolved or archived ticket comes back when the customer answers, like any other ticket; see Resolve, snooze or archive a ticket.
Send later, translate or save as a template
Section titled “Send later, translate or save as a template”The arrow next to Create opens a menu with Choose Delaying Time and Save Reply as a Template. Both work as in a reply:
- Choose Delaying Time creates the ticket now and sends the message after a number of minutes or at a date and time you pick. Until then the message waits in the new ticket, and you can send it at once or cancel it there. See Delayed sending.
- Save Reply as a Template saves the text as a new template without sending anything; see Templates.
When you have a default delay in your account settings, Create itself waits that long, and the message is scheduled like every reply you send.
Translate opens a language list with Translate, which shows the translation in the text box, and Translate and Create, which creates the ticket and sends the message in the chosen language. When your company translates automatically, the button turns the send button into Translate and Create with a language list next to it. See Translations.
With keyboard shortcuts switched on in your account settings, Ctrl+Enter creates the ticket and Ctrl+Alt+Enter translates and creates it.
When Replyco does not create the ticket
Section titled “When Replyco does not create the ticket”Create checks the form in a fixed order and stops at the first problem. The message appears at the top right; nothing is sent, and everything you entered stays in the form.
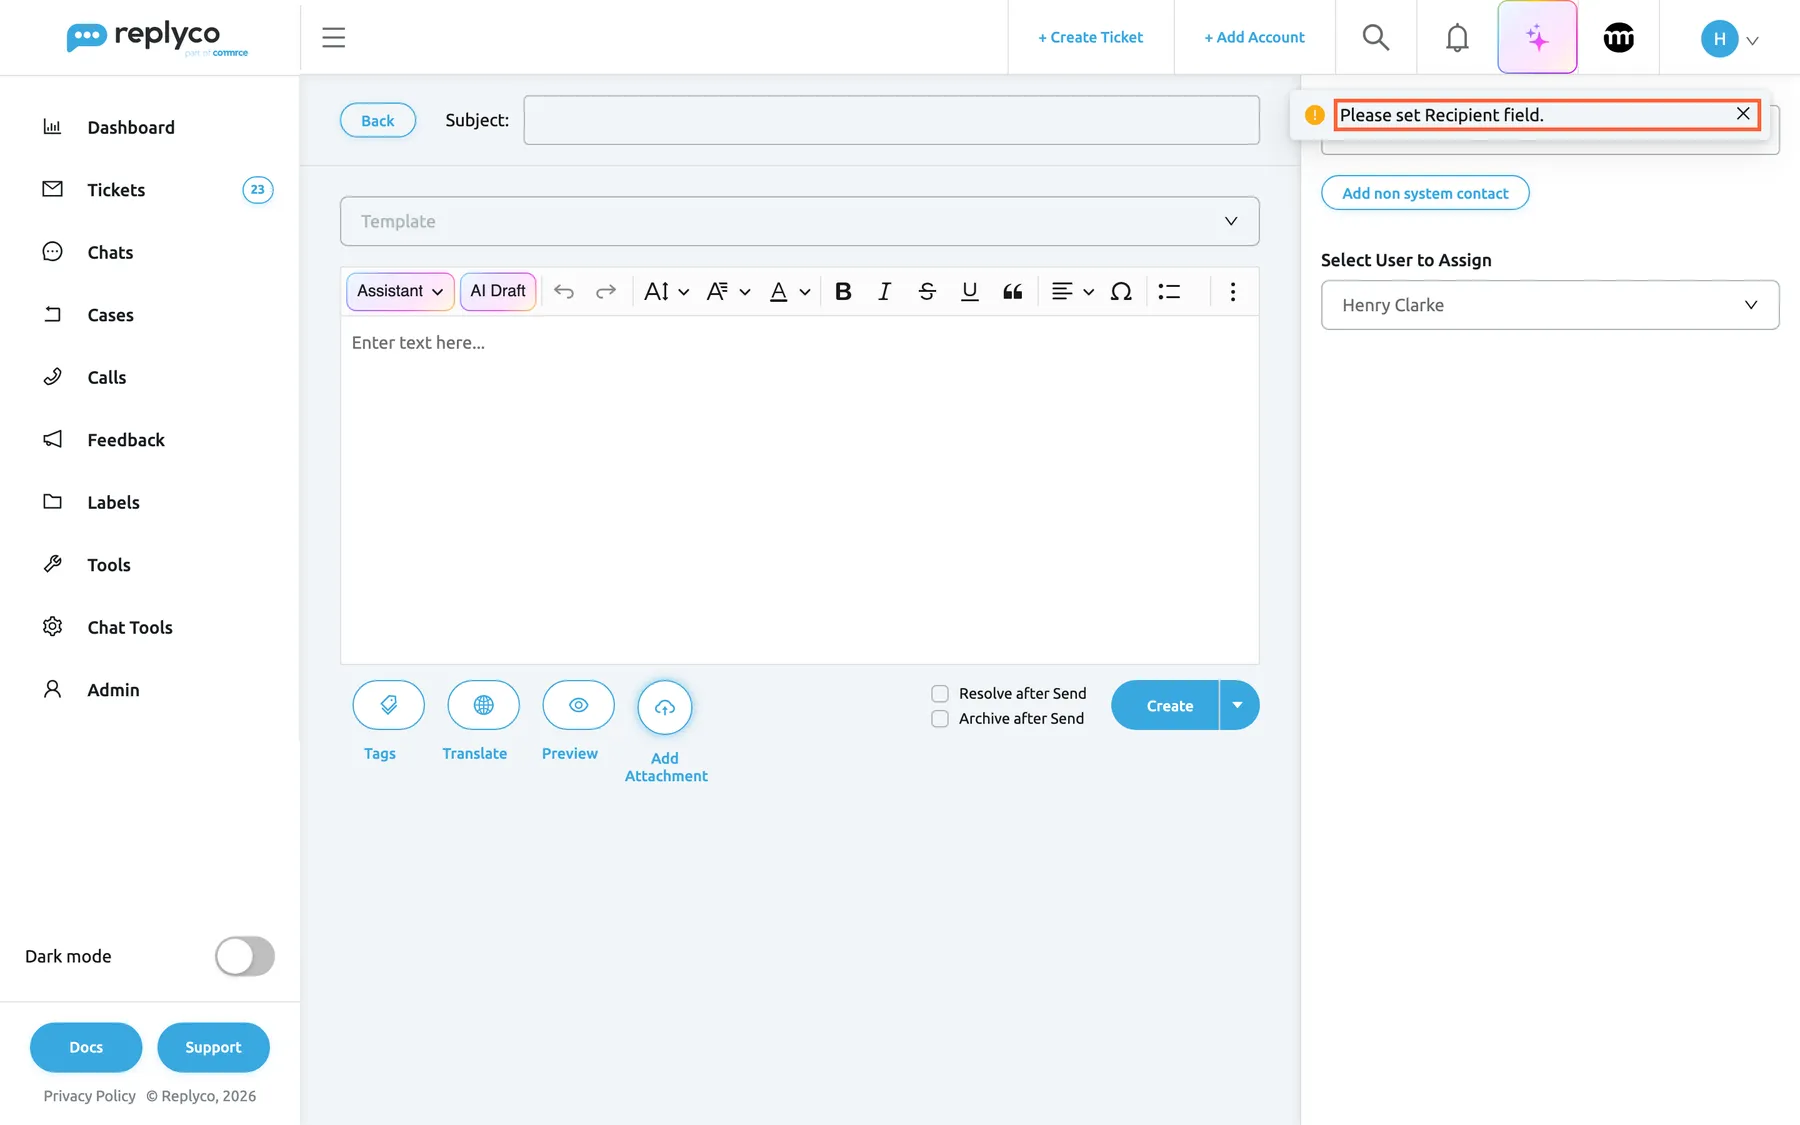
What this screenshot shows
- Screen
- + Create Ticket (/createTicket)
- Highlighted
- alert “Please set Recipient field.”, top-right, shown. reports the first missing field
- Also visible
- empty Subject and text box; warning message at the top right; Create button
- Purpose
- the validation message when a required field is missing
| Message | What is missing |
|---|---|
| Please set Recipient field. | No recipient chosen and no new contact started |
| Please set Sender field. | No sending account |
| Please set Subject field. | The subject is empty |
| Please set Message text. | The text box is empty |
| Please set Customer field. | The chosen recipient has no contact behind it; choose it again or add a new contact |
| Unblock the account to restore the ability to send the message | The sender is blocked or needs a new login |
| Please enter valid CC or Please enter valid BCC | A copy address is not a valid email address |
| Please input Name for a new contact | A new contact without a name |
| Please input Email for a new contact | A new contact without an email address |
| Please input valid email address. | The new contact’s email address is not valid |
| Please select Order and Message Type | An eBay or Kaufland buyer without order or message type |
When the server refuses the ticket, its own message appears instead, for example Sorry, you can not create ticket now! Please contact support! when ticket creation is not available for your company.
What happens after you send
Section titled “What happens after you send”When the server accepts the ticket, Replyco shows Ticket successfully created. and opens the new ticket. What you find there:
- Your message is the first message of the ticket, with the subject you entered and the placeholders filled in. It shows Processing until it has gone out, in the next sending round, usually within two minutes; a scheduled message shows Delayed and the time.
- The ticket is assigned to the user you chose, and it is resolved or archived if you ticked those boxes.
- The ticket is in your lists like one a customer started, under the recipient as its customer and the sending account as its account. See Ticket lists.
- When the customer answers, the answer arrives in this ticket, and a resolved or archived ticket becomes open again.
If the channel refuses the message later, for example eBay because of personal information, the message shows Error Sending; hover it for the reason and try again from the ticket. See The ticket screen.
Back at the top left leaves the form without asking and without saving: Create Ticket keeps no draft.
Forward a message
Section titled “Forward a message”Forwarding passes one message of a ticket to someone else, for example a customer’s new delivery address to your warehouse. It opens the same form, filled in, and the new ticket stays linked to the ticket you forwarded from.
- Open the ticket and, on the message, select the forward arrow, Forward, at the right of its header.
- The form opens with Fwd:, a space and the message’s subject under Subject, or the ticket’s subject when the message has none. The text box holds your signature and, below it, the message in a block that starts with ---------- Forwarded message --------- and lists its subject, sender, date and recipients; the date is written out in full, in your computer’s time zone and in the language of your screen. The message’s files are in the file list.
- Pick the recipient, or add a new contact, and pick the sender under From.
- (Optional) Write a note above the forwarded block, and remove files you do not want to pass on.
- Select Create.
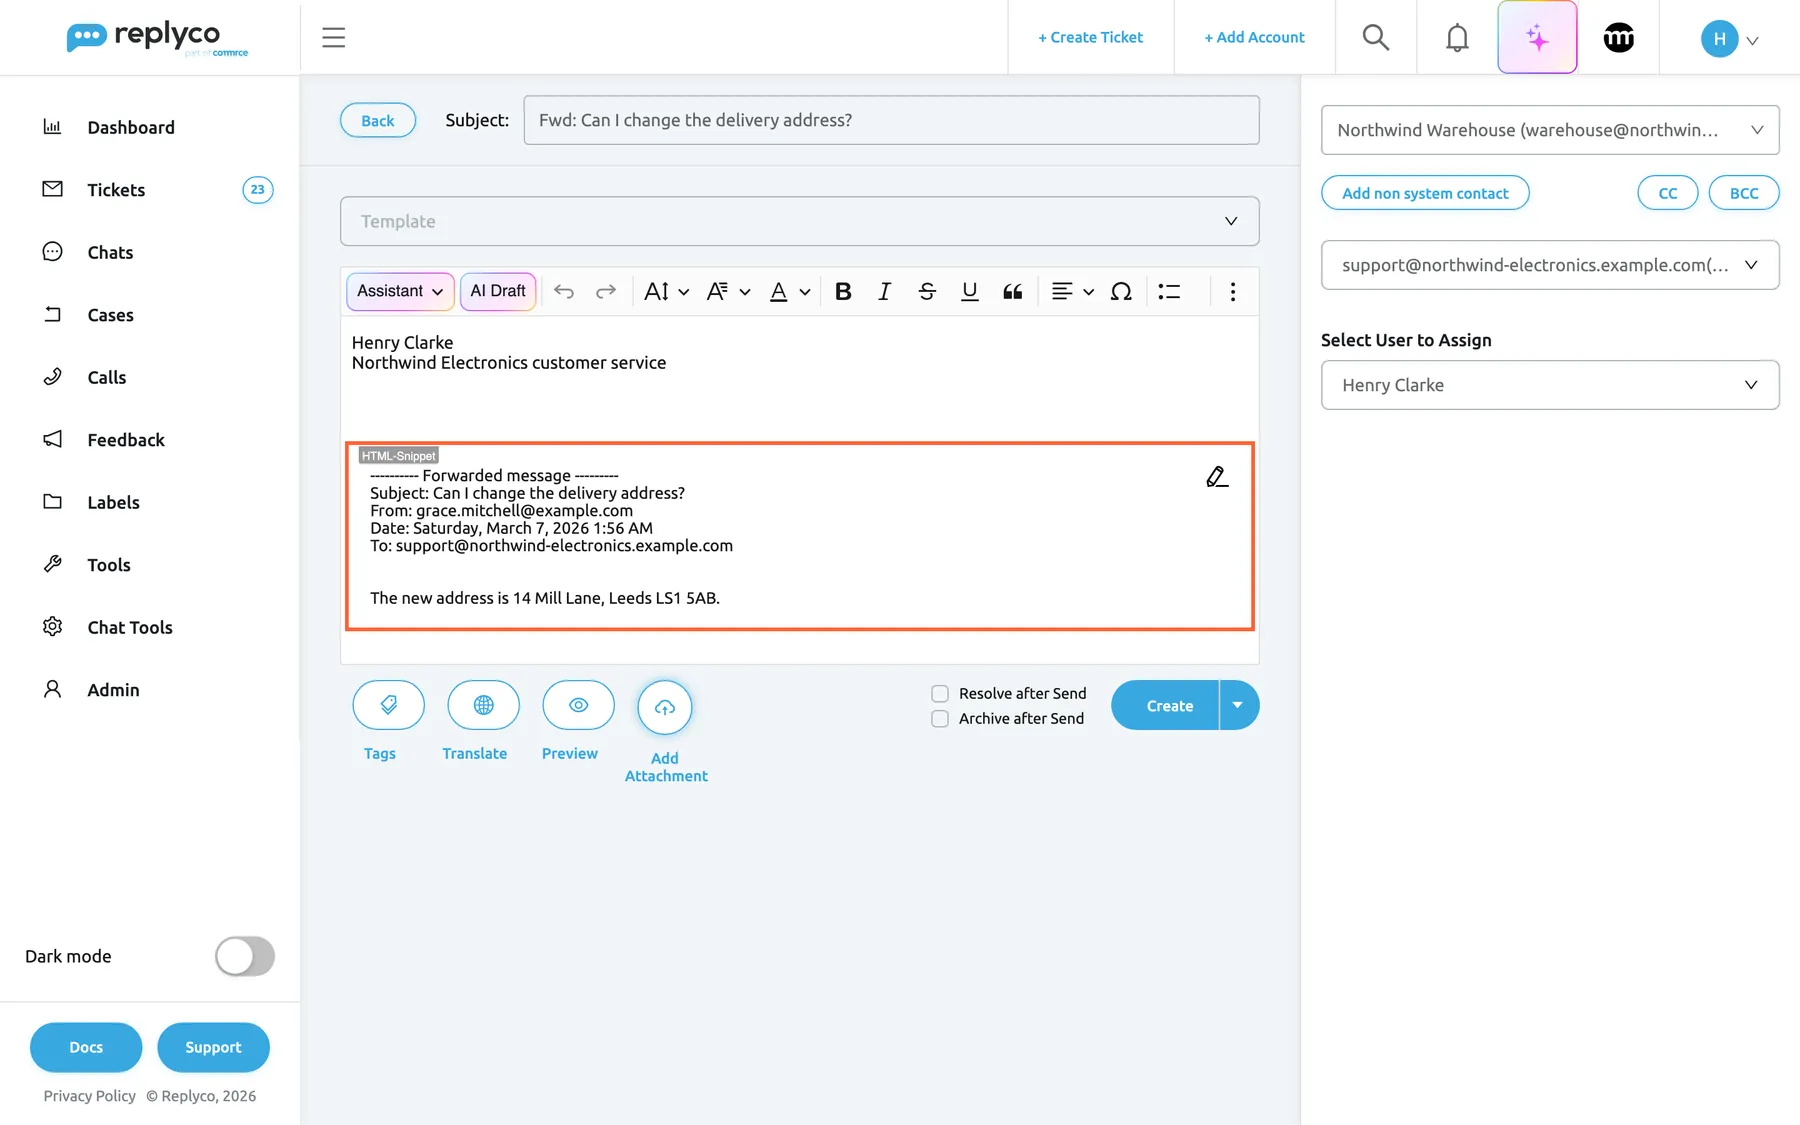
What this screenshot shows
- Screen
- + Create Ticket (/forwardMessage/:threadId/:messageId)
- Highlighted
- region “---------- Forwarded message ---------”, editor, filled. carries the forwarded message into the new ticket
- Also visible
- Subject: Fwd: plus the message subject; signature above the forwarded block; forwarded header: subject, from, date, to; recipient Northwind Warehouse, sender support mailbox
- Purpose
- forward a message as a new, linked ticket
The new ticket is a child of the original: the original shows it under Child Ticket, and the new ticket shows Parent Ticket: with the original’s subject. When the new ticket has a different customer, as with a supplier, the two cannot be merged later; see The ticket screen and Ticket merging.
Every control, explained
Section titled “Every control, explained”The screen has the editor on the left and the recipient column on the right; the forward screen has the same controls.
+ Create Ticket
Section titled “+ Create Ticket”The top bar, to the left of + Add Account. Shown only when your company may create tickets.
Opens an empty Create Ticket form from any screen.
Start a conversation at the moment you think of it, without looking for a ticket first.
Top left of the form.
Returns to the screen you came from. It does not ask and does not save: the text, the recipient and the files are gone.
Leave a message you decided not to send. Copy long texts elsewhere first if you might need them.
Subject
Section titled “Subject”Next to Back at the top of the form.
The subject of the new ticket and of the email the recipient receives. Required: empty, it gives Please set Subject field.. Forwarding fills it with Fwd:, a space and the message’s subject, or the ticket’s subject when the message has none; a transcript fills in its own subject.
The recipient sees it first, and you find the ticket by it in your lists.
Template
Section titled “Template”Above the editor toolbar.
Lists your switched-on templates, and after you pick a sender, only those linked to that account. Picking one replaces the text box with its text and your signature and adds its files; the cross in the field removes the choice.
Send the same well-written message every time, for example a dispatch notice. See Reply templates.
Text box and editor toolbar
Section titled “Text box and editor toolbar”The middle of the form, with the toolbar above the text box.
The message, with formatting: size, font, colour, bold, italic, strikethrough, underline, quote, alignment, special characters and lists. / inserts a snippet, # a placeholder. Assistant rewrites the text. For eBay senders a counter shows the characters used, out of 4000.
Write the message the way you would in a reply, with the same tools.
First button under the text box.
Opens a box of placeholder chips; a chip is inserted where the cursor is.
Insert placeholders without remembering their exact spelling. See Snippets and placeholders.
Translate
Section titled “Translate”Second button under the text box.
Opens a language list with Translate and Translate and Create. With automatic translation for your company, it turns the send button into Translate and Create.
Write in your own language and send in the customer’s. See Translations.
Preview
Section titled “Preview”Third button under the text box.
Opens Message Preview with the formatted message. On Create Ticket placeholders stay as #…#, except #username#; on the forward screen they are filled from the original ticket.
Check the layout and your signature before the customer sees them.
Add Attachment
Section titled “Add Attachment”Fourth button under the text box. You can also drag files onto the text box.
Adds one file at a time to the file list under the buttons, where each file has a button to remove it. Files are checked against the sending account’s limits: 5 images for eBay, 6 MB per message for Amazon.
Send an invoice, a returns label or a photo with the first message.
Send a copy to my email address
Section titled “Send a copy to my email address”Above the other check boxes, only when the sender is an eBay account.
Asks eBay to email you a copy of the message, as it does for eBay replies.
Keep a copy of what you wrote to the buyer in your own mailbox.
Resolve after Send and Archive after Send
Section titled “Resolve after Send and Archive after Send”Left of Create. They start as set in your account settings.
Create the ticket resolved, archived, or both. The customer’s answer opens the ticket again.
Keep one-way messages, such as a dispatch notice, out of your open tickets.
Create and its arrow
Section titled “Create and its arrow”Bottom right of the form.
Create checks the form, creates the ticket and sends the message, after your default delay if you have one. The arrow opens Choose Delaying Time and Save Reply as a Template. The button is greyed out while a file uploads or while an eBay text is over 4000 characters.
Send now, later, or keep the text as a template for next time.
Select recipient
Section titled “Select recipient”Top of the right column.
Searches contacts with an email address and eBay buyers, 10 at a time, and shows each contact’s account. Choosing one fills in the sender with that account. Typing an address that is not in the list offers to use it for a new contact.
Write to a known customer without typing the address, and send from the account they know.
Add non system contact
Section titled “Add non system contact”Under the recipient field.
Replaces the search with Recipient Name and Recipient Email, both required, and shows A New Contact will be created.. Cancel goes back to the search. When you send, Replyco saves the contact under the sending account first.
Write to a supplier, a courier or a customer who has never contacted you.
CC and BCC
Section titled “CC and BCC”Right of Add non system contact, once a recipient is chosen.
Each opens an address field that searches your contacts and accepts typed addresses, up to 4 per field. An invalid address stops the ticket with Please enter valid CC or Please enter valid BCC.
Keep a colleague or a supplier informed without forwarding the message later.
Under the recipient, once a recipient is chosen.
The sending account. It lists accounts that can start a conversation: for an eBay or Kaufland buyer only their own account. Blocked accounts are marked Blocked in red and cannot send. Picking an account loads its templates and your signature for it.
The customer receives the message from the address or marketplace account they know.
eBay and Kaufland fields
Section titled “eBay and Kaufland fields”| Field | When it appears | What it does |
|---|---|---|
| Select Order | eBay or Kaufland buyer, with their account as sender | The buyer’s orders on that account; the message is about this order |
| Select Order Unit | Kaufland only, after an order | The item of the order the message is about |
| Select Message Type | eBay or Kaufland buyer | The type eBay or the reason Kaufland files the message under |
Select User to Assign
Section titled “Select User to Assign”Bottom of the right column.
The user the new ticket is assigned to. It starts with you and cannot be left empty. A colleague you pick gets a notification.
Hand the conversation to whoever will handle the answer.
Who sees what
Section titled “Who sees what”| Part of the screen | What decides whether you see it |
|---|---|
| + Create Ticket in the top bar and the forward arrow on messages | Ticket creation for your company: every company that is not in a trial; during a trial, only once Replyco has verified the company, or from the start when it signed up in the German region |
| Templates limited to the sender’s account | Templates per account, every plan |
Snippets with / | Snippets, every plan |
| Translate | Translations, every plan |
| Assistant and AI Draft | AI, every plan |
| Sender list, CC and BCC | A chosen recipient or a new contact |
| Select Order, Select Message Type | An eBay or Kaufland buyer with their account as sender |
| Send a copy to my email address and the 4000-character counter | An eBay sender |
Companies on an older plan may not have templates per account, snippets or translations; see What each plan includes. No user permission is needed: everyone in a company that may create tickets can use the screen. The recipient search shows all of the company’s contacts.
What you need to know
Section titled “What you need to know”| Topic | Fact |
|---|---|
| Required | Recipient, sender, subject and text; for eBay and Kaufland also order and message type |
| Channels | Mailboxes, webstores, Amazon, Etsy, Fruugo and Otto for anyone with an email address; eBay and Kaufland only for their own buyers; chats never |
| Sending time | In the next sending round after Create, usually within two minutes, or later with a delay |
| Placeholders | Filled in from the new ticket when it is created; Preview on Create Ticket does not fill them |
| Copies | Up to 4 CC and 4 BCC addresses |
| Assignment | You by default; a colleague you pick is notified |
| No draft | Back or leaving the page discards the form |
| New contacts | Saved as email contacts of the sending account before the ticket is created |
| Forward | Creates a linked child ticket; carries the message’s files |
Frequently asked questions
Section titled “Frequently asked questions”General
Section titled “General”Why is there no Create Ticket button in my top bar?
Section titled “Why is there no Create Ticket button in my top bar?”+ Create Ticket appears only when your company may create tickets. During a trial this stays off until Replyco has verified your company, and the forward arrow on messages is hidden as well; companies that signed up in Replyco’s German region can create tickets from the start. Confirming your email address does not count as this verification. The server message Sorry, you can not create ticket now! Please contact support! says the same: contact support to have your company verified.
Which channels can I start a conversation on?
Section titled “Which channels can I start a conversation on?”On Create Ticket you can send from mailboxes, webstores such as Shopify and WooCommerce, and from Amazon, Etsy, Fruugo and Otto, to anyone with an email address. eBay and Kaufland accounts can only write to their own buyers about one of their orders. WhatsApp, Facebook, Instagram, Telegram, TikTok and live chat are chats, not tickets, and cannot be used here.
Can every agent create tickets, or only admins?
Section titled “Can every agent create tickets, or only admins?”Every user of a company that may create tickets sees + Create Ticket in the top bar; it needs no separate user permission. The recipient search shows all of the company’s contacts with an email address, whoever handled them before.
Where do I find the ticket after I sent it?
Section titled “Where do I find the ticket after I sent it?”Replyco opens the new ticket as soon as it is created and shows Ticket successfully created.. Afterwards it is in your ticket lists like any other ticket, assigned to the user you chose under Select User to Assign, and resolved or archived if you ticked those boxes on Create Ticket.
Recipients and senders
Section titled “Recipients and senders”Why can’t I find a customer in the recipient list?
Section titled “Why can’t I find a customer in the recipient list?”Select recipient on Create Ticket only lists contacts with an email address, and eBay buyers known by their eBay ID. A customer who wrote through a chat or a marketplace without an address is not in the list. Use Add non system contact with their email address, or look them up under ToolsCustomers.
Why did the sender change when I picked the recipient?
Section titled “Why did the sender change when I picked the recipient?”Choosing a contact under Select recipient fills in the sender with the account the contact came from, so the customer hears from the store or marketplace they know. You can pick another account in the sender list. For eBay and Kaufland buyers the sender is fixed to their own account.
Why is our eBay account missing from the sender list?
Section titled “Why is our eBay account missing from the sender list?”eBay only delivers messages to its own buyers, about an order. On Create Ticket the eBay account appears only when you pick an eBay buyer under Select recipient, and then it is the only sender offered. For a new contact or an email customer, pick a mailbox or store account instead.
Why does the sender field say there is no sender for an eBay buyer?
Section titled “Why does the sender field say there is no sender for an eBay buyer?”The message No available senders for this customer appears on Create Ticket when you pick an eBay buyer whose eBay account is not connected to Replyco any more. Replyco cannot send eBay messages from another account. Reconnect the account under AdminAccounts.
Can I write to someone who has never contacted us?
Section titled “Can I write to someone who has never contacted us?”Yes. On Create Ticket select Add non system contact, enter the name and email address, pick a mailbox or store account as the sender and send. Replyco saves the person as a new contact first, so they appear in the recipient search from then on.
Writing the message
Section titled “Writing the message”Why does the template list change after I pick the sender?
Section titled “Why does the template list change after I pick the sender?”Create Ticket first lists all switched-on templates and, once you pick a sender, only the templates linked to that account. A template without the account is then not offered. Link templates to accounts on the Templates screen under ToolsAutomation.
Why does Preview show my placeholders as they are?
Section titled “Why does Preview show my placeholders as they are?”On Create Ticket the ticket does not exist yet, so Preview has no customer or order to take values from and shows placeholders such as #customer_first_name# as written; only #username# is filled. Replyco fills in the placeholders from the new ticket when you select Create.
eBay and Kaufland
Section titled “eBay and Kaufland”Why does Create Ticket ask for an order when I write to an eBay buyer?
Section titled “Why does Create Ticket ask for an order when I write to an eBay buyer?”eBay and Kaufland let a seller contact a buyer only about an order. On Create Ticket, for an eBay or Kaufland buyer, you pick the order under Select Order and the type under Select Message Type; Kaufland also asks for the item. Without them Replyco shows Please select Order and Message Type.
Why does a dialog ask me to sync the order first?
Section titled “Why does a dialog ask me to sync the order first?”Replyco needs the eBay listing of the order to send an eBay message. When the order you pick on Create Ticket has none, the dialog Order is not synced with eBay offers Sync Order, which fetches the order from eBay and selects it. If the listing is still missing, pick another order of the buyer.
Why was my eBay message marked as failed?
Section titled “Why was my eBay message marked as failed?”eBay refuses messages with phone numbers, email addresses or links to other sites. Replyco creates the ticket from Create Ticket, but marks such a message as failed with that reason. Open the ticket, remove the personal information and send the text again as a reply. eBay messages are also limited to 4000 characters.
After sending and forwarding
Section titled “After sending and forwarding”When does the customer receive the message?
Section titled “When does the customer receive the message?”Replyco creates the ticket at once and sends the message in the next sending round, usually within two minutes; until then the message shows Processing in the new ticket. With Choose Delaying Time, or a default delay in your account settings, it waits until the time you set.
What happens when the customer answers?
Section titled “What happens when the customer answers?”The answer arrives in the ticket you created on Create Ticket, like any other message. A ticket you created resolved or archived becomes open again, so it reappears in your open ticket lists and is handled like a ticket the customer started.
Is a forwarded message linked to the original ticket?
Section titled “Is a forwarded message linked to the original ticket?”Yes. A ticket created with the forward arrow on a message is a child of the original ticket: the original shows it under Child Ticket and the new one shows Parent Ticket:. Select either subject to switch between them on the ticket screen.
Data and privacy
Section titled “Data and privacy”What does the recipient of a forwarded message see?
Section titled “What does the recipient of a forwarded message see?”The recipient gets your text, your signature, and the forwarded block with the original message, its subject, the sender’s address, the date and the addresses it went to, plus the files you kept in the list. Remove anything they should not see from the text box and the file list before you select Create.
Troubleshooting
Section titled “Troubleshooting”| Symptom | What to check |
|---|---|
| No + Create Ticket in the top bar and no forward arrow | Your company is in a trial and Replyco has not verified it yet; ticket creation is off until then. Confirming your email address does not switch it on; contact support |
| Sorry, you can not create ticket now! Please contact support! | Ticket creation is not available for your company, usually a trial that is not verified yet; contact support |
| A message at the top right, and nothing is sent | The field it names; the check stops at the first missing one. The table under When Replyco does not create the ticket lists each message |
| Unblock the account to restore the ability to send the message | The sender is marked Blocked; reconnect it, see Fix a blocked or silent account, or pick another sender |
| The eBay account is not in the sender list | Pick an eBay buyer as recipient; eBay accounts are offered only for their own buyers |
| No available senders for this customer | The buyer’s eBay account is not connected to Replyco any more; reconnect it |
| Please select Order and Message Type | Pick the order and the message type, and for Kaufland the item |
| Create stays greyed out | A file is still uploading, or an eBay text is over 4000 characters |
| A template is missing from the list | After picking the sender, only templates linked to that account are shown; check the template’s accounts on the Templates screen |
Placeholders show as #…# in Preview | Expected on Create Ticket; they are filled in when the ticket is created |
| The eBay message failed | Phone numbers, email addresses or links in the text; remove them and send again from the ticket |
Related
Section titled “Related”- Reply templates: writing templates and limiting them to accounts
- Snippets and placeholders: every placeholder, snippet and fallback
- Templates: the Templates screen under Automation
- The ticket screen: where the new ticket opens, and the forward arrow
- Answer a ticket: replying in an existing ticket with the same editor
- Delayed sending · Translations · AI drafts
- Account Signatures · Customers · Transcripts