

Manage Smart Filters
A Smart Filter is a saved set of ticket-list conditions, such as open tickets assigned to me that are waiting for a reply, shown to the team as a card with a count. This screen is where filters are made and maintained: you create, edit, copy, order and delete them, read who changed them, and from here the cards appear for your colleagues. Team leads and admins use it; everyone else uses the cards. Open it from ToolsSmart Filters. To open the tickets of a filter, use the cards on TicketsSmart Filters; see Smart Filters.
Availability: every plan includes the Smart Filter feature, and during a trial every feature is on; companies on an older plan may not have it. The screen is in the menu for users with the Smart Filters permission, and creating, editing, reordering and deleting filters needs that permission with Edit. Choosing which colleagues get which filter is done on their Access Rights. See What each plan includes and User permissions and roles.
What you can do here
Section titled “What you can do here”- See every Smart Filter of your company, in the order the cards appear for everyone, including filters that are not on your own screen. The screen at a glance
- Read a filter’s conditions without opening the form. Read a filter’s conditions
- Create a Smart Filter from a name, an icon and up to eight kinds of condition: search, marketplaces, accounts, assignees, ticket types, deadline states, a creation date range and labels. Create a Smart Filter
- Edit a filter, for everyone who has it. Edit a Smart Filter
- Copy a filter to build a similar one. Copy a Smart Filter
- Put the filters in order; the cards follow it for every user. Put the filters in order
- Delete a filter, for everyone. Delete a Smart Filter
- See who created and changed a filter, and what they changed. See a filter’s history
- Decide who gets which filter. A new filter goes to every user at that moment; admins adjust it per user. Decide who gets a filter · User permissions and roles
The screen at a glance
Section titled “The screen at a glance”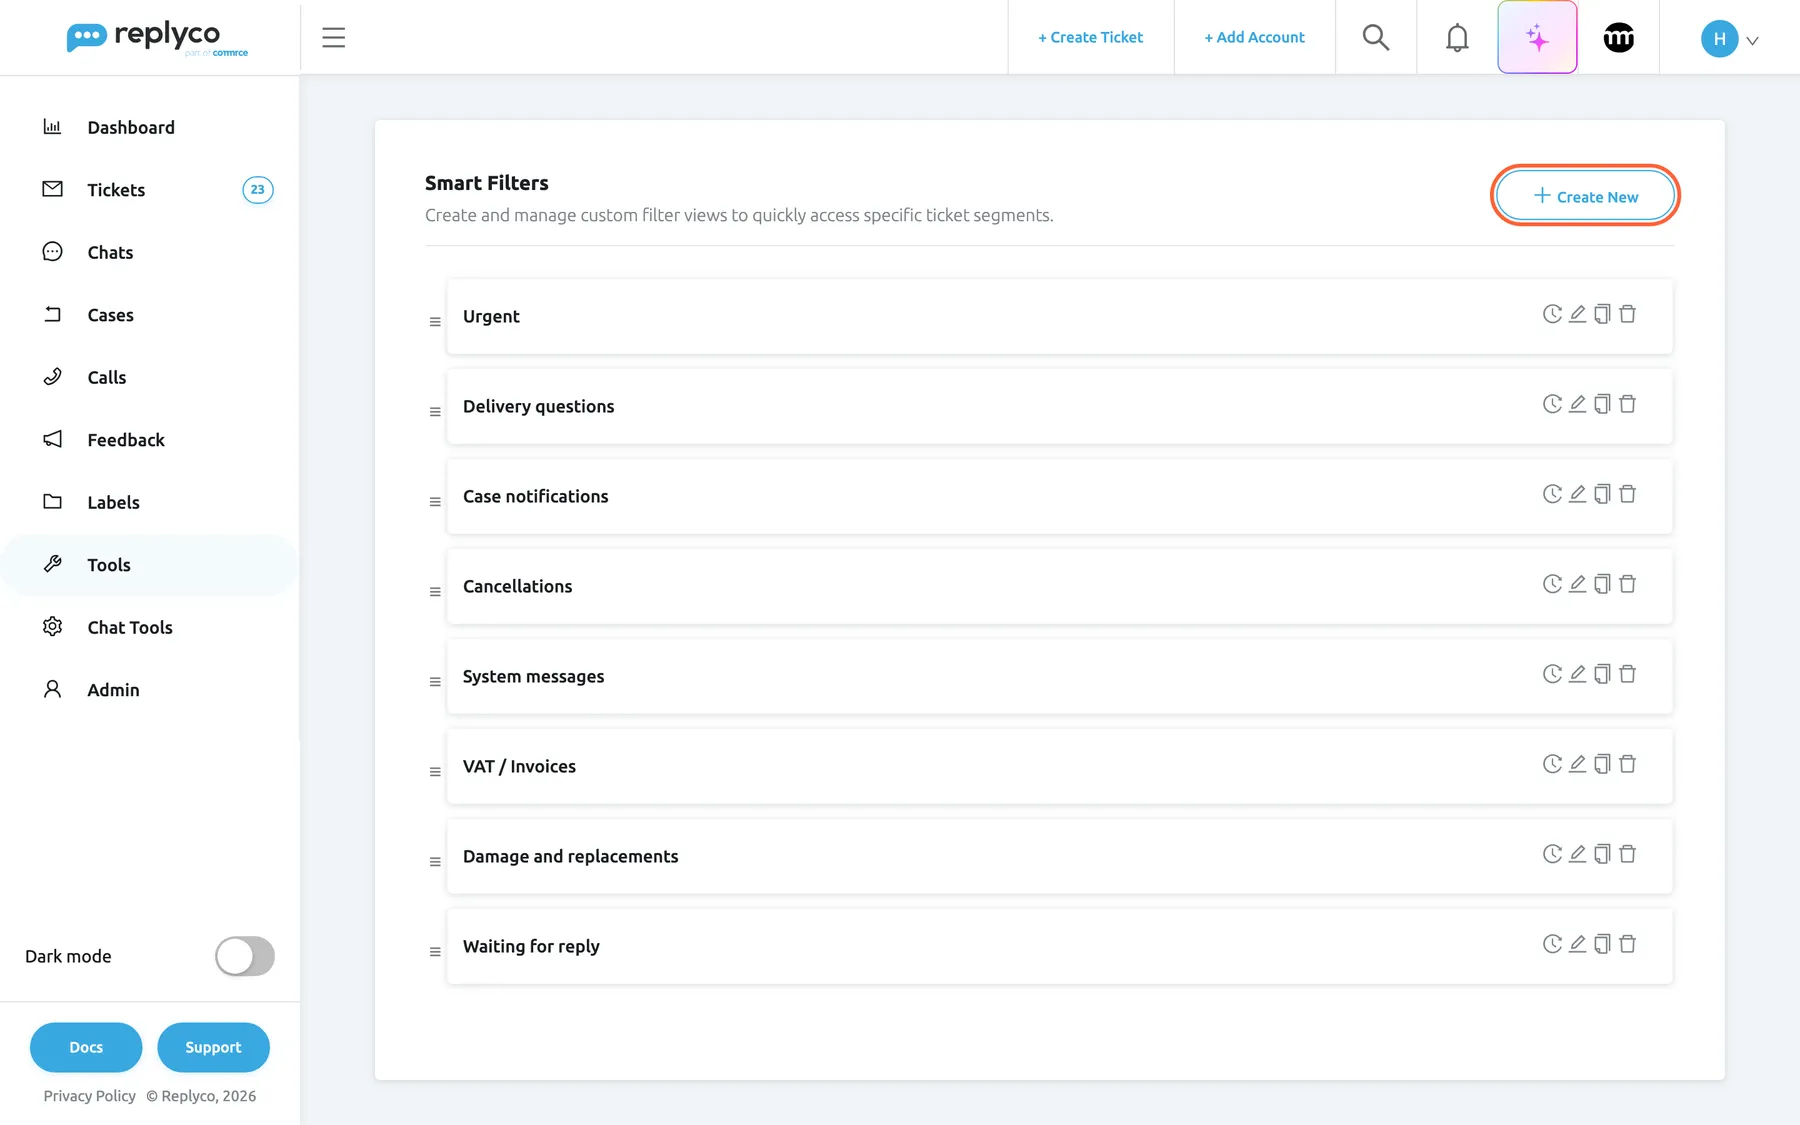
What this screenshot shows
- Screen
- Smart Filters (/smart-filters)
- Highlighted
- button “Create New”, header-right, enabled. opens the Create Smart Filter form
- Also visible
- eight filter cards in their set order; history, pencil, copy and bin icons on each card; drag handles
- Purpose
- the management screen as it opens
| Region | What it shows | What you do there |
|---|---|---|
| Header, top | The heading Smart Filters, the description Create and manage custom filter views to quickly access specific ticket segments. and Create New | Start a new filter |
| The list | One card per filter: a drag handle ☰, the name, and the history, pencil, copy and bin icons | Open, reorder, copy or delete a filter, or open its history |
| Panel, right (after a click) | The filter’s icon and conditions with Delete, Copy and Edit, or its history | Read a filter and act on it |
| Form (replaces the list) | Create Smart Filter or Edit Smart Filter: ten sections, a table of contents, Back and Save | Set the name, icon and conditions |
Every new company starts with six filters: Urgent for open tickets whose response deadline has passed, and searches for delivery questions, case notifications, cancellations, system messages from the marketplaces, and VAT or invoice requests. They behave like any other filter. When a company has no filters, the list reads No smart filters found.
Read a filter’s conditions
Section titled “Read a filter’s conditions”Select a card. The panel on the right shows the filter’s icon and every condition that is set, for example the accounts, Additional Filter and Labels; conditions that are not used are left out.
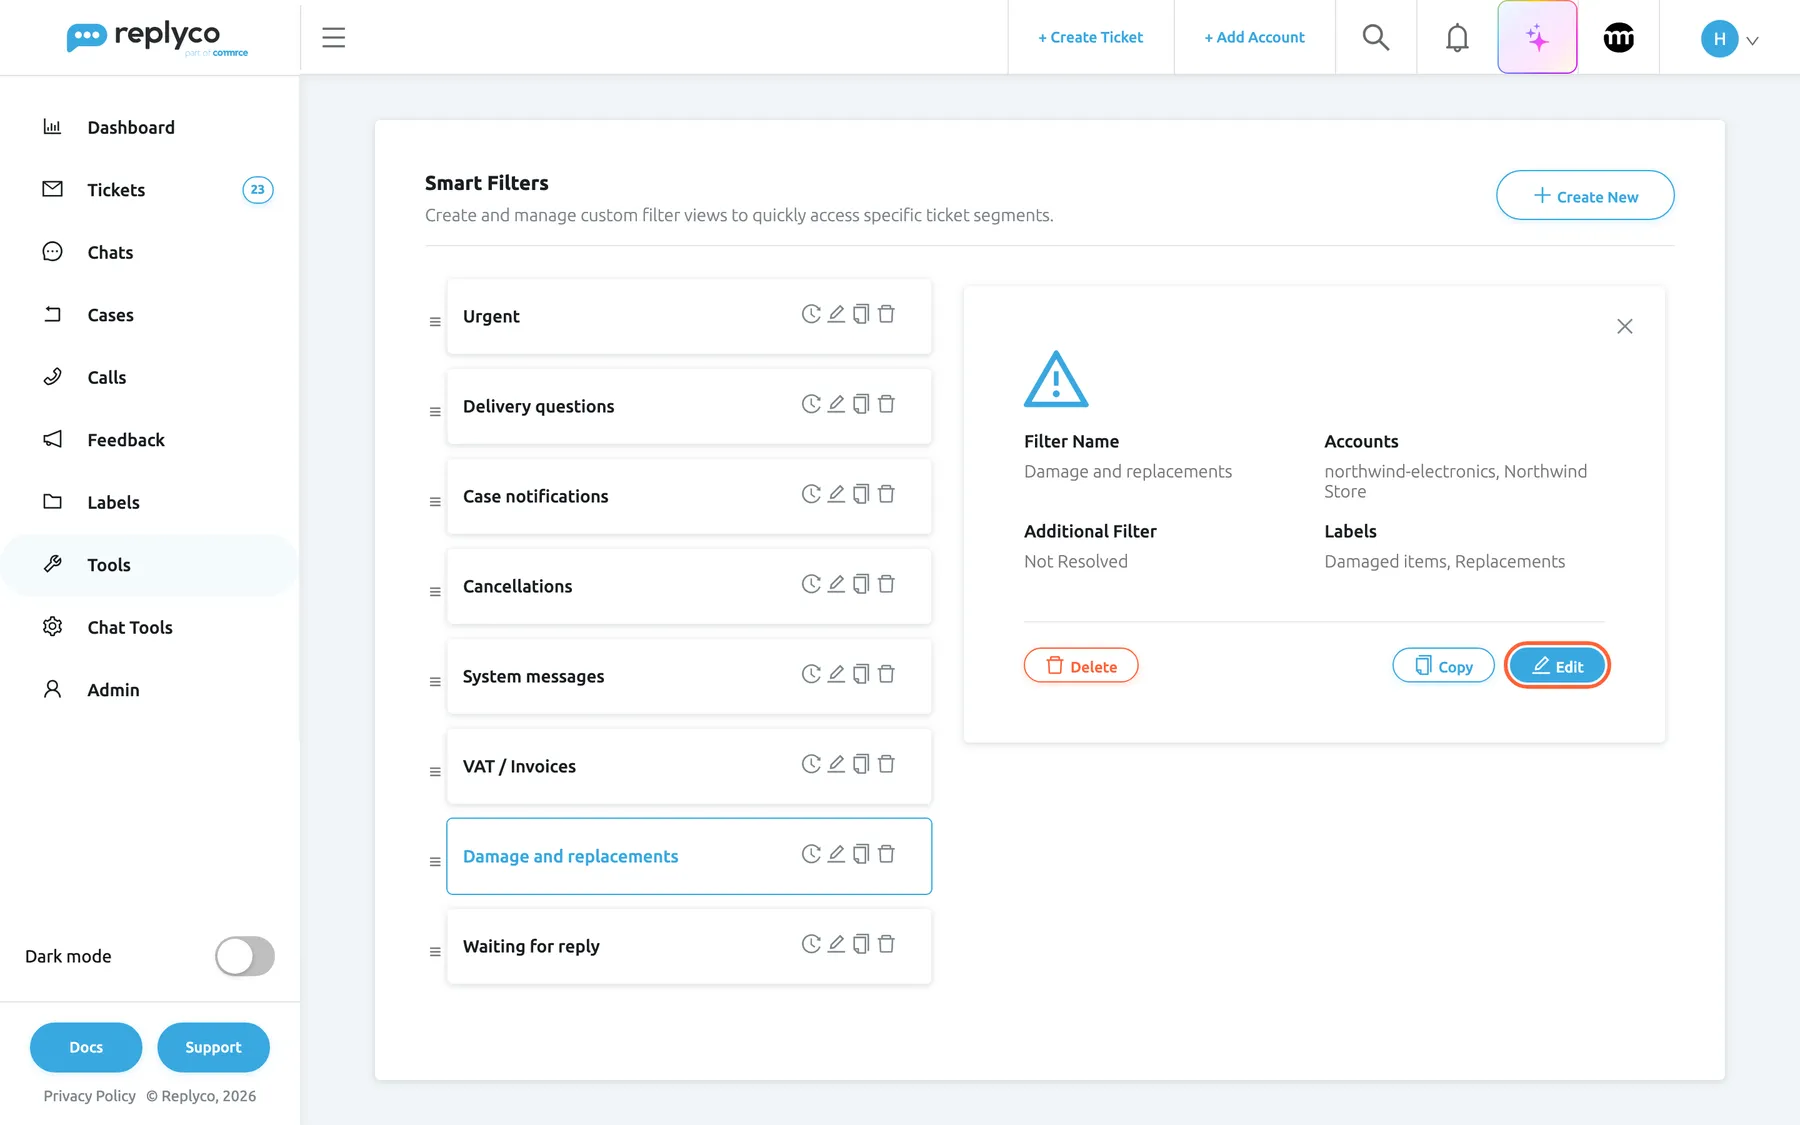
What this screenshot shows
- Screen
- Smart Filters (/smart-filters)
- Highlighted
- button “Edit”, details-right, enabled. opens the Edit Smart Filter form
- Also visible
- conditions of Damage and replacements; Delete, Copy, Edit
- Purpose
- read a filter's conditions
Under the conditions are Delete, Copy and Edit; the cross closes the panel.
Create a Smart Filter
Section titled “Create a Smart Filter”-
Open ToolsSmart Filters and select Create New.
The form Create Smart Filter replaces the list, with the description Configure a customized smart filter to group and prioritize relevant tickets. and a table of contents on the right.
-
Under Icon, pick an icon for the card, or switch to Custom Icon and upload an image. See Every control, explained.
-
Type the name under Filter Name, for example Waiting for reply. This is the name on the card.
-
Set the conditions in the sections below; set only the ones you need. Each is explained in The conditions.
-
Select Save at the top, or in the side column once you have scrolled down.
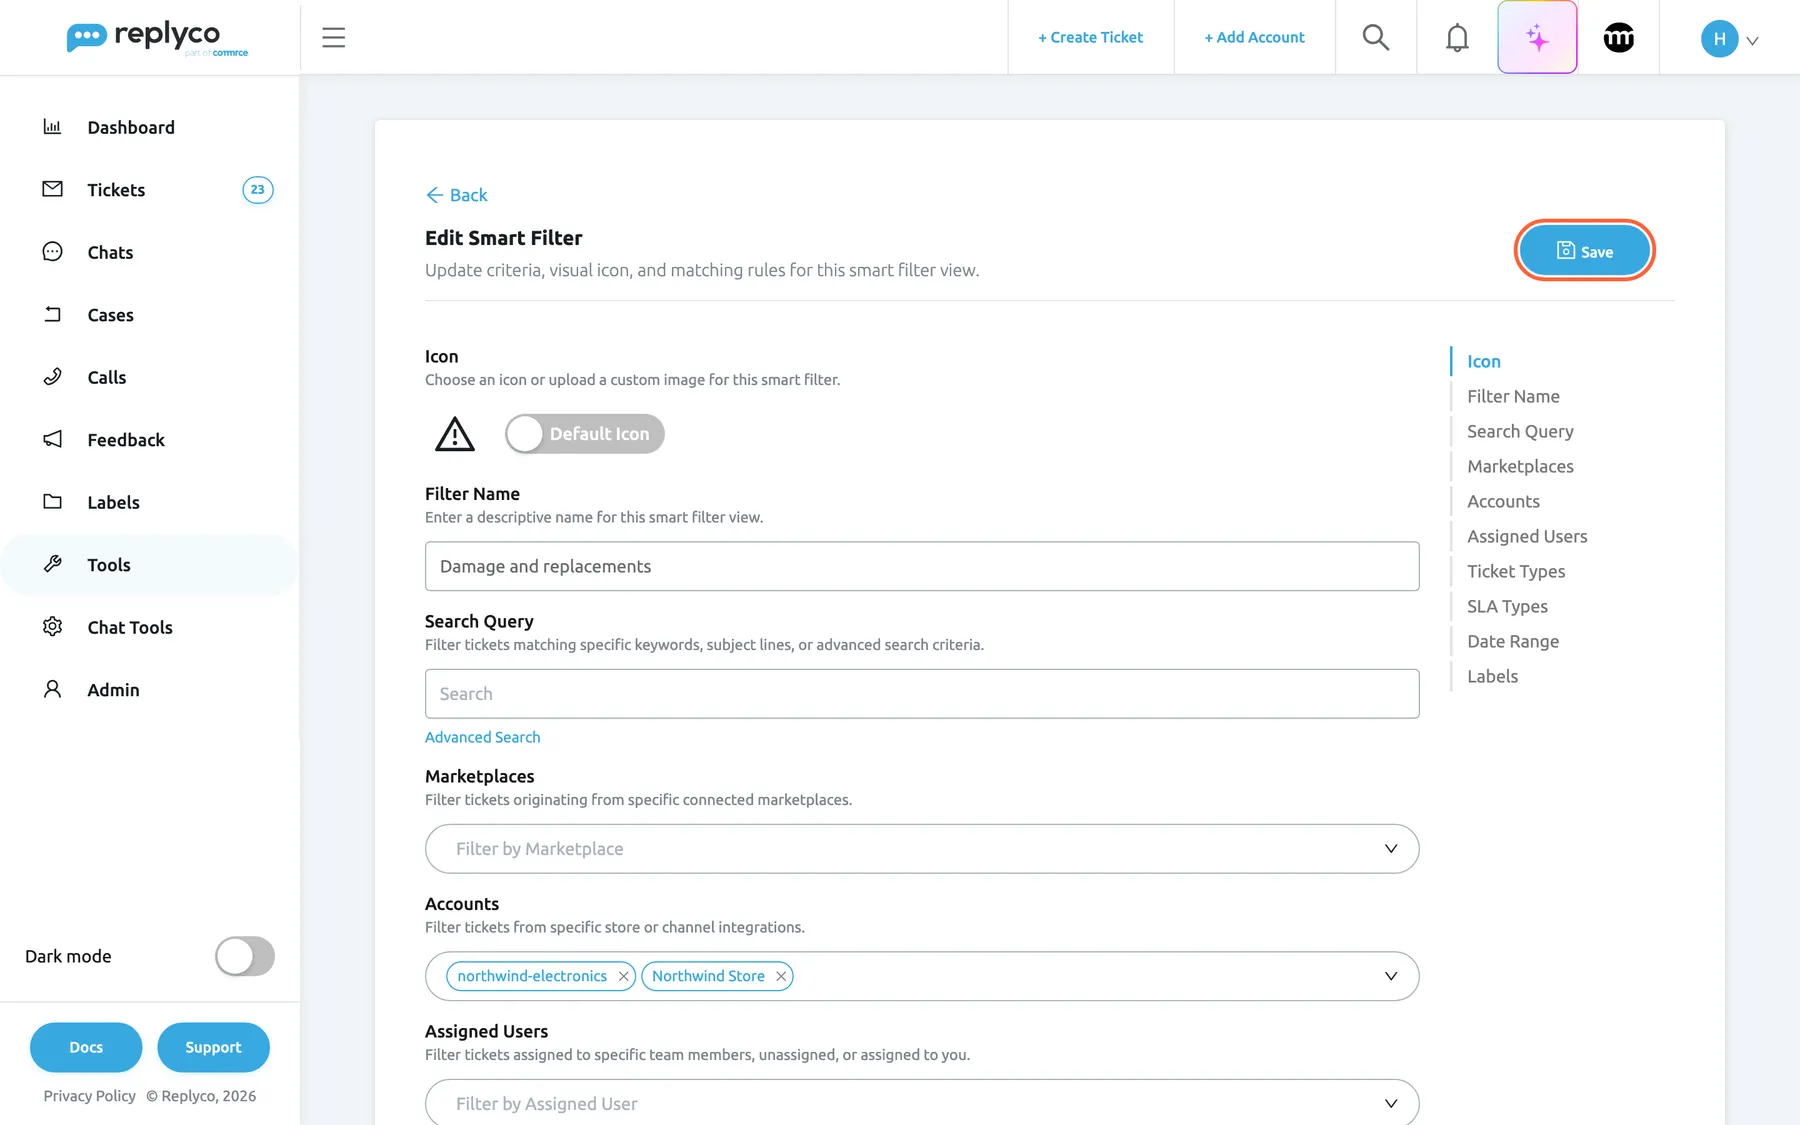
What this screenshot shows
- Screen
- Edit Smart Filter (/smart-filters)
- Highlighted
- button “Save”, header-right, enabled. saves the filter for everyone who has it
- Also visible
- Back; Icon with Default Icon switch; Filter Name; Search Query and Advanced Search; Marketplaces; Accounts: northwind-electronics, Northwind Store; table of contents with ten sections
- Purpose
- edit a filter, top of the form
The form closes, Replyco confirms with Success, and the filter is added at the end of the list. A new filter is given to every user of your company at that moment; each of them sees its card on TicketsSmart Filters after reloading Replyco. To limit it, see Decide who gets a filter.
Replyco checks the form before saving:
| Message | Why |
|---|---|
| Please enter a name. | The name is empty |
| You didn't enter any filter options. | No condition is set; a filter needs at least one |
| Please enter values into search fields. | A condition of the advanced search is empty |
| You cannot add more search fields. | You tried to add an eleventh advanced search condition |
Back leaves the form without saving, so save first.
Example. Northwind Electronics wants every agent to start the day with their own overdue work. A team lead creates Waiting for reply with the clock icon, Me (account user) under Assigned Users, Not Resolved under Ticket Types, and Respond Within - Due and Respond Within - Overdue under SLA Types. Every agent gets the card, and each sees only the open tickets assigned to them that still need a reply.
The conditions
Section titled “The conditions”A ticket must match every section you fill in, and any one value within a section. A filter with the accounts northwind-electronics and Northwind Store and the label Damaged items finds tickets from either account that carry that label.
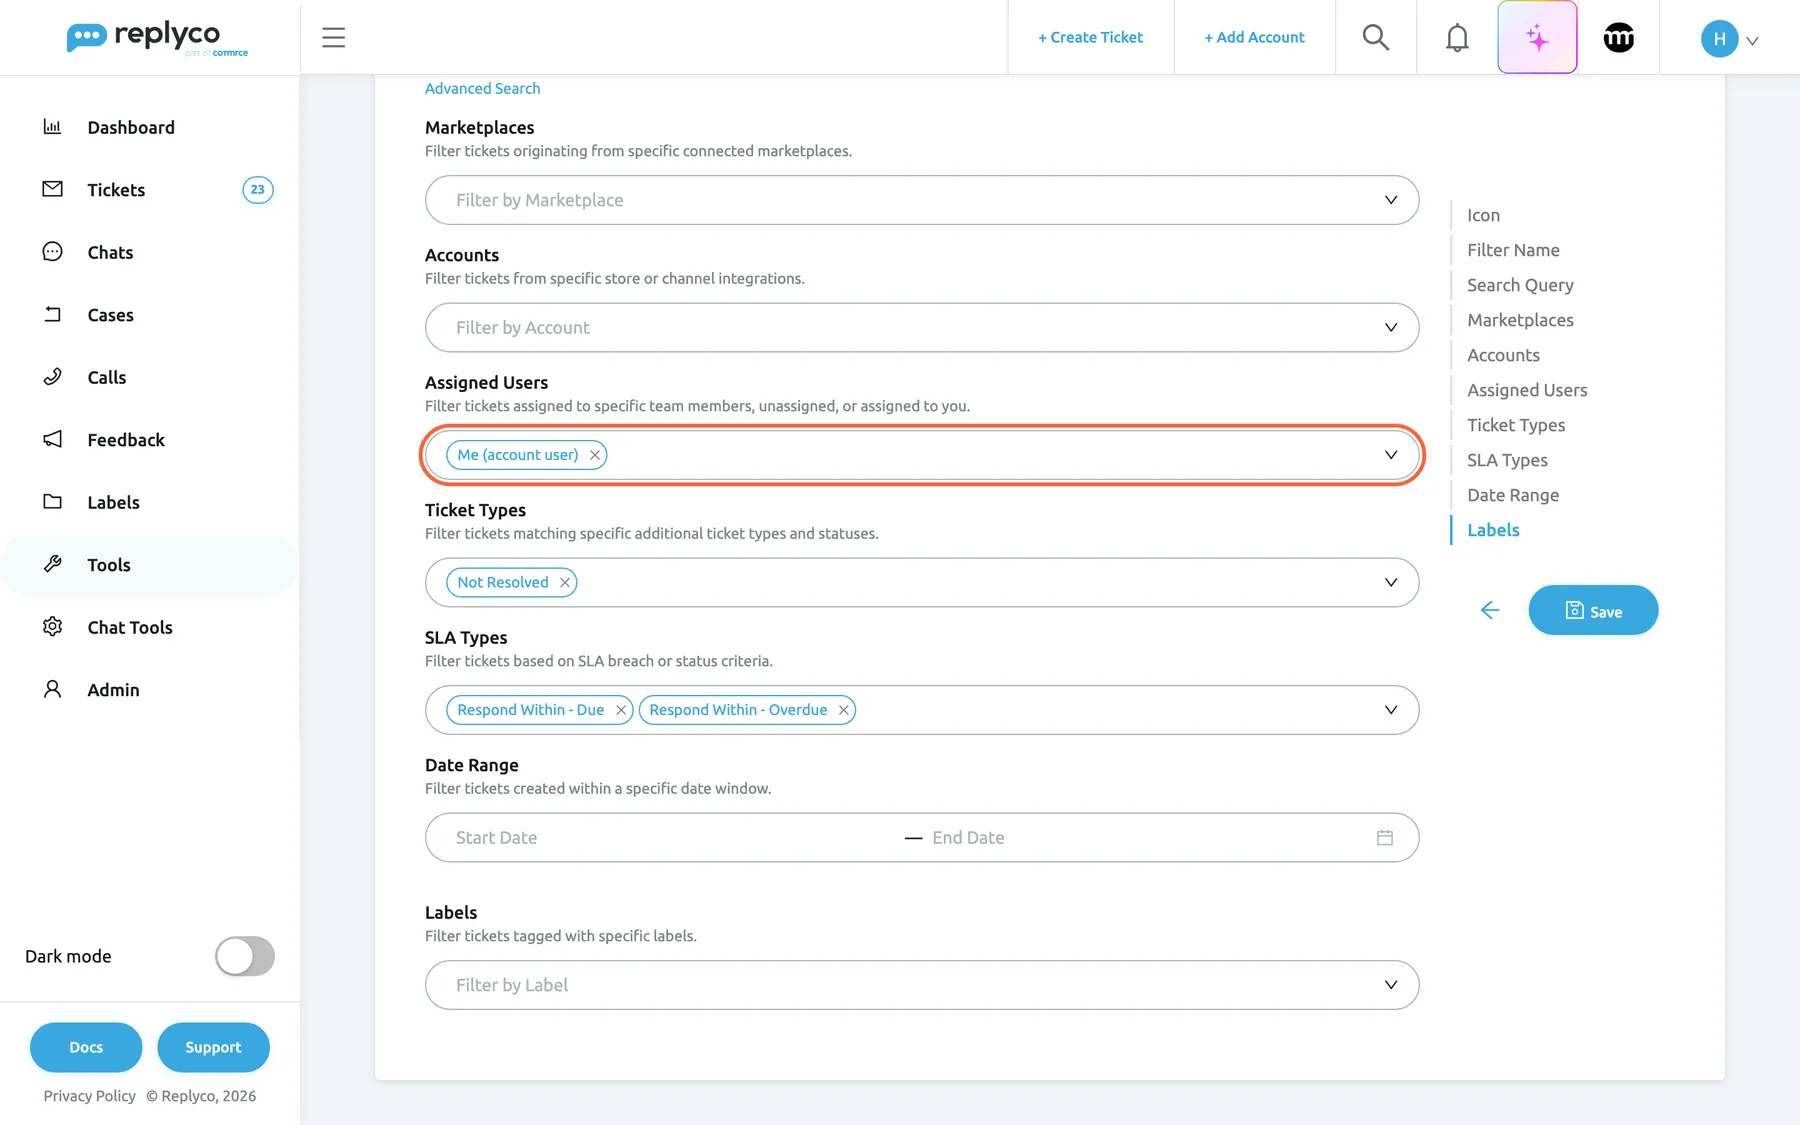
What this screenshot shows
- Screen
- Edit Smart Filter (/smart-filters)
- Highlighted
- “”, form, Me (account user). limits the filter to tickets assigned to whoever looks at it
- Also visible
- Ticket Types: Not Resolved; SLA Types: Respond Within - Due, Respond Within - Overdue; Date Range empty; Labels empty; table of contents with Back and Save
- Purpose
- the conditions of a filter
| Section | What it matches | Good to know |
|---|---|---|
| Search Query | Tickets whose customer, subject, message text, order or tracking number contains the words; with Advanced Search, conditions per field (All, Customer, Order, Thread, Messages) | Conditions in one box must all match (AND); boxes are alternatives (OR). Up to 10 conditions. Hide Advanced Search returns to the search box |
| Marketplaces | Tickets from the chosen marketplaces, shops, mailboxes or messengers | |
| Accounts | Tickets of the chosen connected accounts | |
| Assigned Users | Tickets assigned to any of the chosen colleagues; Me (account user) is whoever looks at the card, Unassigned is nobody | Me (account user) turns one filter into everyone’s personal queue |
| Ticket Types | New, Starred, Not Resolved, Resolved, Unread, Only Sent Messages, With processing messages or With failed messages | Without Not Resolved, resolved tickets are included |
| SLA Types | Open tickets by deadline state: Respond Within - Due, Respond Within - Overdue, Respond Within - Responded, Respond Within - No priority, Resolve Within - Due, Resolve Within - Overdue, Resolve Within - No priority | Only tickets with a priority have deadlines; see Ticket priorities and SLA |
| Date Range | Tickets created on or between the two days, both days included | Fixed calendar days, not a rolling period such as the last seven days |
| Labels | Tickets with any of the chosen labels, or with none when you pick No Label | File the card by label, or collect tickets nobody has labelled yet |
Language and AI categories are not part of a Smart Filter. What each filter does on the ticket list is explained in Ticket lists.
Everyone sees only their own tickets in a filter. A card counts and opens only the tickets the viewer may see, by their accounts and labels, so the same filter can show different numbers to different colleagues. See Smart Filters.
Edit a Smart Filter
Section titled “Edit a Smart Filter”-
Select the filter’s card, then Edit in the panel; or select the pencil icon on the card.
The form Edit Smart Filter opens with the description Update criteria, visual icon, and matching rules for this smart filter view. and every section filled in.
-
Change the name, the icon or the conditions. The table of contents on the right jumps to a section.
-
Select Save. While there are unsaved changes, Save pulses.
A change applies to everyone who has the filter, the next time their Smart Filters screen loads. Replyco writes the change to the filter’s history.
Copy a Smart Filter
Section titled “Copy a Smart Filter”Select the copy icon on a card, or Copy in the panel. The form opens with every condition and the name followed by (copy). Change what you need and select Save: a new filter is created, added at the end of the list and given to every user at that moment, like any new filter. The original stays as it was.
Put the filters in order
Section titled “Put the filters in order”Drag a card by its handle ☰ and drop it where you want it. Replyco saves the order at once. The cards on TicketsSmart Filters follow this order for every user; nobody can sort their own cards differently. Reordering is not written to the history.
Delete a Smart Filter
Section titled “Delete a Smart Filter”-
Select the bin icon on the card, or Delete in the panel.
-
Confirm the question with Yes.
The filter disappears from this list and from the Smart Filters screen of every user; an uploaded icon is deleted with it. Tickets are not affected. A deleted filter cannot be restored. Deleting one of the six filters Replyco creates for a new company also means that colleagues invited later no longer get it.
See a filter’s history
Section titled “See a filter’s history”Select the clock icon on a card. The panel lists who created the filter and each later change, with the date and time; select a change to see what it was, as Property … was changed from … to …. Close or the cross closes the history.
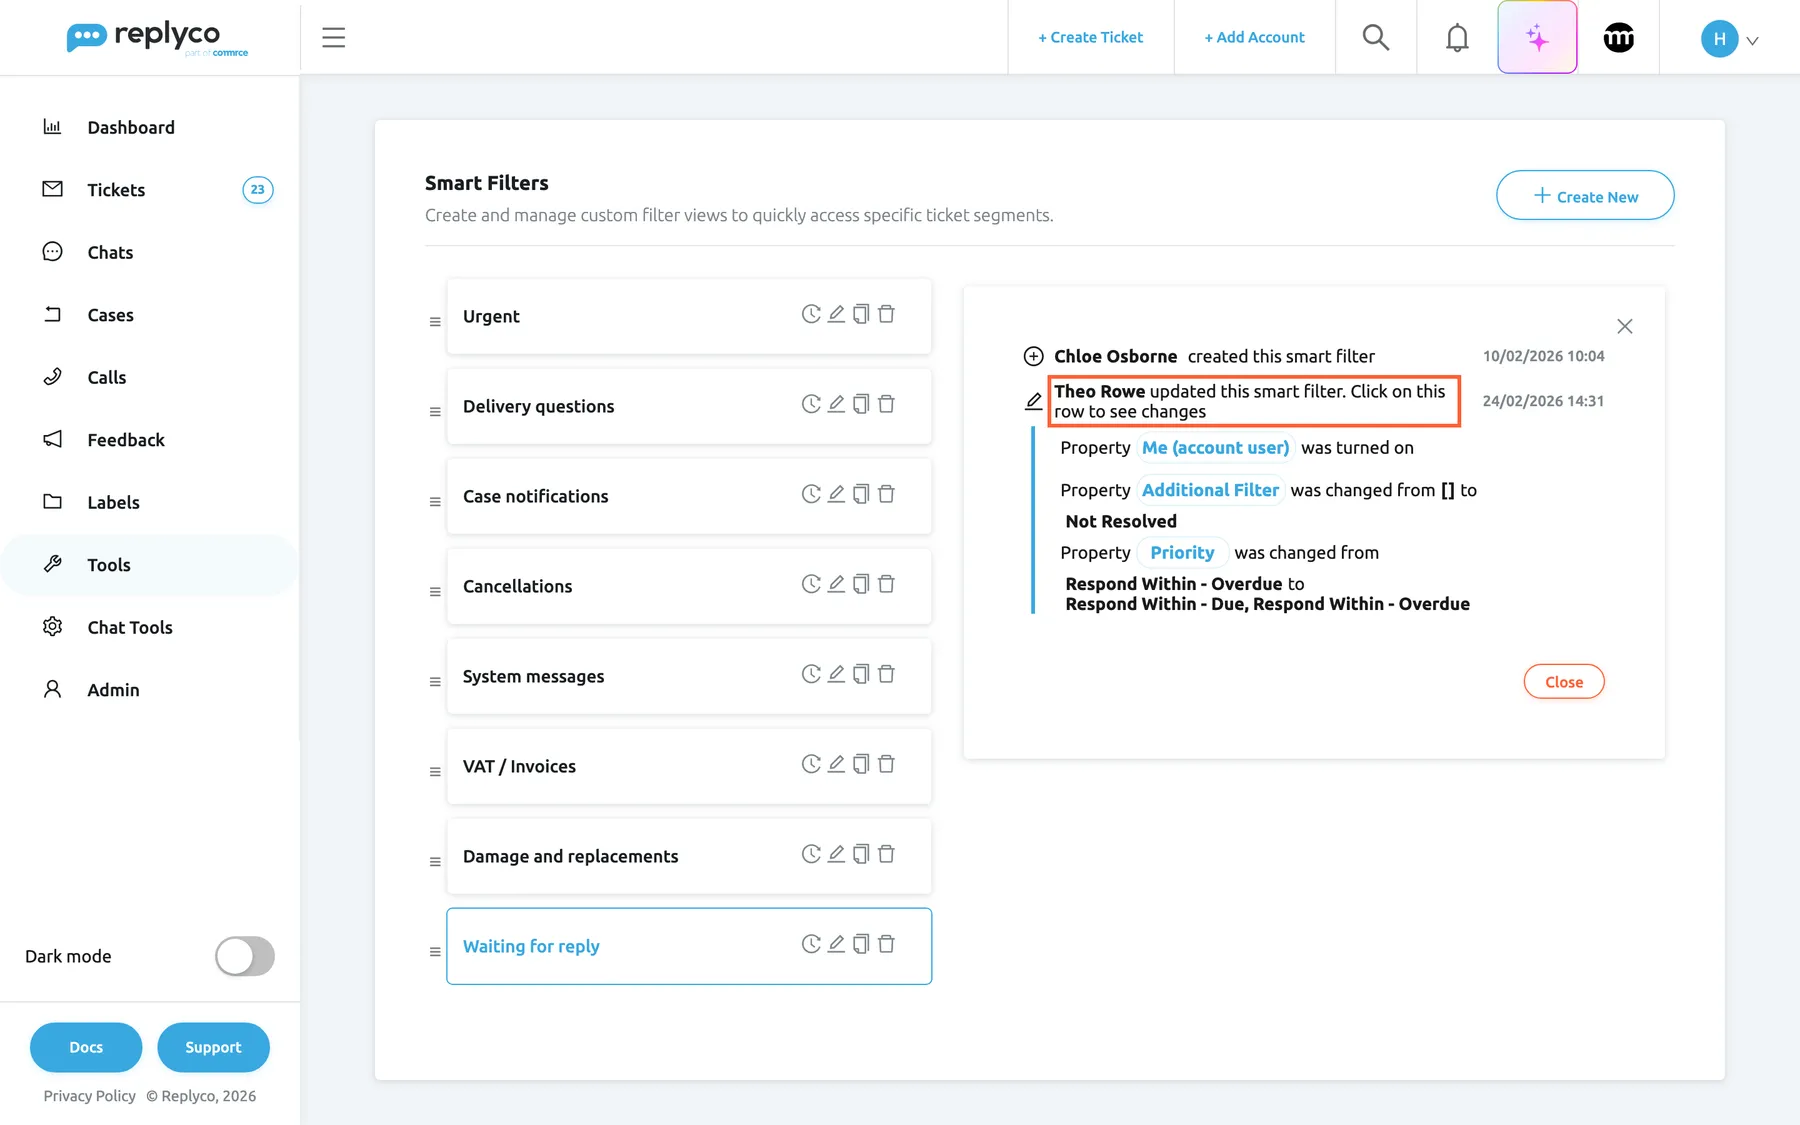
What this screenshot shows
- Screen
- Smart Filters (/smart-filters)
- Highlighted
- “”, history-right, expanded. shows the conditions that changed, old and new
- Also visible
- created row by Chloe Osborne; updated row by Theo Rowe with dates; changed conditions; Close
- Purpose
- audit who changed a filter
The history records creation and every save of the form. It shows the old and new values of the name, the search, the marketplaces, the accounts, Me (account user), Unassigned, Additional Filter, Priority, the dates and the labels. Reordering is not recorded, and a deleted filter’s history is no longer reachable.
Decide who gets a filter
Section titled “Decide who gets a filter”A Smart Filter appears only for the users it is assigned to:
- A new or copied filter goes to every user who exists when it is saved.
- A colleague invited later starts with the six filters Replyco creates for a new company, as far as they still exist, and none of the filters your team added.
- An admin changes this per user:
-
Open AdminUsers, select the user and open Access Rights.
-
Expand the section Smart Filters. It lists every filter of your company with a tick box.
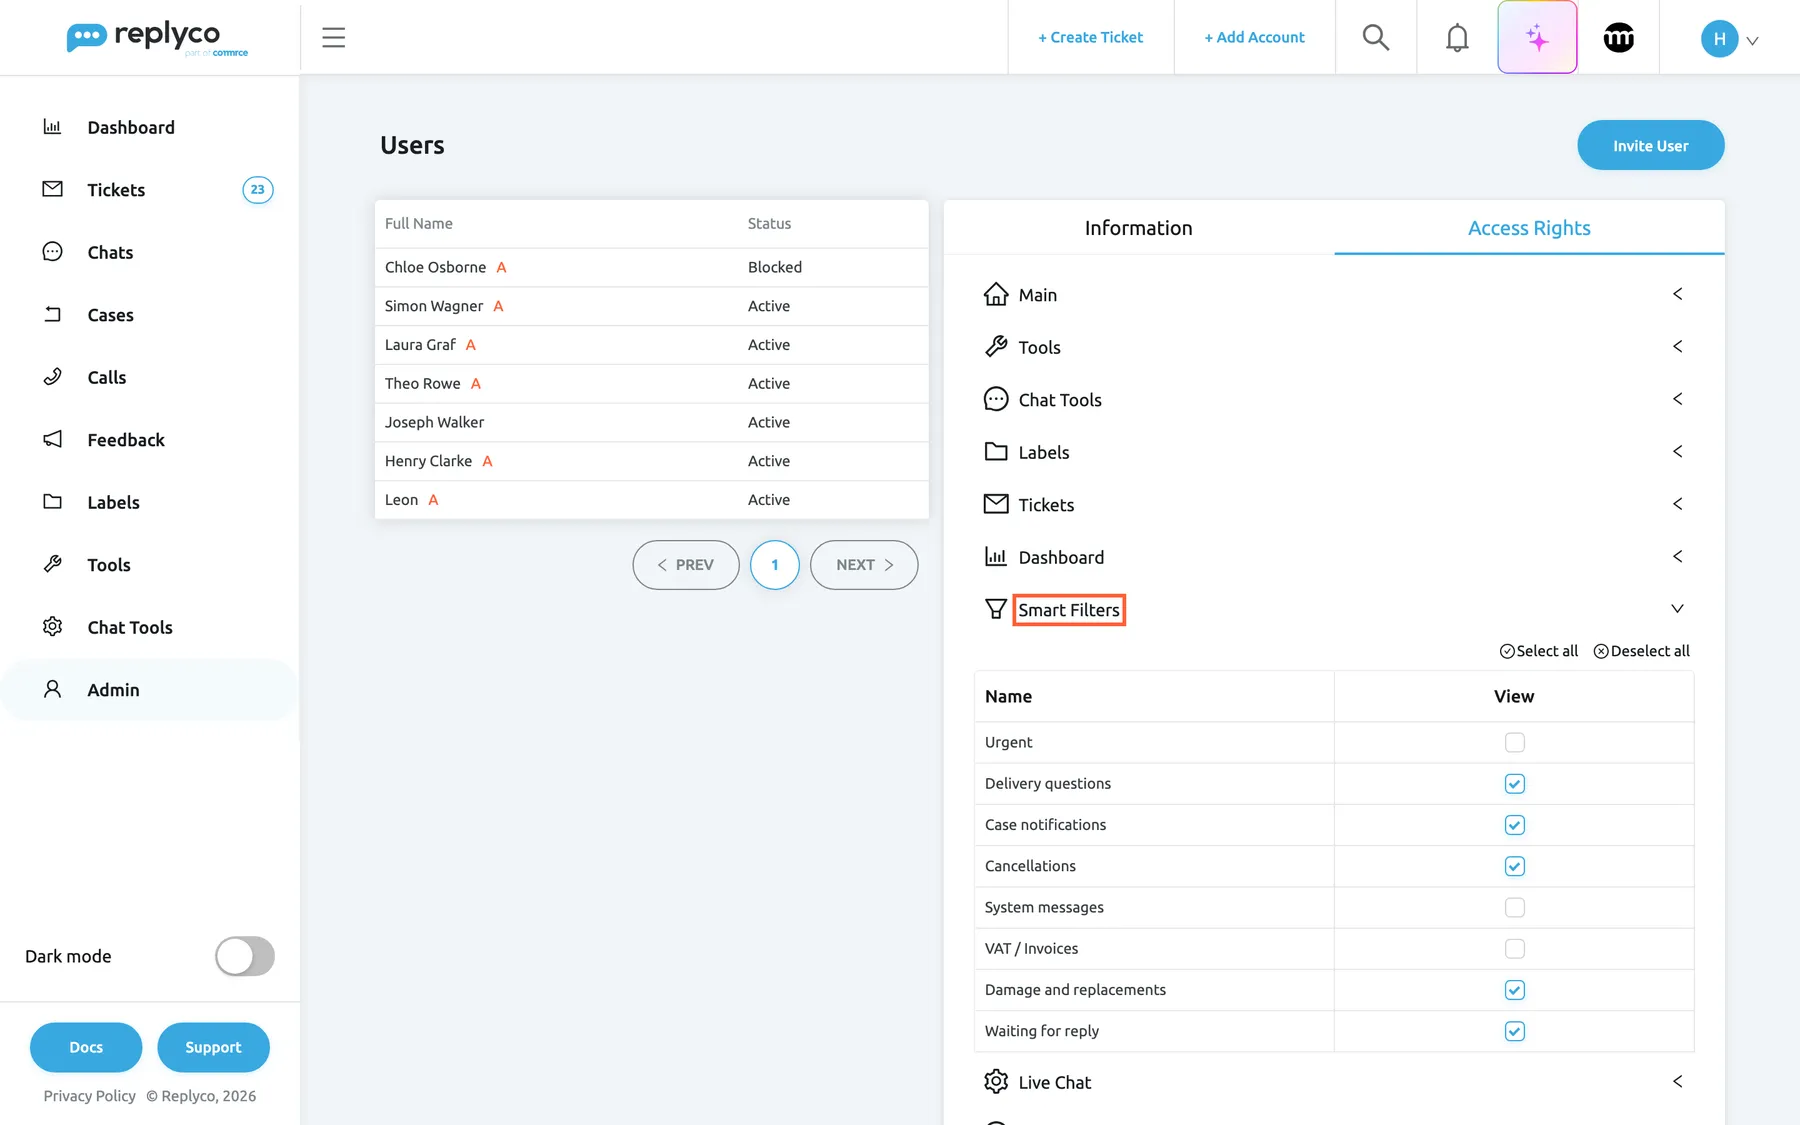
An admin chooses per user which Smart Filters appear on their screen. What this screenshot shows
- Screen
- Access Rights (/users)
- Highlighted
- “”, access-rights-smart-filters, expanded. lists the filters this user gets; ticking and Save change them
- Also visible
- five filters ticked; Urgent, System messages, VAT / Invoices not ticked; Select all and Deselect all
- Purpose
- who a Smart Filter is shared with
-
Tick the filters the user should get and clear the others; Select all and Deselect all do all at once. Select Save.
The user sees the change after reloading Replyco. Getting a filter needs no permission; the Smart Filters permission is only for this management screen.
Example. Simon Wagner works Northwind’s eBay queue. His admin gives him Delivery questions, Case notifications, Cancellations, Damage and replacements and Waiting for reply, and clears Urgent, System messages and VAT / Invoices, which the team lead watches.
Every control, explained
Section titled “Every control, explained”Create New
Section titled “Create New”Top right of ToolsSmart Filters.
Opens the empty form Create Smart Filter in place of the list. It shows a spinner while a new filter is being saved.
Every saved view of your tickets starts here.
Filter card
Section titled “Filter card”One per filter in the list, in the saved order, with a drag handle ☰ on its left.
Shows the filter’s name. Selecting it opens the details panel; the clock opens the history, the pencil the form, the copy icon a copy, and the bin asks for confirmation before deleting. Dragging by the handle changes the order for everyone.
Every action on a filter starts from its card.
Details panel
Section titled “Details panel”On the right after selecting a card; the cross closes it.
The icon and every condition that is set, then Delete (asks Are you sure you want to delete this item?), Copy and Edit.
Check what a filter finds before you change it.
Back and Save
Section titled “Back and Save”Above the form; when you scroll down, the same two appear in the side column under the table of contents.
Save checks and saves the filter and returns to the list; it pulses while an existing filter has unsaved changes. Back returns to the list without saving.
The form is long; both stay within reach while you work down it.
Table of contents
Section titled “Table of contents”On the right of the form.
Lists the ten sections, from Icon to Labels, and marks the one in view. Selecting an entry scrolls to that section.
Jump straight to the condition you want to change.
First section of the form, with the description Choose an icon or upload a custom image for this smart filter.
With the switch on Default Icon, pick one of Replyco’s icons; a new filter starts with an exclamation mark in a circle. With Custom Icon, upload an image, crop it, and Replyco stores it as a PNG of at most 512 × 512 pixels; Delete picture removes it after Are you sure?.
Icons make the cards on the Smart Filters screen easy to tell apart.
Filter Name
Section titled “Filter Name”Second section, with the description Enter a descriptive name for this smart filter view.
The name on the card, required, up to 150 characters. Shown as typed in every language; not translated.
Name the filter after the work it holds, such as Waiting for reply, so every agent knows which card is theirs.
Condition sections
Section titled “Condition sections”Search Query, Marketplaces, Accounts, Assigned Users, Ticket Types, SLA Types, Date Range and Labels, in that order.
Each section offers the same choices as the filter of the same kind on the ticket lists, and each is optional; at least one must be set. What each one matches is in the table under The conditions.
Together they describe a queue your team would otherwise rebuild by hand every day.
History panel
Section titled “History panel”On the right after the clock icon on a card.
One row for the creation and one per saved change, with the colleague’s name, date and time; selecting a change row shows the old and new values. Close closes it.
When a card suddenly shows different tickets, the history tells you who changed the filter and how.
Who sees what
Section titled “Who sees what”| Part | What decides whether you see it or can use it |
|---|---|
| Smart Filters in Tools | The Smart Filter feature (every plan) and the Smart Filters permission, with View or Edit |
| Creating, editing, copying, reordering and deleting | The Smart Filters permission with Edit |
| The list of filters on this screen | Everyone who can open the screen sees every filter of the company |
| The section Smart Filters on Access Rights | Every plan; on AdminUsers |
| A filter’s card on TicketsSmart Filters | The filter being assigned to your user; no permission needed |
During a trial every feature is on. See What each plan includes.
What you need to know
Section titled “What you need to know”| Topic | Fact |
|---|---|
| Plans | Every plan, and every feature during a trial; companies on an older plan may not have it |
| Scope | Filters belong to the company; each user gets the filters assigned to them |
| New and copied filters | Added at the end and given to every current user |
| New users | Get only the six filters Replyco creates for a new company, if they still exist |
| Order | One order for everyone, set by dragging here |
| Matching | Every filled section must match; any value within a section |
| Assigned to me | Me (account user) means whoever looks at the card |
| Date range | Creation date, fixed days, both days included |
| What a user sees | Only tickets of their accounts and labels |
| Name | Required, up to 150 characters, not translated |
| History | Creation and saved changes; reordering is not recorded |
| Deleting | Removes the filter for everyone; tickets are not affected; no undo |
Frequently asked questions
Section titled “Frequently asked questions”Creating and editing
Section titled “Creating and editing”How do I create a Smart Filter?
Section titled “How do I create a Smart Filter?”Open ToolsSmart Filters, select Create New, give the filter a name and an icon, set at least one condition and select Save. The filter is added at the end of the list and appears as a card for every user of your company after they reload Replyco.
Why does Replyco say I didn’t enter any filter options?
Section titled “Why does Replyco say I didn’t enter any filter options?”A Smart Filter needs at least one condition. You didn't enter any filter options. means every section of the form on ToolsSmart Filters is empty. Set a search, a marketplace, an account, an assignee, a ticket type, a deadline state, a date or a label, then select Save.
Can one filter show each agent their own tickets?
Section titled “Can one filter show each agent their own tickets?”Yes. Choose Me (account user) under Assigned Users. It stands for whoever looks at the card, so the same filter counts and opens each colleague’s own tickets. Combine it with Not Resolved under Ticket Types to leave out resolved tickets.
Does a change to a filter affect my colleagues?
Section titled “Does a change to a filter affect my colleagues?”Yes. A Smart Filter is shared: saving a change on ToolsSmart Filters changes it for every user who has it, the next time their Smart Filters screen loads. To experiment without affecting others, copy the filter, change the copy and clear it on your colleagues’ Access Rights.
Why does the date range not move with time?
Section titled “Why does the date range not move with time?”The dates under Date Range are fixed calendar days, stored as you picked them, and match the day each ticket was created. A filter for 1 to 31 March keeps showing March tickets in April. Edit the filter when you need a new period, or leave the date empty.
Sharing and order
Section titled “Sharing and order”Who gets a new Smart Filter?
Section titled “Who gets a new Smart Filter?”Every user of your company at the moment you save it, including users whose filters an admin limited before. Colleagues invited later get only the six filters Replyco creates for a new company. An admin changes who has which filter on AdminUsers, in the Smart Filters section of Access Rights.
How do I give a colleague a filter they are missing?
Section titled “How do I give a colleague a filter they are missing?”Open AdminUsers, select the colleague, open Access Rights, expand Smart Filters, tick the filter and select Save. The card appears on their Smart Filters screen after they reload Replyco.
Can each agent order the cards differently?
Section titled “Can each agent order the cards differently?”No. The order is set by dragging the cards on ToolsSmart Filters and is the same for every user. An agent who has fewer filters sees the ones assigned to them in that same order.
Why is a filter listed here missing from my own screen?
Section titled “Why is a filter listed here missing from my own screen?”This screen lists every filter of your company, but the cards on TicketsSmart Filters show only the filters assigned to your user. Ask an admin to tick it on your Access Rights in AdminUsers, then reload Replyco.
Deleting and history
Section titled “Deleting and history”What happens when I delete a Smart Filter?
Section titled “What happens when I delete a Smart Filter?”It disappears from this list and from the Smart Filters screen of every user, and an uploaded icon is deleted with it. The tickets it found are not changed. There is no undo; create the filter again if you need it back.
How do I find out who changed a filter?
Section titled “How do I find out who changed a filter?”Select the clock icon on the filter’s card on ToolsSmart Filters. The history lists who created the filter and who saved each change, with date and time; select a change to see the old and new values. Reordering is not recorded.
Troubleshooting
Section titled “Troubleshooting”| Symptom | What to check |
|---|---|
| Smart Filters is missing from Tools | Your user has no Smart Filters permission, or your company is on an older plan without the feature; see What each plan includes |
| You don't have enough rights after Save, dragging or deleting | Your permission is View only; changes need Edit. The form has closed, so enter the change again afterwards |
| You didn't enter any filter options. | No condition is set; set at least one |
| Please enter a name. | The name is empty |
| Please enter values into search fields. | A condition in Advanced Search is empty; fill it or remove it |
| A colleague does not see a new filter | They have not reloaded Replyco, or an admin cleared it on their Access Rights |
| A colleague invited later lacks your team’s filters | New users get only the six default filters; tick the others on their Access Rights |
| A card shows a different number for a colleague | They see only tickets of their accounts and labels, and Me (account user) means them |
| A card shows Error | The filter’s search could not be counted; check the search here and see Smart Filters |
| Changes were lost after Back | Back returns without saving; select Save first |