

Live Chat
The Live Chat screen is where you set up the chat window on your website. Each widget is one chat window: its colours, its texts, the hours it counts as open, what it asks visitors, and the code you paste into your website. Visitors’ conversations then arrive under Chats, where your team answers them. Open the screen from Chat ToolsLive Chat in the sidebar. It is used by whoever looks after the website and the chat setup; agents who only answer chats never need it.
What you can do here
Section titled “What you can do here”- See your widgets. The screen lists one row per widget, named by its chat title, so a shop with two websites can run two chat windows with different looks and hours. The screen at a glance
- Create a widget. Create New opens a form that starts with Replyco’s blue theme, the right-hand corner and your company working time; you write four short texts and save. Create a widget · Live chat widget
- Match the widget to your shop. Pick the main and background colours and the corner of the page the chat button sits in. Change how a widget looks
- Write what visitors read. The chat title, a greeting, and one line for open hours and one for closed hours. Write the widget’s texts
- Decide when the widget counts as open. Use your company working time, or give the widget its own days, hours and holidays. Set the widget’s working hours · Working time
- Choose what the widget does on the website. Six switches decide whether it hides outside working hours, greets visitors, plays a sound, shows on phones, asks for privacy consent and records the page a visitor wrote from. Choose the widget’s preferences
- Switch a widget off, or pass messages to your own system. Active takes the widget off every website at once; Webhook sends each visitor message to an address you choose. Switch a widget off or connect a webhook
- Install the widget. Copy the widget’s own code and paste it into your website. Install a widget on your website · Live chat widget
- See who changed a widget. Change Logs lists who created the widget and every later change with the old and new value. See who changed a widget
- Delete a widget. One confirmation, and the chat window is gone from every website that loads it. Delete a widget
The screen at a glance
Section titled “The screen at a glance”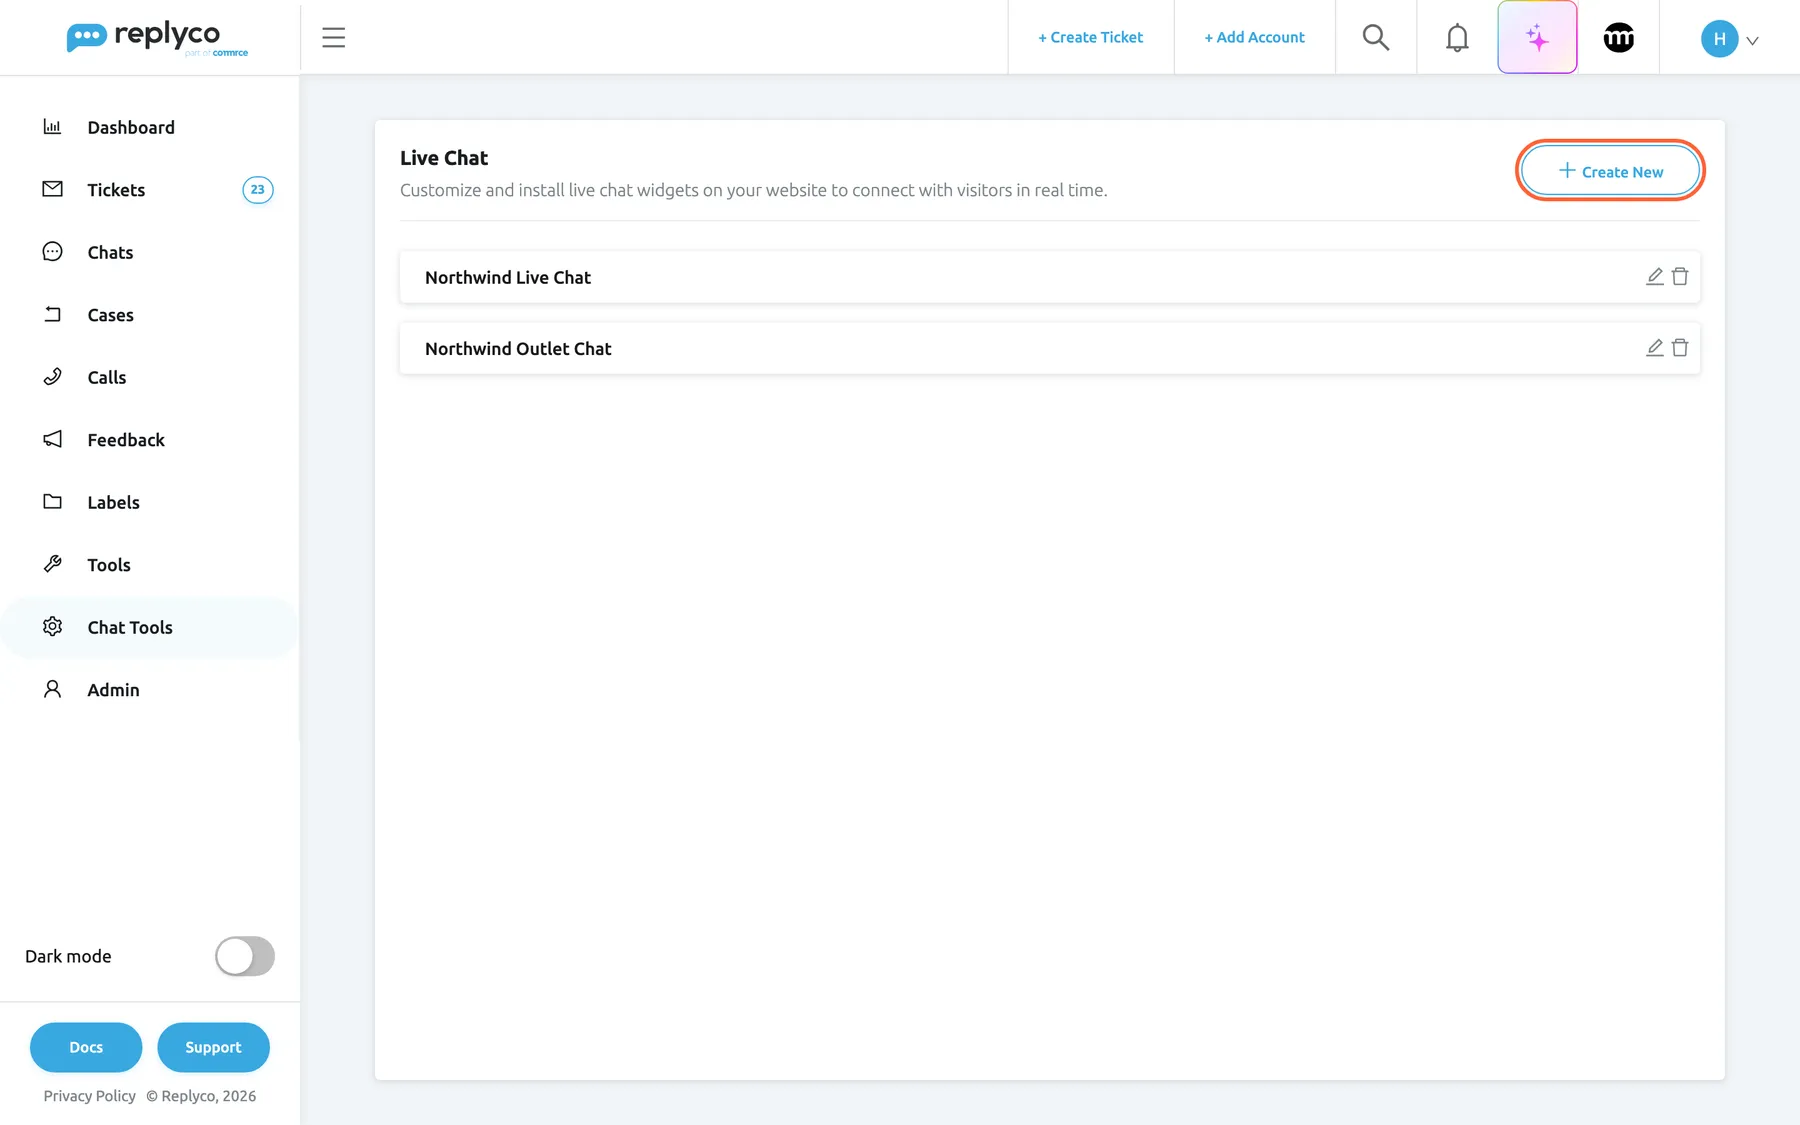
What this screenshot shows
- Screen
- Live Chat (/live-chat-settings)
- Highlighted
- button “Create New”, panel-header-right, enabled. opens an empty widget form below the list
- Also visible
- heading Live Chat with its description; 2 widget rows: Northwind Live Chat, Northwind Outlet Chat; pencil and bin icon on each row; Sidebar: Chat Tools selected
- Purpose
- the screen as it opens
| Region | What it shows | What you do there |
|---|---|---|
| Header | Live Chat, the line Customize and install live chat widgets on your website to connect with visitors in real time. and Create New | Start a new widget |
| Widget rows | One row per widget with its chat title, a pencil and a bin | Open a widget, delete it |
| Editor, below the rows | The selected widget’s tabs: Appearance, Widget Settings, Installation and Change Logs; a new widget has only the first two | Change and save the widget, copy its code, read its history |
Only one widget is open at a time. The list shows No data... when your company has no widget yet.
Create a widget
Section titled “Create a widget”-
Open Chat ToolsLive Chat and select Create New. An empty form opens below the list on the Appearance tab.
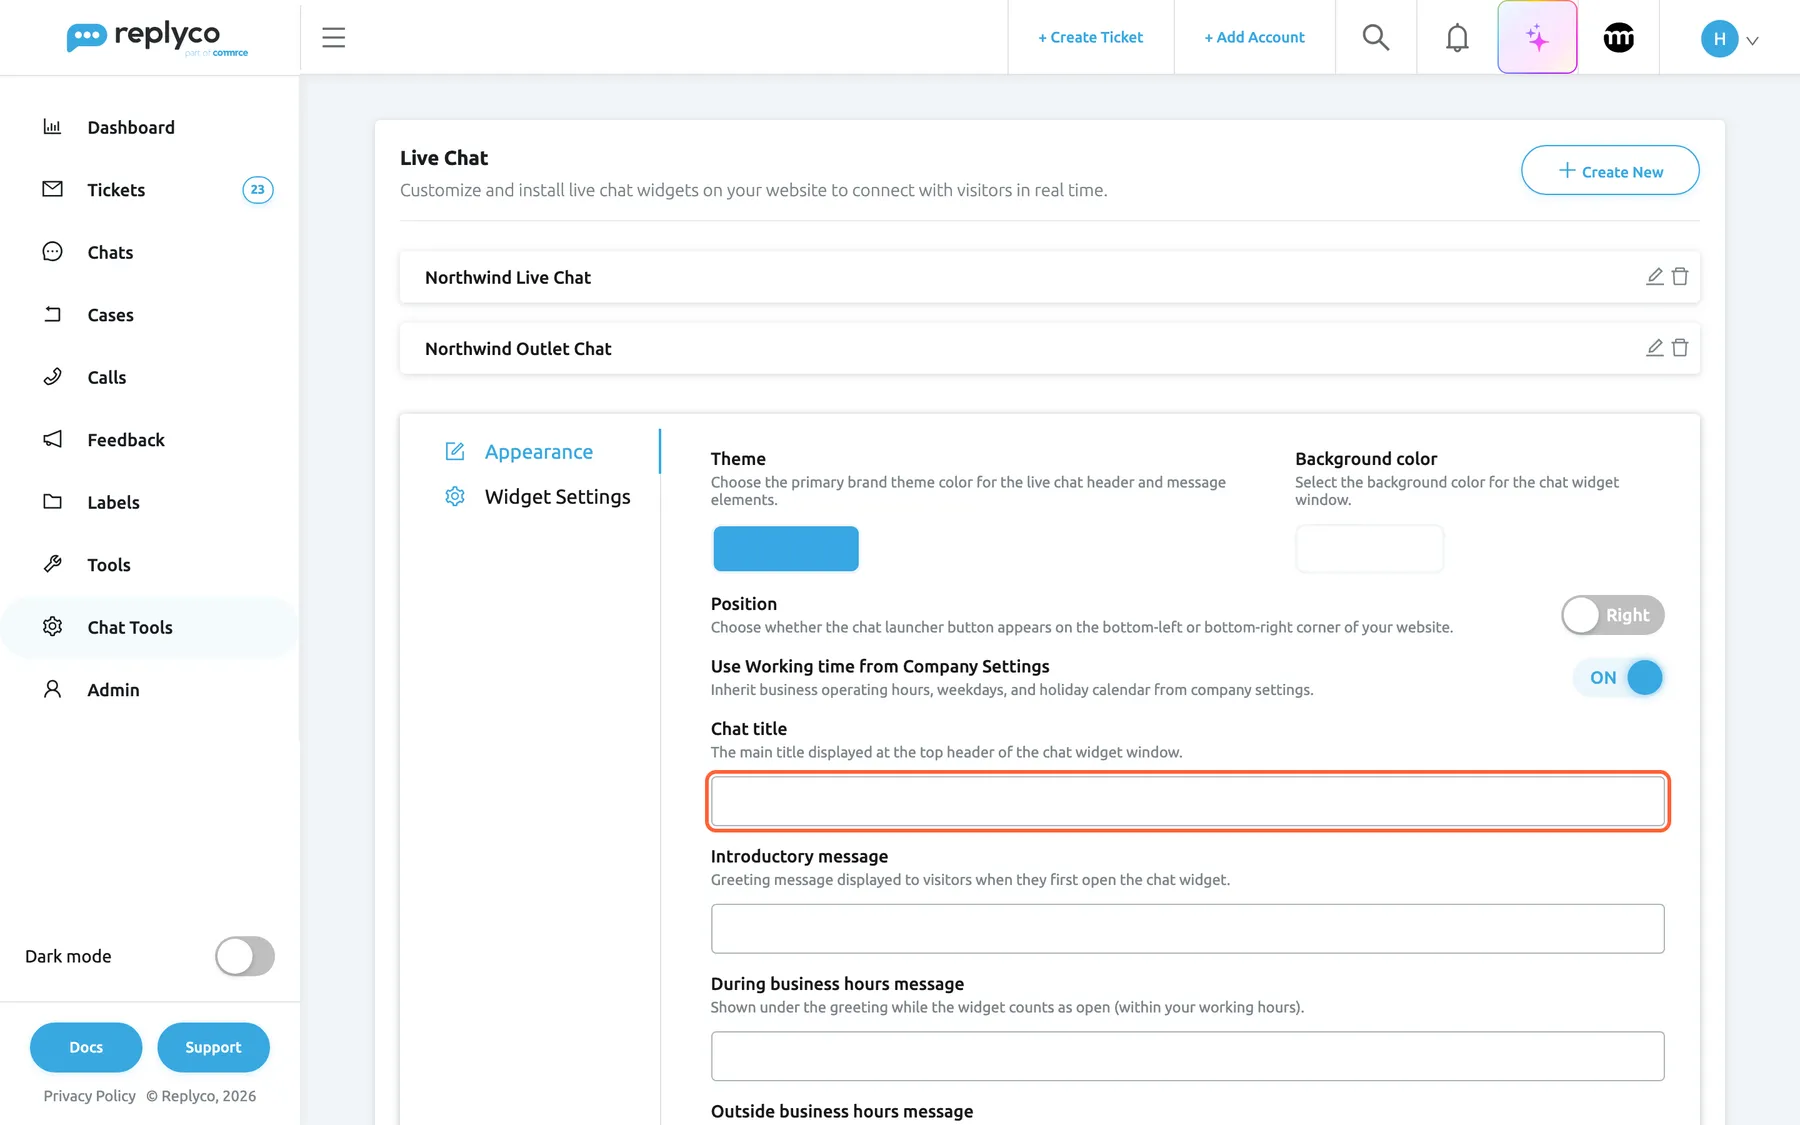
A new widget starts with Replyco's blue theme, the right-hand position and your company working time; only the texts are empty. What this screenshot shows
- Screen
- Live Chat (/live-chat-settings)
- Highlighted
- textbox “Chat title”, editor-appearance-tab, empty. names the widget
- Also visible
- tabs Appearance and Widget Settings (no Installation or Change Logs before saving); Theme #39a7e3, Background color white; Position Right; Use Working time from Company Settings ON; empty text fields
- Purpose
- create a widget
-
Fill in Chat title, Introductory message, During business hours message and Outside business hours message. All four are required.
-
Change the colours, the position, the working time and the switches if the defaults do not suit you. The defaults are listed in Every control, explained.
-
Select Save. Replyco shows Success, closes the form and adds the widget to the list. Open it again to find the Installation tab with its code.
A new widget is switched on (Active) from the moment you save it, but it appears only on websites where you have pasted its code. Every user of your company at that moment gets access to the new widget’s chats; colleagues you invite later need it ticked for them in AdminUsers, see Users.
If a text is empty, or you switched off Use Working time from Company Settings and left the days or a time empty, Replyco shows All fields must be completed. and saves nothing.
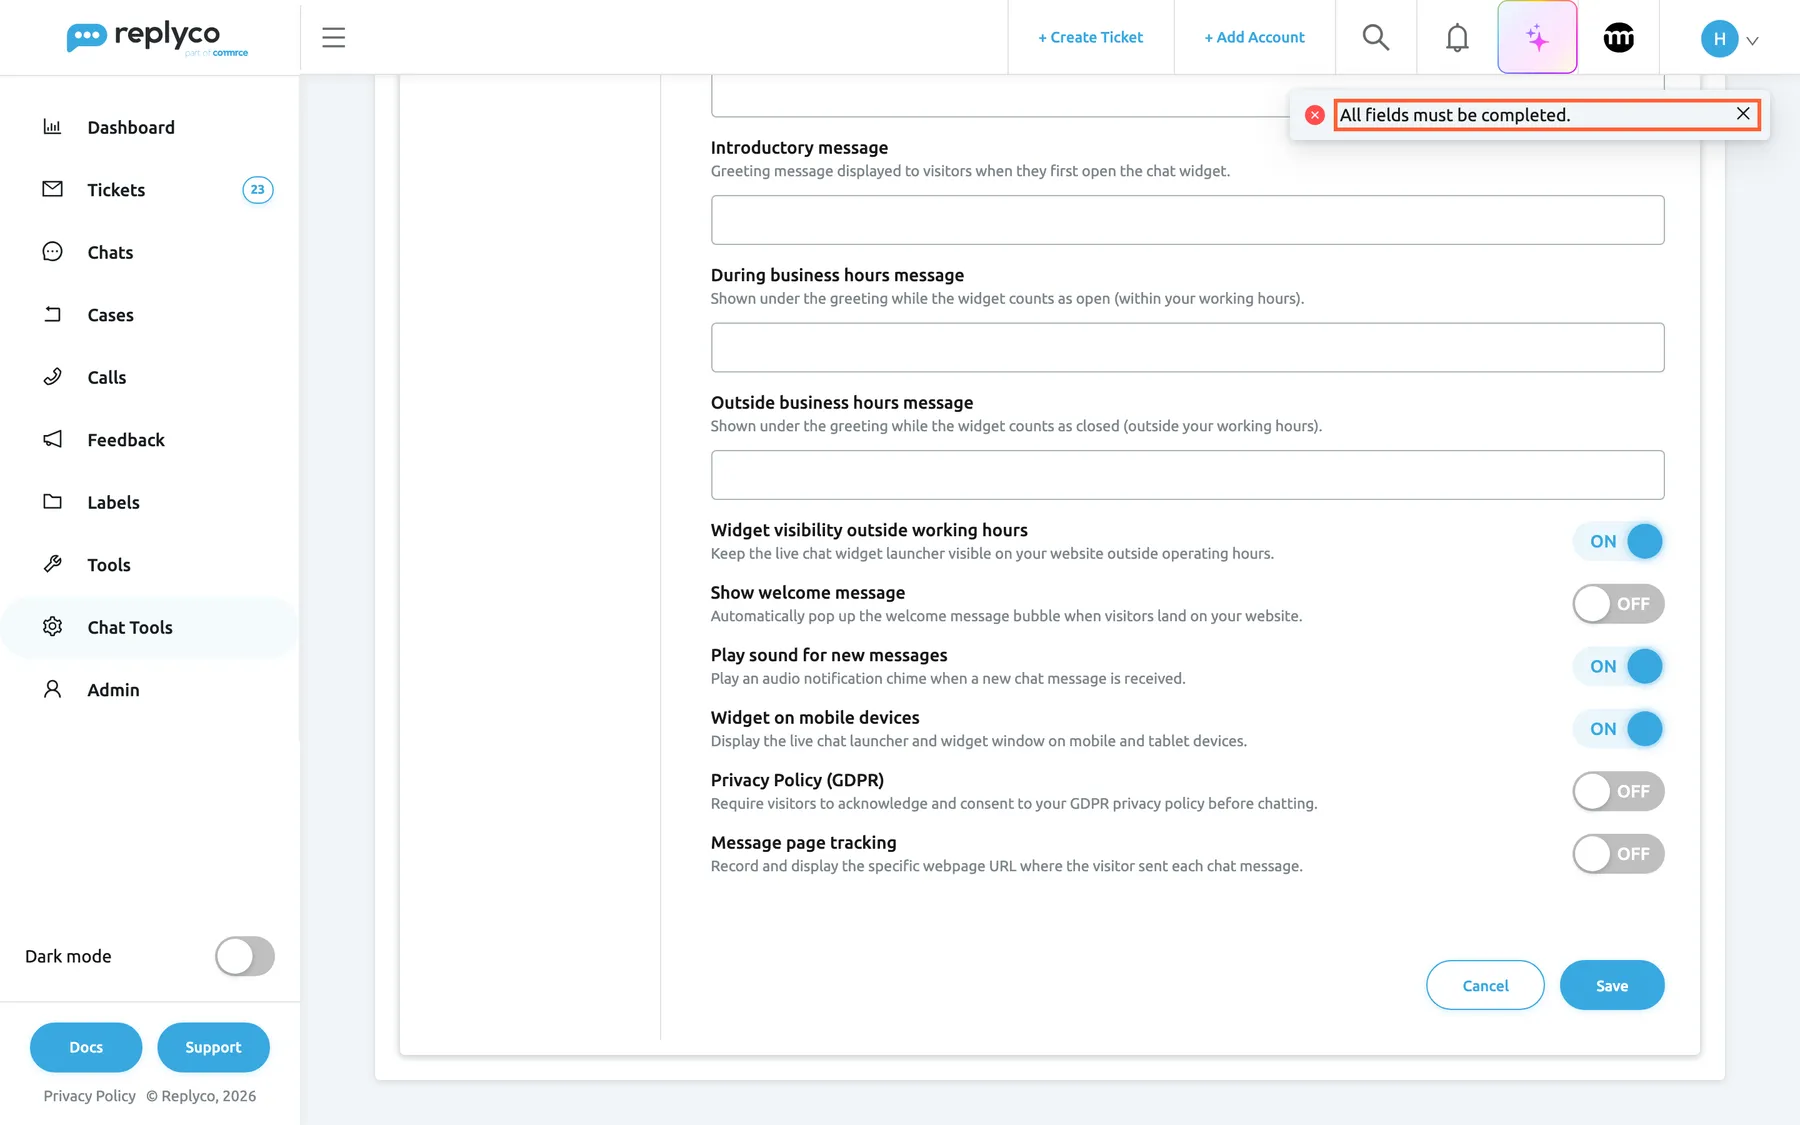
What this screenshot shows
- Screen
- Live Chat (/live-chat-settings)
- Highlighted
- alert “All fields must be completed.”, top-right, shown. explains why nothing was saved
- Also visible
- empty message fields; six preference switches with their defaults; Cancel and Save
- Purpose
- validation when creating a widget
For example, for the Northwind Electronics shop you might create “Northwind Live Chat” with the greeting Hi! How can we help you today?, the open-hours line We usually reply within a few minutes. and the closed-hours line We are offline now and will reply in the morning.
Change how a widget looks
Section titled “Change how a widget looks”- Select the widget’s row, or its pencil. The editor opens on Appearance.
- Select the swatch under Theme or Background color. A colour picker opens: drag in the colour field, type a hex code, or pick one of the preset colours.
- Turn Position to Left or Right for the corner the chat button sits in.
- Select Save.
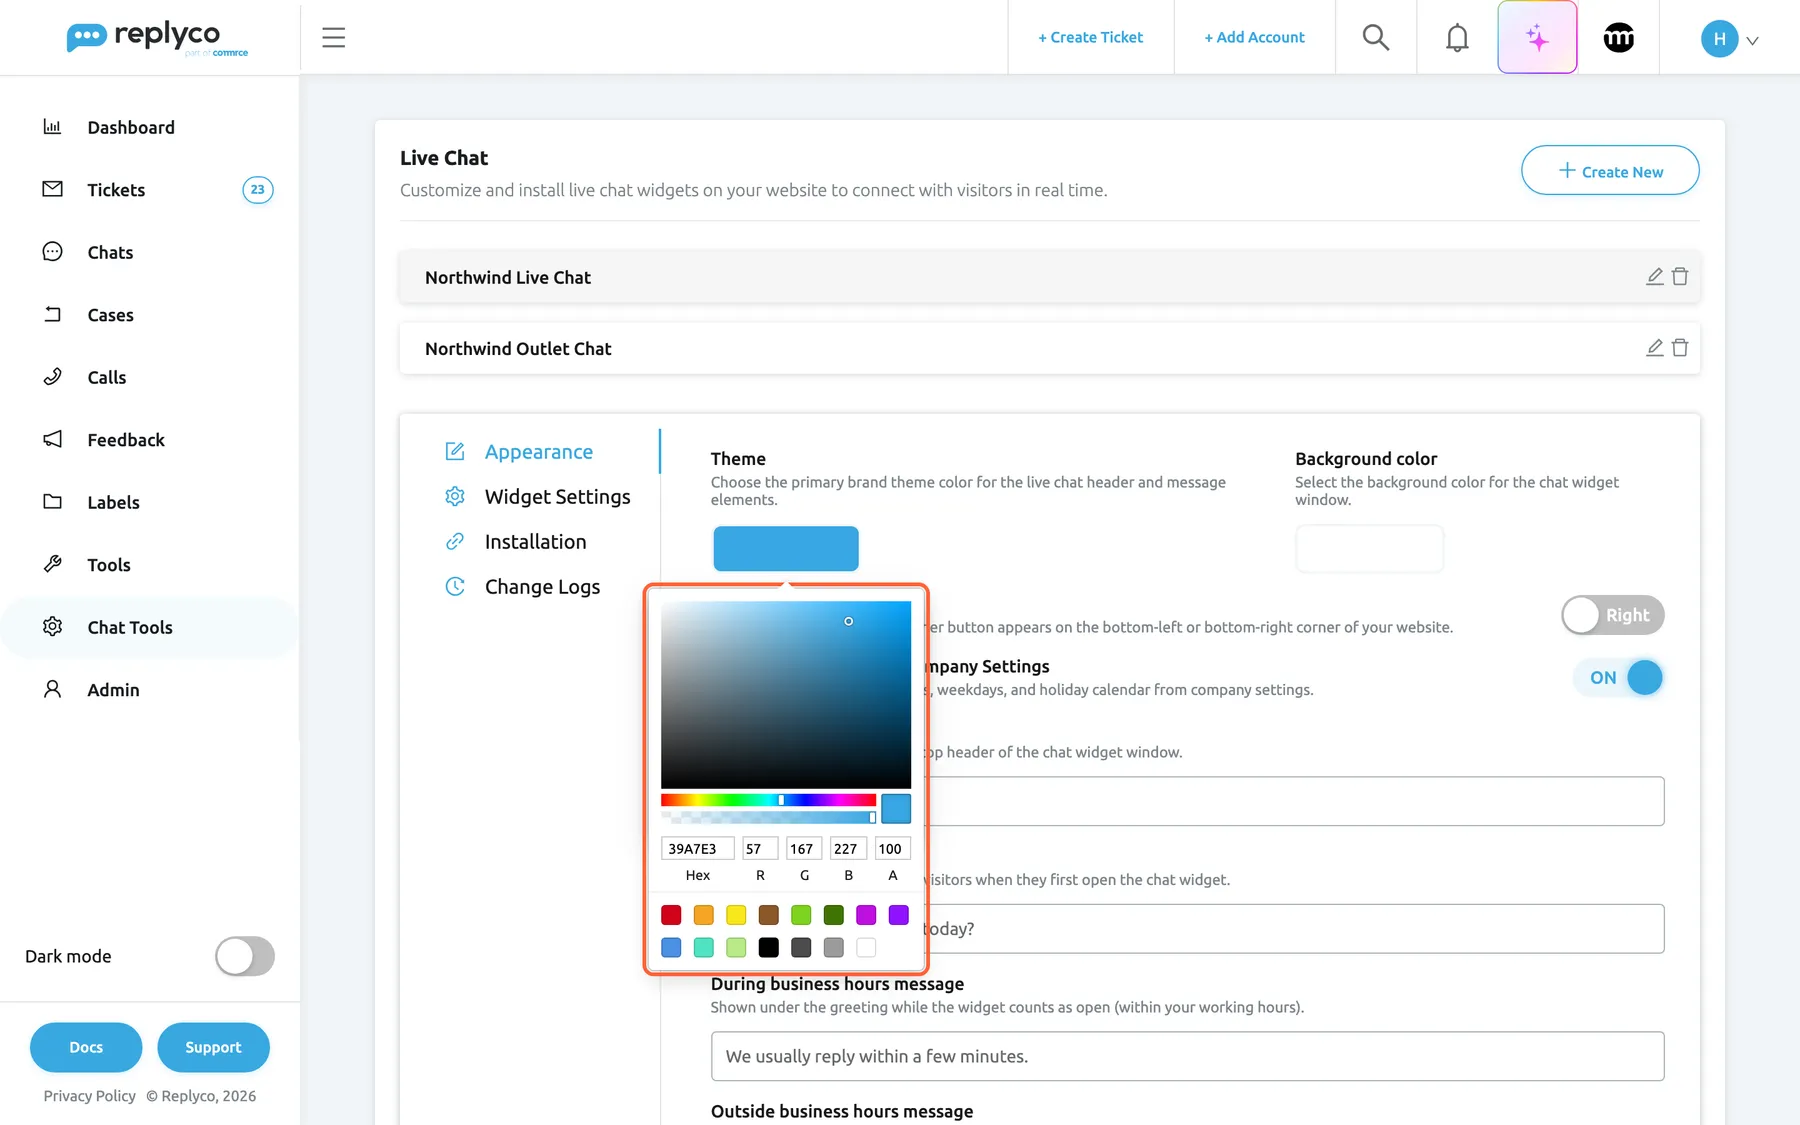
What this screenshot shows
- Screen
- Live Chat (/live-chat-settings)
- Highlighted
- dialog “Theme”, editor-appearance-tab, open. sets the widget's main colour
- Also visible
- Hex 39A7E3, R 57, G 167, B 227, A 100; preset swatches; Background color white; Position Right
- Purpose
- change how a widget looks
Theme colours the chat button, the header of the chat window, the welcome bubble and the widget’s buttons; Background color fills the area behind the messages. A new colour shows in the form at once, but nothing changes on your website until you save, and visitors see it the next time a page loads the widget.
Write the widget’s texts
Section titled “Write the widget’s texts”The four texts sit on the Appearance tab, under the working time. Visitors see them exactly as you type them.
| Text | Where visitors see it | Example |
|---|---|---|
| Chat title | The heading of the chat window before a conversation starts. It is also the widget’s name in Replyco: in the list on this screen, in the chat list under Chats, in Filter by Account and in user access rights | Northwind Live Chat |
| Introductory message | Under the title; at the top of the window during a conversation and in the form that asks for the visitor’s email; in the welcome bubble when Show welcome message is on | Hi! How can we help you today? |
| During business hours message | A line under the greeting while the widget counts as open | We usually reply within a few minutes. |
| Outside business hours message | The same line while the widget counts as closed | We are offline now and will reply in the morning. |
The two hours messages are a line of text in the widget, chosen by the working time; they are not added to the chat. To answer visitors automatically with a chat message, use Auto-responses for chats. Replyco sets no length limit on the texts.
Set the widget’s working hours
Section titled “Set the widget’s working hours”The widget uses working time for two things: which of the two hours messages it shows, and, when Widget visibility outside working hours is off, whether it shows at all.
- On Appearance, leave Use Working time from Company Settings on to use the working days, hours and holidays of your company. They are set in AdminCompany Settings; see Company Settings.
- To give this widget its own hours, turn the switch off. The working time controls open under it.
- Select the days under Working days; selected days are blue. Set the start and end time under Active between. The same hours apply to every selected day.
- (Optional) Add days off under Holidays: pick a date, and it appears as a chip. Select the cross on a chip to remove it.
- Select Save.
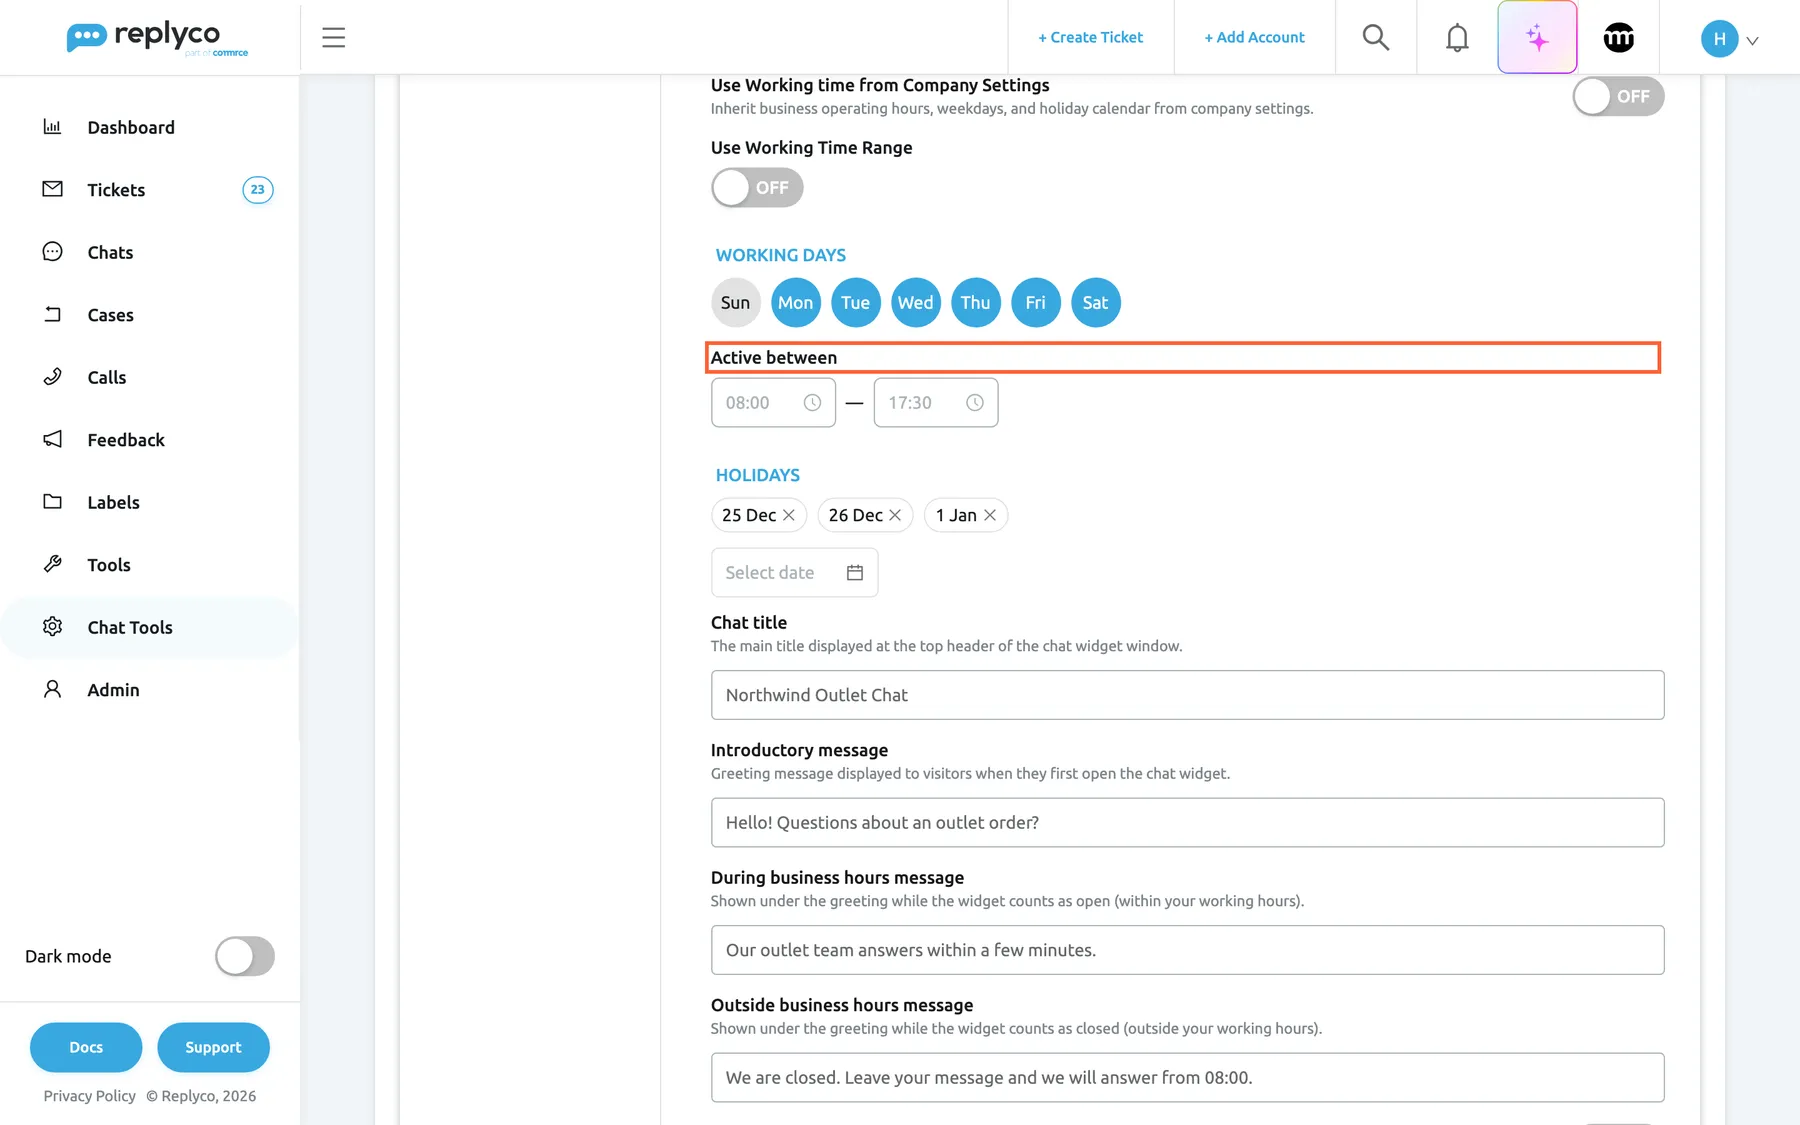
What this screenshot shows
- Screen
- Live Chat (/live-chat-settings)
- Highlighted
- group “Active between”, editor-working-time, 08:00–17:30. sets the daily opening hours of the widget
- Also visible
- Use Working time from Company Settings OFF; Use Working Time Range OFF; Working days Mon–Sat; Holidays 25 Dec, 26 Dec, 1 Jan
- Purpose
- set the widget's own working time
For a team that works one continuous stretch, turn on Use Working Time Range. The days and hours give way to Active From and Active To, each with a day and a time, and the whole stretch counts as open.
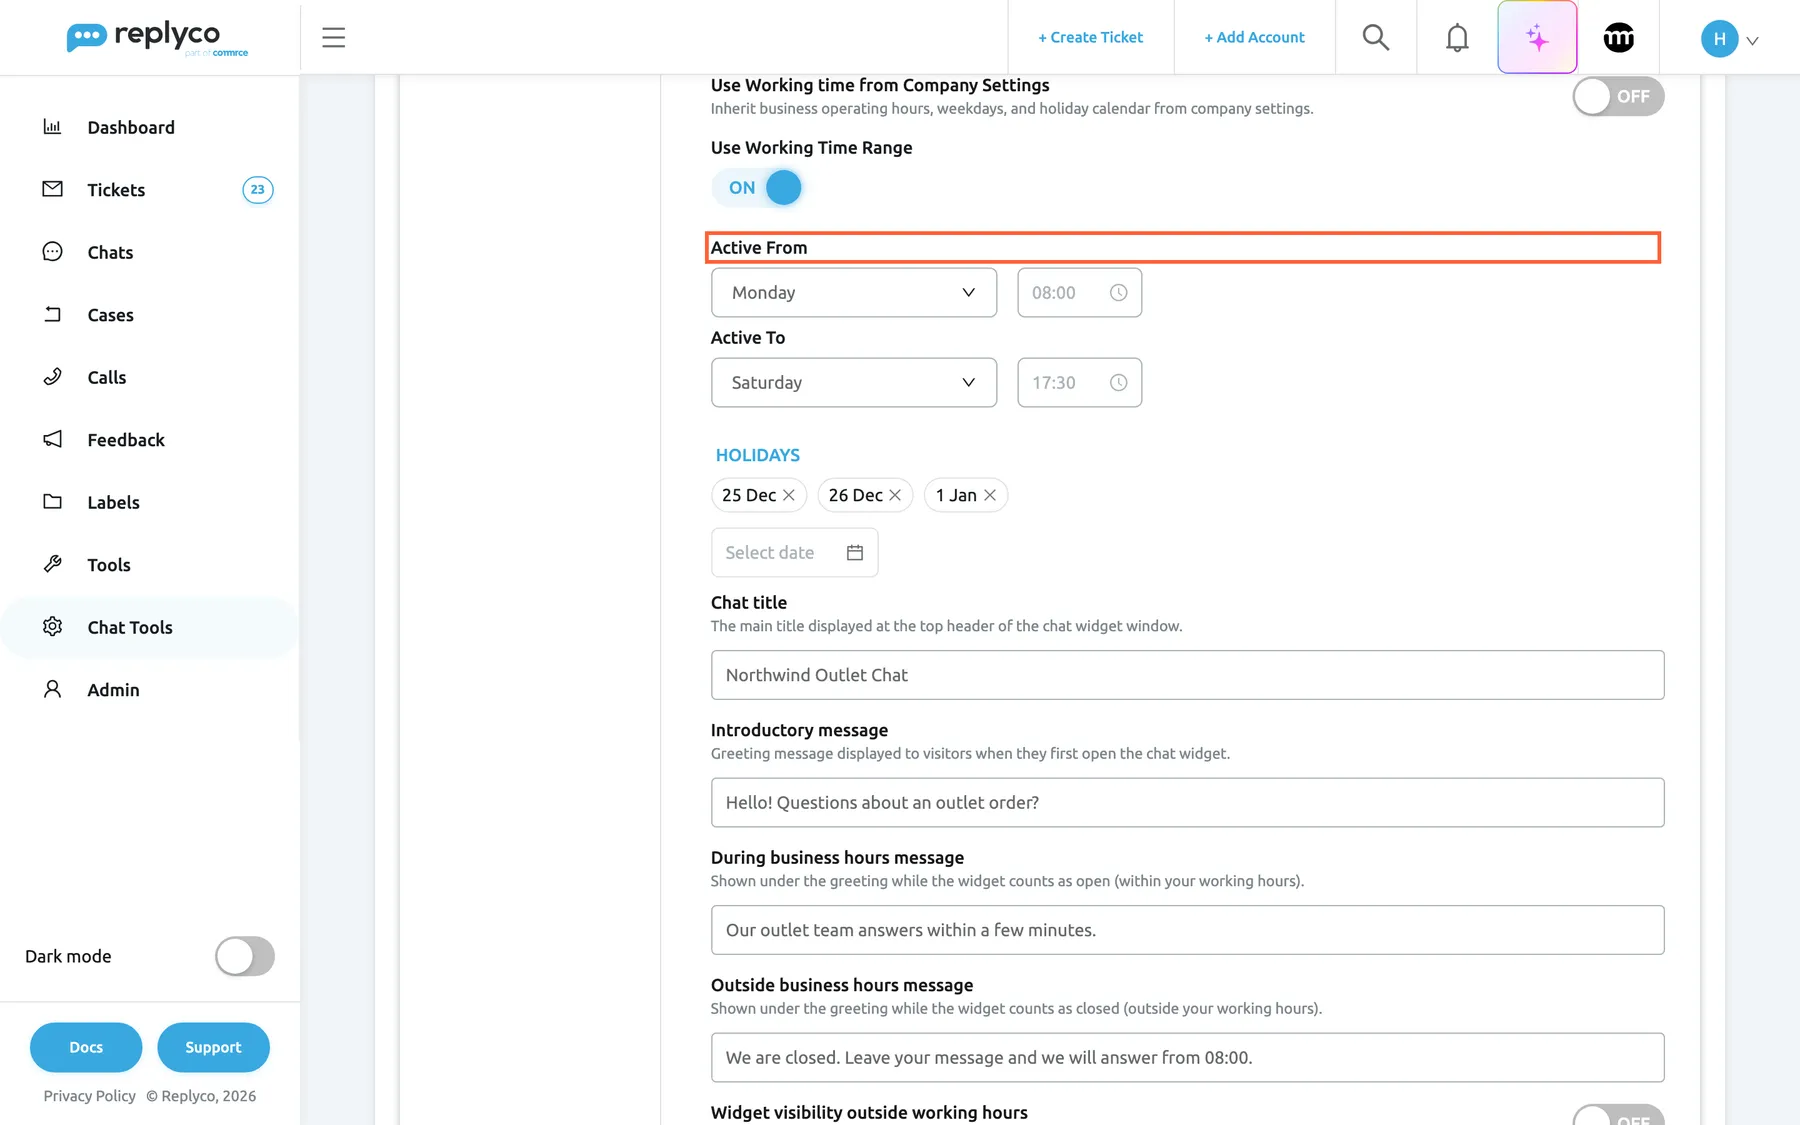
What this screenshot shows
- Screen
- Live Chat (/live-chat-settings)
- Highlighted
- group “Active From”, editor-working-time, Monday 08:00. sets where the continuous stretch starts
- Also visible
- Use Working Time Range ON; Active To Saturday 17:30; Holidays 25 Dec, 26 Dec, 1 Jan
- Purpose
- set a continuous working time range
For example, the Northwind Outlet Chat uses Monday to Saturday, 08:00–17:30, and closes on 25 December, 26 December and 1 January. A holiday repeats every year on the same day and month, and the date picker ignores a date whose day and month are already in the list. The times are in your browser’s time zone. The exact minute rules, overnight hours and the time zone are explained in Live chat widget.
When you turn Use Working time from Company Settings back on, the widget’s own hours are kept but not used.
Choose the widget’s preferences
Section titled “Choose the widget’s preferences”Six switches follow the texts on the Appearance tab. They save with Save.
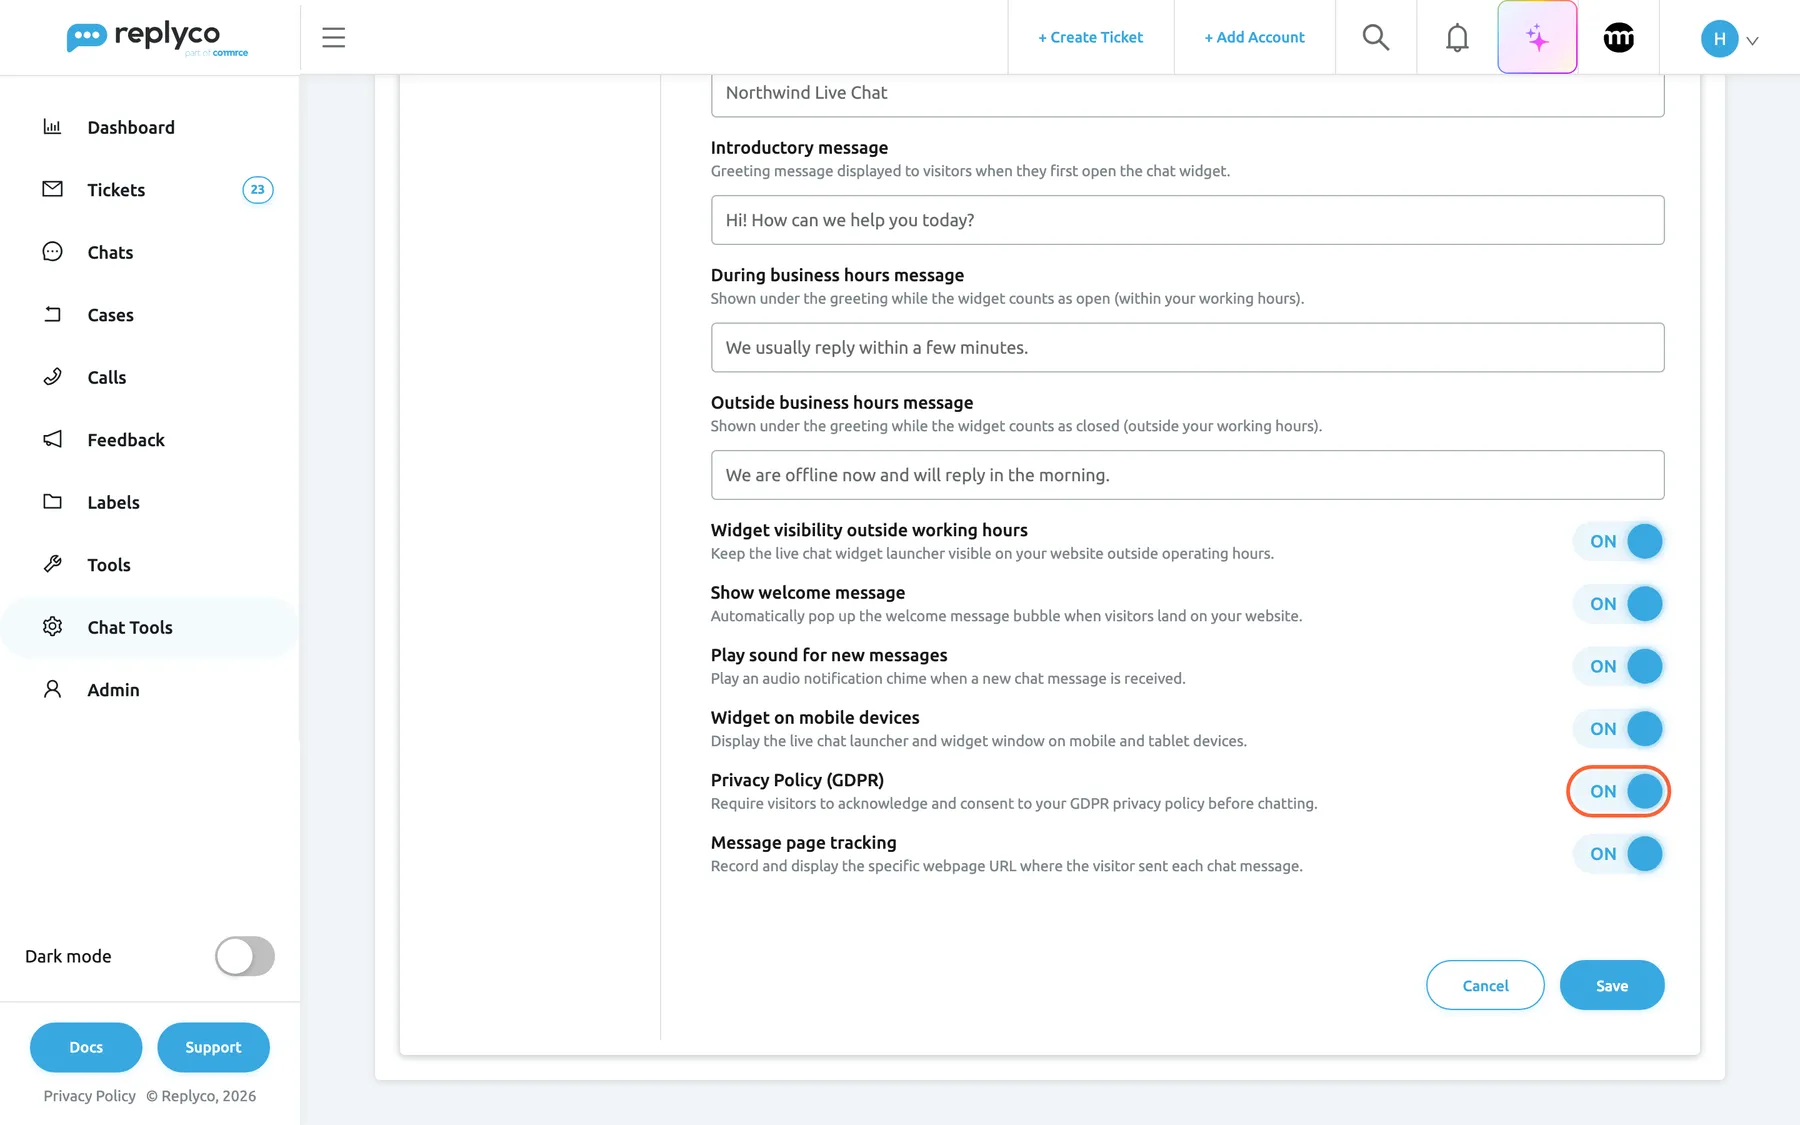
What this screenshot shows
- Screen
- Live Chat (/live-chat-settings)
- Highlighted
- switch “GDPR”, editor-preferences, on. adds a required consent checkbox to the visitor form
- Also visible
- Outside business hours message filled; Widget visibility outside working hours ON; Show welcome message ON; Play sound for new messages ON; Widget on mobile devices ON; Message page tracking ON; Cancel, Save
- Purpose
- choose the widget's preferences
| Switch | New widgets | On | Off |
|---|---|---|---|
| Widget visibility outside working hours | On | The chat button stays on the website outside working hours, with the closed-hours line | The widget disappears outside working hours |
| Show welcome message | Off | A bubble with the greeting pops up next to the closed chat button until the visitor closes it | No bubble |
| Play sound for new messages | On | The visitor’s browser plays a sound when your team’s reply arrives | Silent for the visitor |
| Widget on mobile devices | On | The widget shows on phones and tablets | The widget is hidden on phones and tablets |
| Privacy Policy (GDPR) | Off | Visitors must tick a consent box before they can chat | No consent box |
| Message page tracking | Off | Each visitor message carries the address of the page it was sent from, shown as from the page in the chat | No page address |
Play sound for new messages is about the visitor. Whether you hear new chats in Replyco is your own choice in Notifications. The consent box names Replyco and links to Replyco’s privacy policy, not your own; what the widget stores, and where, is in Live chat widget.
Switch a widget off or connect a webhook
Section titled “Switch a widget off or connect a webhook”- Open the widget and select the Widget Settings tab.
- Turn Active off to take the widget off every website that loads its code, or on to bring it back.
- (Optional) Type an address into Webhook. Open Message Schema for Webhook Transmission to see the fields Replyco sends.
- Select Save.
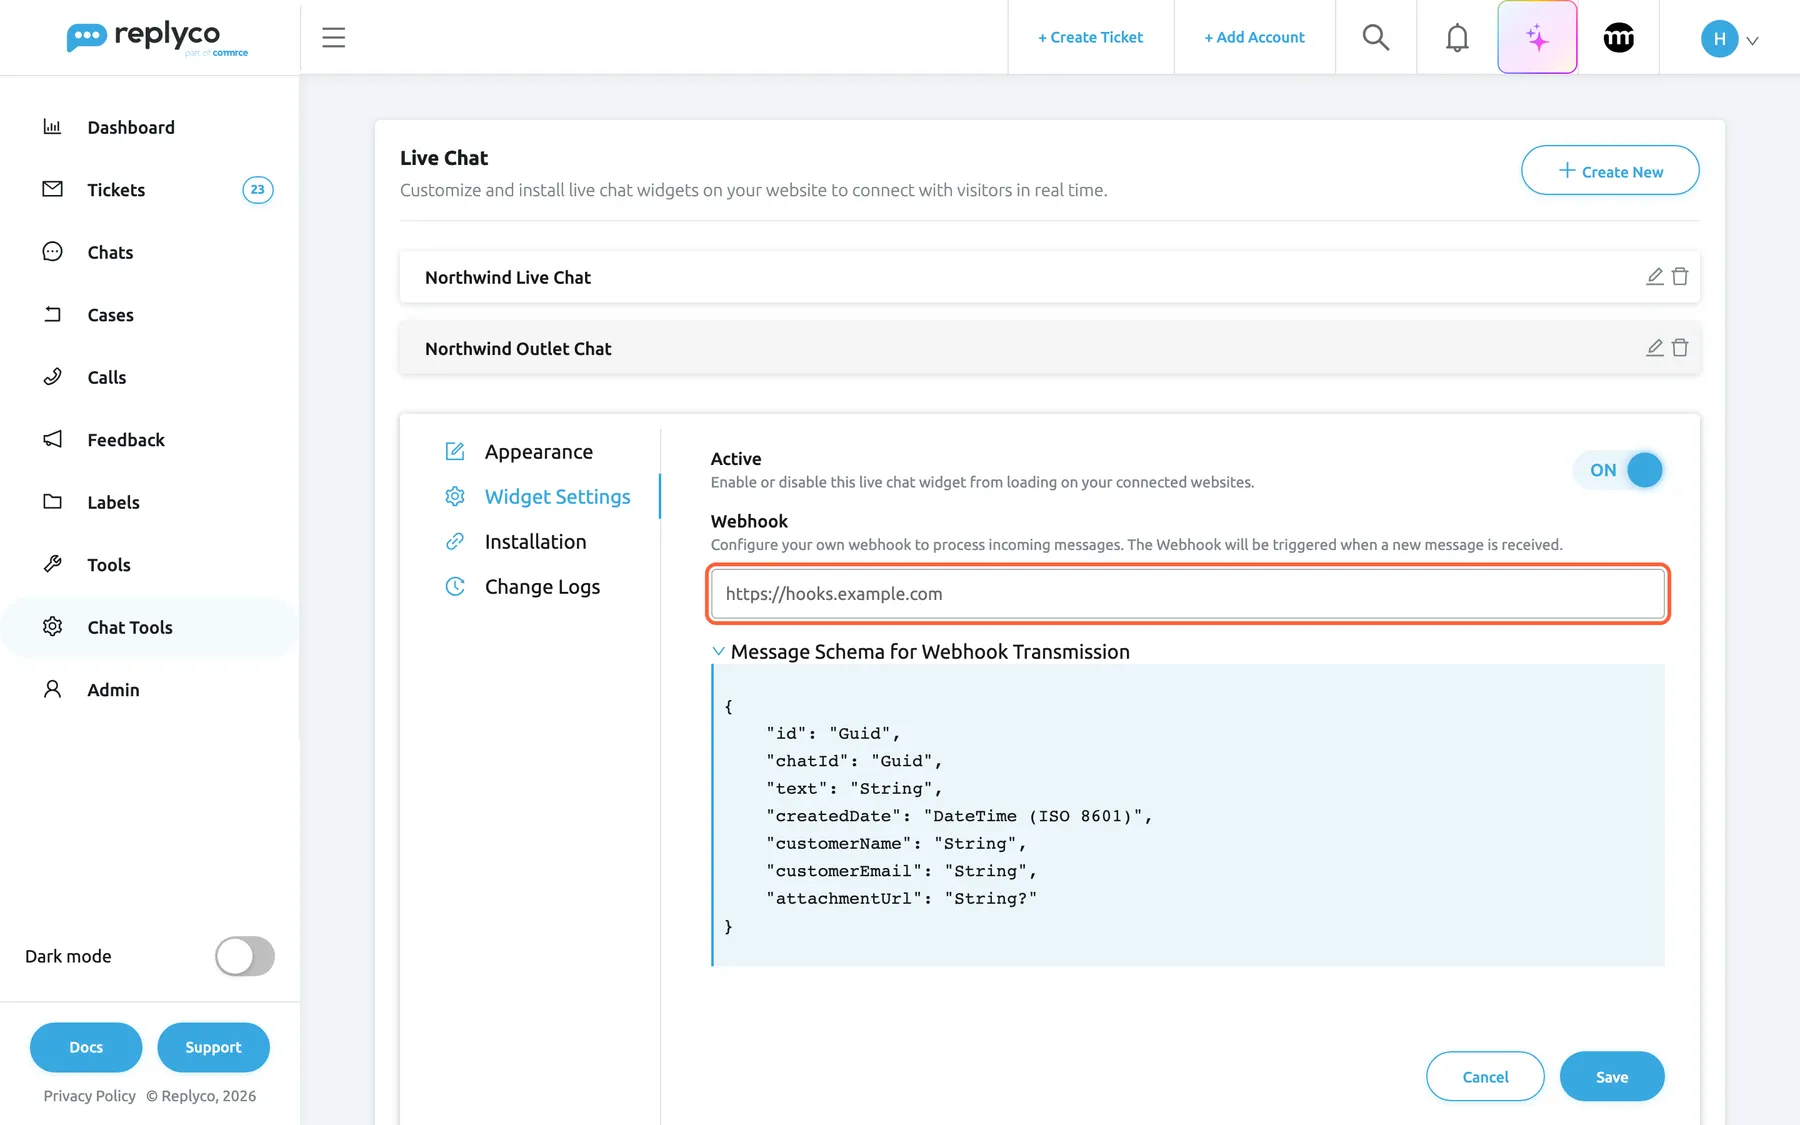
What this screenshot shows
- Screen
- Live Chat (/live-chat-settings)
- Highlighted
- textbox “Webhook”, editor-widget-settings-tab, https://hooks.example.com. sends each visitor message to this address
- Also visible
- Active ON; Message Schema for Webhook Transmission expanded; Cancel, Save
- Purpose
- switch a widget off or connect a webhook
With a webhook, Replyco sends every message a visitor writes in this widget to that address, as it arrives. Your team’s replies are not sent. The address starts with http:// or https://, for example https://hooks.example.com. Leave the field empty for no webhook.
Switching a widget off keeps all its settings and its chats. What the webhook sends, and what happens when your address does not answer, is in Live chat widget.
Install a widget on your website
Section titled “Install a widget on your website”- Open a saved widget and select the Installation tab. A new widget gets the tab after its first save.
- Select Copy under the code. The link reads Copied for five seconds.
- Paste the code into your website’s template before the closing
</body>tag, on every page where the chat should appear, and publish the change.
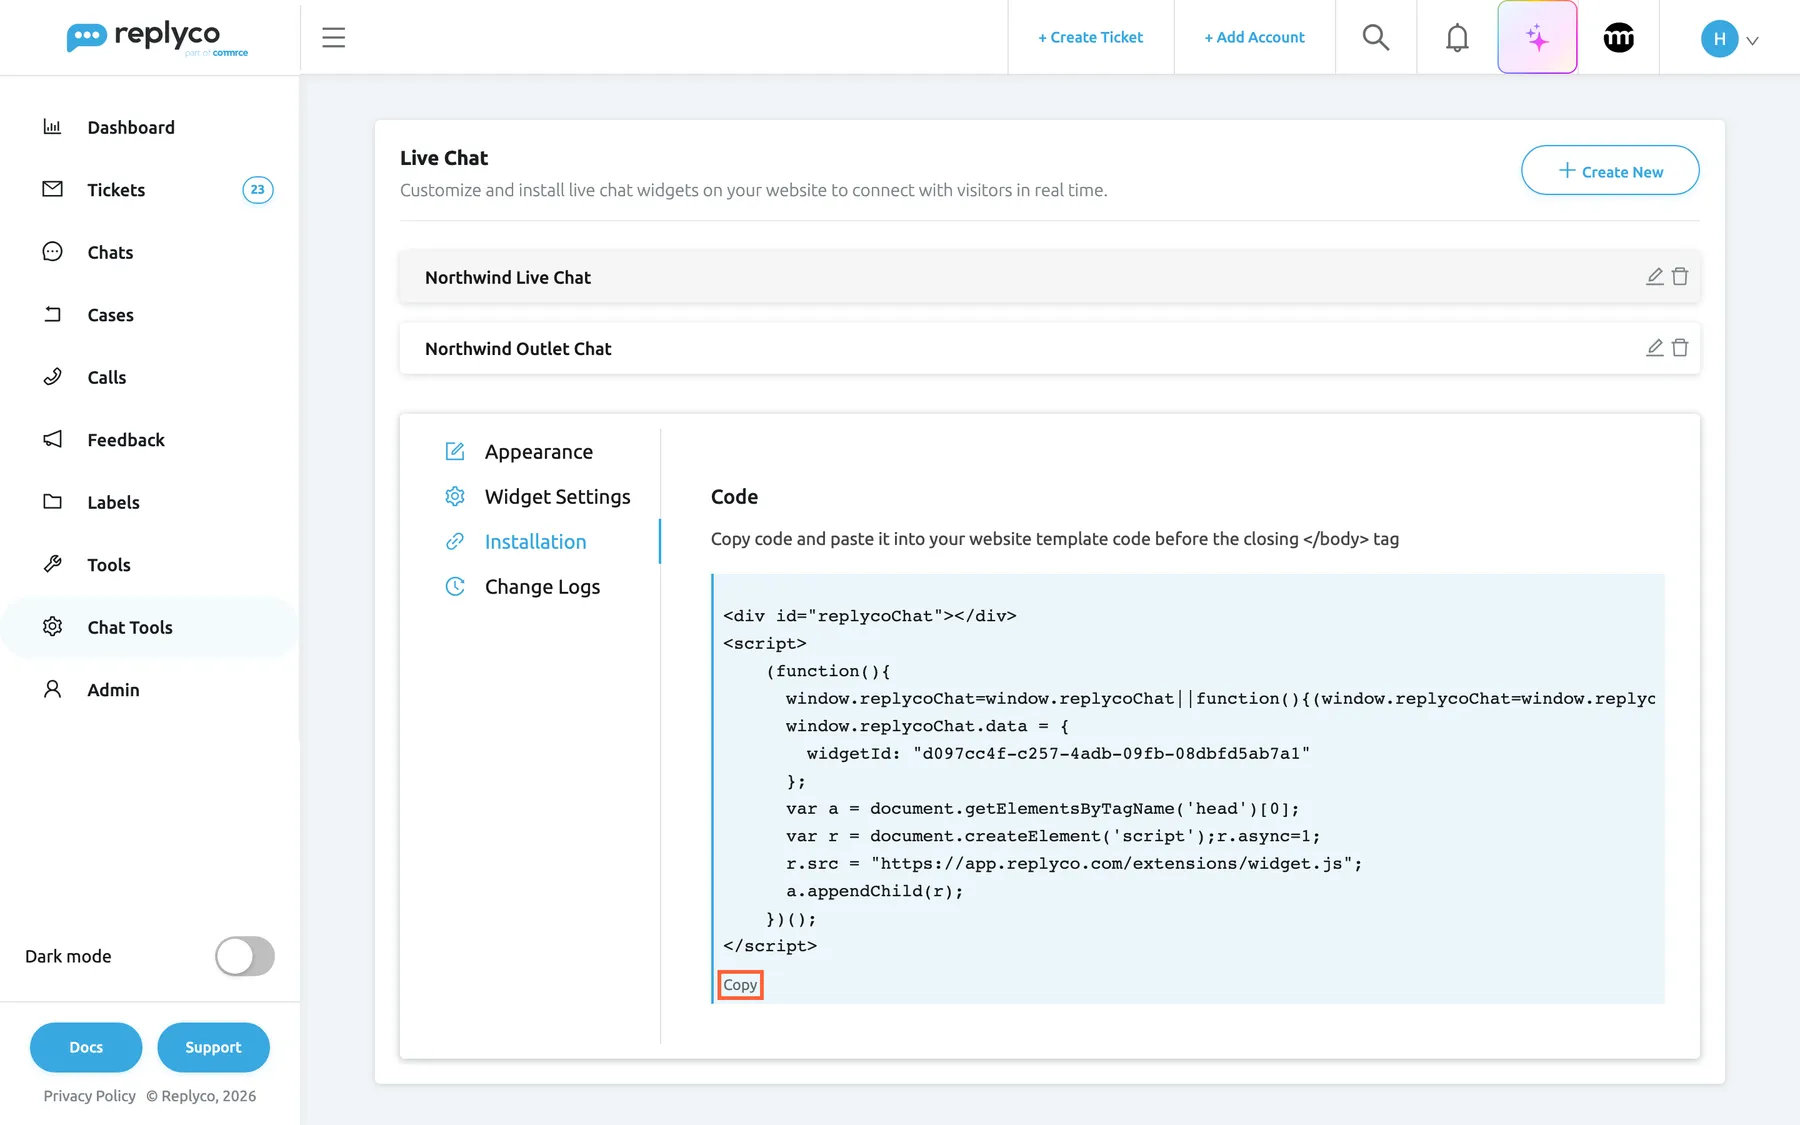
What this screenshot shows
- Screen
- Live Chat (/live-chat-settings)
- Highlighted
- button “Copy”, editor-installation-tab, enabled. copies the installation code
- Also visible
- heading Code; instruction to paste before </body>; div id replycoChat; widget ID; script address https://app.replyco.com/extensions/widget.js
- Purpose
- install the widget on a website
The code is an empty div with the ID replycoChat and a short script that names your widget and loads the chat from https://app.replyco.com/extensions/widget.js. Paste all of it: the chat is drawn inside that div. Each widget has its own code, so pasting the code of a different widget on another site gives that site its own look and hours. Notes for Shopify, WordPress, Magento and BigCommerce are in Live chat widget.
Changes you save later reach the website without touching the code again: visitors get them the next time a page loads.
See who changed a widget
Section titled “See who changed a widget”Open the widget and select Change Logs. Each row names the colleague and the time. A row that says the widget was updated opens when you select it and lists each changed setting, with the old and the new value for texts and colours, and on or off for switches.
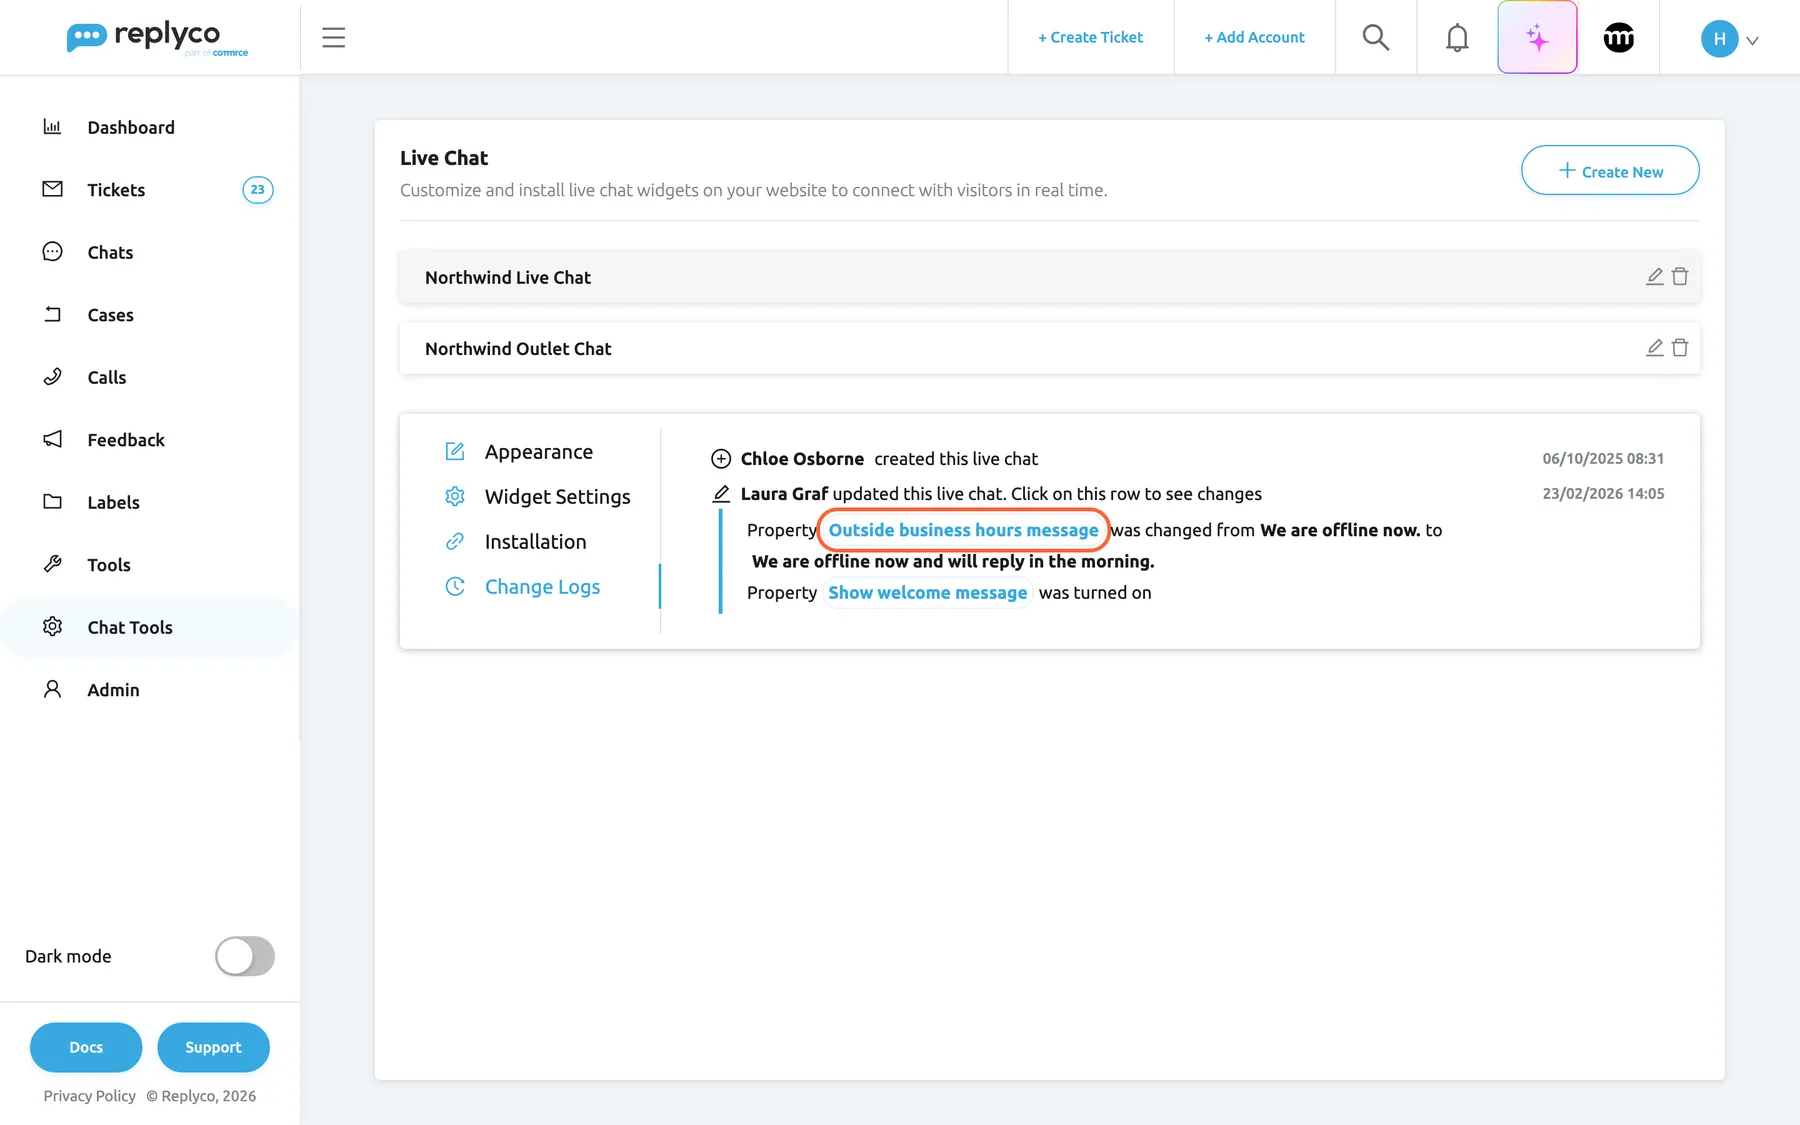
What this screenshot shows
- Screen
- Live Chat (/live-chat-settings)
- Highlighted
- listitem “Outside business hours message”, editor-change-logs-tab, expanded. shows the old and the new text
- Also visible
- Chloe Osborne created this live chat; Laura Graf updated this live chat; Show welcome message was turned on
- Purpose
- see who changed a widget
For example, the history of the Northwind Live Chat shows that Chloe Osborne created it and that Laura Graf later changed Outside business hours message and turned on Show welcome message.
Delete a widget
Section titled “Delete a widget”- Select the bin in the widget’s row.
- Replyco asks Are you sure?. Select Yes to delete, or No to keep the widget.
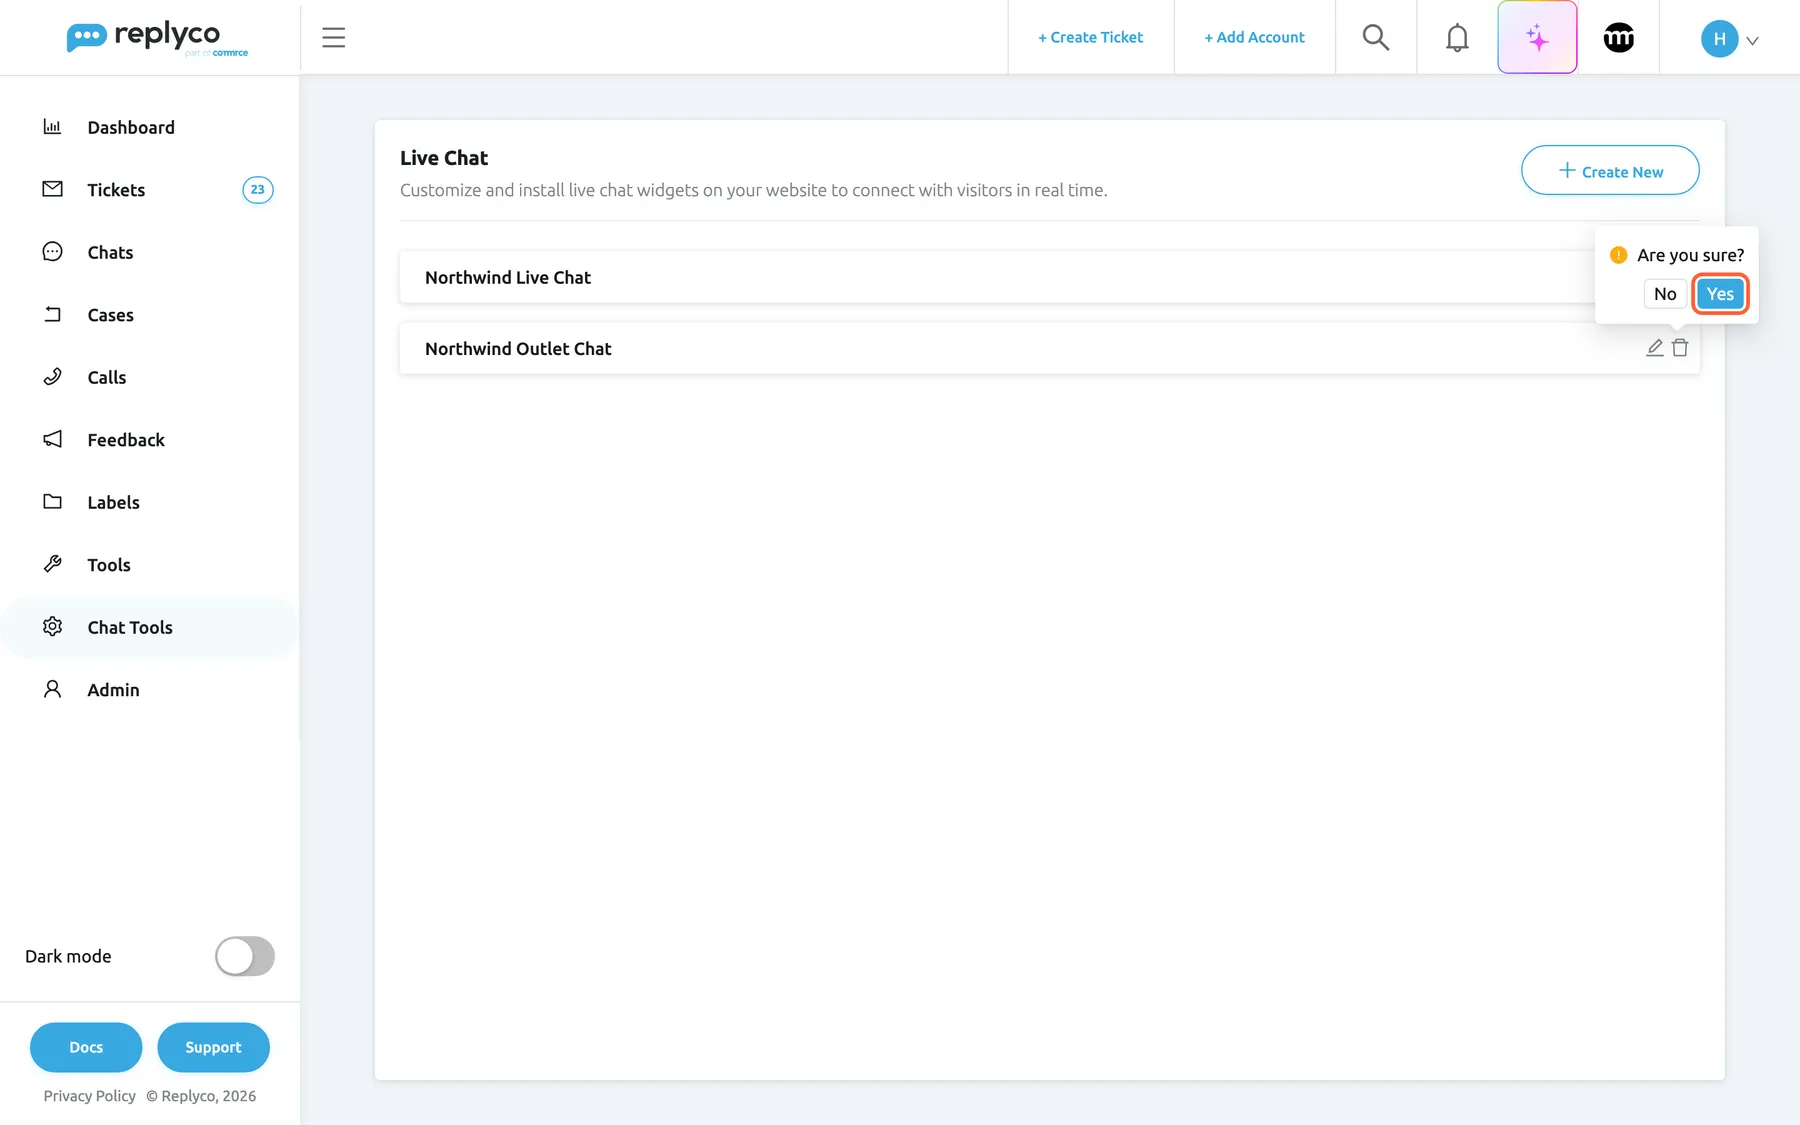
What this screenshot shows
- Screen
- Live Chat (/live-chat-settings)
- Highlighted
- button “Yes”, widget-row-right, enabled. deletes the widget
- Also visible
- Are you sure? with No and Yes; rows Northwind Live Chat and Northwind Outlet Chat
- Purpose
- delete a widget
Deleting cannot be undone. The widget disappears from this list, from your colleagues’ access rights and from every website that loads its code; the page shows no chat button from then on. The chats it already brought in stay under Chats with their messages. If you only want to pause the chat, switch off Active instead.
Every control, explained
Section titled “Every control, explained”The controls of the Live Chat screen, from the list to the four tabs of the editor.
Widget rows
Section titled “Widget rows”Below the header, one row per widget. The whole row and the pencil open the widget; the bin deletes it.
Each row shows the widget’s Chat title. Opening another row, or Create New, replaces the open editor without a warning, and changes you have not saved are lost.
One widget per website or brand keeps looks and hours apart.
Create New
Section titled “Create New”Header, right.
Opens an empty widget with the tabs Appearance and Widget Settings. Defaults: Theme #39a7e3, Background color white, Position Right, Use Working time from Company Settings on, Widget visibility outside working hours, Play sound for new messages and Widget on mobile devices on, the other switches off, Active on, no webhook.
The defaults give a working widget as soon as the texts are written.
| Tab | What it holds | Shown |
|---|---|---|
| Appearance | Colours, position, working time, texts, the six switches, Cancel and Save | Always |
| Widget Settings | Active, Webhook, the schema, Cancel and Save | Always |
| Installation | The code and Copy | Saved widgets |
| Change Logs | The history | Saved widgets |
Switching tabs keeps what you typed; Save on either of the first two tabs saves both.
Theme and Background color
Section titled “Theme and Background color”Appearance, top. Select the swatch to open the colour picker; select outside it to close it. Saved with Save.
Theme is the main colour of the chat button, the window’s header, the welcome bubble and the buttons; Background color is the area behind the messages. The picker takes a hex code, R, G and B values or a preset.
A chat window in your shop’s colours looks like part of the shop.
Position
Section titled “Position”Appearance, under the colours. A switch showing Right or Left.
The bottom corner of the page where the chat button sits. New widgets start on Right.
Move the chat away from a cookie banner or a basket button in the same corner.
Use Working time from Company Settings
Section titled “Use Working time from Company Settings”Appearance, under Position. Turning it off opens the working time controls.
On (the default): the widget follows the working days, hours and holidays in Company Settings, including later changes there. Off: the widget uses its own working time. Saving with the switch off needs at least one day and both times.
One set of hours for the whole company is easier to keep right; a separate website with other opening hours needs its own.
Working time controls
Section titled “Working time controls”| Control | What it does | Why |
|---|---|---|
| Use Working Time Range | Off: selected days with one daily time span. On: one stretch from Active From to Active To, each a day and a time; the days in between count as open all day, and the stretch can run across the weekend | Teams that work shifts over several days |
| Working days | Round buttons from Sunday to Saturday; blue days are working days. New widgets start with Monday to Friday | The days you answer chats |
| Active between | Start and end time, the same for every working day; an end before the start means hours across midnight | Your daily opening hours |
| Active From, Active To | Start and end of the stretch, with Use Working Time Range on | A stretch such as Monday 08:00 to Saturday 17:30 |
| Holidays | Dates that count as closed all day, every year on the same day and month; select a chip’s cross to remove it | Bank holidays and shop closures |
Chat title
Section titled “Chat title”Appearance, first text box. Required.
The heading visitors see in the chat window, and the widget’s name everywhere in Replyco: this list, the chat list, Filter by Account, user access rights and auto-response rules.
Visitors see whom they are talking to, and your team sees which website a chat came from.
Introductory message
Section titled “Introductory message”Appearance, under the title. Required.
The greeting under the title, at the top of the conversation and the email form, and in the welcome bubble.
The first thing a visitor reads; it tells them what to ask.
During business hours message and Outside business hours message
Section titled “During business hours message and Outside business hours message”Appearance, under the greeting. Both required.
A line in the widget under the greeting: the first while the widget counts as open, the second while it counts as closed. They are not sent as messages.
Visitors know whether to wait for an answer now or later.
Widget visibility outside working hours
Section titled “Widget visibility outside working hours”Appearance, first of the six switches. On for new widgets.
On: the widget stays on the website outside working hours, and visitors can still write. Off: the widget is not shown outside working hours.
Keep it on to collect questions overnight; turn it off if nobody should expect a chat outside your hours.
Show welcome message
Section titled “Show welcome message”Appearance, second switch. Off for new widgets.
On: a bubble with Introductory message appears next to the closed chat button. It stays away once the visitor closes it in that browser, and does not show once the conversation has messages.
Invites visitors to ask before they leave the page.
Play sound for new messages
Section titled “Play sound for new messages”Appearance, third switch. On for new widgets.
On: the visitor’s browser plays a short sound when a reply from your team arrives. It has no effect on sounds in Replyco.
Visitors who switched to another tab notice your answer.
Widget on mobile devices
Section titled “Widget on mobile devices”Appearance, fourth switch. On for new widgets.
Off: the widget does not show on phones and tablets, judged by the browser’s own description of the device.
On a small screen a chat button can cover your shop’s buttons.
Privacy Policy (GDPR)
Section titled “Privacy Policy (GDPR)”Appearance, fifth switch. Off for new widgets. Not shown to companies registered in Replyco’s German region.
On: the form that asks for the visitor’s email also shows a required consent sentence in English with an Agree checkbox; the visitor cannot start the chat without ticking it.
Visitors agree actively before they give their name and email.
Message page tracking
Section titled “Message page tracking”Appearance, last switch. Off for new widgets.
On: each visitor message carries the address of the page it was written on, shown as from the page in the conversation. Messages sent while it was off have no address.
You see which product page a question came from without asking.
Cancel and Save
Section titled “Cancel and Save”Bottom right of Appearance and Widget Settings.
Save checks the form, saves both tabs, shows Success and closes the editor. Cancel closes the editor and drops unsaved changes.
Nothing reaches your website until you save.
Active
Section titled “Active”Widget Settings, top. On for new widgets. Saved with Save.
Off: the widget no longer appears on any website that loads its code. Its settings and chats are kept.
Pause the chat, for example during a holiday closure, without removing the code.
Webhook and Message Schema for Webhook Transmission
Section titled “Webhook and Message Schema for Webhook Transmission”Widget Settings, under Active. The schema opens and closes with its arrow.
An address, starting with http:// or https://, that receives every visitor message of this widget; see Switch a widget off or connect a webhook. The schema lists the message ID, chat ID, text, time, visitor name and email, and a link to an attached file.
Pass website questions to a CRM or another tool as they arrive.
Code and Copy
Section titled “Code and Copy”Installation tab of a saved widget.
The widget’s installation code with its widget ID; Copy copies all of it and reads Copied for five seconds.
The code is the only thing your website needs; it stays the same when you change the widget.
Change Logs
Section titled “Change Logs”Last tab of a saved widget. Select an update row to open it.
Who created the widget, and who changed it when, with the settings that changed.
When the chat suddenly looks or behaves differently, you see who changed what.
Who sees what
Section titled “Who sees what”| Part of the screen | What decides whether you see it |
|---|---|
| Chat ToolsLive Chat in the sidebar | The Widgets permission under Chat Tools, set per user in AdminUsers; see User permissions and roles. Live chat is part of every plan, though companies on an older plan may not have it; see What each plan includes |
| Installation and Change Logs | A saved widget |
| The working time controls | Use Working time from Company Settings off |
| Active From and Active To | Use Working Time Range on |
| Privacy Policy (GDPR) | Companies outside Replyco’s German region |
Who answers a widget’s chats is set separately, per user, in the Live Chat section of Access Rights; see Users.
What you need to know
Section titled “What you need to know”| Topic | Fact |
|---|---|
| Number of widgets | No limit on this screen; each has its own code |
| Saving | Nothing saves on its own; Save saves both editable tabs and closes the editor |
| Required | Chat title and the three messages; with own working time, at least one day and both times |
| Webhook | Visitor messages only; the address starts with http:// or https:// |
| Working time | Company working time by default; holidays repeat every year; times in your browser’s time zone |
| Reaching the website | Saved changes show on the next page load; the code never changes |
| Access to chats | Everyone in the company when the widget is created; later users by an admin |
| Deleting | Removes the widget from websites and access rights; its chats stay |
| Visitor language | The widget’s own buttons and form are in English; your texts show as you type them |
Frequently asked questions
Section titled “Frequently asked questions”Setting up
Section titled “Setting up”How do I add a live chat to my website?
Section titled “How do I add a live chat to my website?”Open Chat ToolsLive Chat, select Create New, fill in Chat title, Introductory message and the two hours messages, and select Save. Open the widget again, copy the code from Installation and paste it into your website before the closing </body> tag.
Why is the live chat setup missing from my sidebar?
Section titled “Why is the live chat setup missing from my sidebar?”Chat ToolsLive Chat shows only to users with the Widgets permission under Chat Tools. An administrator sets it in AdminUsers, on the user’s Access Rights tab. Answering the chats needs the Chats permission under Main as well.
Why is there no Installation tab?
Section titled “Why is there no Installation tab?”A new widget has only Appearance and Widget Settings. Select Save, then open the widget again from the list on Chat ToolsLive Chat: Installation and Change Logs are there.
Why does Replyco refuse to save my new widget?
Section titled “Why does Replyco refuse to save my new widget?”All fields must be completed. means Chat title, Introductory message, During business hours message or Outside business hours message is empty, or Use Working time from Company Settings is off and no working day or no start or end time is set. Fill them in on Appearance and select Save again.
Can I have more than one widget?
Section titled “Can I have more than one widget?”Yes. Each widget on Chat ToolsLive Chat has its own colours, texts, hours and code, and its chats arrive under Chats with its Chat title as the account name. Use one per website or brand.
Hours and texts
Section titled “Hours and texts”Can the widget answer visitors automatically when we are closed?
Section titled “Can the widget answer visitors automatically when we are closed?”Not through its texts: During business hours message and Outside business hours message are a line of text inside the widget, and Replyco picks one by the widget’s working time. For an automatic chat reply, set up a rule in Chat auto-response rules with the widget; how those replies work is in Auto-responses for chats.
Where do I set the hours when the widget uses the company working time?
Section titled “Where do I set the hours when the widget uses the company working time?”In AdminCompany Settings, in the Working Time card; see Company Settings. A widget with Use Working time from Company Settings on follows every later change there, including new holidays, so you keep one set of hours for tickets, auto-responses and the widget.
Do holidays have to be entered again every year?
Section titled “Do holidays have to be entered again every year?”No. A date under Holidays counts every year on the same day and month. Holidays that move, such as Easter Monday, need their new date each year, and the old one removed with the cross on its chip.
Can the widget be hidden when we are closed?
Section titled “Can the widget be hidden when we are closed?”Yes. Turn off Widget visibility outside working hours on Appearance and select Save. Outside the widget’s working time, the chat button then does not appear on your website.
Website and visitors
Section titled “Website and visitors”Do I need to change the code on my website after changing the widget?
Section titled “Do I need to change the code on my website after changing the widget?”No. The code only names the widget. Colours, texts, hours and switches you save on Chat ToolsLive Chat reach visitors the next time a page loads the widget.
How do I take the chat off my website for a while?
Section titled “How do I take the chat off my website for a while?”Open the widget, select Widget Settings, turn off Active and select Save. The widget disappears from every website that loads its code; its settings and chats are kept. Turn it on again to bring it back.
What happens to the chats when I delete a widget?
Section titled “What happens to the chats when I delete a widget?”They stay under Chats with all their messages. The widget itself disappears from every website and from users’ access rights, and it cannot be restored. To pause the chat instead, switch off Active.
Can visitors write in German?
Section titled “Can visitors write in German?”Yes, visitors can write in any language. The widget’s own buttons and form fields are in English only; the title, greeting and hours lines show exactly as you type them, so write them in your visitors’ language.
Webhook and history
Section titled “Webhook and history”What does the webhook send?
Section titled “What does the webhook send?”Every message a visitor writes in the widget, as it arrives, with the fields listed under Message Schema for Webhook Transmission on the Widget Settings tab: message ID, chat ID, text, time, the visitor’s name and email, and a link to an attached file. Your team’s replies are not sent. The full example is in Live chat widget.
How do I see who changed our live chat?
Section titled “How do I see who changed our live chat?”Open the widget on Chat ToolsLive Chat and select Change Logs. Select an update row to see each changed setting with its old and new value.
Troubleshooting
Section titled “Troubleshooting”| Symptom | What to check |
|---|---|
| Chat ToolsLive Chat is missing | Your user needs the Widgets permission; an admin sets it in AdminUsers. |
| All fields must be completed. | All four texts filled in? With own working time: at least one day and both times? |
| No Installation tab | The widget is not saved yet; save it and open it again. |
| The chat does not appear on the website | In order: is Active on? Is the whole code, div included, on that page and published? Is it outside working hours with Widget visibility outside working hours off? A phone with Widget on mobile devices off? Was the widget deleted? More in Live chat widget. |
| The widget shows the closed-hours line during opening hours | Is Use Working time from Company Settings on, and are the company hours right? Is today in Holidays? See Live chat widget. |
| A change does not show on the website | Was Save selected, and did Success appear? Reload the website page. |
| Changes disappeared | Opening another widget or Create New before Save drops them; check Change Logs for what was saved. |
| A colleague does not see the widget’s chats | Tick the widget for them in AdminUsers, Access Rights, section Live Chat. Replyco decides who is responsible for a chat when it starts, so older chats reach them only when someone assigns them. |
| The consent box does not appear | Privacy Policy (GDPR) on and saved? The consent box shows in the form that asks for the visitor’s email, not before. |