

Users
AdminUsers is where administrators manage the people who work in Replyco: everyone your company has invited, their status, and what each person may see and do. Owners and administrators use it to invite a new colleague, give them a role, narrow their access to some ticket lists, labels or accounts, and block or remove someone who has left. To prepare a whole team at once, see Set up Replyco for your team; for the invitation step by step, see Invite users and set what they can do.
Availability: the Users screen is in the Admin menu for users with the Admin permission. Every plan includes user roles and the Access Rights tab, and during a trial every feature is on. Companies on an older plan may not have them; see What each plan includes. What each permission opens across Replyco is explained in User permissions and roles.
What you can do here
Section titled “What you can do here”- See everyone who uses Replyco. The list shows every user of your company with their status, Active, Blocked or Not Activated, and a red A for administrators. Find a user and read their status
- Invite a colleague. Enter a name and e-mail address and pick a role; Replyco e-mails an invitation and gives you a registration link to copy. Invite a colleague · Invite users and set what they can do
- Send an invitation again. A colleague who has not registered yet keeps their registration link, which you can copy again at any time. Send an invitation again
- Keep details up to date. Change a user’s name, e-mail address, mobile number, the language Replyco translates messages into for them and how messages open. Change a user’s details · Translations
- Give a ready-made role. Admin, Moderator and User set a user’s permissions, ticket lists and dashboards in one step. Change a user’s role · User permissions and roles
- Decide exactly what each person sees. Access Rights sets, per user, the areas they may view or edit, their ticket lists, dashboards, labels, Smart Filters, live chat widgets and accounts. Set what a user can see and do · Labels · Manage Smart Filters
- Stop someone from signing in. Blocking ends their sessions at once and keeps the user; unblocking lets them back in. Block or unblock a user
- Remove a user. Deleting takes the user off the list for good. Delete a user
The screen at a glance
Section titled “The screen at a glance”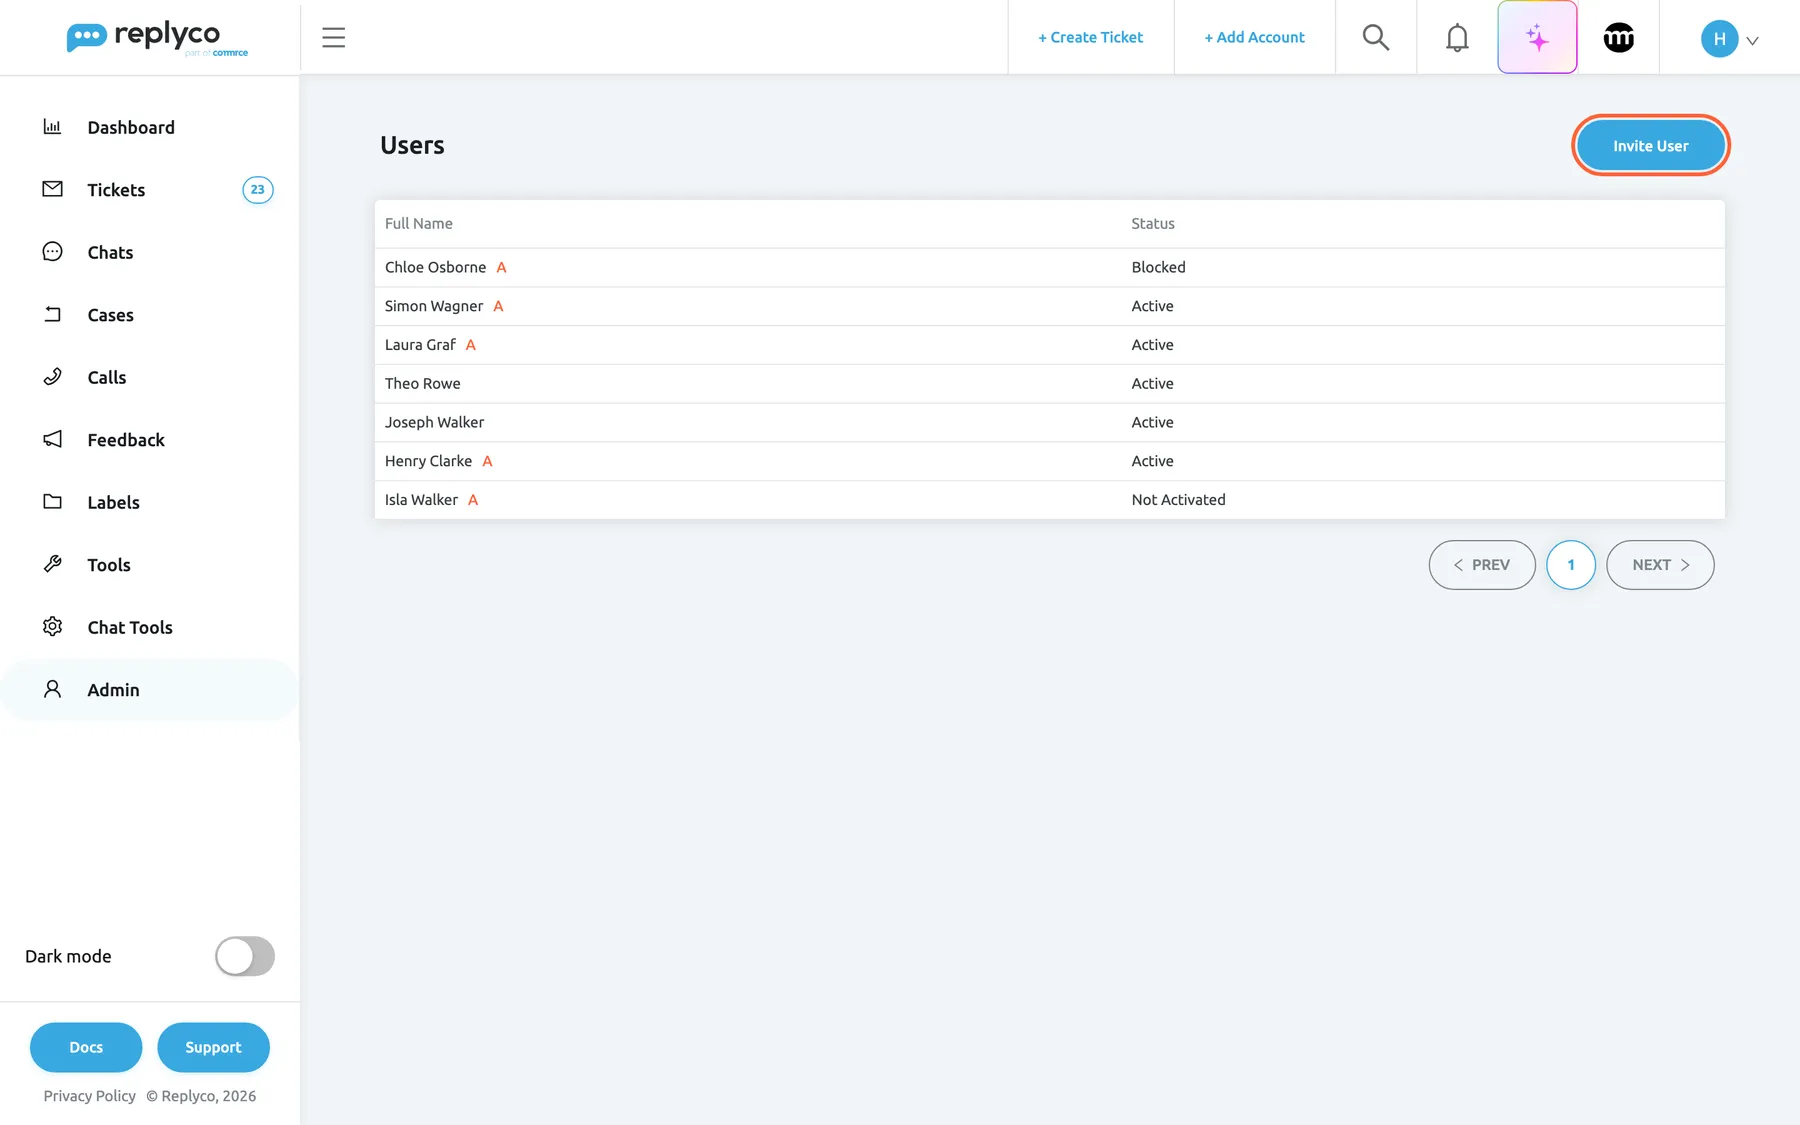
What this screenshot shows
- Screen
- Users (/users)
- Highlighted
- button “Invite User”, top-right, enabled. opens the Invite User form
- Also visible
- 7 users with Full Name and Status; red A after administrators; statuses Active, Blocked, Not Activated; pagination
- Purpose
- the screen at a glance
| Region | What it shows | What you do there |
|---|---|---|
| Title bar | Users and, at the right, Invite User | Invite a colleague |
| The list | One row per user: Full Name with a red A for administrators, and Status | Select a row to open the user’s details |
| Page buttons, below the list | Ten users per page, with buttons for the previous and next page | Move between pages |
| Details, right of the list | Appears when you select a user: the tabs Information and Access Rights | Change the user, block or delete them, set their access |
Find a user and read their status
Section titled “Find a user and read their status”The list shows every user of your company, ten per page, with their full name and status. Select a row to open that user’s details next to the list; select Cancel in the details to close them again.
| Status | Meaning |
|---|---|
| Active | The user has registered and can sign in |
| Not Activated | The user was invited but has not finished registration yet |
| Blocked | An administrator blocked the user; they cannot sign in |
A red A after a name marks a user with the Admin permission and Edit rights; hover it and it reads Admin. In the example above, Theo Rowe and Joseph Walker work without administrator rights, and Isla Walker has been invited but has not registered yet.
A user without a full name is listed by their e-mail address.
Invite a colleague
Section titled “Invite a colleague”Every person who works in Replyco needs their own user. You invite them from this screen, and they finish their registration from the e-mail.
-
Select Invite User at the top right of AdminUsers.
The form Invite User opens.
-
Fill in Name, Last Name and Email. Mobile is optional.
-
Check Message language, English unless you change it, and Default Message View, which starts on HTML.
-
Choose the User Role: Admin, Moderator or User. User is preselected.
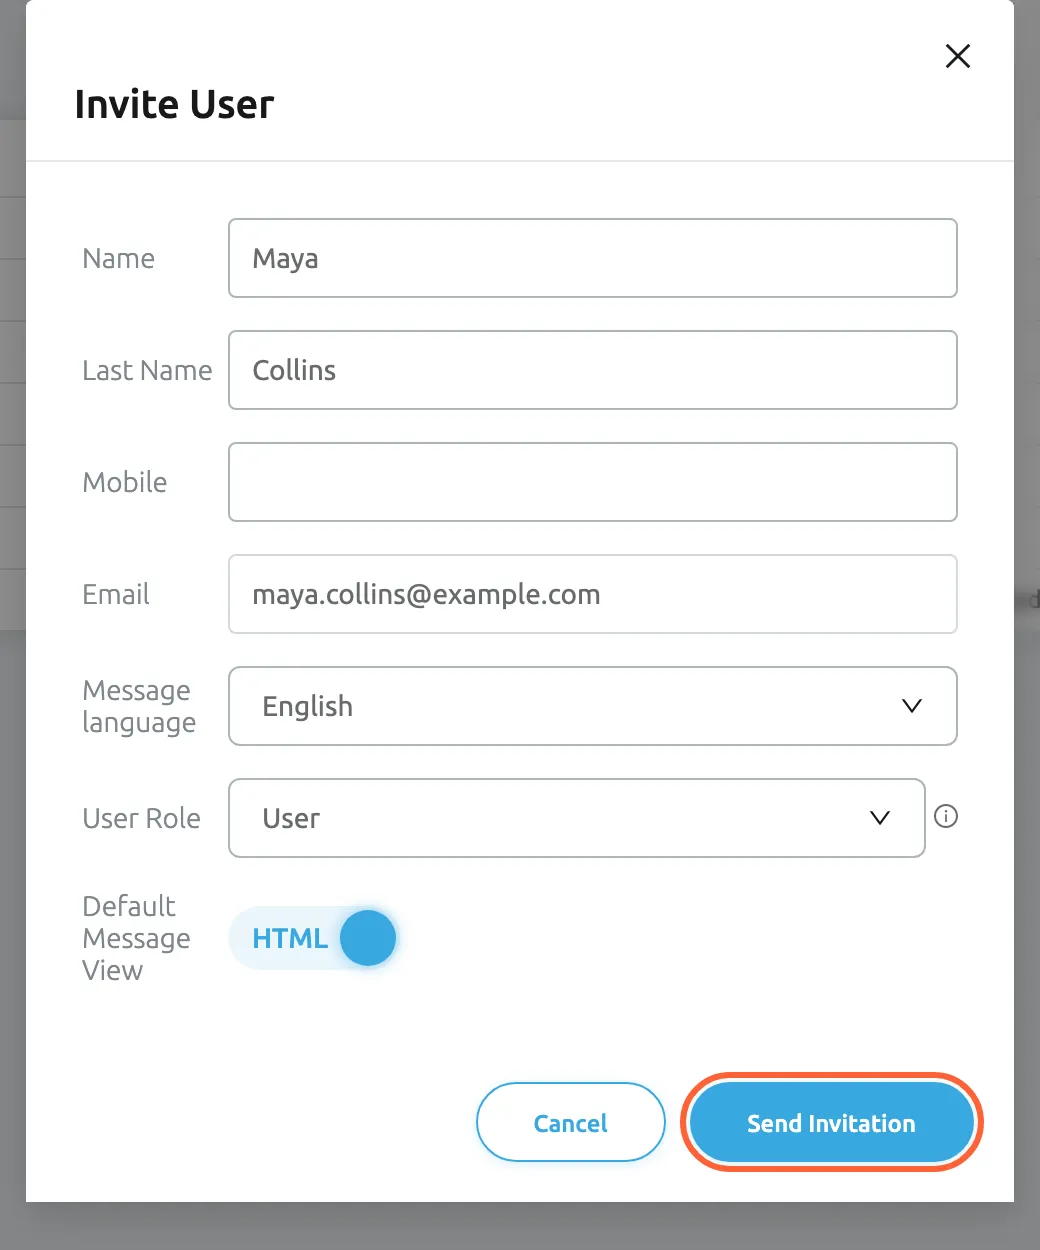
Name, last name and e-mail are required; the role decides what the new colleague can open from the start. What this screenshot shows
- Screen
- Invite User (/users)
- Highlighted
- button “Send Invitation”, dialog-footer, enabled. asks for confirmation
- Also visible
- Name Maya, Last Name Collins, Email maya.collins@example.com; Message language English; User Role User; Default Message View HTML
- Purpose
- invite a colleague
-
Select Send Invitation, then Yes in the question that appears.
Replyco creates the user, e-mails the invitation and shows the registration link, which you can copy with Copy. The new colleague appears in the list with the status Not Activated.
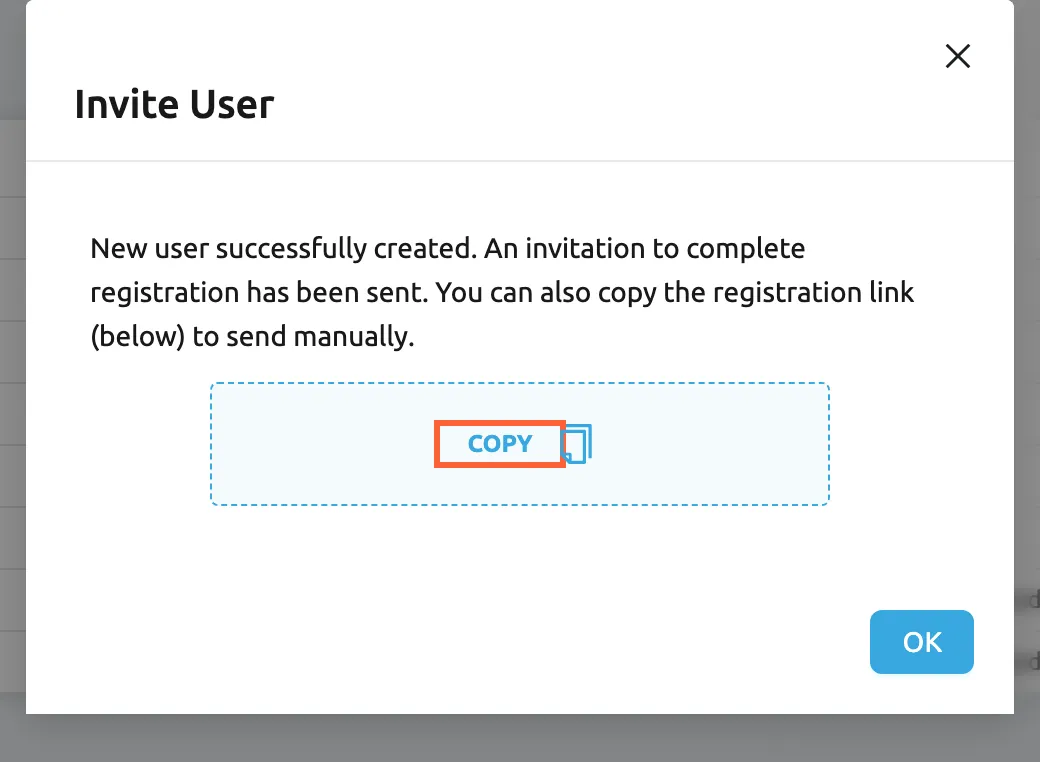
The invitation is on its way; Copy gives you the registration link to send yourself, for example in a chat. What this screenshot shows
- Screen
- Invite User (/users)
- Highlighted
- “”, dialog-body, enabled. copies the registration link
- Also visible
- the confirmation text about the sent invitation; Copy box; OK button
- Purpose
- the result of an invitation
The e-mail, sent from Replyco with the subject Invite to Replyco, tells the colleague that you invited them and contains a button to get started. It opens the invitation variant of the sign-in screen, where they create their password and set up two-factor authentication, which is mandatory for every new user; see Sign in and Two-factor authentication. Once they have registered, their status changes to Active.
A new user starts with every label, Replyco’s default Smart Filters and every connected account, and with the permissions, ticket lists and dashboards of their role. Adjust that right away on their Access Rights tab if they should see less; see Set what a user can see and do.
Replyco refuses the invitation when a field is empty (All fields required.), when the e-mail address is not valid (User Email is invalid.) and when it is a disposable address (“Email address is disabled!”). An e-mail address can belong to only one Replyco user, in any company, so a colleague who once signed up on their own with the same address cannot be invited with it.
Send an invitation again
Section titled “Send an invitation again”A colleague whose status is Not Activated still has their registration link. Select them in the list: next to Status, Copy invite link copies the link, and you can send it to them in a chat or an e-mail of your own.
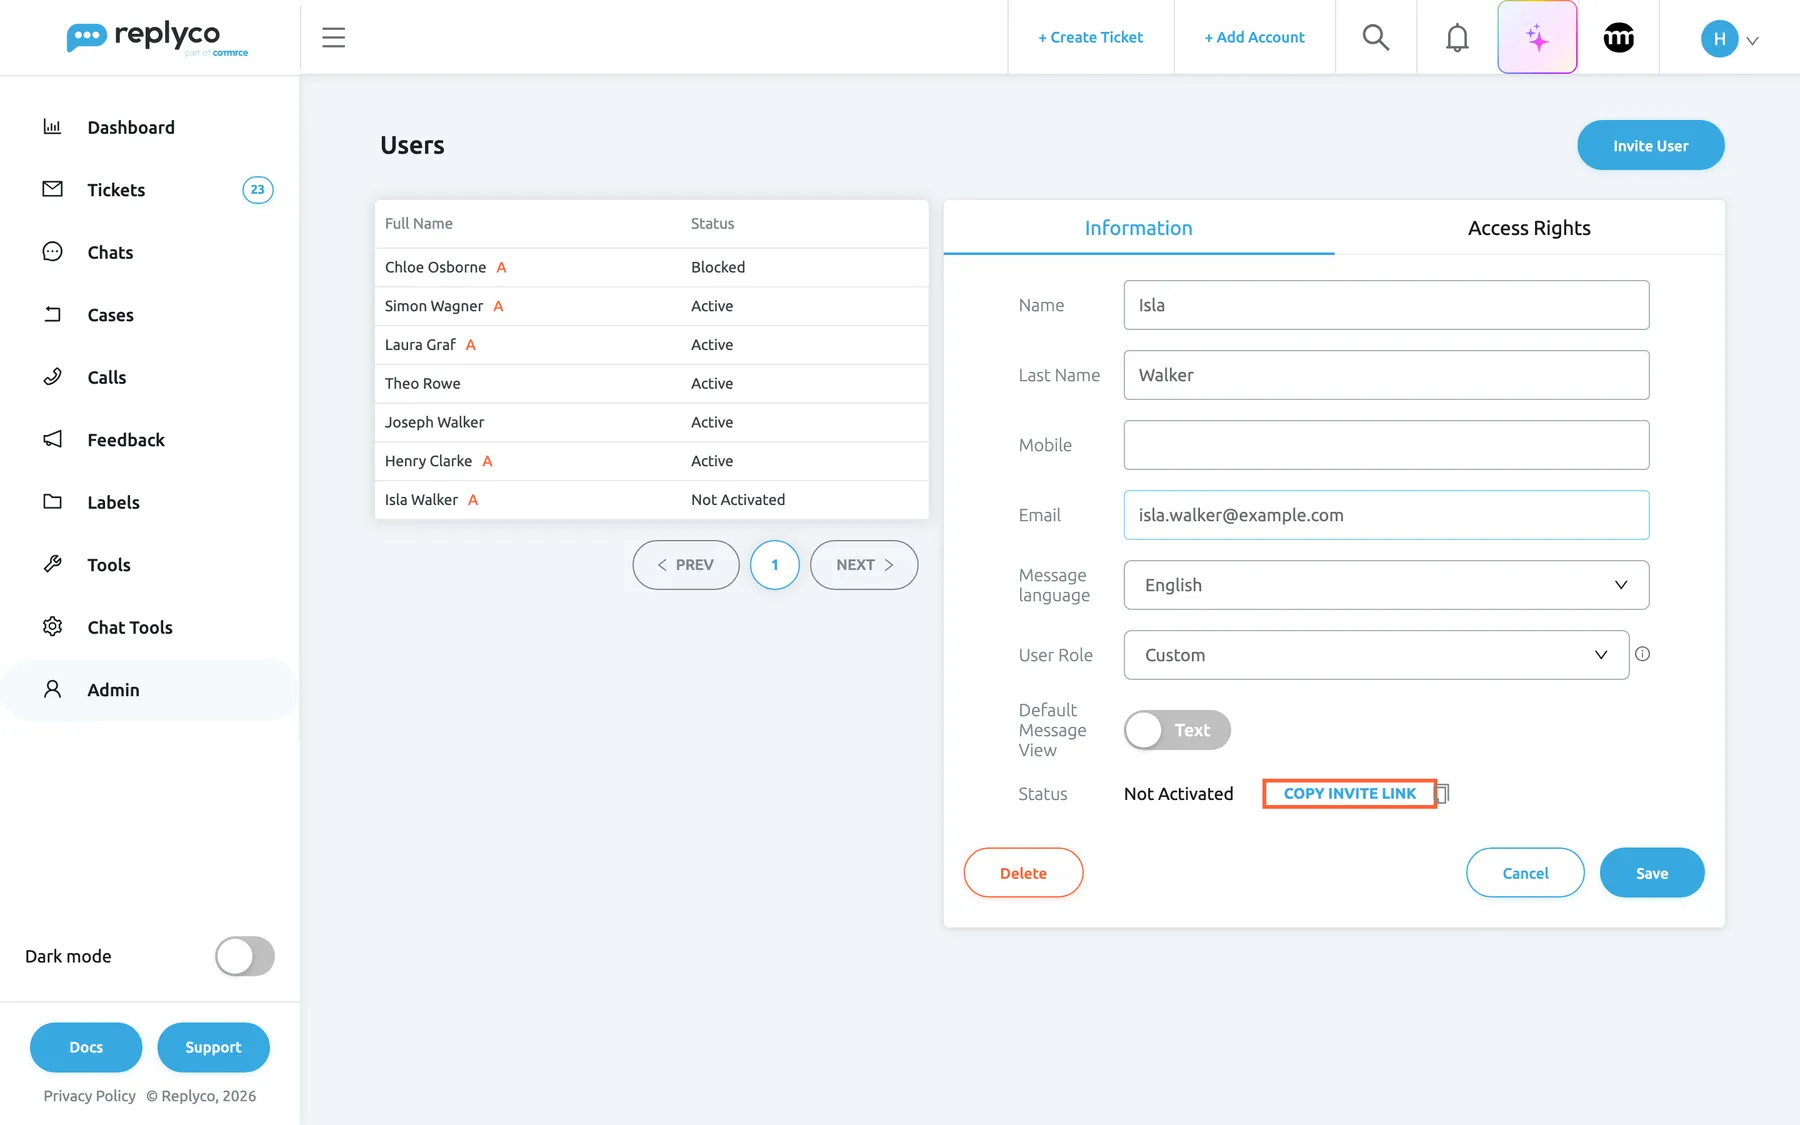
What this screenshot shows
- Screen
- Information (/users)
- Highlighted
- “”, details-panel, enabled. copies the registration link of the invited user
- Also visible
- Isla Walker Not Activated; User Role Custom; Delete without Block User
- Purpose
- resend an invitation
For example, Isla Walker cannot find the invitation. Select her row, select Copy invite link and paste the link into a message to her; she registers from it as from the e-mail. The link disappears once she has registered.
Change a user’s details
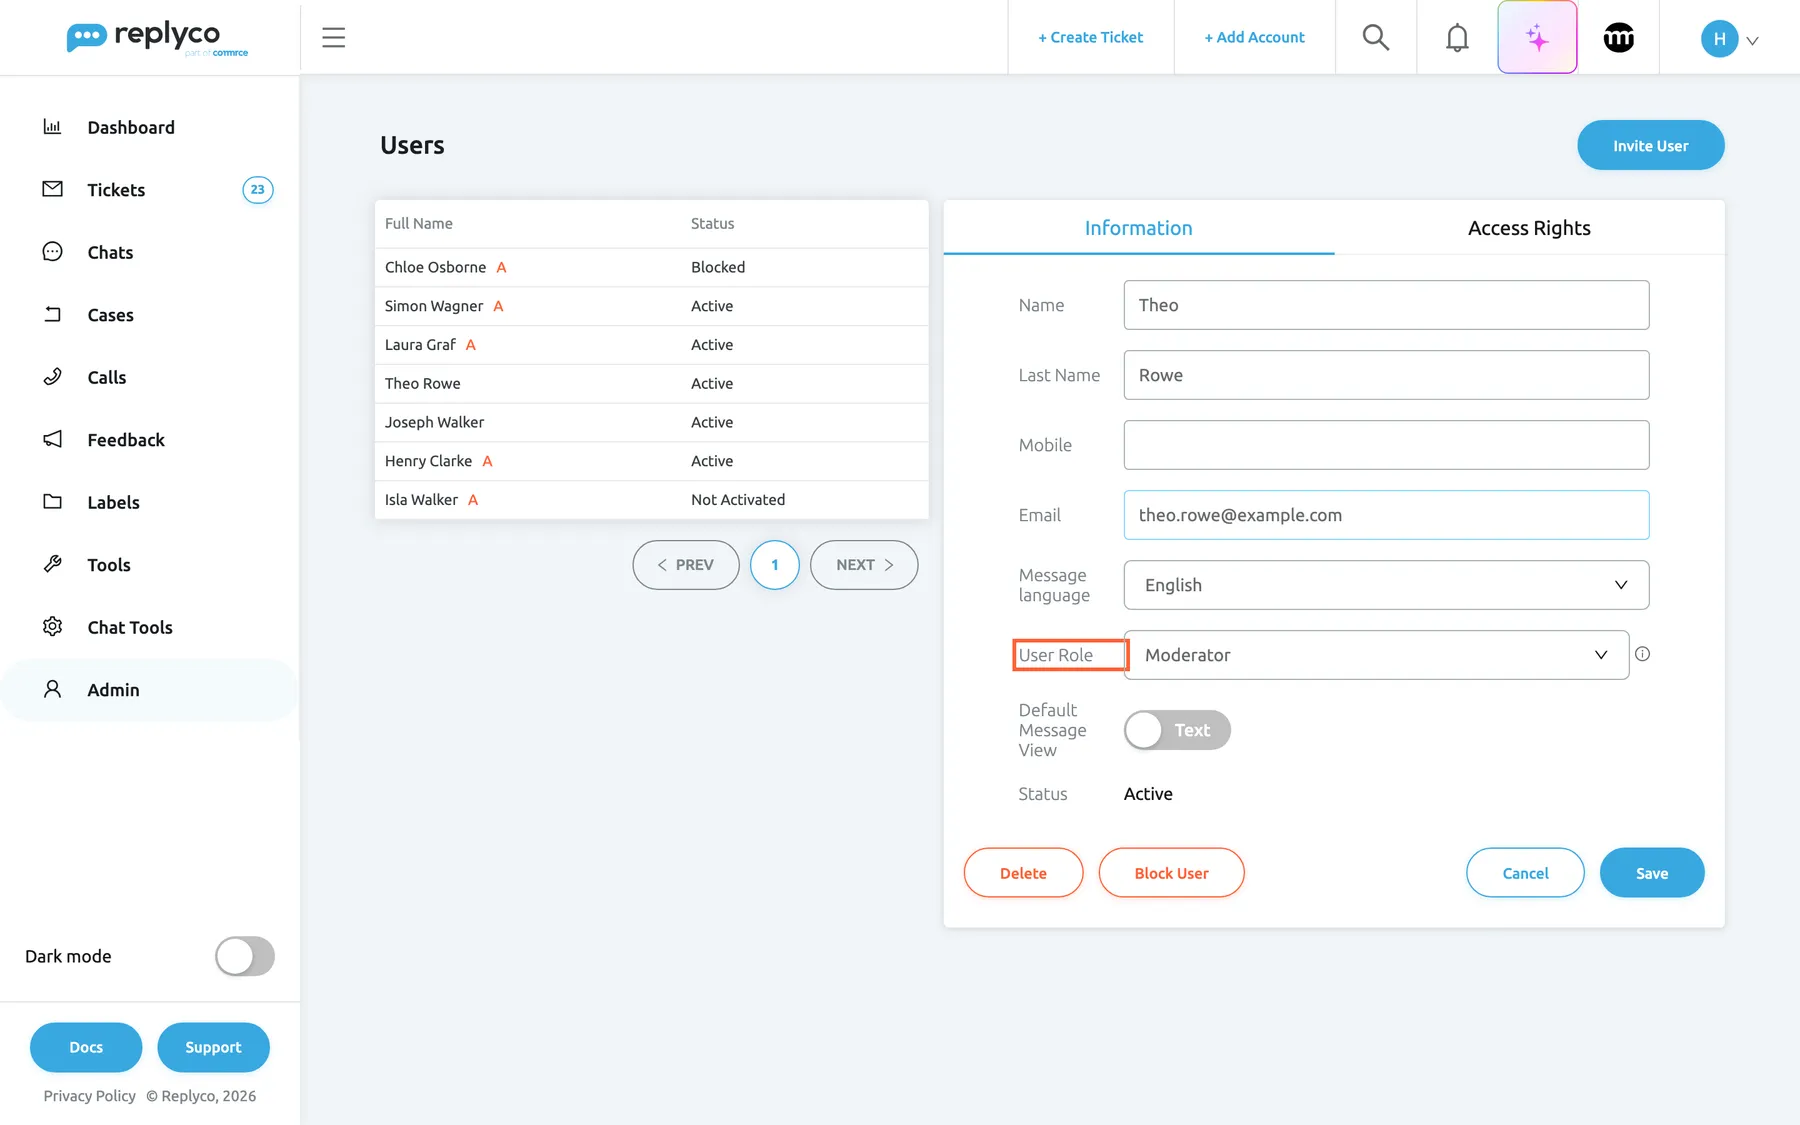
Section titled “Change a user’s details”Select the user and stay on the Information tab. Change what you need and select Save; Replyco saves the details, closes them and confirms with Success. Cancel closes the details without saving.
What this screenshot shows
- Screen
- Information (/users)
- Highlighted
- “”, details-panel, showing Moderator. choosing Admin, Moderator or User replaces the user's permissions, ticket lists and dashboards when saved
- Also visible
- Theo Rowe selected; Name, Last Name, Mobile, Email, Message language; User Role Moderator; Delete, Block User, Cancel, Save
- Purpose
- change a user's details and role
| Field | What it holds |
|---|---|
| Name and Last Name | The name shown to colleagues, for example as the assignee of a ticket. A new name also replaces the old one on the user’s tickets |
| Mobile | A phone number for your records; optional |
| The address the user signs in with; required and checked for a valid format | |
| Message language | The language Replyco translates a customer’s message into when this user selects the translate icon in a ticket; see Translations |
| User Role | The user’s role; see Change a user’s role |
| Default Message View | Whether messages open as HTML or as Text for this user |
| Status | Active, Blocked or Not Activated; read only |
Each user can change their own language and message view later in their Account Settings.
Change a user’s role
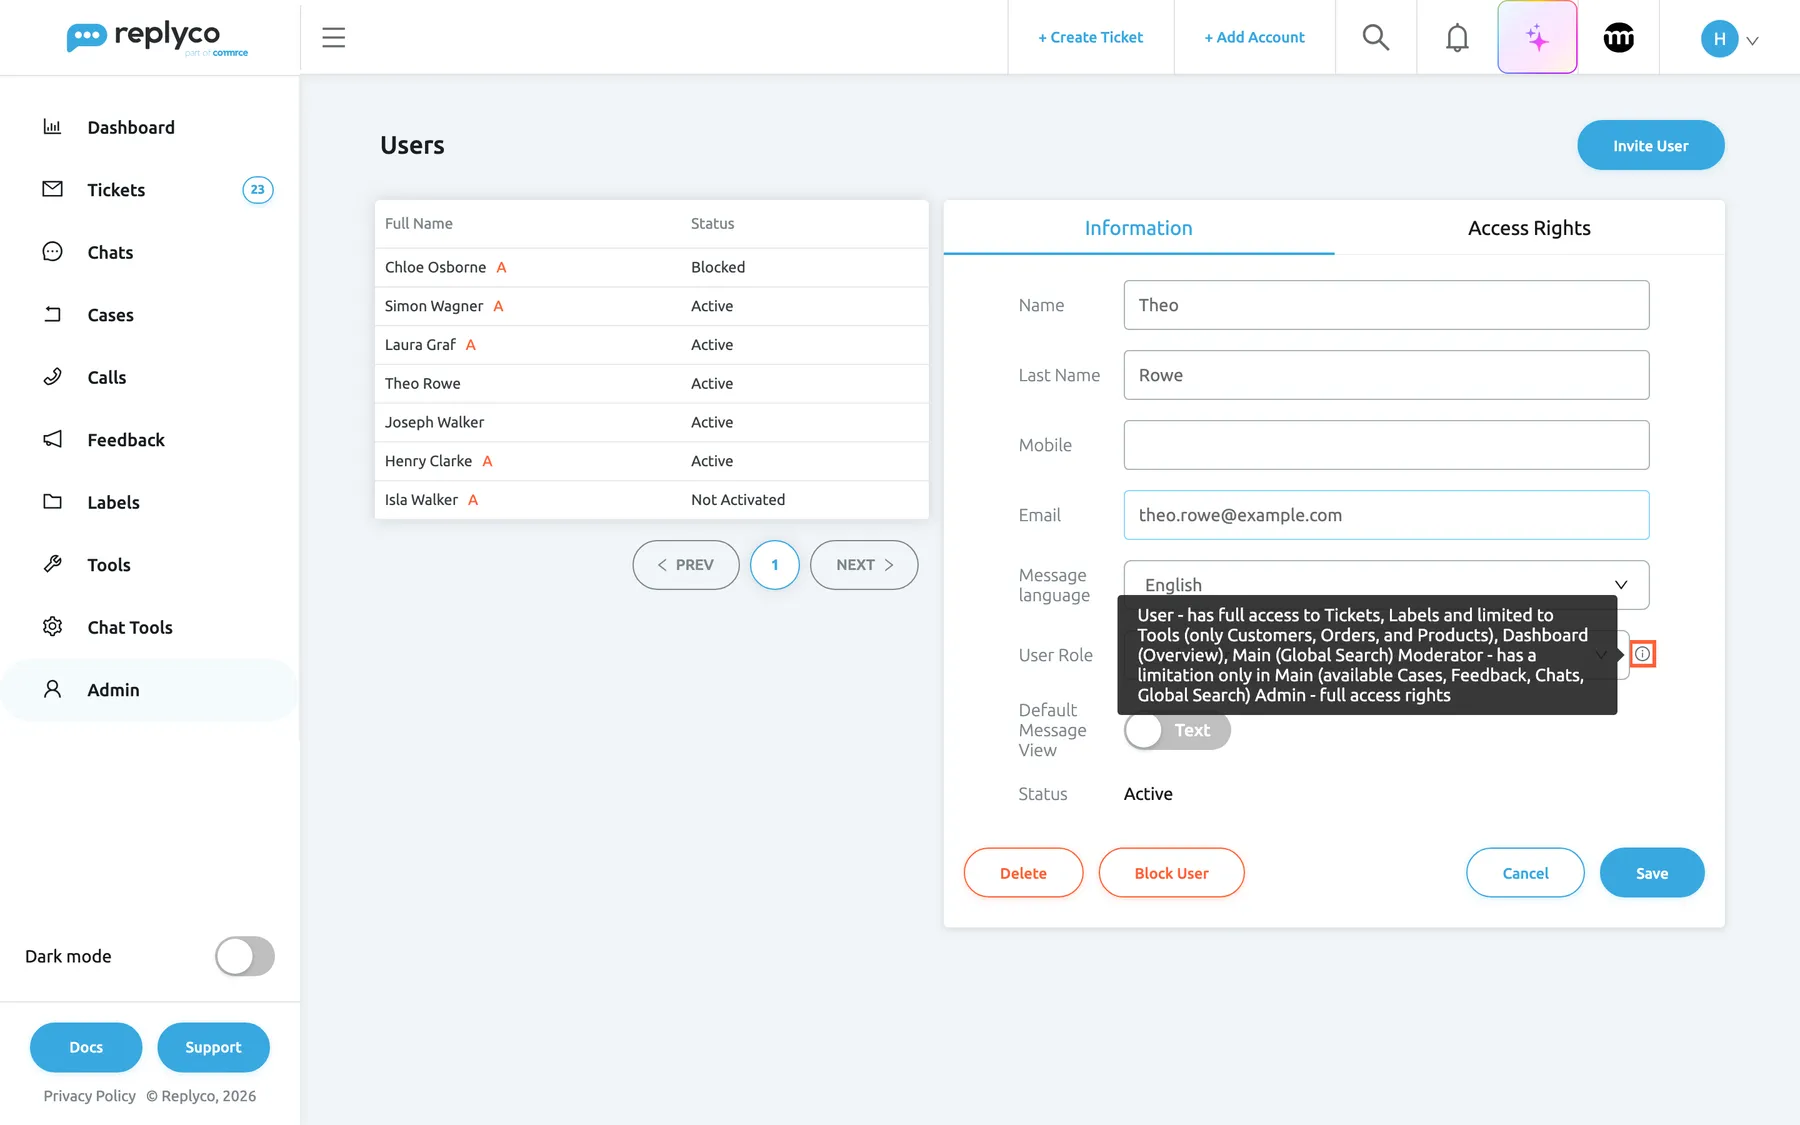
Section titled “Change a user’s role”A role is a ready-made set of access: permissions, ticket lists and dashboards. Pick it under User Role on the Information tab and select Save. The information icon beside the drop-down sums up the three roles in Replyco’s own words:
What this screenshot shows
- Screen
- Information (/users)
- Highlighted
- img “”, details-panel, hovered. shows the description of the roles User
- Also visible
- User Role Moderator; tooltip with the three role descriptions
- Purpose
- what each role includes, in the product's words
| Role | What it gives, as the product describes it | Suits |
|---|---|---|
| User | Full access to tickets and labels; of the tools only customers, orders and products; of the dashboards only Overview; of the main areas only the global search | Agents who answer customers |
| Moderator | Limited only in the main areas, where cases, feedback, chats and the global search are available | Team leads who also run tools and automation |
| Admin | Full access rights, including the Admin menu | Owners and administrators |
Admin and Moderator leave out the Chats dashboard by design. For anyone who should see the chat figures, tick it under Dashboard on Access Rights.
Saving a role replaces the user’s permissions, ticket lists and dashboards with the role’s set. Their labels, Smart Filters, live chat widgets and accounts stay as they are. When a user’s access matches none of the three roles, for example after you changed one box on Access Rights, the drop-down shows Custom; you cannot pick Custom, it only tells you the access was adjusted by hand.
Example: Theo Rowe leads the Northwind returns team. Give him Moderator, save, and then open Access Rights to check the details.
Set what a user can see and do
Section titled “Set what a user can see and do”The Access Rights tab of a user holds ten sections. Select a section’s title to open it, tick or clear boxes, then select Save at the bottom. Replyco saves only the sections you changed and confirms with Permissions have been updated. What each permission opens across Replyco, menu by menu, is in User permissions and roles.
-
Open AdminUsers and select the user.
-
Select the Access Rights tab.
-
Open a section, for example Main, and tick what the user may do.
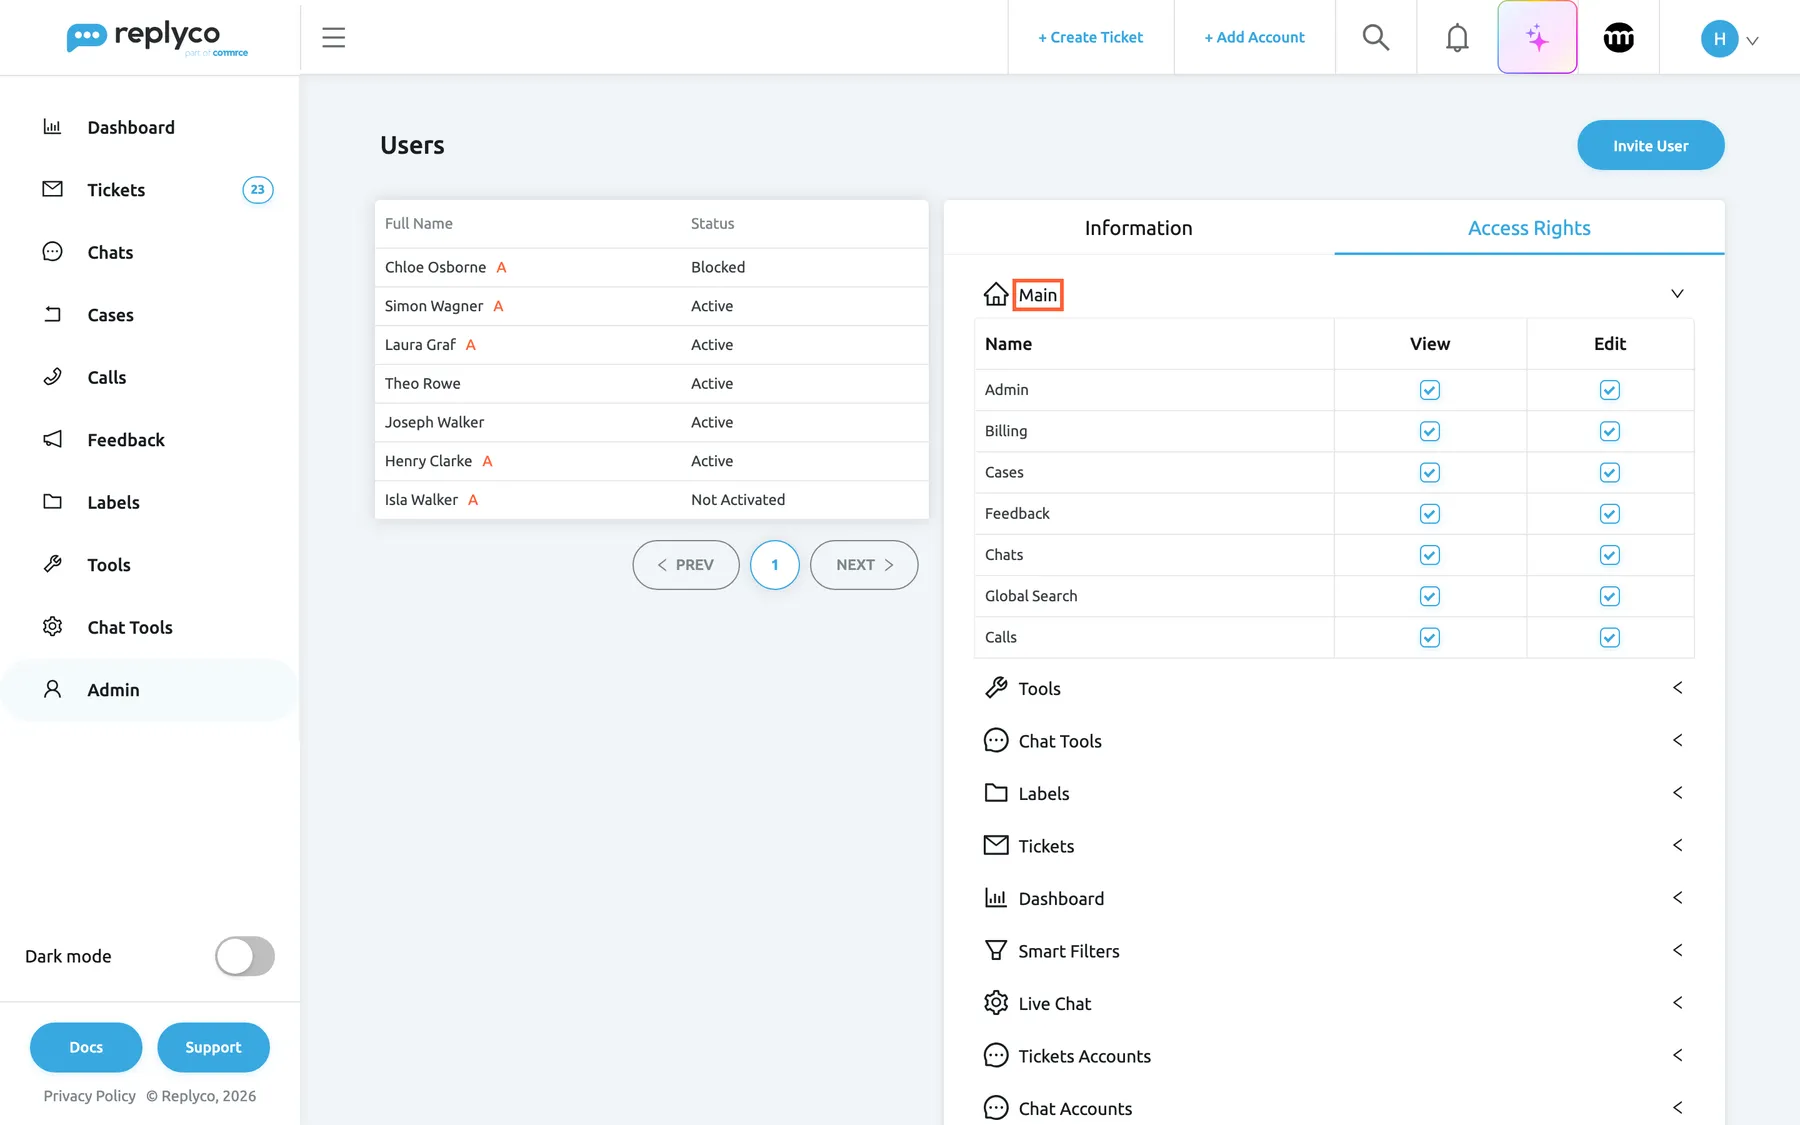
Access Rights sets, per user, which areas they may view or edit; Edit always includes View. What this screenshot shows
- Screen
- Access Rights (/users)
- Highlighted
- “”, access-rights-main, expanded. shows the Main permissions with View and Edit
- Also visible
- Admin, Billing, Cases, Feedback, Chats, Global Search, Calls with View and Edit ticked; the other nine sections collapsed
- Purpose
- set what a user may open and change
-
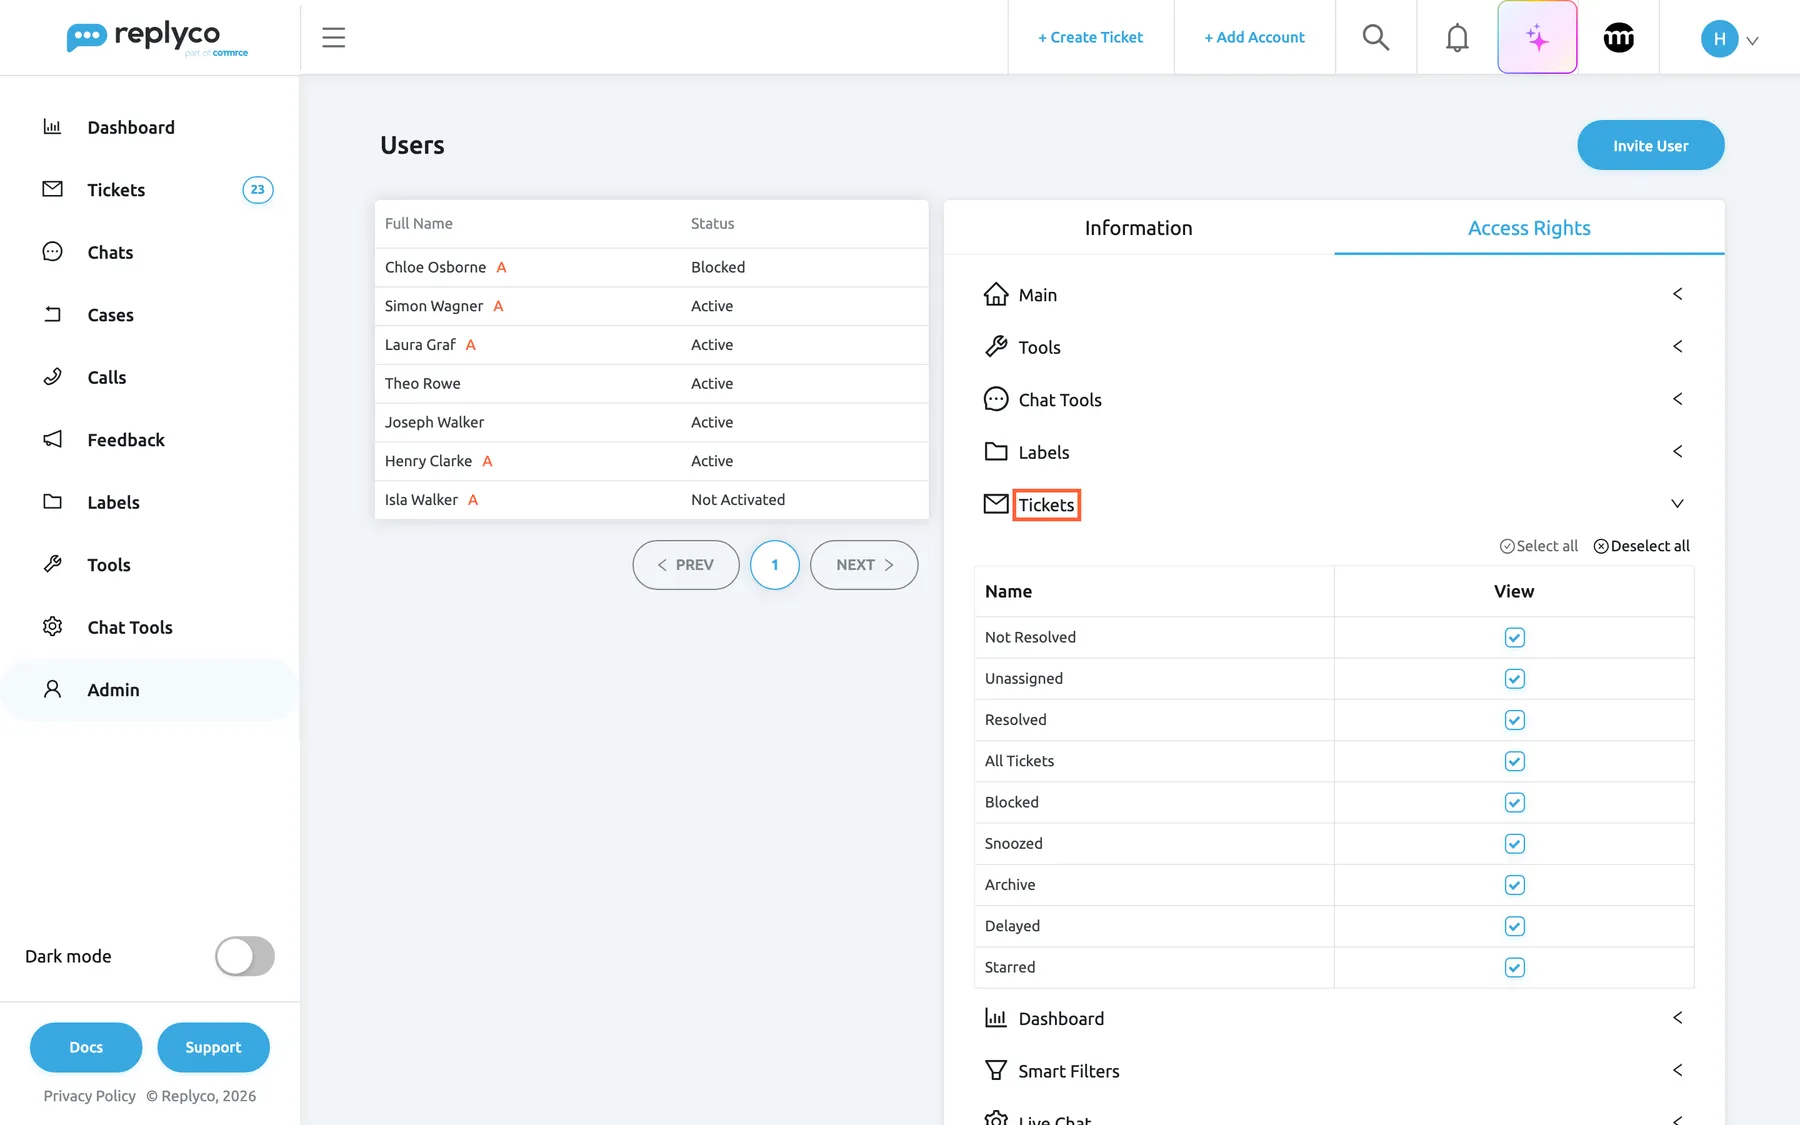
Open the other sections you need, such as Tickets for the ticket lists or Tickets Accounts for the accounts.
-
Select Save.
The colleague sees the change in their menu the next time Replyco loads for them, for example after they reload the page.
| Section | What you tick | Effect |
|---|---|---|
| Main | View and Edit for Admin, Billing, Cases, Feedback, Chats, Global Search and Calls | Which main areas appear in the user’s menu, and whether they may change things there |
| Tools | View and Edit for Customers, Orders, Automation, Labels, Shipping Labels, Custom Fields, Smart Filters, Fallbacks and Custom Shipping Links | Which tools the user may open or edit |
| Chat Tools | View and Edit for Automation, Widgets and Transcripts | Which chat tools the user may open or edit |
| Labels | Each label, plus No Label | Which labels and their tickets the user sees; No Label shows tickets that carry no label. See Labels |
| Tickets | Each ticket list | Which lists appear under Tickets; My Tickets is always included. See Ticket lists |
| Dashboard | Each dashboard | Which dashboards appear under Dashboard. See How the dashboards count |
| Smart Filters | Each Smart Filter | Which of the Smart Filters the user sees. See Manage Smart Filters |
| Live Chat | Each live chat widget | The widgets whose chats the user is responsible for: the existing ones as soon as you save and every new one; clearing a widget takes the user off its chats again. See Live chat widget |
| Tickets Accounts | Each account that brings in tickets | Only the tickets of ticked accounts appear for the user. See Accounts |
| Chat Accounts | Each chat account | For each ticked account, the user becomes responsible for its chats, the existing ones as soon as you save and every new one, which then appear for them under Open. Clearing the account takes them off those chats again; chats assigned to them still appear. See User permissions and roles |
Edit includes View. Ticking Edit ticks View too and locks it; clear Edit first to leave a permission at View, then clear View to take it away. The sections from Labels down have one View box per item and the links Select all and Deselect all.
What this screenshot shows
- Screen
- Access Rights (/users)
- Highlighted
- “”, access-rights-tickets, expanded. shows the ticket lists with a View box each, and Select all and Deselect all
- Also visible
- nine ticket lists, all ticked; Select all, Deselect all
- Purpose
- choose the ticket lists a user sees
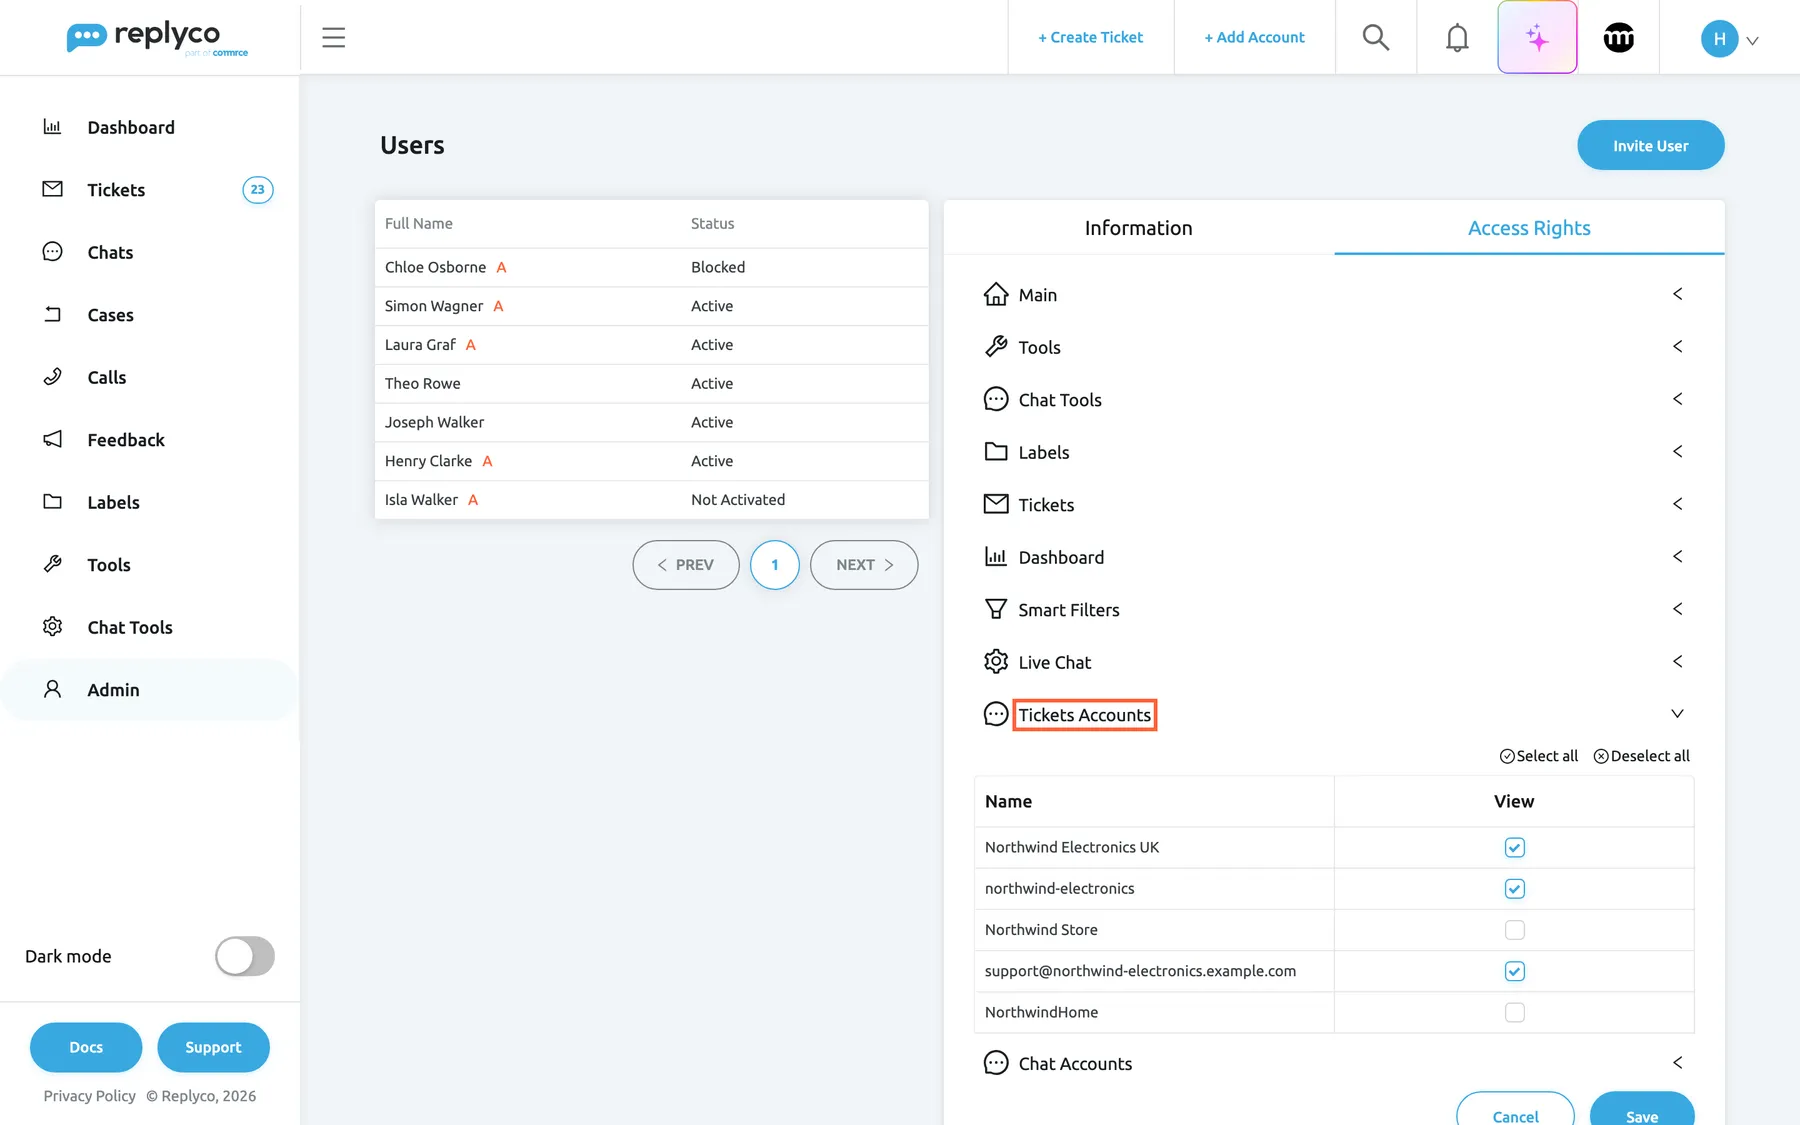
What this screenshot shows
- Screen
- Access Rights (/users)
- Highlighted
- “”, access-rights-accounts, expanded. shows the ticket accounts with a View box each
- Also visible
- Amazon, eBay and mailbox ticked; Shopify and Etsy clear; Chat Accounts collapsed; Cancel, Save
- Purpose
- limit a user to some accounts
Example: Simon Wagner handles only marketplace customers. On his Tickets Accounts, tick Northwind Electronics UK, northwind-electronics and the support mailbox and clear Northwind Store and NorthwindHome; after he reloads Replyco, the Shopify and Etsy tickets no longer appear in his lists.
Block or unblock a user
Section titled “Block or unblock a user”Block a user when they should stop working in Replyco but you want to keep them, for example during a long absence. Select the user and select Block User at the bottom of the Information tab. Replyco ends every session of that user at once, sets the status to Blocked and closes the details. A blocked user cannot sign in; see Sign in.
To let them back in, select the user and select Unblock User; the status returns to Active. Neither action asks for confirmation.
You cannot block yourself, and a user who has not registered yet has no Block User button; delete them instead if they should not join.
Delete a user
Section titled “Delete a user”Select the user and select Delete at the bottom left of the Information tab. Replyco asks Are you sure you want to delete this user? Select Yes to delete the user, or No to keep them.
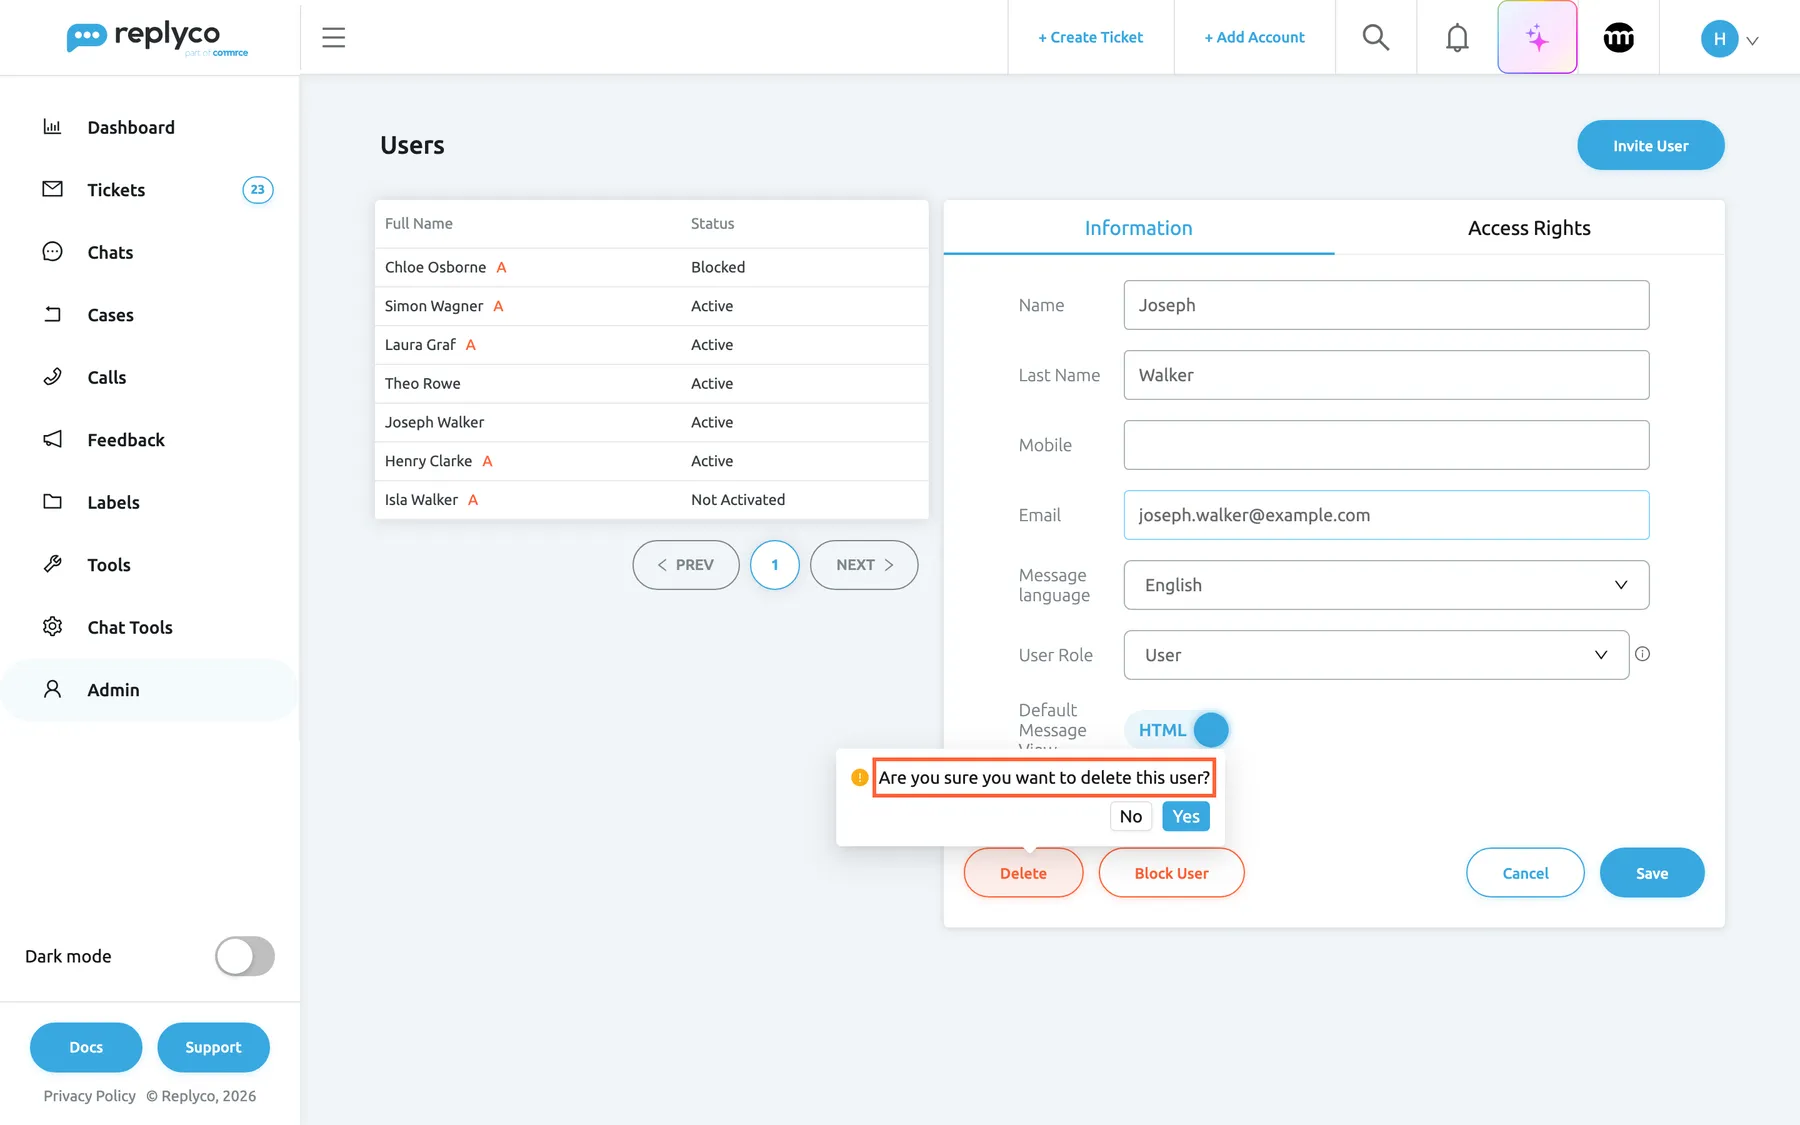
What this screenshot shows
- Screen
- Information (/users)
- Highlighted
- “”, details-footer, open. Yes deletes the user, No closes the question
- Also visible
- Joseph Walker, role User; confirmation with No and Yes; Block User, Cancel, Save
- Purpose
- remove a user
The user disappears from the list and from the user lists in Replyco’s filters. You cannot delete yourself.
Every control, explained
Section titled “Every control, explained”The controls of AdminUsers, in the order the screen shows them.
Invite User
Section titled “Invite User”Top right of the screen, a blue button.
Opens the form Invite User with Name, Last Name, Mobile, Email, Message language, User Role and Default Message View, and the buttons Cancel and Send Invitation. Every field except Mobile is required; the e-mail address must be valid, must not be a disposable address and must not belong to another Replyco user. After Send Invitation and Yes, Replyco e-mails the invitation and shows the registration link with Copy.
Each colleague gets their own user, so assignments, history and permissions belong to a person.
The user list
Section titled “The user list”Left of the screen, ten users per page.
| Column | What it shows | Why |
|---|---|---|
| Full Name | The user’s name, or their e-mail address when the name is empty, and a red A for the Admin permission with Edit rights | See who administers your company |
| Status | Active, Not Activated or Blocked | Spot colleagues who have not registered or are blocked |
Selecting a row opens the user’s details on the right.
One place to check who can work in Replyco.
Information
Section titled “Information”Details of the selected user, first tab. Saved with Save at the bottom right.
Name, Last Name, Mobile, Email, Message language, User Role, Default Message View and Status. Save refuses an empty e-mail address (User email is required.) and an invalid one (User Email is invalid.), then saves, closes the details and shows Success.
Keep names and addresses right, and set each person’s translation language and message view.
User Role
Section titled “User Role”Information tab and the invitation form, a drop-down with an information icon. Shown with user roles, which every current plan includes.
Admin, Moderator or User. Choosing one replaces the user’s permissions, ticket lists and dashboards with the role’s set when you save. Shows Custom when the user’s access matches no role. A new user starts with User.
Give a colleague sensible access in one step, then fine-tune it on Access Rights.
Copy invite link
Section titled “Copy invite link”Information tab, next to Status, shown while the status is Not Activated.
Copies the user’s registration link, the same one the invitation e-mail contains.
Send the invitation again yourself when the e-mail did not arrive.
Block User and Unblock User
Section titled “Block User and Unblock User”Information tab, bottom left, next to Delete. Not shown for yourself or for a user who has not registered.
Block User ends all of the user’s sessions, sets Blocked and stops them from signing in. Unblock User sets Active again. No confirmation.
Stop access at once without losing the user.
Delete
Section titled “Delete”Information tab, bottom left. Not shown for yourself.
Asks Are you sure you want to delete this user? and, after Yes, deletes the user. On a plan priced per user, the question is Removing a user will immediately adjust your subscription price. The updated cost will take effect and be reflected in your next invoice.
Remove people who have left for good.
Access Rights
Section titled “Access Rights”Details of the selected user, second tab. Shown with user permissions, which every current plan includes. Saved with Save at the bottom.
Ten collapsible sections: Main, Tools and Chat Tools with View and Edit per permission; Labels, Tickets, Dashboard, Smart Filters, Live Chat, Tickets Accounts and Chat Accounts with one View box per item and Select all and Deselect all. Save stores the sections that changed and shows Permissions have been updated; Cancel closes the details.
Give each person exactly the lists, labels and accounts their job needs.
Who sees what
Section titled “Who sees what”| Part | Shown when |
|---|---|
| Users in the Admin menu | The user has the Admin permission |
| User Role | User roles, part of every current plan |
| The Access Rights tab | User permissions, part of every current plan |
| Copy invite link | The user’s status is Not Activated |
| Block User or Unblock User | Another user who has registered |
| Delete | Another user |
| The price warnings | Your plan is priced per user |
What you need to know
Section titled “What you need to know”| Topic | Fact |
|---|---|
| One address, one user | An e-mail address can belong to only one Replyco user, in any company. |
| New users | Start with the role’s permissions, ticket lists and dashboards, every label with No Label ticked, Replyco’s default Smart Filters and every account. |
| Roles | A saved role replaces permissions, ticket lists and dashboards; labels, Smart Filters, widgets and accounts stay. |
| My Tickets | Always part of every user’s ticket lists. |
| Edit and View | Edit includes View. |
| When changes apply | A colleague’s menu follows their new access the next time Replyco loads for them. |
| Last administrator | The only administrator cannot remove their own Admin rights. |
| Blocking | Ends the user’s sessions at once and keeps the user. |
| Price | On a plan priced per user, inviting or deleting a user changes the price at once. |
| Paging | Ten users per page. |
Frequently asked questions
Section titled “Frequently asked questions”General
Section titled “General”Who can manage users in Replyco?
Section titled “Who can manage users in Replyco?”Anyone with the Admin permission sees Users in the Admin menu and can open AdminUsers; every current plan includes the screen. The Admin role gives that permission with Edit rights, which the red A in the list marks. See User permissions and roles.
Why is there no Users item in my Admin menu?
Section titled “Why is there no Users item in my Admin menu?”Users appears in the Admin menu when your user has the Admin permission; ask an administrator to tick it for you. Every current plan includes user permissions and roles, but a company on an older plan may not have them. See What each plan includes and User permissions and roles.
What does the red A next to a name mean?
Section titled “What does the red A next to a name mean?”It marks a user with the Admin permission and Edit rights, which is what the Admin role gives. Hover it and it reads Admin. Users without it, like agents with the User role, have no A in AdminUsers.
Inviting
Section titled “Inviting”How do I add a colleague?
Section titled “How do I add a colleague?”Open AdminUsers, select Invite User, fill in name, last name and e-mail, choose a role and select Send Invitation, then Yes. Replyco e-mails the invitation and shows a registration link you can copy. For the whole procedure, see Invite users and set what they can do.
My colleague did not get the invitation e-mail. What can I do?
Section titled “My colleague did not get the invitation e-mail. What can I do?”Ask them to look in their junk folder first. Then open AdminUsers, select their row, which shows Not Activated, and select Copy invite link next to Status. Send them the copied link yourself; they register from it as from the e-mail.
Why can’t I invite someone with their e-mail address?
Section titled “Why can’t I invite someone with their e-mail address?”An e-mail address can belong to only one Replyco user, in any company, so an address that already has its own Replyco sign-up cannot be invited. Replyco also refuses disposable addresses with “Email address is disabled!”, an empty field with All fields required. and a malformed address with User Email is invalid..
Which role should a new agent get?
Section titled “Which role should a new agent get?”User, which Replyco preselects: full access to tickets and labels, customers and orders among the tools, the Overview dashboard and the global search. Give Moderator to team leads who also run tools and automation, and Admin only to people who manage users, settings and billing. You can adjust each person afterwards on Access Rights in AdminUsers.
Does inviting a user change what I pay?
Section titled “Does inviting a user change what I pay?”On a plan priced per user, yes: the confirmation reads Adding a new user will immediately adjust your subscription price. The updated cost will take effect and be reflected in your next invoice. and the price changes at once; deleting a user changes it back. If you pay through Shopify, Replyco opens Shopify so you can approve the new price. See Billing.
Roles and access
Section titled “Roles and access”Why does the role say Custom?
Section titled “Why does the role say Custom?”The user’s permissions, ticket lists or dashboards no longer match any of the three roles, usually because someone changed a box on Access Rights. Custom is a description, not a choice. Pick Admin, Moderator or User under User Role and select Save to go back to a role’s set.
I changed a user’s role. Why do they still see the same labels?
Section titled “I changed a user’s role. Why do they still see the same labels?”A role sets permissions, ticket lists and dashboards only. Labels, Smart Filters, live chat widgets and accounts stay as they are. Change those in their sections on the Access Rights tab of the user in AdminUsers and select Save.
How do I give someone access to only one marketplace?
Section titled “How do I give someone access to only one marketplace?”Open AdminUsers, select the user, open Access Rights and then Tickets Accounts. Tick that marketplace’s account, clear the others and select Save. Chat accounts are in Chat Accounts, a separate section. See Accounts.
Why can’t a colleague see tickets that others see?
Section titled “Why can’t a colleague see tickets that others see?”Access is set per user in several sections, and a ticket must pass all of them. On the user’s Access Rights in AdminUsers, check Tickets Accounts for the account, Labels for the ticket’s label or No Label for unlabelled tickets, and Tickets for the list. See Ticket lists.
I changed a colleague’s access. When do they see it?
Section titled “I changed a colleague’s access. When do they see it?”The next time Replyco loads for them. Ask them to reload the page; their menu then shows the lists, dashboards and areas you set on Access Rights in AdminUsers.
Can I remove my own administrator rights?
Section titled “Can I remove my own administrator rights?”Only if another user keeps the Admin permission with Edit rights. When you are the only administrator, Replyco refuses with “You’re the only administrator of this account. You cannot remove administrative rights.” Give a colleague the Admin role in AdminUsers first.
Blocking and deleting
Section titled “Blocking and deleting”What is the difference between blocking and deleting a user?
Section titled “What is the difference between blocking and deleting a user?”Block User ends the user’s sessions at once and stops them from signing in, but keeps them in AdminUsers, so you can unblock them later. Delete removes the user from the list after Are you sure you want to delete this user? Block a colleague who may come back; delete one who has left for good.
What should I do with the tickets of a colleague who leaves?
Section titled “What should I do with the tickets of a colleague who leaves?”Reassign them before you delete the user: filter a ticket list by their name, select the tickets and assign them to a colleague or leave them unassigned; see Assign, label and merge tickets. Then block or delete the user in AdminUsers.
Why is there no Block User button for a user?
Section titled “Why is there no Block User button for a user?”Block User is not offered for your own user or for a user whose status is Not Activated. Someone who never registered cannot sign in anyway; delete them in AdminUsers if they should not join.
Troubleshooting
Section titled “Troubleshooting”| Symptom | What to check |
|---|---|
| Users is missing from the Admin menu | Your user has the Admin permission; on an older plan, the plan includes user permissions and roles (What each plan includes) |
| The invitation is refused with All fields required. | Name, Last Name and Email are all filled in |
| The invitation is refused with “Email address is disabled!” | The address is a regular mailbox, not a disposable address |
| The invitation cannot be sent for an address | The address is not already used by another Replyco user, for example from an earlier sign-up |
| The colleague never got the invitation | Their junk folder; the address in their details; then Copy invite link and send the link yourself |
| A colleague still sees a list or area you removed | You selected Save on Access Rights; they reloaded Replyco |
| A colleague sees no tickets of an account | The account is ticked in Tickets Accounts; the ticket’s label or No Label is ticked in Labels |
| The role shows Custom | Access was changed by hand; pick a role and save to reset it |