

Mailbox by forwarding
Customers write to support@ your shop, and that address lives with a mail service Replyco cannot sign in to, or is an alias or a group rather than a mailbox. Connecting a mailbox by forwarding solves that: Replyco creates its own address for your mailbox, you forward your mail to it, and every message becomes a ticket, while your replies still go out as your own address and sender name. You add it under AdminAccounts with + Add Account, and it works with any mail service that can forward.
What it does
Section titled “What it does”A support address is only useful if every message in it reaches your team and every reply reaches the customer. When the mailbox cannot be connected by signing in, the mail stays in a separate inbox, and replies sent from somewhere else land in spam or are refused, because they come from a server your domain has not authorised.
When you connect a mailbox by forwarding, Replyco creates one forwarding address for that mailbox on its own mail server, a random name such as q8v3n5t2w7kd at a Replyco domain. From there:
- Everything your mail service forwards to that address arrives as tickets of the mailbox, about every five minutes. See the forwarding address.
- Your replies go out from your own address and sender name, sent by Replyco’s mail server. See E-mail address and Sender Name.
- Domain authentication with DKIM lets strict recipients such as Gmail and Microsoft accept those replies: you publish one DNS record, and Replyco signs your replies as your domain. See understanding domain authentication.
- The same forwarding address and domain authentication serve WooCommerce, BigCommerce, Magento and Fruugo accounts. See forwarding for webstores and marketplaces.
The account’s details show the forwarding address and the domain’s status at any time, labelled Good or Limited, so you can check what Replyco uses before a customer tells you a reply never arrived.
Before you start
Section titled “Before you start”| Requirement | Details |
|---|---|
| The Admin permission | + Add Account in the top bar and the Admin menu appear only for users with the Admin permission. See User permissions and roles. |
| A free account on your plan | Every plan can connect a mailbox by forwarding. Each mailbox counts towards your plan’s number of accounts; during a trial there is no limit. See What each plan includes. |
| Access to your mail service’s settings | You create the forwarding rule in the mail service, program or mail server that receives your support mail. |
| Access to your domain’s DNS, for domain authentication | The DKIM TXT record goes into the DNS zone of the domain in your address, at the company that manages your domain. You can skip this and come back later. |
| Cost | None. Forwarding and domain authentication use no AI actions or paid add-ons. |
Understanding the forwarding address and domain authentication
Section titled “Understanding the forwarding address and domain authentication”A mailbox connected by forwarding has two parts. The forwarding address decides what arrives: Replyco reads its own mailbox behind that address and turns every message in it into a ticket. Domain authentication with DKIM decides how your replies are received: Replyco sends them from your address, and a DKIM signature for your domain proves they are allowed to. The domain’s status appears as Deliverability: in the domain authentication step and in the account’s details:
| What you see | Deliverability | What it means | What to do |
|---|---|---|---|
| Waiting for you to publish the DNS record, then verify. | Limited | Replyco created a key for your domain and waits for the DNS record | Publish the record, then select Verify DNS |
| We couldn't find the DKIM record in your DNS yet. Publish it and check again. | Limited | No TXT record at the host Replyco checks | Check the host name and that the record was saved; DNS changes can take a few hours |
| A DKIM record was found but it doesn't match. Make sure you copied the exact value. | Limited | A record is there, but its key differs from Replyco’s | Copy the value again with its copy icon and replace the record |
| The DNS lookup timed out. This is usually temporary — try again shortly. | Limited | The DNS lookup did not answer in time | Select Verify DNS again a little later |
| Set up DKIM button, no record | Limited | No key exists yet for this domain | Select Set up DKIM to create one |
| Re-check DNS button | Good | The record matches; Replyco signs your replies as your domain | Nothing; Re-check DNS checks again after DNS changes |
| No domain authentication section | none | The address is at a public mail service such as gmail.com, or at a Replyco domain | Nothing to set up; the domains are listed under What you need to know |
How Replyco decides
Section titled “How Replyco decides”- One forwarding address per mailbox. Replyco creates it the moment you save the mailbox: twelve random lowercase letters and digits at a Replyco mail domain. Every message that reaches it becomes a message of this mailbox’s tickets, whoever sent it.
- Replies come from your address. A reply shows your Sender Name and your E-mail address as the sender, and Replyco’s mail server sends it. Customers reply to your own address, which forwards to Replyco again, so the conversation stays in one ticket.
- The domain comes from your address. For
support@northwind-electronics.example.comthe domain isnorthwind-electronics.example.com. Replyco creates one DKIM key per domain, so two mailboxes on the same domain share one record. - A company domain gets its key straight away. When you save a mailbox whose address is on your own domain, Replyco creates the DKIM key at once, so the record is ready in the next step.
- Signing needs a verified record. Replyco signs a reply as your domain only while the domain is verified. Until then it sends the reply without that signature; domain authentication never stops a reply from being sent.
- Replyco checks the DNS when you ask. Verify DNS and Re-check DNS look up the TXT record at
rco1._domainkey.plus your domain and compare its key with Replyco’s. Spaces and line breaks inside the published key do not matter.
What does not get imported
Section titled “What does not get imported”- Mail that reached your address before you set up forwarding. The forwarding address starts empty; nothing older is fetched.
- Mail your mail service does not forward, for example when your rule forwards only certain messages.
- Replies you write from your own mail program. They go straight from your mail service to the customer, never to the forwarding address.
- A message this mailbox already has. Replyco recognises an email by its message ID and imports it once.
Setting it up in five steps
Section titled “Setting it up in five steps”-
Choose forwarding. Select + Add Account in the top bar, then the Email tile under Mailbox Accounts. The window asks How do you want to integrate your E-Mail Account?; select Setup Forwarding.
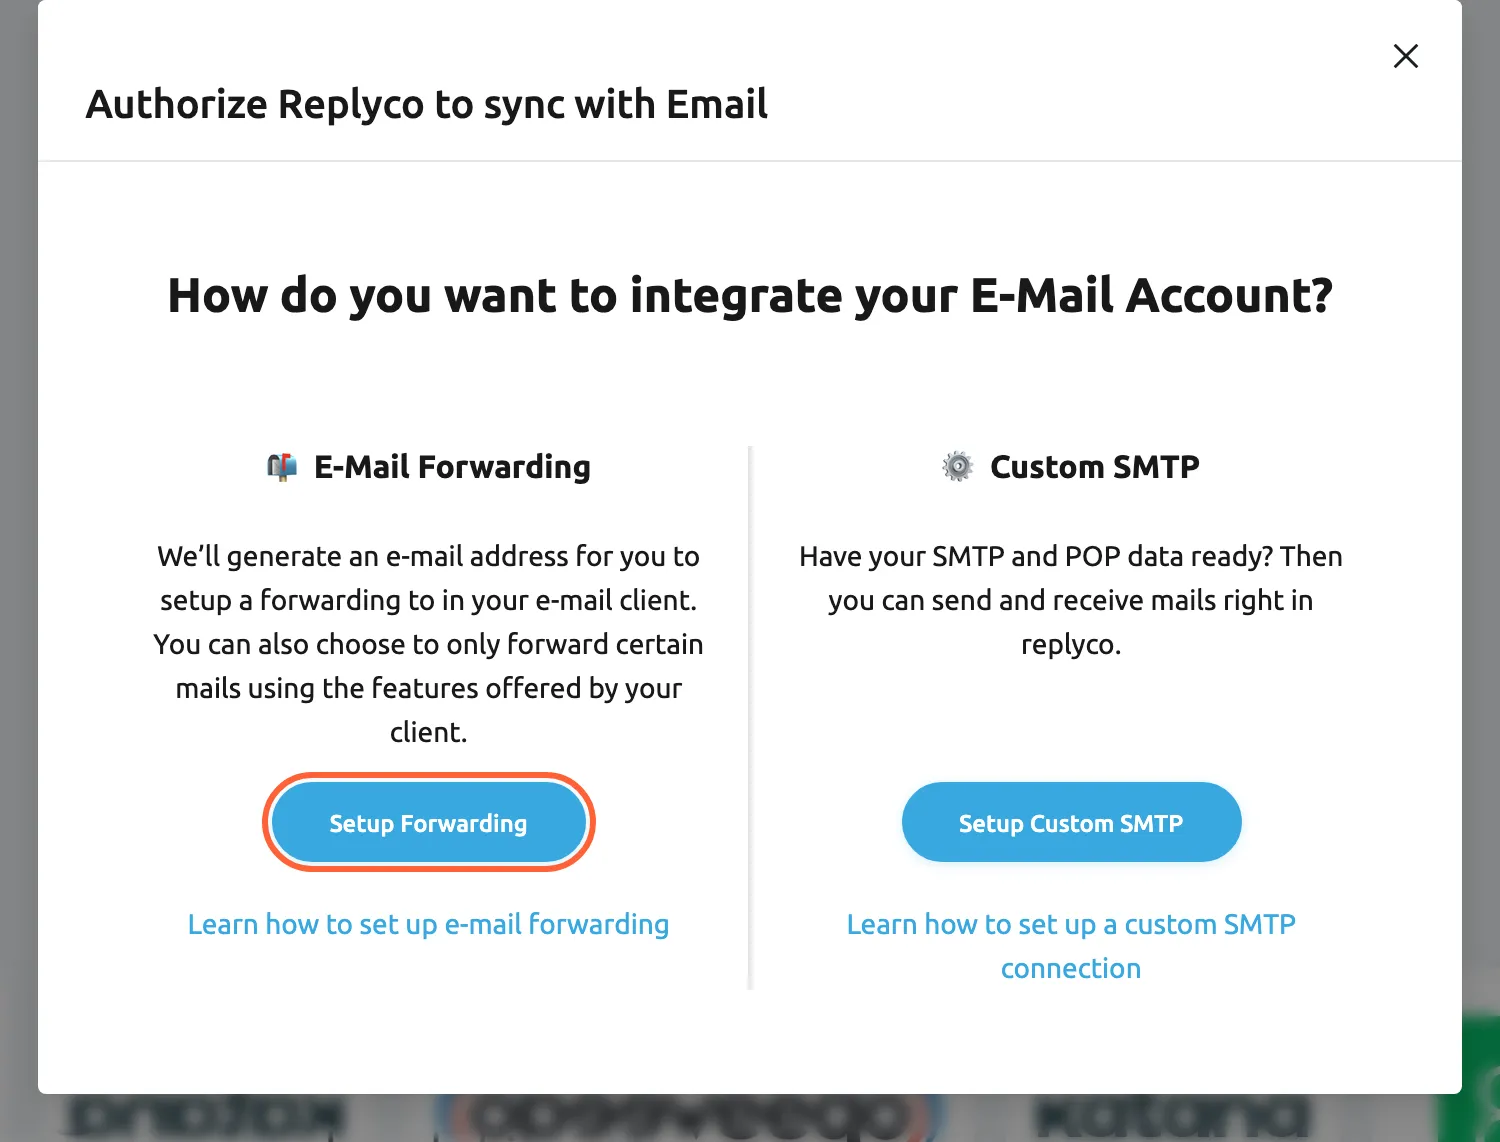
Choose Setup Forwarding to connect a mailbox by forwarding its mail to Replyco. What this screenshot shows
- Screen
- Add Account (/integrations/add)
- Highlighted
- button “Setup Forwarding”, dialog-left-column, enabled. opens the forwarding form (INFO step)
- Also visible
- question How do you want to integrate your E-Mail Account?; E-Mail Forwarding column with its help link; Custom SMTP column with Setup Custom SMTP
- Purpose
- entry point of connecting a mailbox by forwarding
-
Enter the address and the sender name. At INFO, type the address your customers write to in E-mail address and the name they should see in Sender Name, then select Authorize. Replyco saves the mailbox, shows Account successfully saved. and moves to EMAIL.
-
Copy the forwarding address. Select Copy Email Address, then Continue. Replyco shows Email Account successfully added. and moves to DOMAIN AUTH.
-
Forward your mail to it. In a separate browser tab, open the settings of the mail service that receives your support mail, create a forwarding rule for the address from step 2, and paste the copied address as the destination. Forward everything, or only certain messages if your mail service offers filters. If your mail service first sends a confirmation message to the new destination, that message arrives in Replyco as a ticket of this mailbox; open it there to find the code or link. For Gmail and Outlook, follow Forwarding in Gmail or Forwarding in Outlook.
-
Authenticate your domain, or skip for now. At DOMAIN AUTH, add the TXT record shown at your domain’s DNS provider and select Verify DNS, or select Skip and Skip anyway. Then select Finish. The mailbox is saved either way.
Send a test email to your support address from another mailbox. It arrives as a ticket at the next sync, usually within five minutes. If it does not, see Troubleshooting.
Forwarding in Gmail
Section titled “Forwarding in Gmail”In a Gmail or Google Workspace mailbox, forwarding is set on Gmail’s settings page. Keep the forwarding address from EMAIL copied; the labels below are those of Gmail’s English interface.
-
In Gmail, select Settings (the gear), then See all settings, and open the tab Forwarding and POP/IMAP.
-
Select Add a forwarding address, paste the forwarding address and select Next. Gmail shows the address once more; select Proceed, then OK.
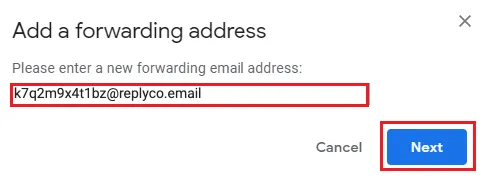
Paste the forwarding address from Replyco into Gmail's Add a forwarding address dialog and select Next. What this screenshot shows
- Screen
- ()
- Highlighted
- “”, , .
- Also visible
- Please enter a new forwarding email address:; the Replyco forwarding address in the field; Cancel; Next
- Purpose
-
Gmail sends a verification message to the forwarding address. It arrives in Replyco as a ticket of this mailbox at the next sync, usually within five minutes. Open the ticket and select the verification link in it.
-
Back in Gmail, reload the settings page and open Forwarding and POP/IMAP again. Select Forward a copy of incoming mail to, with the forwarding address, choose to keep Gmail’s copy in the inbox, and select Save Changes at the bottom of the page.
Forwarding in Outlook
Section titled “Forwarding in Outlook”In Outlook on the web and the new Outlook for Windows, forwarding is a mail setting:
-
Select Settings (the gear), then Mail › Forwarding. On Outlook.com the page is called Forwarding and IMAP.
-
Turn on Enable forwarding and enter the forwarding address.
-
Tick Keep a copy of forwarded messages if the mail should stay in Outlook as well, and select Save.
A Microsoft 365 organisation can block forwarding to addresses outside it. Forwarded mail then bounces with the error “5.7.520 Access denied, Your organization does not allow external forwarding”, and nothing reaches Replyco. Your Microsoft 365 administrator allows external forwarding in the organisation’s outbound spam filter policy.
Every setting, explained
Section titled “Every setting, explained”The settings of a forwarding mailbox are in the add window, in the order below, and afterwards under Edit in the account’s details on AdminAccounts.
E-mail address, the address customers see
Section titled “E-mail address, the address customers see”+ Add Account › Email › Setup Forwarding › INFO, the first field. Later: the account’s details › Edit, saved with Save.
The address your customers write to and see on every reply, such as support@northwind-electronics.example.com. It is required and must be an e-mail address; otherwise the field shows Make sure to put in a valid e-mail address. and Authorize stays unavailable. It also becomes the account’s name in the list. Replyco refuses to add an address that is already connected as a mailbox. Its domain is the one domain authentication is set up for.
Customers trust and answer the address they already know. Keeping it means nothing changes for them when your team moves to Replyco.
| Do | Don’t |
|---|---|
Enter the address customers already write to: support@northwind-electronics.example.com | Enter the forwarding address Replyco creates |
| Use an address on your own domain, so you can authenticate it | Expect domain authentication for an address at gmail.com or outlook.com |
| Add each support address as its own mailbox | Forward two different addresses to one mailbox if your team needs to tell them apart |
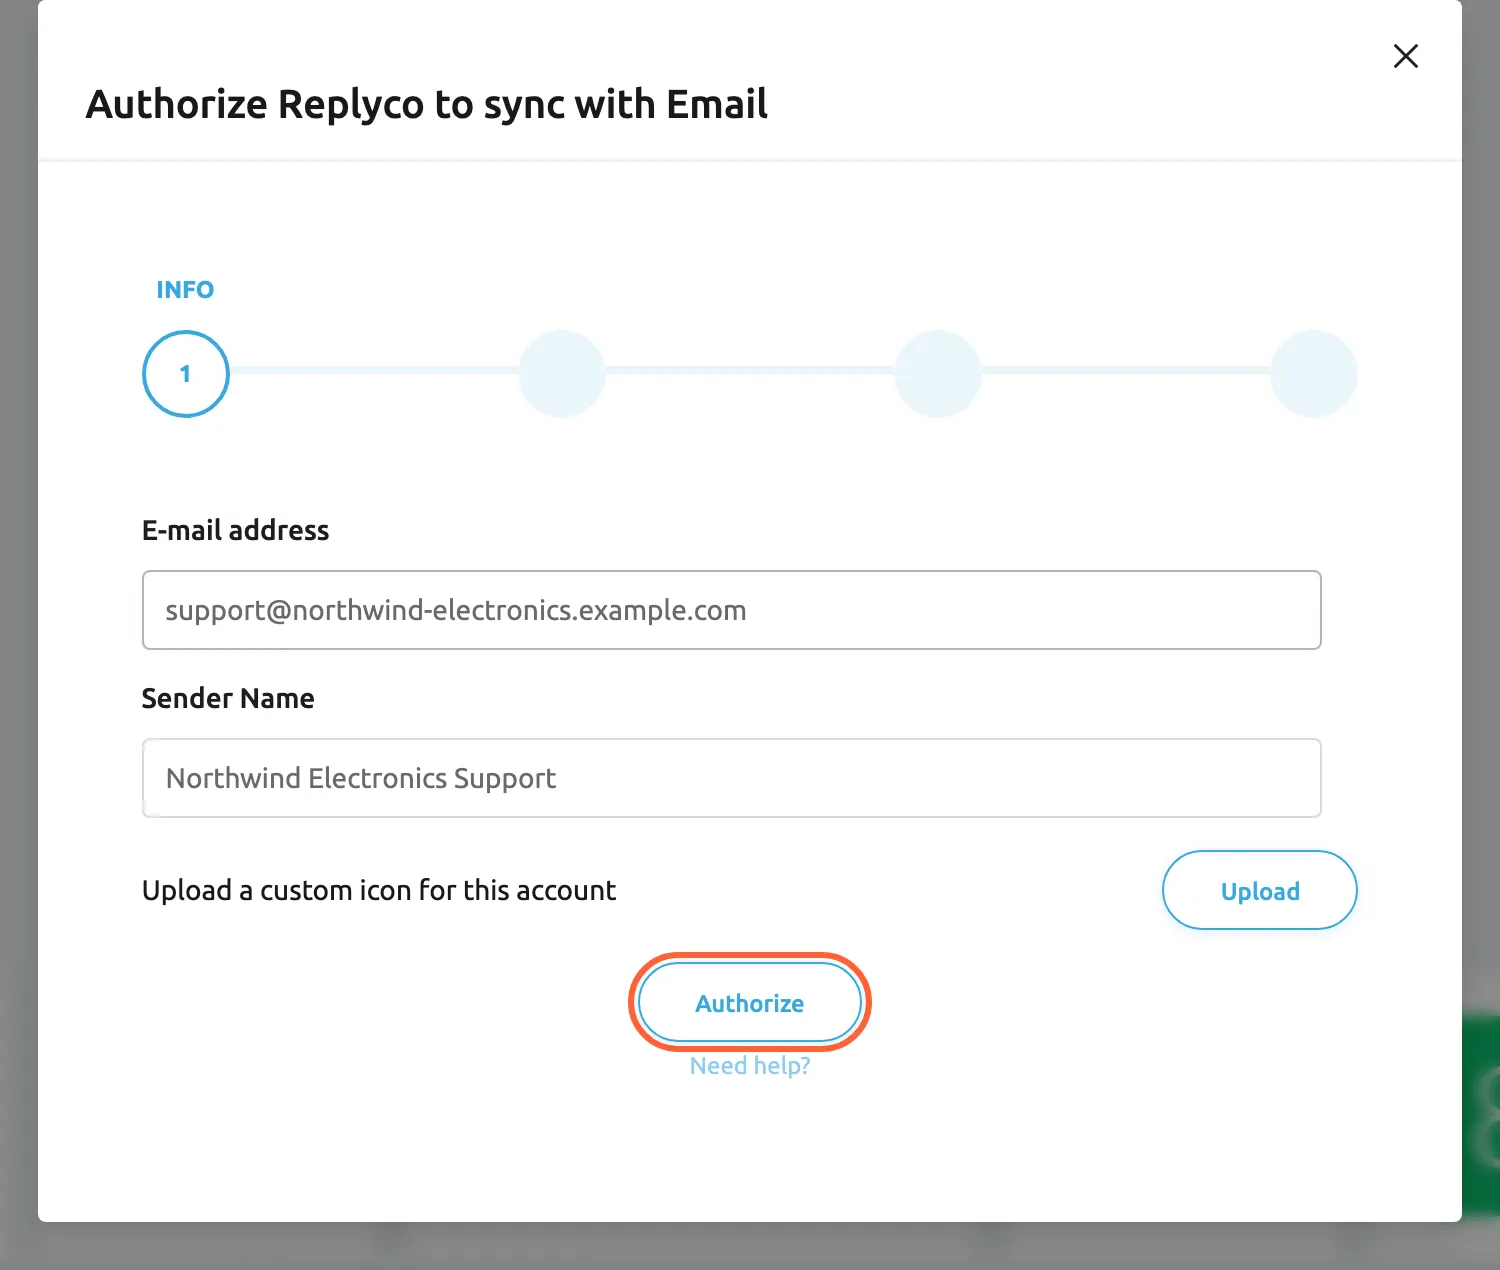
What this screenshot shows
- Screen
- Add Account (/integrations/add)
- Highlighted
- button “Authorize”, dialog-bottom, enabled. saves the mailbox and shows the forwarding address
- Also visible
- step indicator: INFO active, three more steps; E-mail address: support@northwind-electronics.example.com; Sender Name filled; Upload a custom icon for this account
- Purpose
- the details form of a forwarding mailbox, filled
Sender Name
Section titled “Sender Name”The second field at INFO, and in the account’s details › Edit.
The name shown next to your address on every reply, such as Northwind Electronics Support. It is optional; without it, customers see the address alone. A change applies to the next reply you send.
A name customers recognise gets opened; a bare address is easier to mistake for spam.
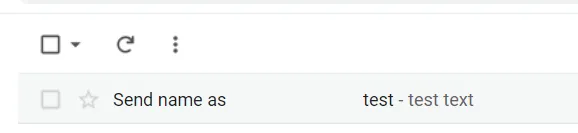
What this screenshot shows
- Screen
- ()
- Highlighted
- “”, , .
- Also visible
- inbox row with the sender name Send name as; subject test; preview test text
- Purpose
Upload a custom icon for this account
Section titled “Upload a custom icon for this account”Below Sender Name, with Upload. Also in the account’s details › Edit.
An image of your choice for this mailbox. It replaces the envelope icon wherever Replyco shows this account’s icon, such as the Source column of AdminAccounts. Optional.
With several mailboxes, a logo per brand or team tells them apart at a glance.
Copy Email Address, the forwarding address
Section titled “Copy Email Address, the forwarding address”Step EMAIL of the add window, under Set Up Email Forwarding. Later: the account’s details, under Email settings › Setup Email Forwarding:, where the box shows the address itself.
Selecting the box copies the forwarding address Replyco created for this mailbox. Continue moves on only after you have copied it; before that, Replyco shows Click the copy icon and save the e-mail address before you proceed. The address belongs to this mailbox only and does not change.
Forwarding is only finished when your mail service knows where to send. Copying the address is the moment you take it there.
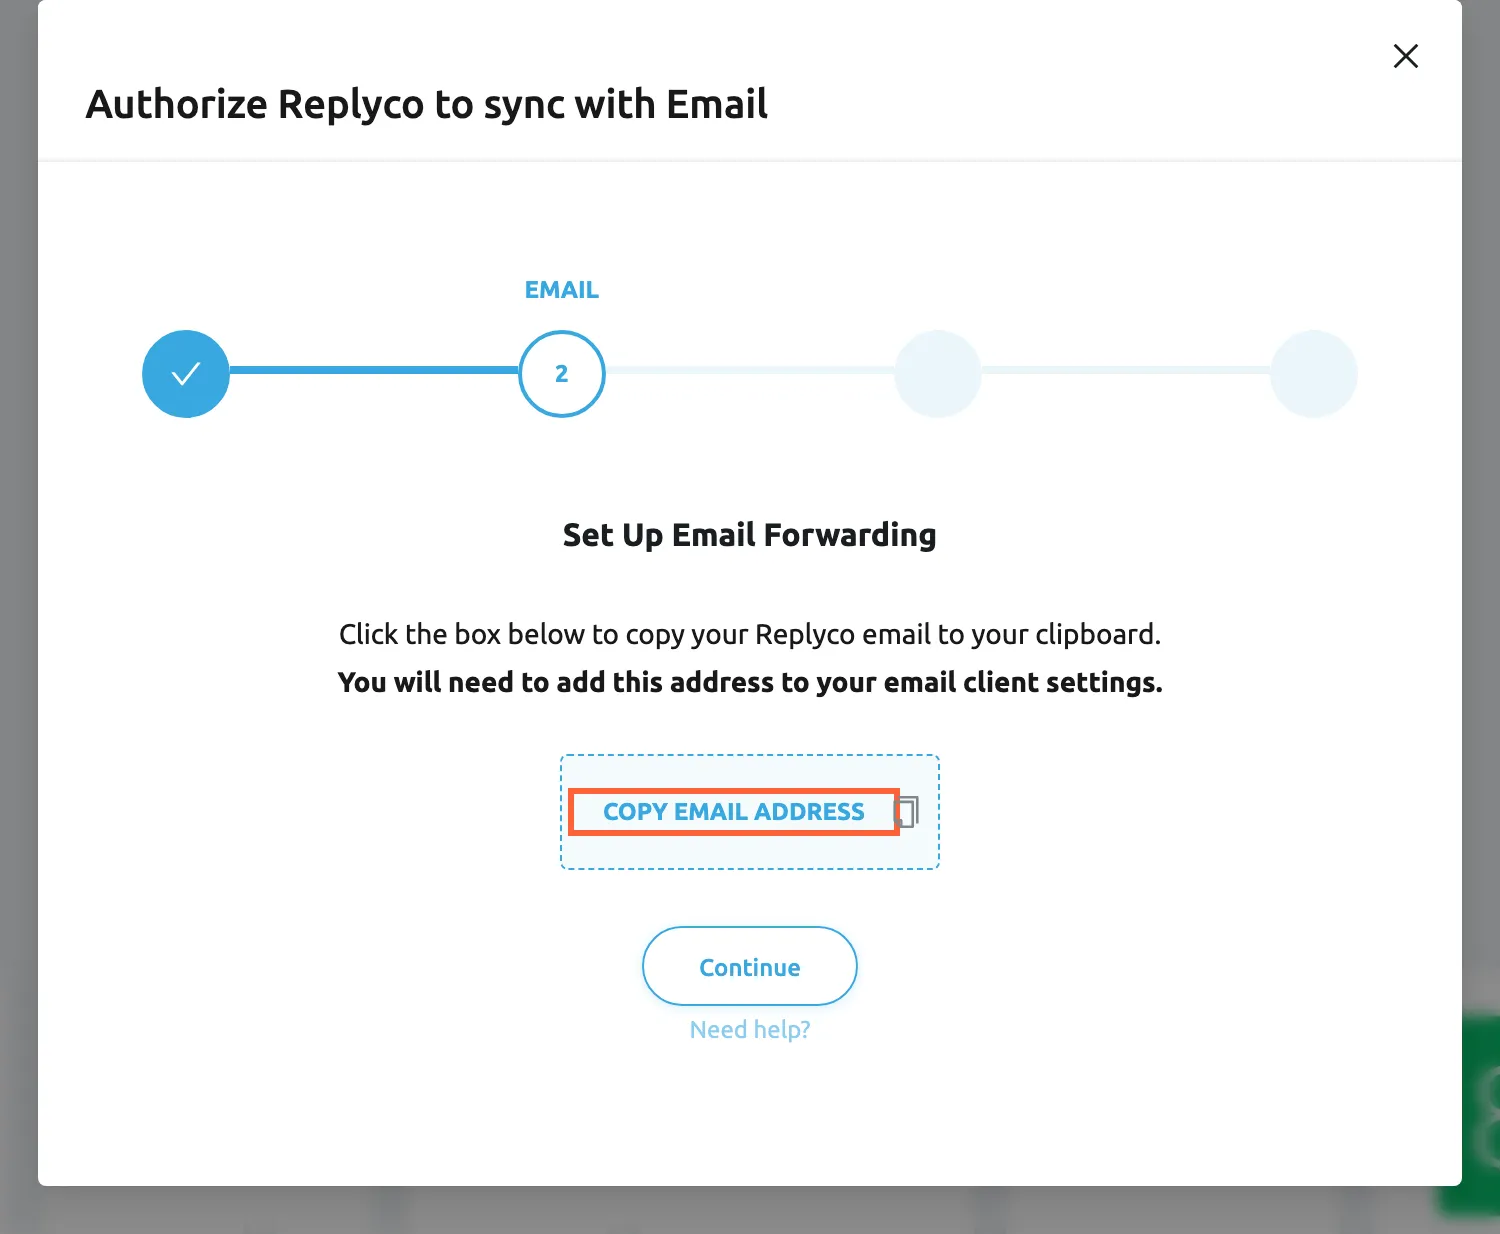
What this screenshot shows
- Screen
- Add Account (/integrations/add)
- Highlighted
- “”, dialog-center, enabled. copies the generated forwarding address to the clipboard
- Also visible
- step indicator: EMAIL active, INFO done; title Set Up Email Forwarding; Continue button
- Purpose
- get the forwarding address to set up forwarding in your mail service
DKIM record, the record for your DNS
Section titled “DKIM record, the record for your DNS”Step DOMAIN AUTH of the add window, under Domain authentication (DKIM), and in the account’s details under Email settings. Each value has a copy icon.
One TXT record: Type TXT, Host / Name rco1._domainkey. followed by your domain, and a Value that starts with v=DKIM1; k=rsa; p= and continues with your domain’s public key. It goes into your domain’s DNS zone at the company that manages your domain, not into your mailbox. It is the only record Replyco asks for. In the add window, How to add it lists the four steps.
Replyco sends your replies from your address through its own server. The record tells receiving mail servers that your domain allows it, which is what strict recipients check before they accept mail.
| Do | Don’t |
|---|---|
| Copy the host and the value with their copy icons | Retype the value; one wrong character makes it a different key |
| Create a record of type TXT | Create a CNAME or put the value in an SPF record |
Paste the host as shown; if your DNS provider adds your domain by itself, enter only rco1._domainkey | Add the record at your mail service instead of your domain’s DNS |
| Keep the record as long as the mailbox sends from Replyco | Delete it after verification; the next check would fail |
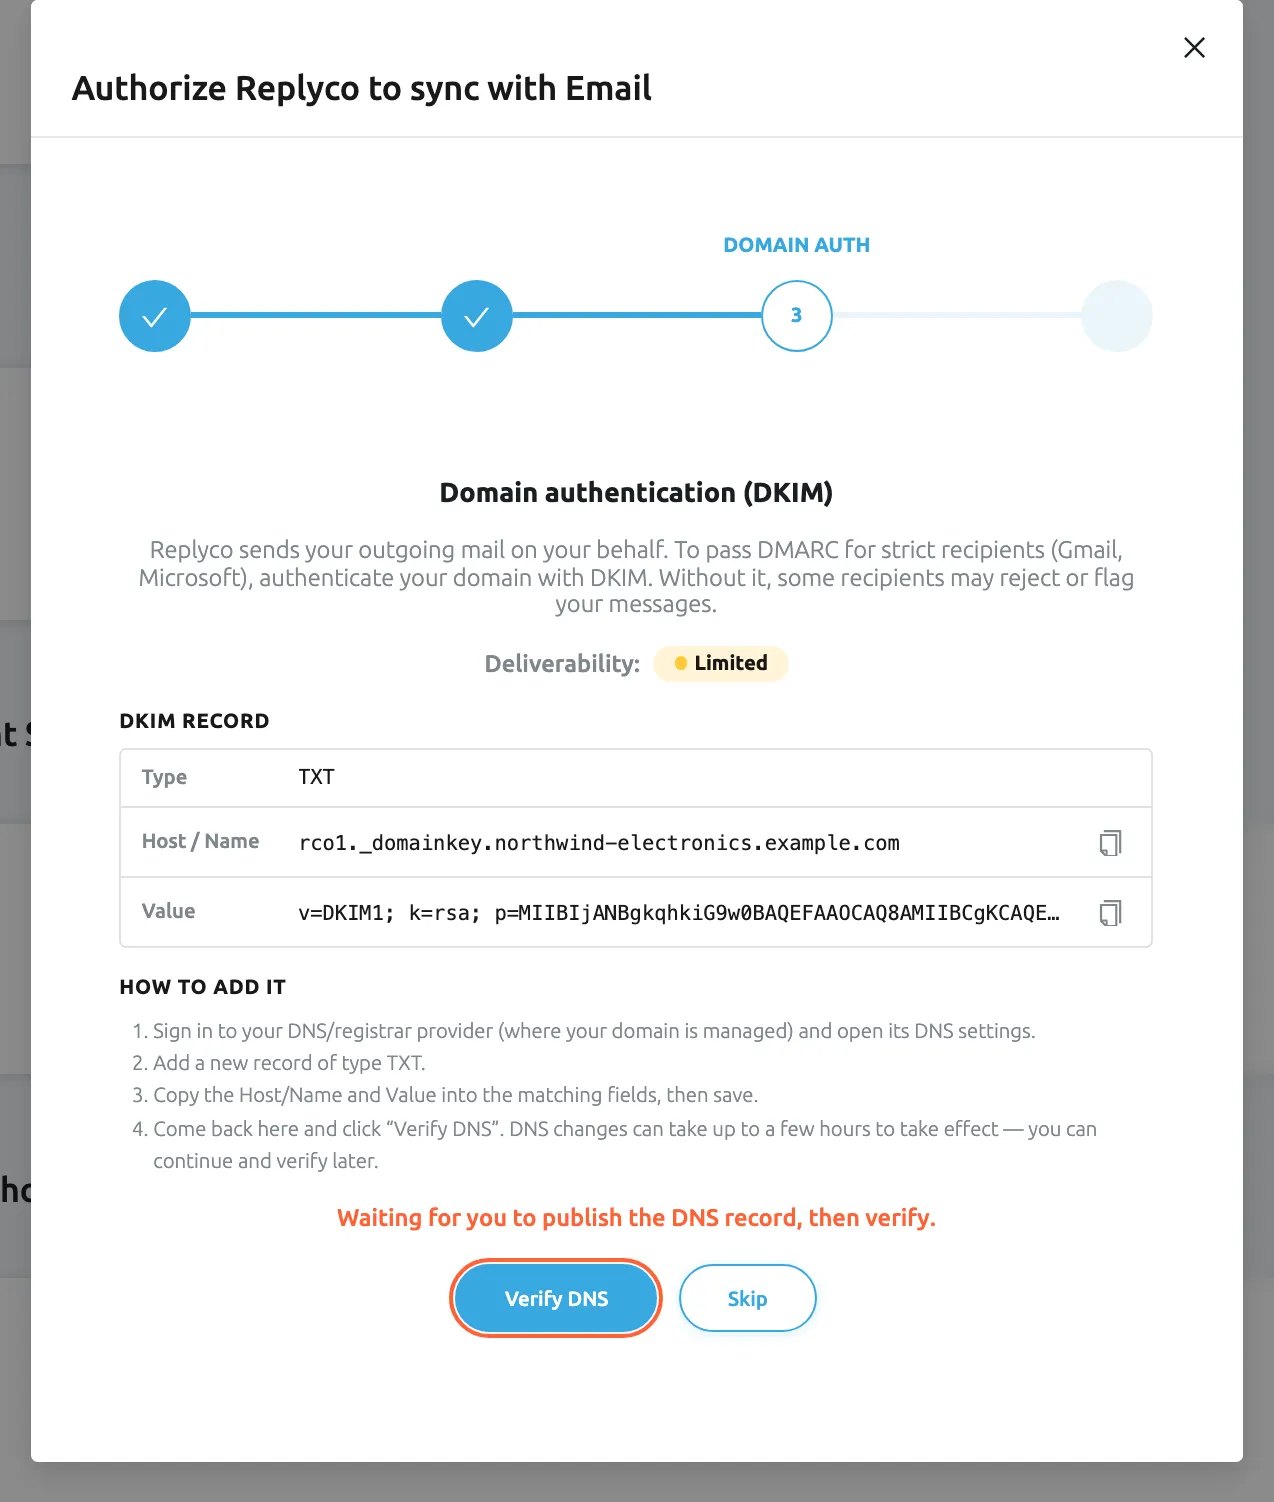
What this screenshot shows
- Screen
- Add Account (/integrations/add)
- Highlighted
- button “Verify DNS”, dialog-bottom, enabled. looks up the TXT record in DNS and updates the status
- Also visible
- Deliverability: Limited; DKIM record: TXT, rco1._domainkey.northwind-electronics.example.com, v=DKIM1; k=rsa; p=…; How to add it, four steps; Waiting for you to publish the DNS record, then verify.; Skip button
- Purpose
- domain authentication step of the forwarding set-up
Verify DNS and Re-check DNS
Section titled “Verify DNS and Re-check DNS”Under the DKIM TXT record, in the add window and in the account’s details. After a successful check, the button in the details reads Re-check DNS.
Replyco looks up the TXT record at the host and compares the key. The result replaces the line under the record and the Deliverability: label: Good when it matches, or one of the messages in the status table. Replyco checks only when you select the button, so select it again after changing the record. DNS changes can take up to a few hours to become visible.
You decide when the record is ready. A check the moment you select it tells you straight away whether a typo is to blame.
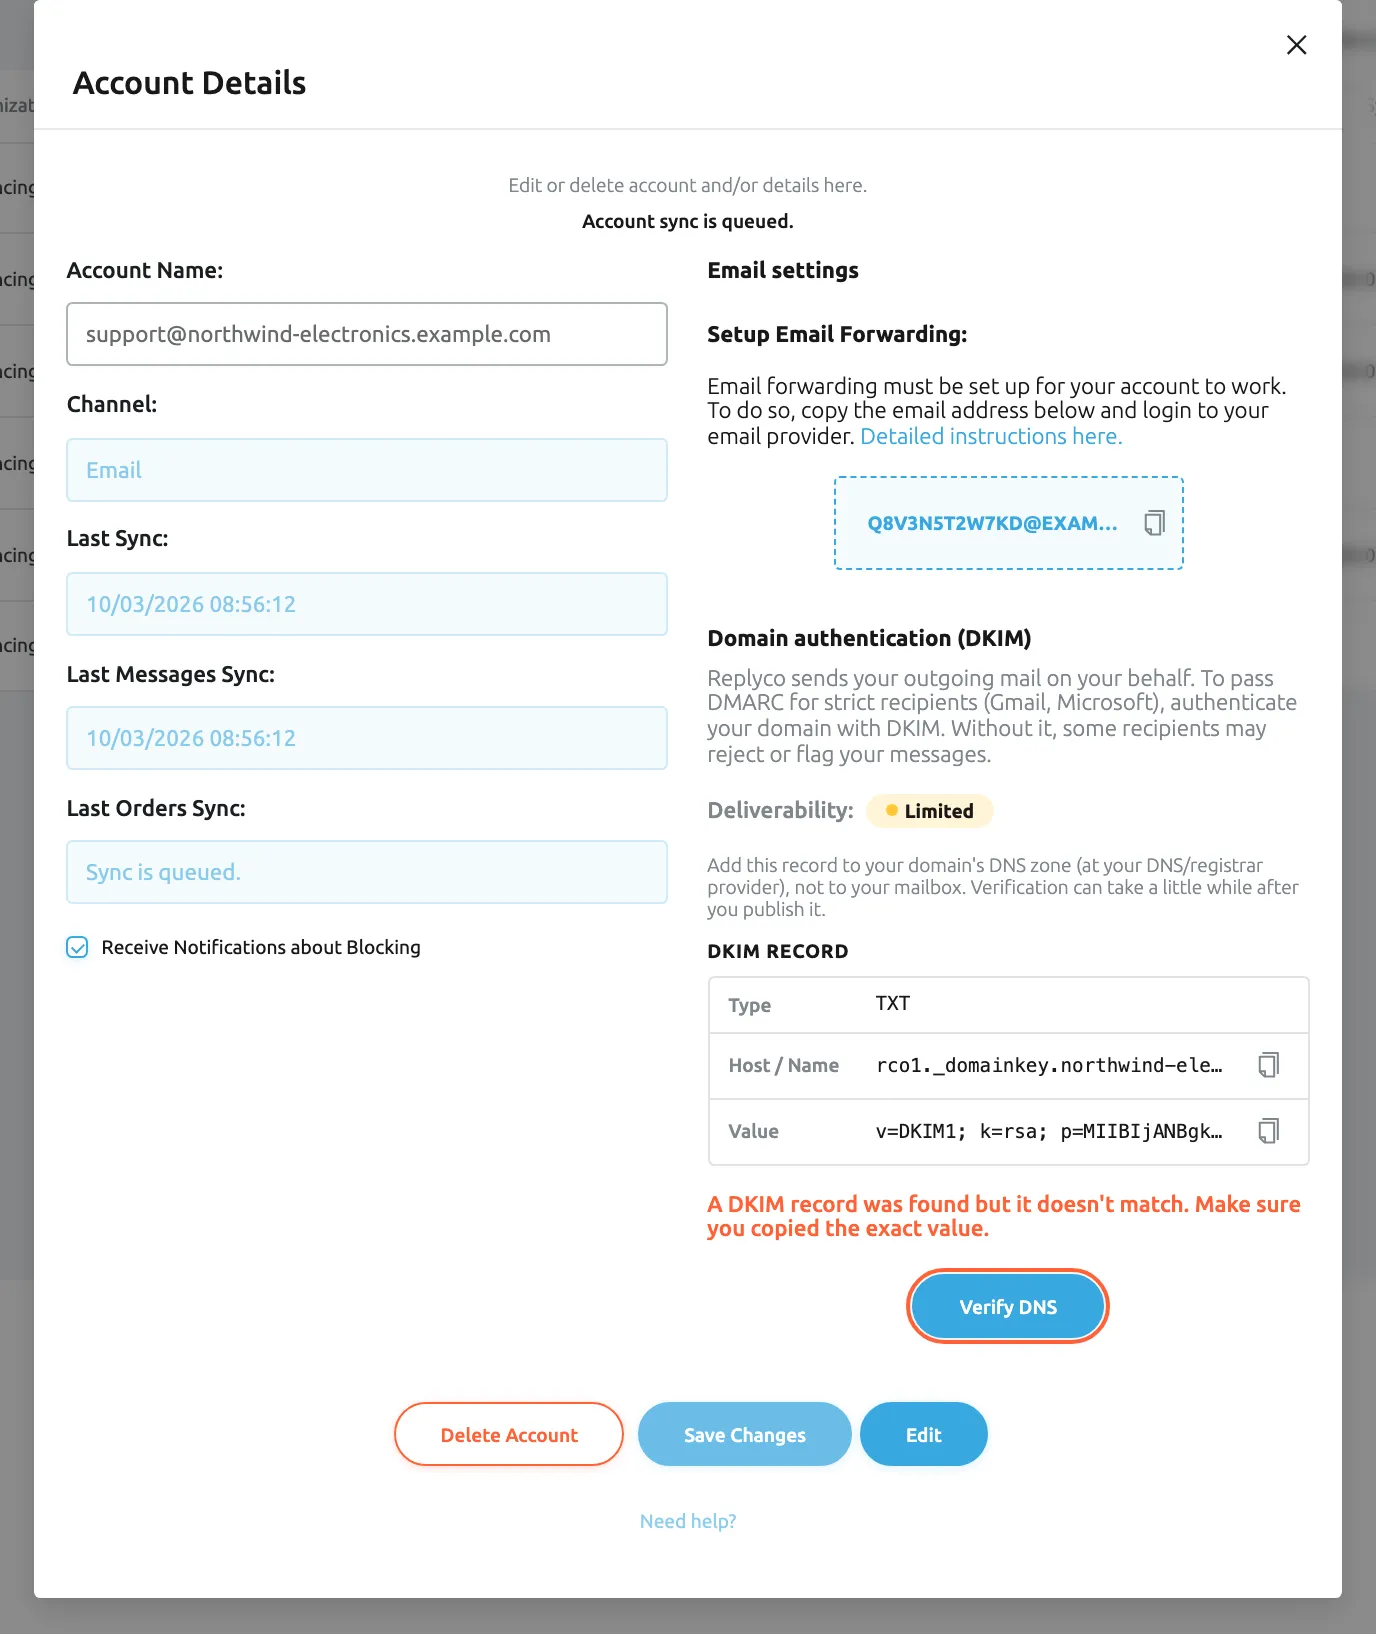
What this screenshot shows
- Screen
- Accounts (/integrations)
- Highlighted
- button “Verify DNS”, details-right-column, enabled. runs the DNS check again
- Also visible
- Deliverability: Limited; DKIM record with copy icons; message: A DKIM record was found but it doesn't match. Make sure you copied the exact value.
- Purpose
- what a mismatched DKIM record looks like
Set up DKIM
Section titled “Set up DKIM”In the account’s details under Email settings, and in the add window, when no key exists yet for the address’s domain.
Creates the DKIM key for the domain of the account’s address and shows the record to publish. It appears, for example, after you change E-mail address to an address on another domain. If the domain already has a key, Replyco uses that one.
Every sending domain needs its own record; this button gives a new domain one without adding the mailbox again.
Next to Verify DNS at DOMAIN AUTH. It opens Skip domain authentication? with Go back and Skip anyway.
Skip anyway moves to FINISH without verifying. The mailbox is already saved, and the record stays in the account’s details for later. When there is nothing to set up, for an address at a public mail service, the step shows Continue instead.
DNS changes can take hours, and the person adding the mailbox is not always the person who manages the domain. Setting up the mailbox never has to wait for them.
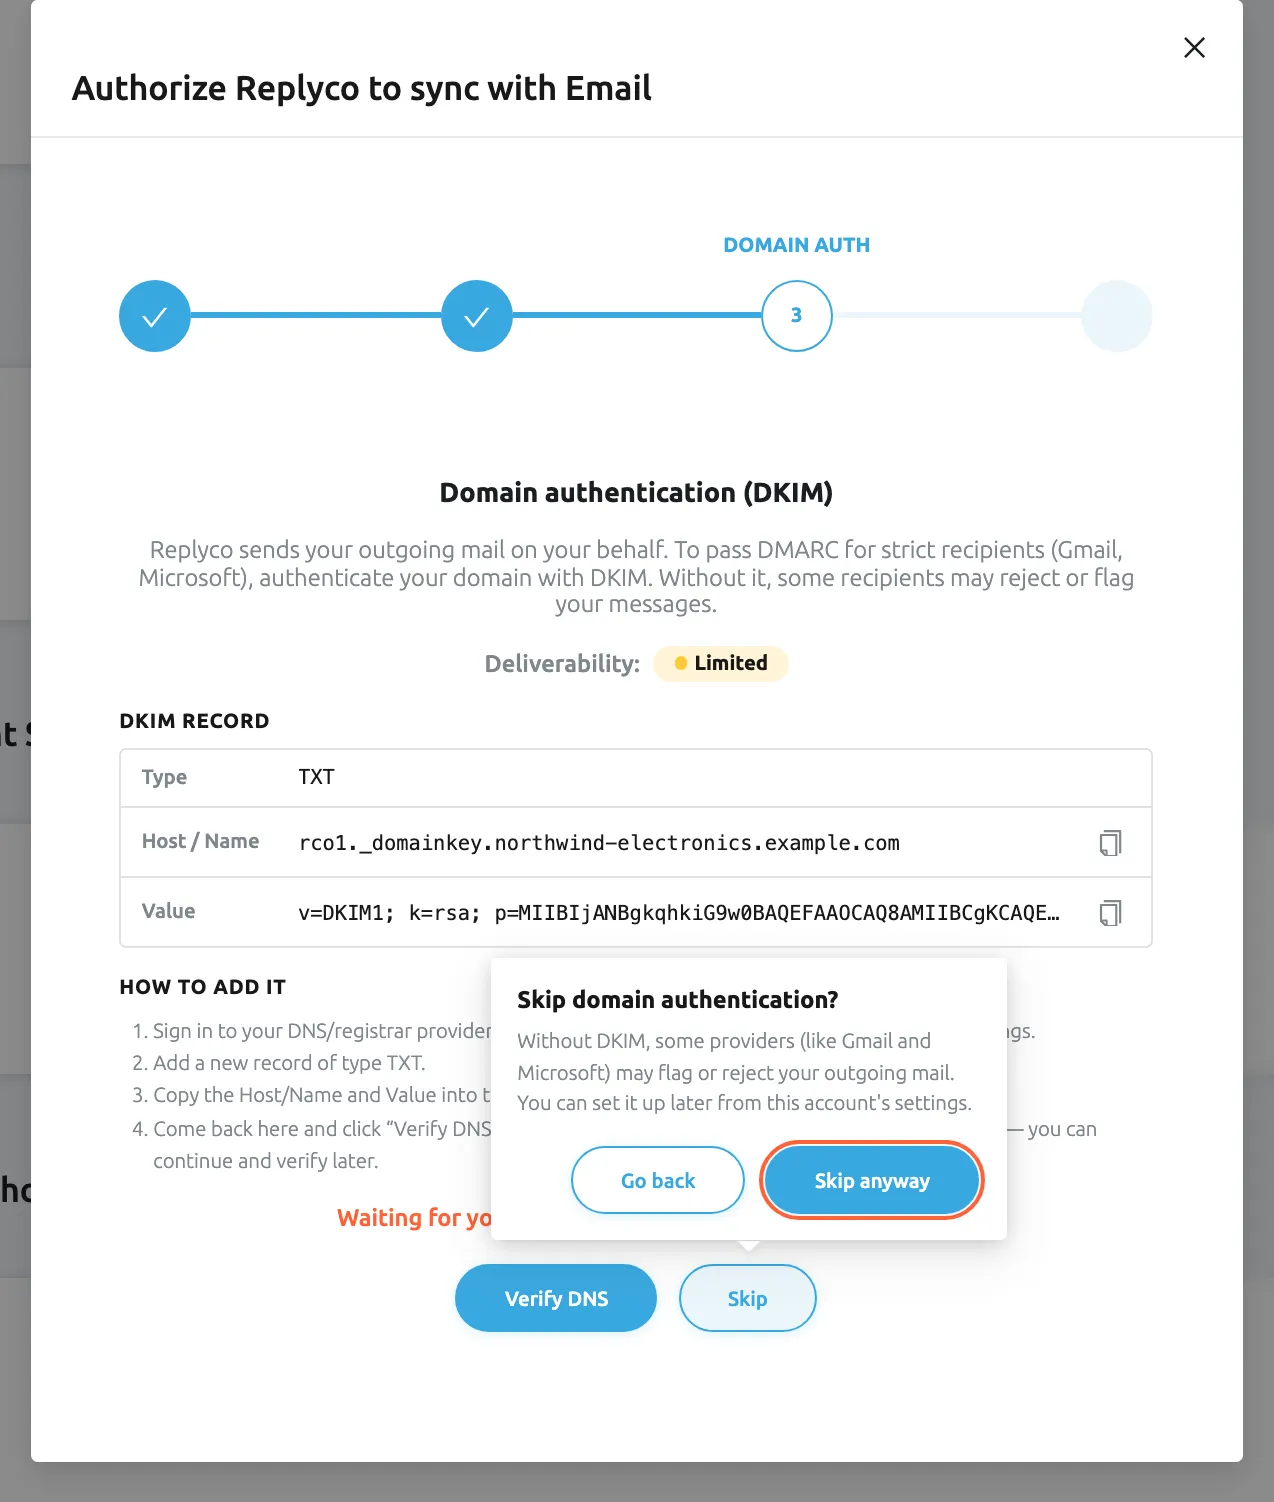
What this screenshot shows
- Screen
- Add Account (/integrations/add)
- Highlighted
- button “Skip anyway”, popover-above-skip, enabled. skips domain authentication and goes to FINISH
- Also visible
- title Skip domain authentication?; warning about Gmail and Microsoft; Go back button; DKIM record behind the bubble
- Purpose
- the warning before skipping domain authentication
Custom SMTP Configuration, moving to your own mail server
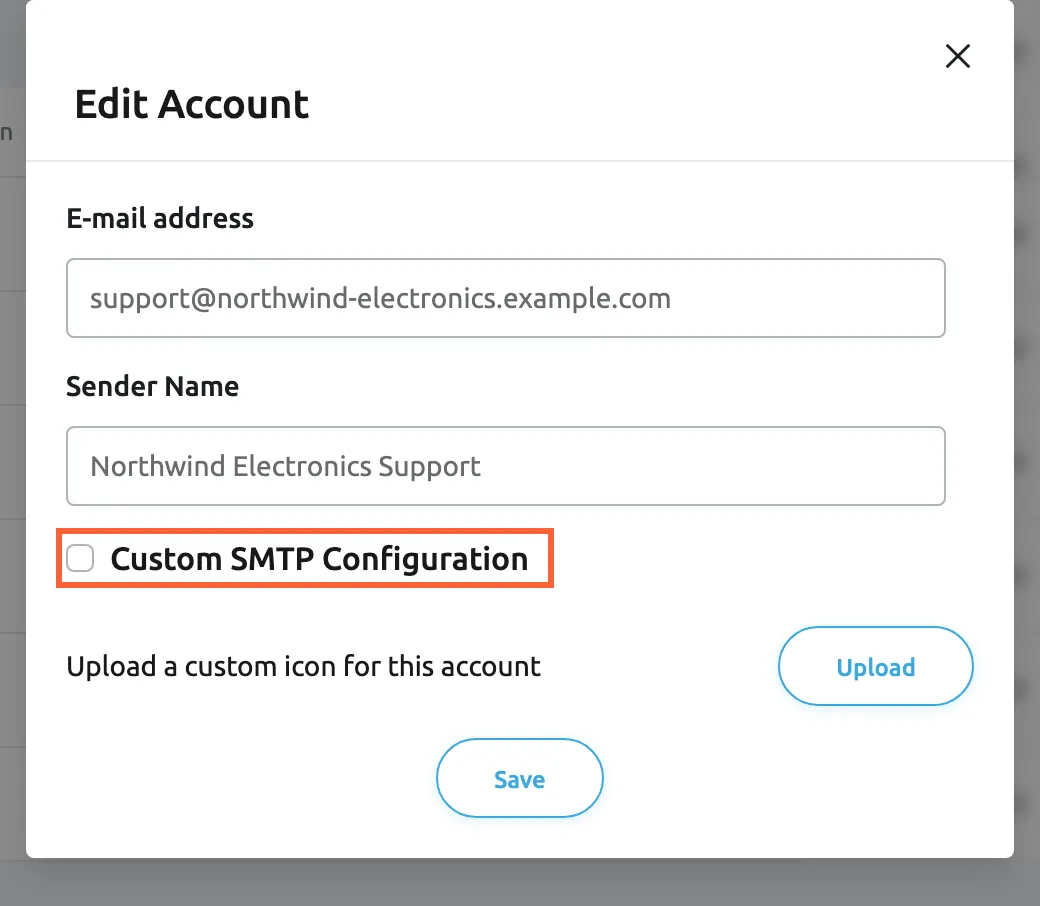
Section titled “Custom SMTP Configuration, moving to your own mail server”The account’s details › Edit › Edit Account, under Sender Name.
Ticking it opens the question Switch to your own mail server? with the explanation You are currently using the Replyco email server. If you continue, the configuration will be removed. Continue shows the server fields of Mailbox with IMAP and SMTP. Enter your mailbox’s login, password and servers and select Save; Replyco signs in to your server to test them and, from then on, reads and sends mail there instead of through the forwarding address. On a mailbox that already uses your own server, the box is ticked and cannot be cleared.
Mail that Replyco reads and sends through your own server needs no forwarding rule. Domain authentication stays in the account’s details: with a verified record, Replyco also signs the replies it sends through your server as your domain; see Mailbox with IMAP and SMTP.
What this screenshot shows
- Screen
- Accounts (/integrations)
- Highlighted
- checkbox “Custom SMTP Configuration”, edit-dialog, unchecked. asks to confirm
- Also visible
- E-mail address and Sender Name filled; Upload a custom icon for this account; Save button
- Purpose
- change the sender or switch a forwarding mailbox to your own server
How the settings combine
Section titled “How the settings combine”What your customers’ mail servers receive depends on the domain of your address and its status:
| Your address | Domain authentication | Replies are sent | What strict recipients see |
|---|---|---|---|
| On your own domain | Good | From your address, signed as your domain | A message your domain authorised |
| On your own domain | Limited (not published, not matching or skipped) | From your address, without your domain’s signature | They may reject or flag it |
| At a public mail service, such as gmail.com | Not available | From your address, without your domain’s signature | They may reject or flag it |
Forwarding in the account’s details
Section titled “Forwarding in the account’s details”After you finish, the mailbox is a row on AdminAccounts, and its details keep everything forwarding needs. The domain’s state uses one indicator:
| Indicator | Meaning | When |
|---|---|---|
| Green dot, Good | Replies are signed as your domain | The last check found a matching record |
| Yellow dot, Limited | Replies go out without your domain’s signature | Before the record is published and verified, or after a failed check |
The Accounts list
Section titled “The Accounts list”The mailbox appears with the envelope icon, or your own icon, under Source, Email under Account and your address under Name. Last Messages Sync shows when Replyco last read the forwarding address. For every column and status, see Accounts.
Why: it tells you at a glance whether Replyco is still reading the mailbox.
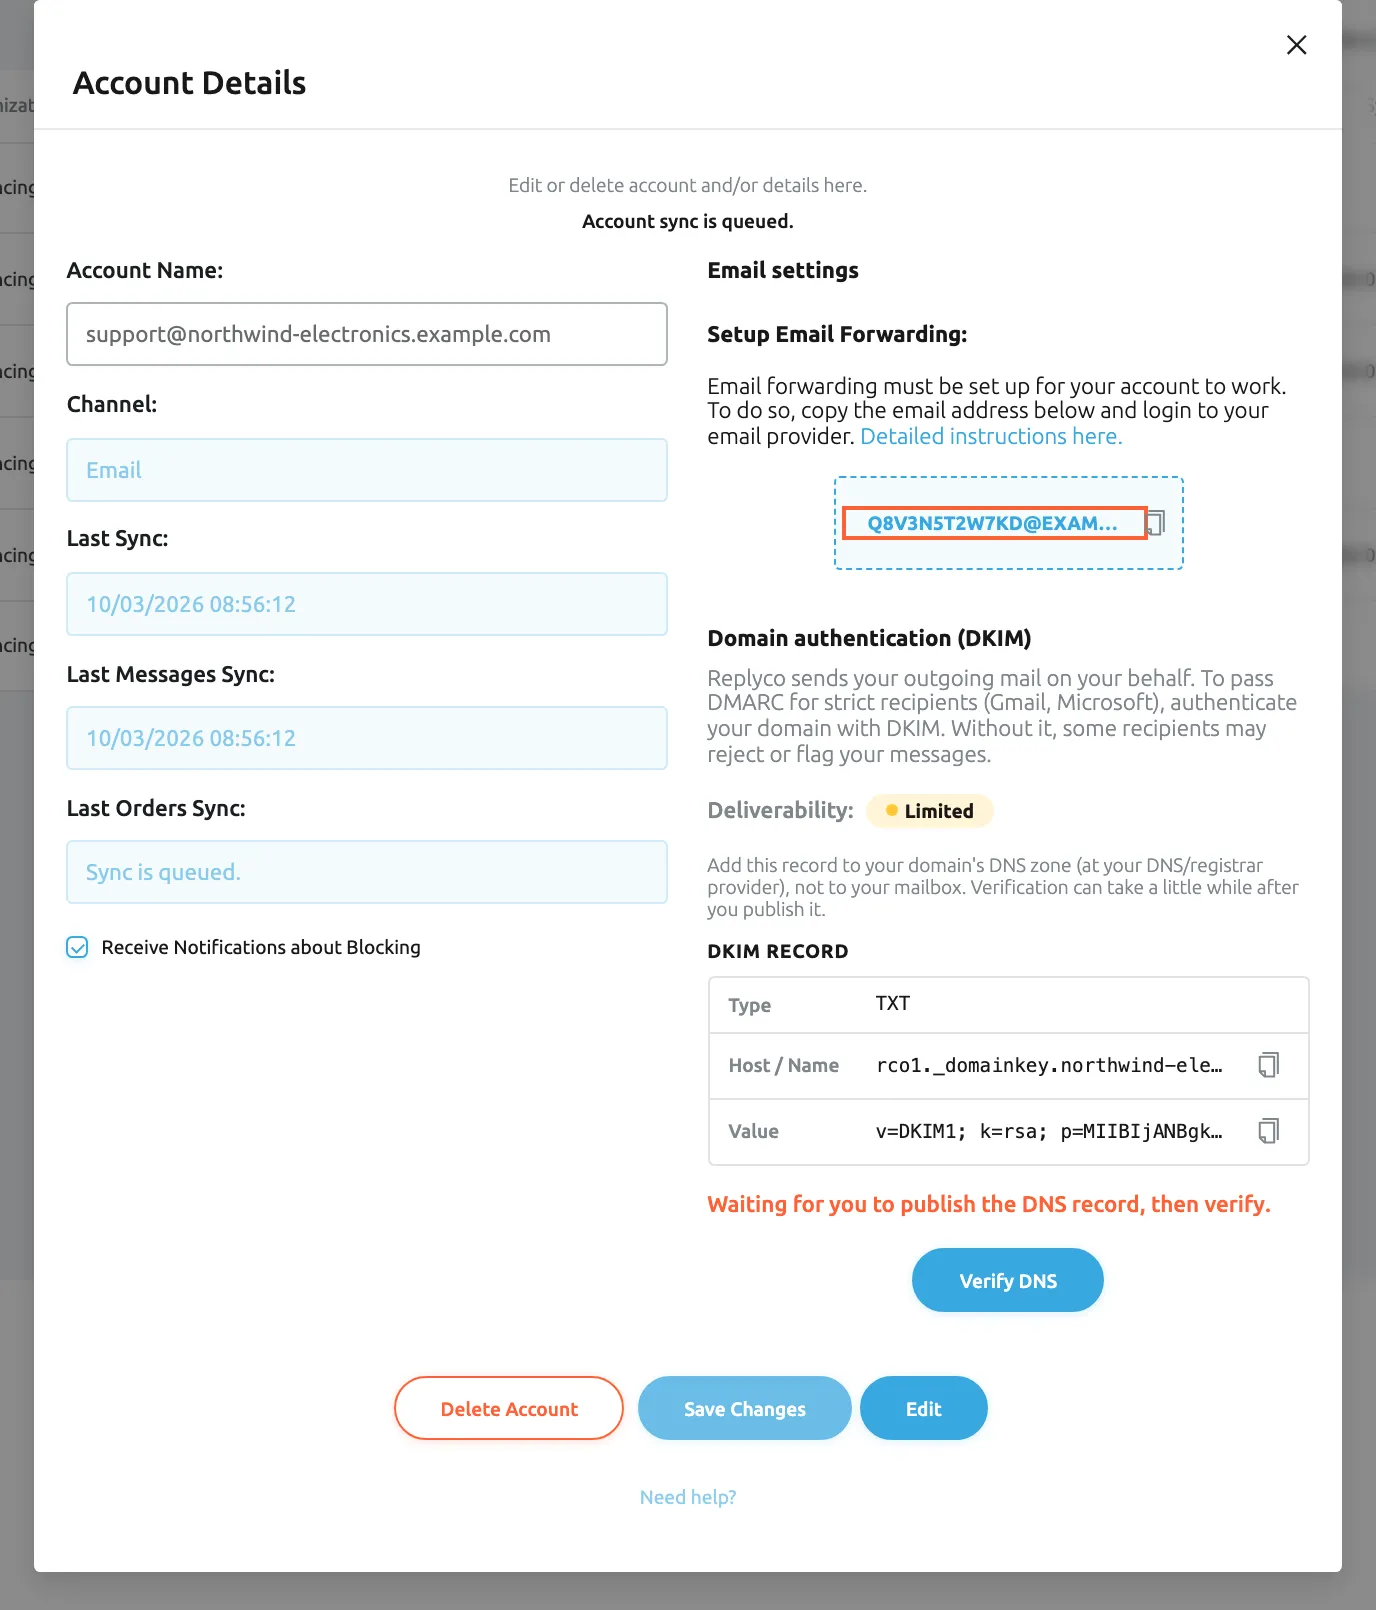
Email settings in the account’s details
Section titled “Email settings in the account’s details”Select the row to open Account Details. The right column, Email settings, starts with Setup Email Forwarding: and the forwarding address itself, which you copy by selecting it. Below it is Domain authentication (DKIM) with the record, Add this record to your domain's DNS zone (at your DNS/registrar provider), not to your mailbox. Verification can take a little while after you publish it. and the check button.
Why: this is where you find the forwarding address again, for a second mail service or a colleague who sets up the rule.
What this screenshot shows
- Screen
- Accounts (/integrations)
- Highlighted
- “”, details-right-column, enabled. copies the forwarding address
- Also visible
- Email settings column; Setup Email Forwarding: with the address; Domain authentication (DKIM): Deliverability Limited, DKIM record, Verify DNS; Delete Account, Save Changes, Edit
- Purpose
- where the forwarding address and DKIM live after set-up
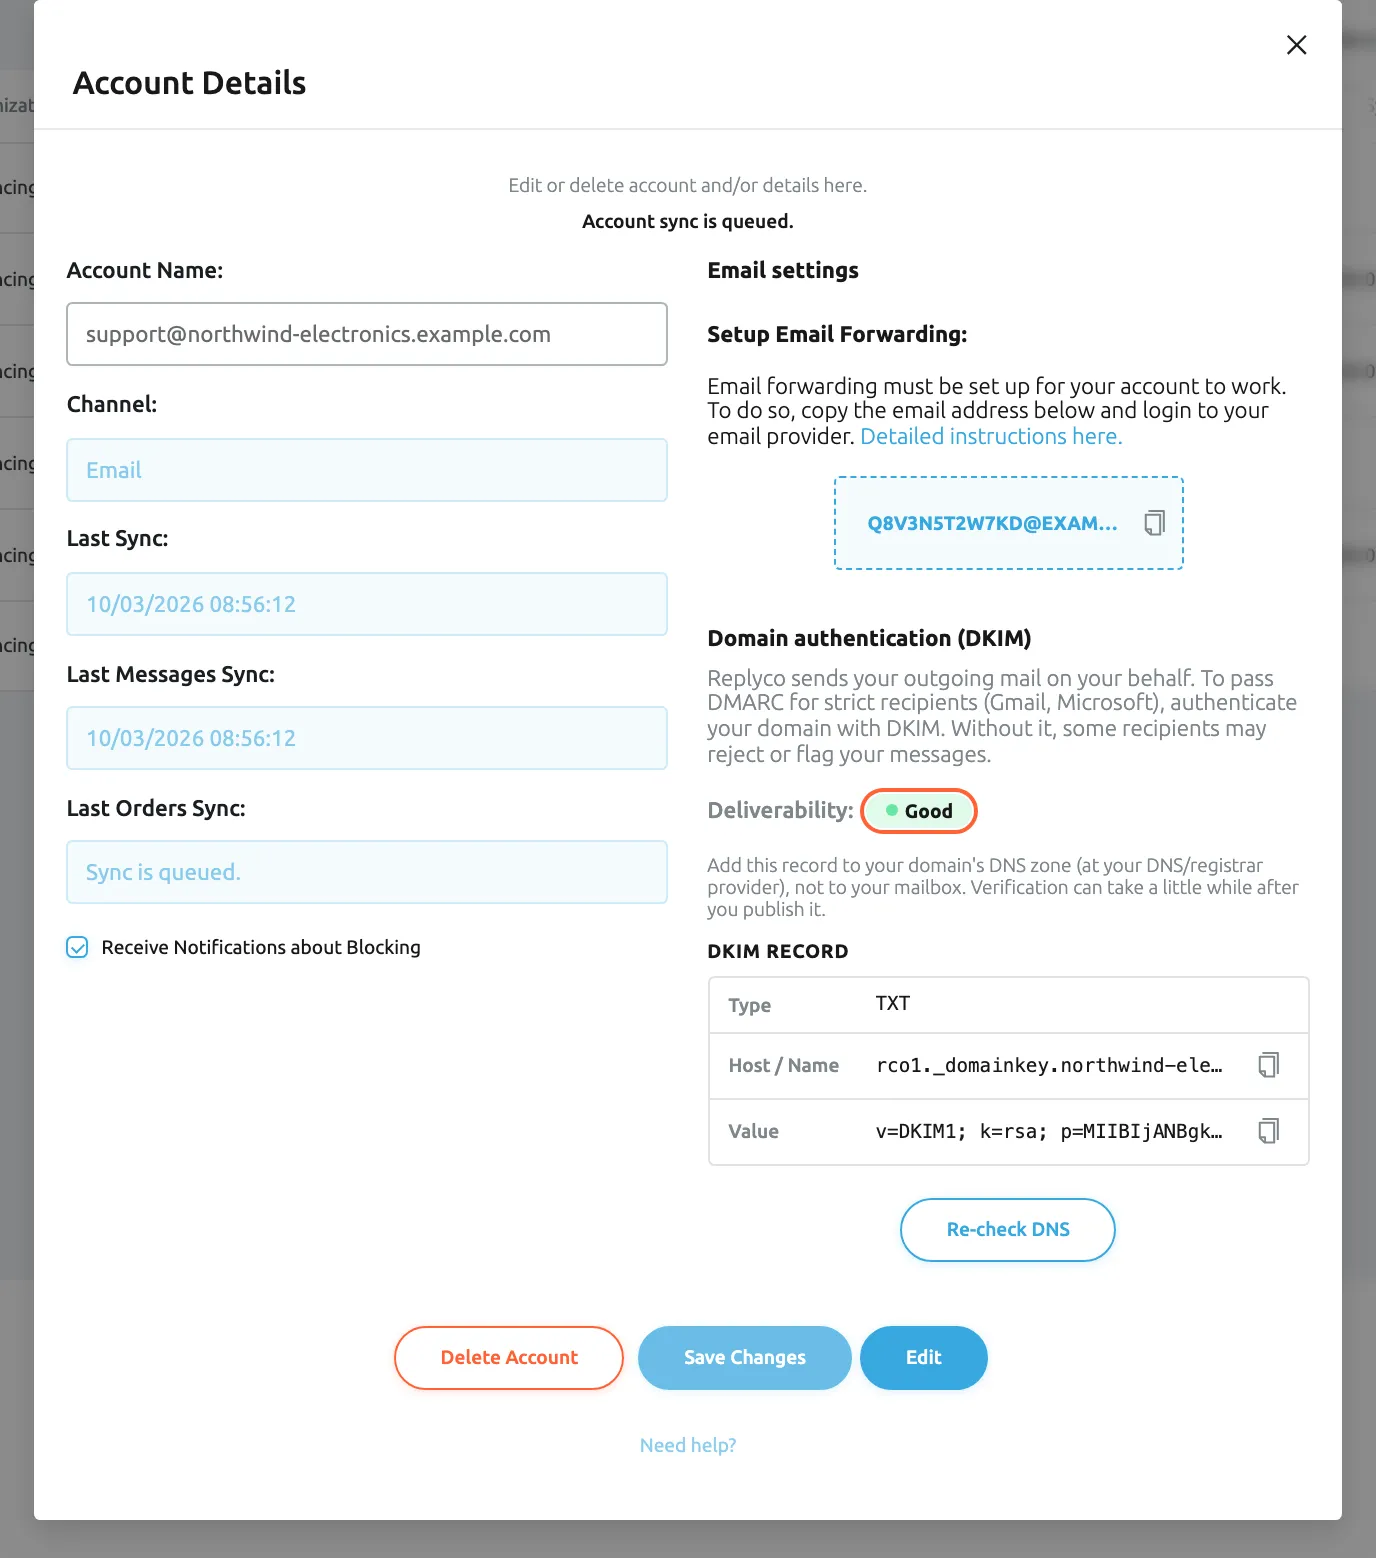
After the record is verified
Section titled “After the record is verified”Deliverability: shows Good with a green dot, and the button reads Re-check DNS. From the next reply on, Replyco signs your mail as your domain. Select Re-check DNS after you move your domain to another DNS provider, to confirm the record came along.
Why: verified is the state in which strict recipients accept your replies.
What this screenshot shows
- Screen
- Accounts (/integrations)
- Highlighted
- “”, details-right-column, shown. none; shows the verified status
- Also visible
- Deliverability: Good with a green dot; DKIM record still listed; Re-check DNS button
- Purpose
- the verified state of domain authentication
What your customers receive
Section titled “What your customers receive”A reply from a ticket reaches the customer from your Sender Name and E-mail address, for example Northwind Electronics Support at support@northwind-electronics.example.com. When the customer answers, the answer goes to your address, your mail service forwards it, and it joins the same ticket. For writing and sending replies, see Answer a ticket.
Why: customers keep one address for you, whichever tool your team uses.
Forwarding for webstores and marketplaces
Section titled “Forwarding for webstores and marketplaces”+ Add Account › WooCommerce, BigCommerce, Magento or Fruugo. After the channel’s own details, the add window continues with EMAIL and DOMAIN AUTH, the same steps as for a mailbox.
The account gets its own forwarding address for the email your store or marketplace sends to customers and receives from them, and domain authentication for the address you send from. Everything on this page applies: the address in the account’s details, the DNS record, the check and the indicator. At INFO, Custom SMTP Configuration connects that email through your own mail server instead; see Mailbox with IMAP and SMTP.
Customer email about orders belongs next to the order data, in the same account’s tickets.
Three ways it is used:
- Northwind’s WooCommerce shop forwards its contact address to the WooCommerce account’s forwarding address, so shop enquiries arrive next to the orders. See Connect WooCommerce.
- A Magento store sends from
orders@northwind-electronics.example.com; one DKIM TXT record for the domain covers it and the support mailbox on the same domain. See Connect Magento. - A Fruugo account uses its forwarding address for Fruugo’s customer emails. See Connect Fruugo.
What you need to know
Section titled “What you need to know”| Topic | Fact |
|---|---|
| One address per mailbox | Replyco creates a forwarding address for each mailbox; it does not change while the mailbox is connected. |
| What arrives | Every message that reaches the forwarding address, from the moment forwarding is on. Nothing older is imported. |
| How often | Replyco reads the forwarding address about every five minutes. |
| Your password | Not needed. Replyco never signs in to your own mailbox for forwarding. |
| Sender | Replies show your sender name and address and are sent by Replyco’s mail server. |
| DKIM TXT record | One TXT record per domain, at rco1._domainkey. plus the domain, shared by every mailbox on that domain. |
| Verification | Only when you select Verify DNS or Re-check DNS; DNS changes can take a few hours. |
| Without verification | Replies are still sent, without your domain’s signature; strict recipients may reject or flag them. |
| Public mail services | No domain authentication for addresses at gmail.com, googlemail.com, yahoo.com, yahoo.co.uk, ymail.com, rocketmail.com, outlook.com, hotmail.com, hotmail.co.uk, live.com, msn.com, icloud.com, me.com, mac.com, aol.com, gmx.com, gmx.de, web.de, mail.com, yandex.com, yandex.ru, protonmail.com, proton.me or zoho.com. |
| Plan | Every plan; each mailbox counts towards the plan’s number of accounts. |
| Deleting | Delete Account removes the mailbox with all its tickets, orders and customers, and the forwarding address stops accepting mail. Turn off the forwarding rule in your mail service as well. |
Frequently asked questions
Section titled “Frequently asked questions”General
Section titled “General”What is a mailbox by forwarding?
Section titled “What is a mailbox by forwarding?”It is an Email account in Replyco that receives your mail through forwarding. Replyco creates a forwarding address for the mailbox, you forward your support address to it in your mail service, and every forwarded message becomes a ticket. Replies go out from your own address. You add it with + Add Account › Email › Setup Forwarding.
When should I use forwarding instead of IMAP and SMTP?
Section titled “When should I use forwarding instead of IMAP and SMTP?”Use forwarding when Replyco cannot sign in to the mailbox, for example an alias or group address, or when you do not want to give Replyco a mailbox password. Use IMAP and SMTP when you want Replyco to read and send through your own mail server; see Mailbox with IMAP and SMTP. For Gmail and Microsoft mailboxes, the Gmail and Outlook integrations sign in directly.
Does forwarding cost extra?
Section titled “Does forwarding cost extra?”No. A mailbox by forwarding is part of every plan and counts towards your plan’s number of accounts, like any other account. Domain authentication has no cost either.
Who can add a mailbox by forwarding?
Section titled “Who can add a mailbox by forwarding?”Users with the Admin permission. Only they see + Add Account in the top bar and AdminAccounts, where mailboxes are added and changed. See User permissions and roles.
Where do I find the forwarding address after setup?
Section titled “Where do I find the forwarding address after setup?”Open AdminAccounts, select the mailbox, and look under Email settings › Setup Email Forwarding:. Select the box to copy the address. The address does not change while the mailbox is connected.
How do I set up forwarding in my mail service?
Section titled “How do I set up forwarding in my mail service?”In your mail service’s settings, create a forwarding rule for your support address and enter the forwarding address Replyco created as the destination. You can forward everything or only certain messages, if your mail service offers filters. For Gmail and Outlook, see Forwarding in Gmail and Forwarding in Outlook; for other mail services, their own help describes the menus.
My mail service wants to confirm the forwarding address. How do I do that?
Section titled “My mail service wants to confirm the forwarding address. How do I do that?”Any message sent to the forwarding address arrives in Replyco as a ticket of that mailbox, including a confirmation email from your mail service. Open the newest ticket of the mailbox under your ticket lists, and use the code or link in it to confirm the forwarding.
Why can’t I continue from the EMAIL step?
Section titled “Why can’t I continue from the EMAIL step?”Continue at EMAIL works only after you have copied the forwarding address, because forwarding cannot work without it. Select Copy Email Address first; until then, Replyco shows Click the copy icon and save the e-mail address before you proceed.
How do I know forwarding works?
Section titled “How do I know forwarding works?”Send an email to your support address from another mailbox. It should appear as a ticket of the new mailbox within about five minutes, and Last Messages Sync on AdminAccounts shows the latest read.
Can I change the address or the sender name later?
Section titled “Can I change the address or the sender name later?”Yes. Open the mailbox on AdminAccounts, select Edit, change E-mail address or Sender Name and select Save. If the new address is on another domain, set up domain authentication for it with Set up DKIM in the details.
Domain authentication
Section titled “Domain authentication”Do I have to set up DKIM?
Section titled “Do I have to set up DKIM?”No; the mailbox works without it. Without a verified record, replies are sent without your domain’s signature, and strict recipients such as Gmail and Microsoft may reject or flag them. Setting it up takes one TXT record at your domain’s DNS provider, and you can do it any time in the account’s details.
Where do I add the DKIM TXT record?
Section titled “Where do I add the DKIM TXT record?”In your domain’s DNS zone, at the company that manages your domain, not in your mailbox. Create a TXT record with the host rco1._domainkey. plus your domain and the value shown under DKIM record, then select Verify DNS in Replyco.
Which DNS records do I need besides DKIM?
Section titled “Which DNS records do I need besides DKIM?”Replyco asks only for the one DKIM TXT record shown under DKIM record in the account’s details. It is what makes your replies count as your domain’s own mail.
How long does verification take?
Section titled “How long does verification take?”The check itself runs the moment you select Verify DNS. Your DNS provider may need up to a few hours before the new record is visible; if the check says We couldn't find the DKIM record in your DNS yet. Publish it and check again., wait and select Verify DNS again.
Does Replyco check the record again by itself?
Section titled “Does Replyco check the record again by itself?”No. Replyco checks when you select Verify DNS or Re-check DNS in the account’s details. After changing or moving your DNS, select Re-check DNS to confirm the record.
Why is domain authentication not offered for my address?
Section titled “Why is domain authentication not offered for my address?”The address is at a public mail service, such as gmail.com, outlook.com or gmx.de, or at a Replyco domain. You cannot add records to those domains, so there is nothing to set up, and the details show no domain authentication section. Use an address on your own domain to authenticate it.
I have two mailboxes on the same domain. Do I need two records?
Section titled “I have two mailboxes on the same domain. Do I need two records?”No. Replyco creates one DKIM key per domain, so both mailboxes show the same record. Publish it once; verifying it in one mailbox’s details covers the other.
Replies and delivery
Section titled “Replies and delivery”Which address do customers see on my replies?
Section titled “Which address do customers see on my replies?”Your E-mail address with your Sender Name, for example Northwind Electronics Support at support@northwind-electronics.example.com. Replyco’s mail server sends the reply on your behalf; customers answer your own address.
Why do my replies land in customers’ junk folders?
Section titled “Why do my replies land in customers’ junk folders?”Strict recipients check whether your domain allowed Replyco’s server to send for it. Open the mailbox on AdminAccounts and check Deliverability:: Limited means the DKIM TXT record is missing or does not match. Publish it and select Verify DNS until it shows Good.
Do customer replies come back into the same ticket?
Section titled “Do customer replies come back into the same ticket?”Yes. The customer answers your own address, your mail service forwards the answer to Replyco, and it joins the conversation’s ticket. Replyco recognises the answer by the email’s message ids and threading headers, so it depends on the customer’s mail program and your forwarding keeping them; an answer without them can arrive as a separate conversation.
Do replies I send from my own mail program appear in Replyco?
Section titled “Do replies I send from my own mail program appear in Replyco?”No. Mail you send from your own mail program goes straight to the customer and never reaches the forwarding address. Reply from the ticket in Replyco to keep the whole conversation there.
Changes and removal
Section titled “Changes and removal”Can I switch a forwarding mailbox to my own mail server?
Section titled “Can I switch a forwarding mailbox to my own mail server?”Yes. Open the mailbox on AdminAccounts, select Edit, tick Custom SMTP Configuration, confirm with Continue, enter your server settings and password and select Save. Then turn off the forwarding rule in your mail service. See Mailbox with IMAP and SMTP.
What happens when I delete the mailbox?
Section titled “What happens when I delete the mailbox?”Delete Account in the account’s details removes the mailbox with all its tickets, orders and customers after you confirm, and the forwarding address no longer receives mail. Turn off the forwarding rule in your mail service too, so it stops sending mail to an address that no longer exists.
Data and privacy
Section titled “Data and privacy”Does Replyco get my mailbox password?
Section titled “Does Replyco get my mailbox password?”No. For forwarding, Replyco creates its own mailbox behind the forwarding address and never signs in to yours. Only mail your mail service forwards reaches Replyco.
Is the DKIM private key safe?
Section titled “Is the DKIM private key safe?”Replyco keeps the private key of your domain encrypted and never shows it; the details show only the public key, which is meant to be published in your DNS.
Troubleshooting
Section titled “Troubleshooting”| Symptom | What to check |
|---|---|
| The mailbox shows no new tickets | In order: is forwarding switched on in your mail service? Is the destination exactly the address under Setup Email Forwarding: in the account’s details? Does your rule forward the messages in question, or only some? Did the test message arrive in your own inbox at all? |
| Only some messages arrive | Your forwarding rule or a filter in your mail service limits what is forwarded. Check the rule’s conditions. |
| A ticket asks to confirm a forwarding address | That is your mail service’s confirmation message. Open it and use its code or link to finish setting up forwarding. |
| Forwarding from Microsoft 365 bounces with “5.7.520 Access denied” | Your Microsoft 365 organisation blocks forwarding to external addresses. Ask your administrator to allow it; see Forwarding in Outlook. |
| Continue at EMAIL does nothing and Click the copy icon and save the e-mail address before you proceed. appears | Select Copy Email Address first, then Continue. |
| Authorize stays unavailable at INFO | E-mail address is empty or not an e-mail address; the field shows Make sure to put in a valid e-mail address. |
| The mailbox cannot be saved | The address is already connected as a mailbox, or your plan’s accounts are used up; the message says which. See Accounts for the account limit. |
| Replies land in junk or are rejected by Gmail or Microsoft | Deliverability: in the account’s details shows Limited. Publish the DKIM TXT record and select Verify DNS. |
| We couldn't find the DKIM record in your DNS yet. Publish it and check again. | The record is not visible yet, or is at a different host. Check the host rco1._domainkey. plus your domain; if your DNS provider adds the domain itself, enter only rco1._domainkey. Wait for DNS changes and check again. |
| A DKIM record was found but it doesn't match. Make sure you copied the exact value. | The value was changed while copying. Copy it again with the copy icon and replace the record. |
| The DNS lookup timed out. This is usually temporary — try again shortly. | The DNS lookup did not answer in time. Select Verify DNS again a little later. |
| No domain authentication section in the details | The address is at a public mail service or a Replyco domain; there is nothing to set up. |
| Set up DKIM appears instead of a record | No key exists yet for the address’s domain, for example after changing the address. Select Set up DKIM, publish the record and verify it. |
| Every message arrives twice | The same email reaches two accounts, for example a forwarding mailbox and a Gmail or marketplace account for the same address. Keep one route per address. |