

Sign up
The sign-up screen creates a new Replyco company with you as its first user and administrator. You give three things, a country, a work email address and a password, then set up two-factor authentication with an authenticator app on your phone. Replyco then opens your new workspace, starts a free trial and sends an email to confirm your address. Open the screen with Sign Up here. under the sign-in form. You need your phone at hand: sign-up cannot finish without an authenticator app. If a colleague already uses Replyco, ask them to invite you instead of signing up, so you join their company; see Invite users and set what they can do.
What you can do here
Section titled “What you can do here”- Create your company and your user. Choose your country, enter your work email and a password of at least 12 characters with an uppercase letter, a lowercase letter, a number and a special character. Fill in the sign-up form
- Set up two-factor authentication. Scan a QR code with Google Authenticator or any TOTP app and confirm the first six-digit code. Every new user must use two-factor authentication, on every plan, so every account created here signs in with a password and a code. Set up two-factor authentication · Two-factor authentication
- Start in the right region and language. The country decides whether your company is created in the UK or the German region, which sets the trial length (7 or 30 days) and the language you start with. Choose your country
- Know what happens next. A welcome window offers to connect your first account, the trial starts, and a confirmation email waits in your inbox. What happens after you sign up
The screen at a glance
Section titled “The screen at a glance”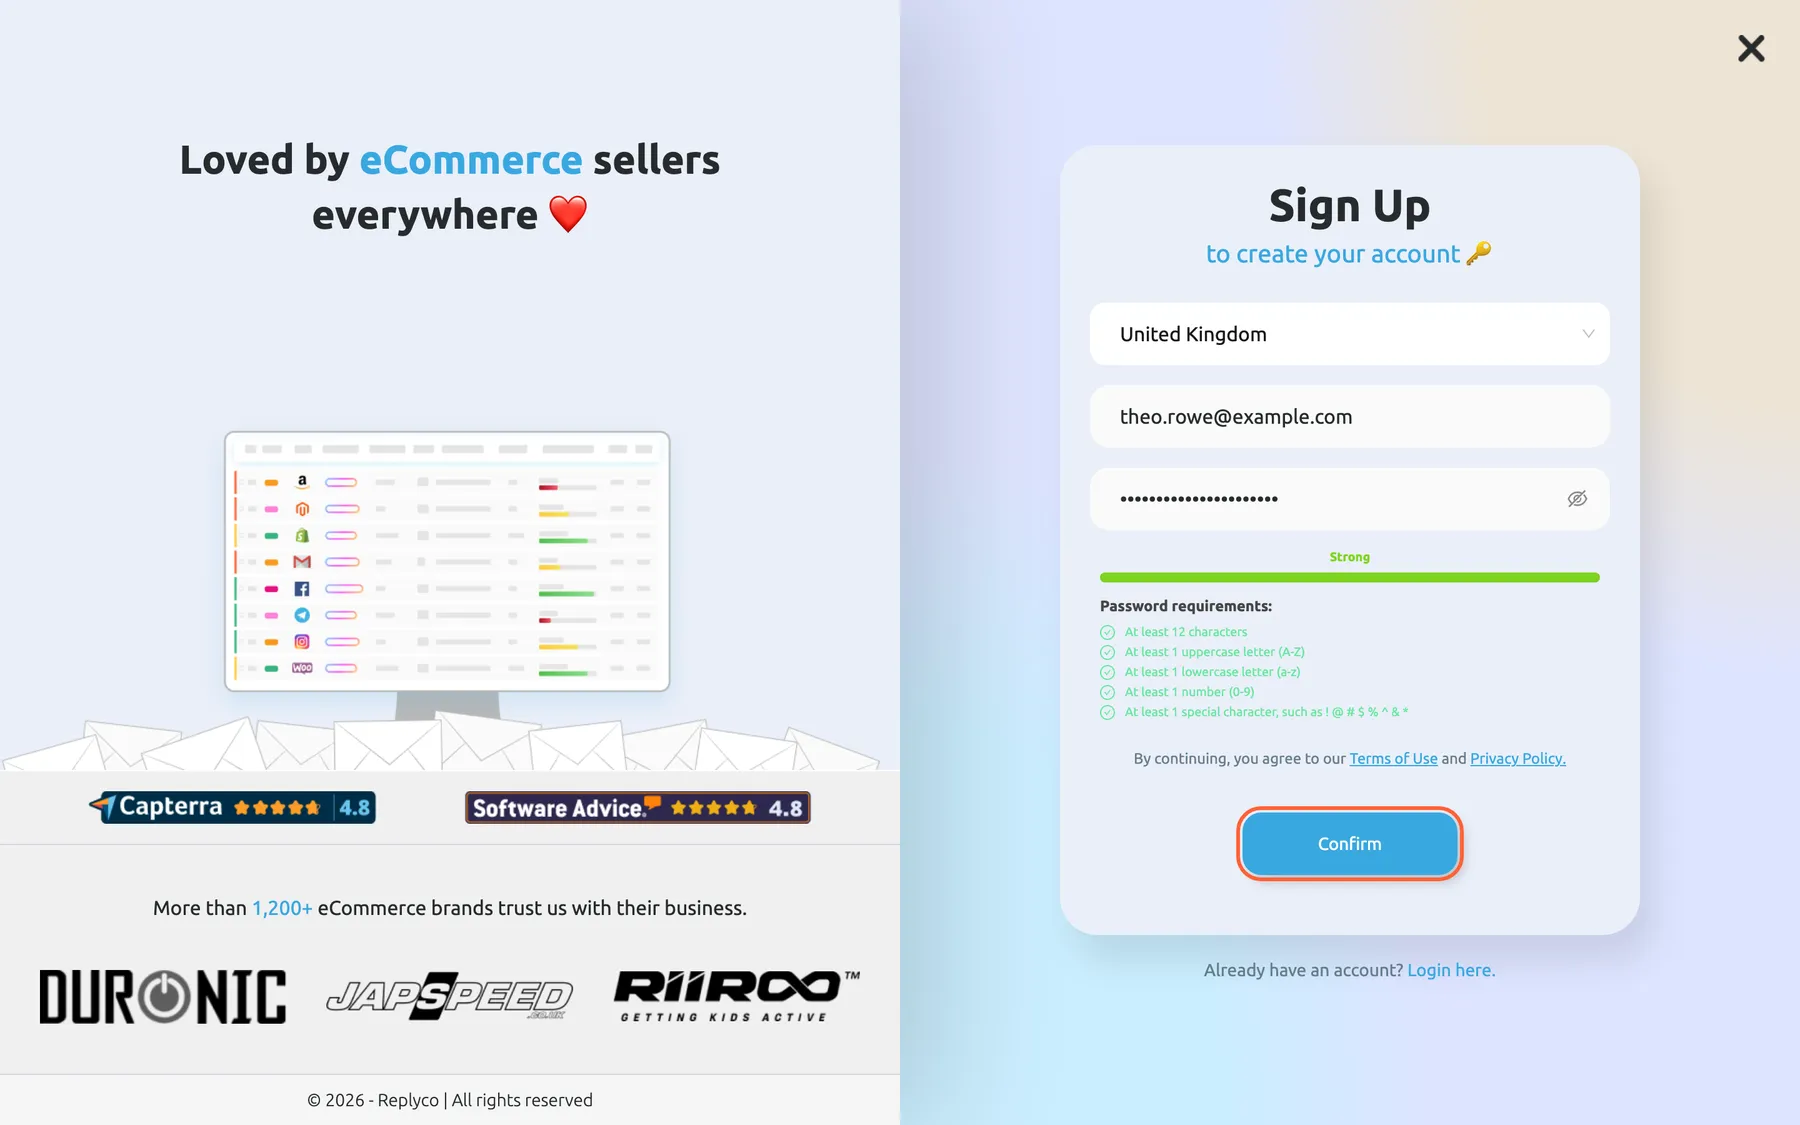
What this screenshot shows
- Screen
- Sign Up (/signup)
- Highlighted
- button “Confirm”, card-bottom, enabled. checks the email address and password and opens the two-factor setup
- Also visible
- country list preset from the browser's time zone; Work email filled with a sample address; Password masked, strength Strong; five password requirements ticked; Terms of Use and Privacy Policy links; Login here link
- Purpose
- first step of creating a Replyco account
| Region | What it shows | What you do there |
|---|---|---|
| The sign-up card | Sign Up, the country list, Work email and Password | Enter your details |
| Under the password | A strength bar and the list Password requirements: | Check that every rule is ticked green |
| Above the button | Terms of Use and Privacy Policy. | Read the terms you accept by continuing |
| Confirm | The button that checks your details | Move on to two-factor authentication |
| Under the card | Already have an account? Login here. | Go to the sign-in screen instead |
| Top corner | A cross | Go back to the page you came from |
| The other half | Customer logos and ratings | Nothing; it is decoration |
The screen has no Replyco menus, because you are not signed in yet. It appears in German when the country you choose belongs to the German region, and in English otherwise.
Choose your country
Section titled “Choose your country”The country list at the top of the card is preset from your computer’s time zone; when the time zone gives no country, it shows United Kingdom. Open the list and type to find your country.
The country decides your company’s region:
| You choose | Region | Trial | Language the screen and your company start with |
|---|---|---|---|
| Germany, Austria, Switzerland or Liechtenstein | German region | 30 days | German |
| Any other country | UK region | 7 days | English |
The screen switches language as soon as you pick a country, so a German merchant sees the German form. The country also sets the interface language of your whole company; there is no language switch in Replyco itself, see The Replyco screen. Companies in the German region can also create tickets and send copies (CC and BCC) during the trial; for UK-region companies both stay off until you choose a plan or Replyco has verified the company, see Create a ticket.
Fill in the sign-up form
Section titled “Fill in the sign-up form”-
Choose your country from the list; what it changes is explained in Choose your country.
-
Type your address into Work email.
Use the address you will sign in with every day. It becomes the name of your user and the address of your company, and it receives the confirmation email and every password or two-factor reset.
-
Type a password into Password. Select the eye icon to see what you typed.
Each rule under Password requirements: turns green when the password meets it: At least 12 characters, At least 1 uppercase letter (A-Z), At least 1 lowercase letter (a-z), At least 1 number (0-9) and At least 1 special character, such as ! @ # $ % ^ & *.
-
Select Confirm.
Replyco checks the address and the password, then shows the two-factor setup. Nothing is created yet.
If something is wrong, Replyco says so under the field and stays on the form:
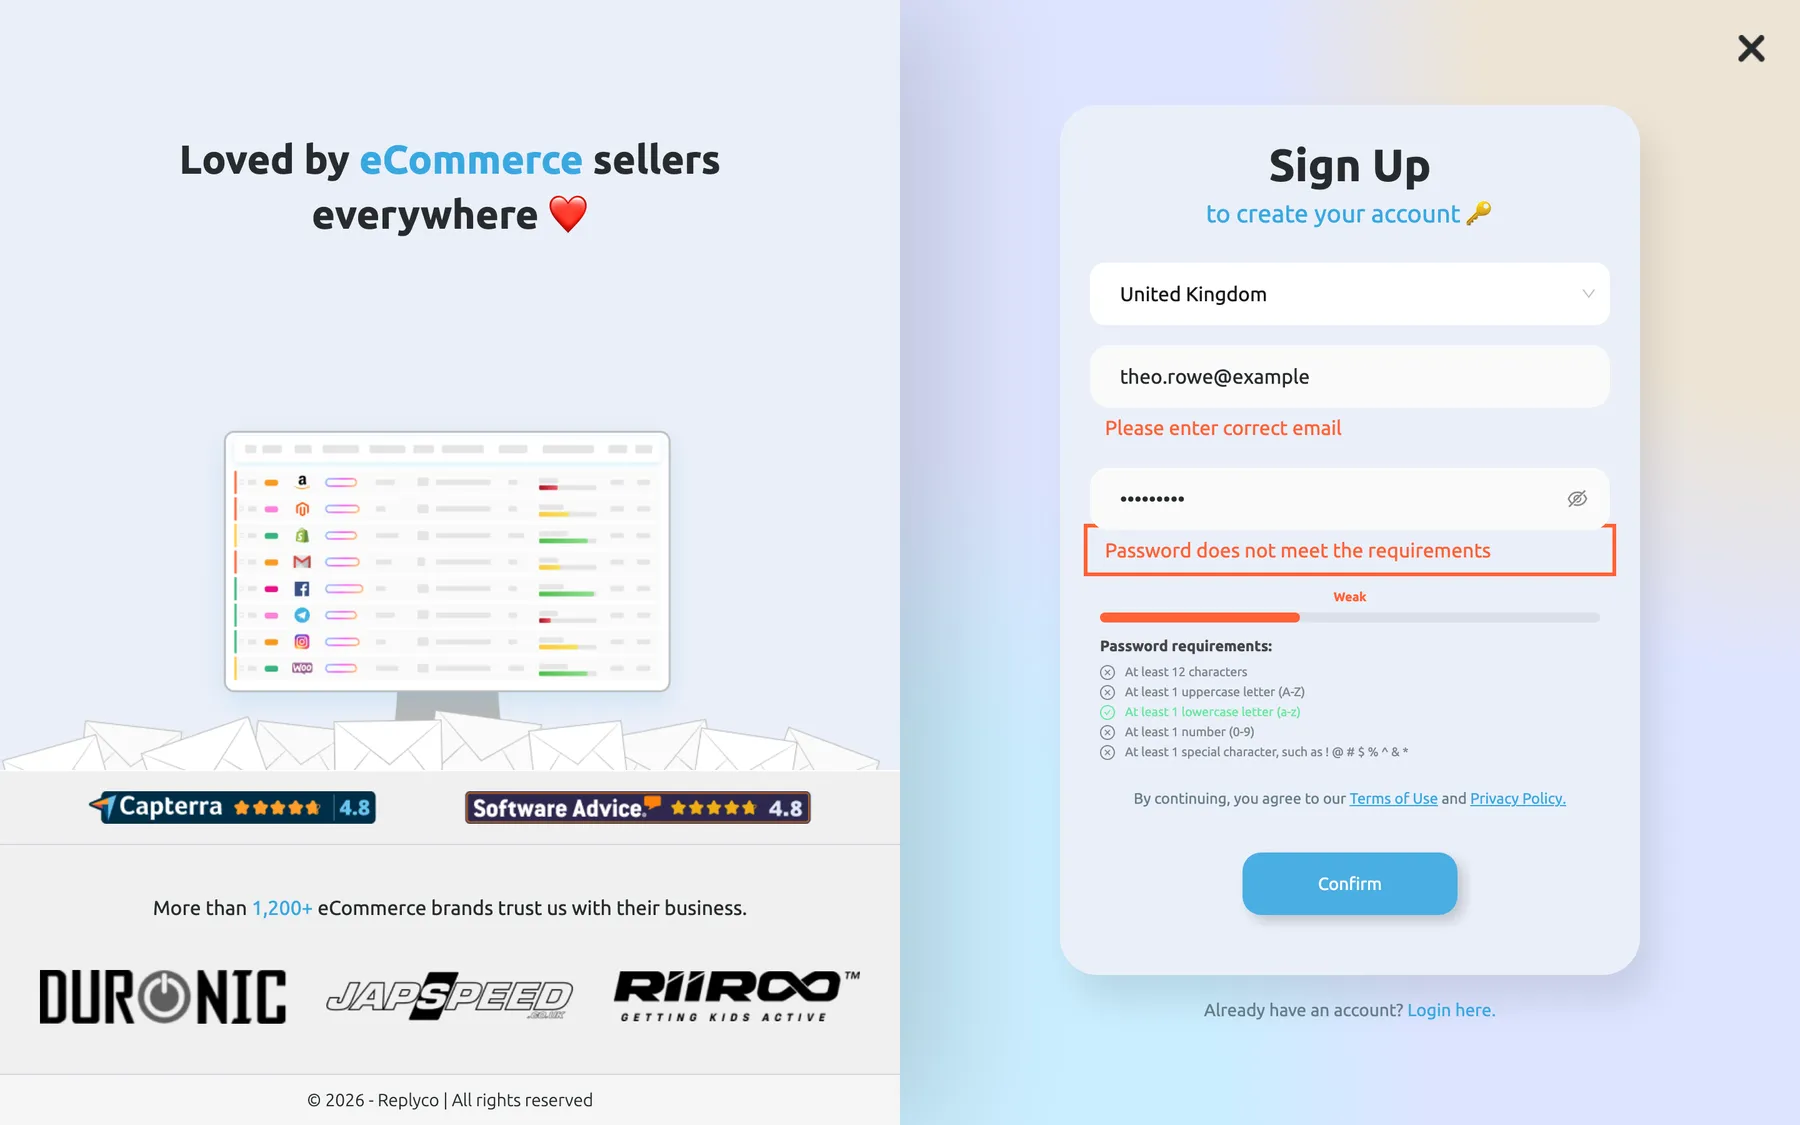
What this screenshot shows
- Screen
- Sign Up (/signup)
- Highlighted
- alert “Password does not meet the requirements”, card-centre, shown. explains why the password is refused
- Also visible
- Please enter correct email under Work email; strength bar partly filled; one of five requirements ticked
- Purpose
- validation of the sign-up form
| Message | Under | Why |
|---|---|---|
| Please enter correct email | Work email | The address is empty or malformed, or Replyco does not accept its domain: addresses ending in .ru and addresses at disposable-mail services are refused |
| This email is already registered | Work email | A Replyco user already has this address, in your company or another one |
| Please enter correct password | Password | The password is empty |
| Password does not meet the requirements | Password | At least one of the five rules is not met |
Example. Northwind-Spring-2026! meets every rule: 22 characters, capitals, lower-case letters, digits and three special characters. northwind2026 is refused because it has no capital letter and no special character.
Set up two-factor authentication
Section titled “Set up two-factor authentication”Every new user must use two-factor authentication, on every plan, so it is part of signing up: there is no way to skip it on this screen. You need an authenticator app on your phone that makes time-based six-digit codes, such as Google Authenticator. Replyco asks for a code from this app every time you sign in with your password.
-
Read Secure Your Data! and install an authenticator app if you have none, then select Let's Set Up.
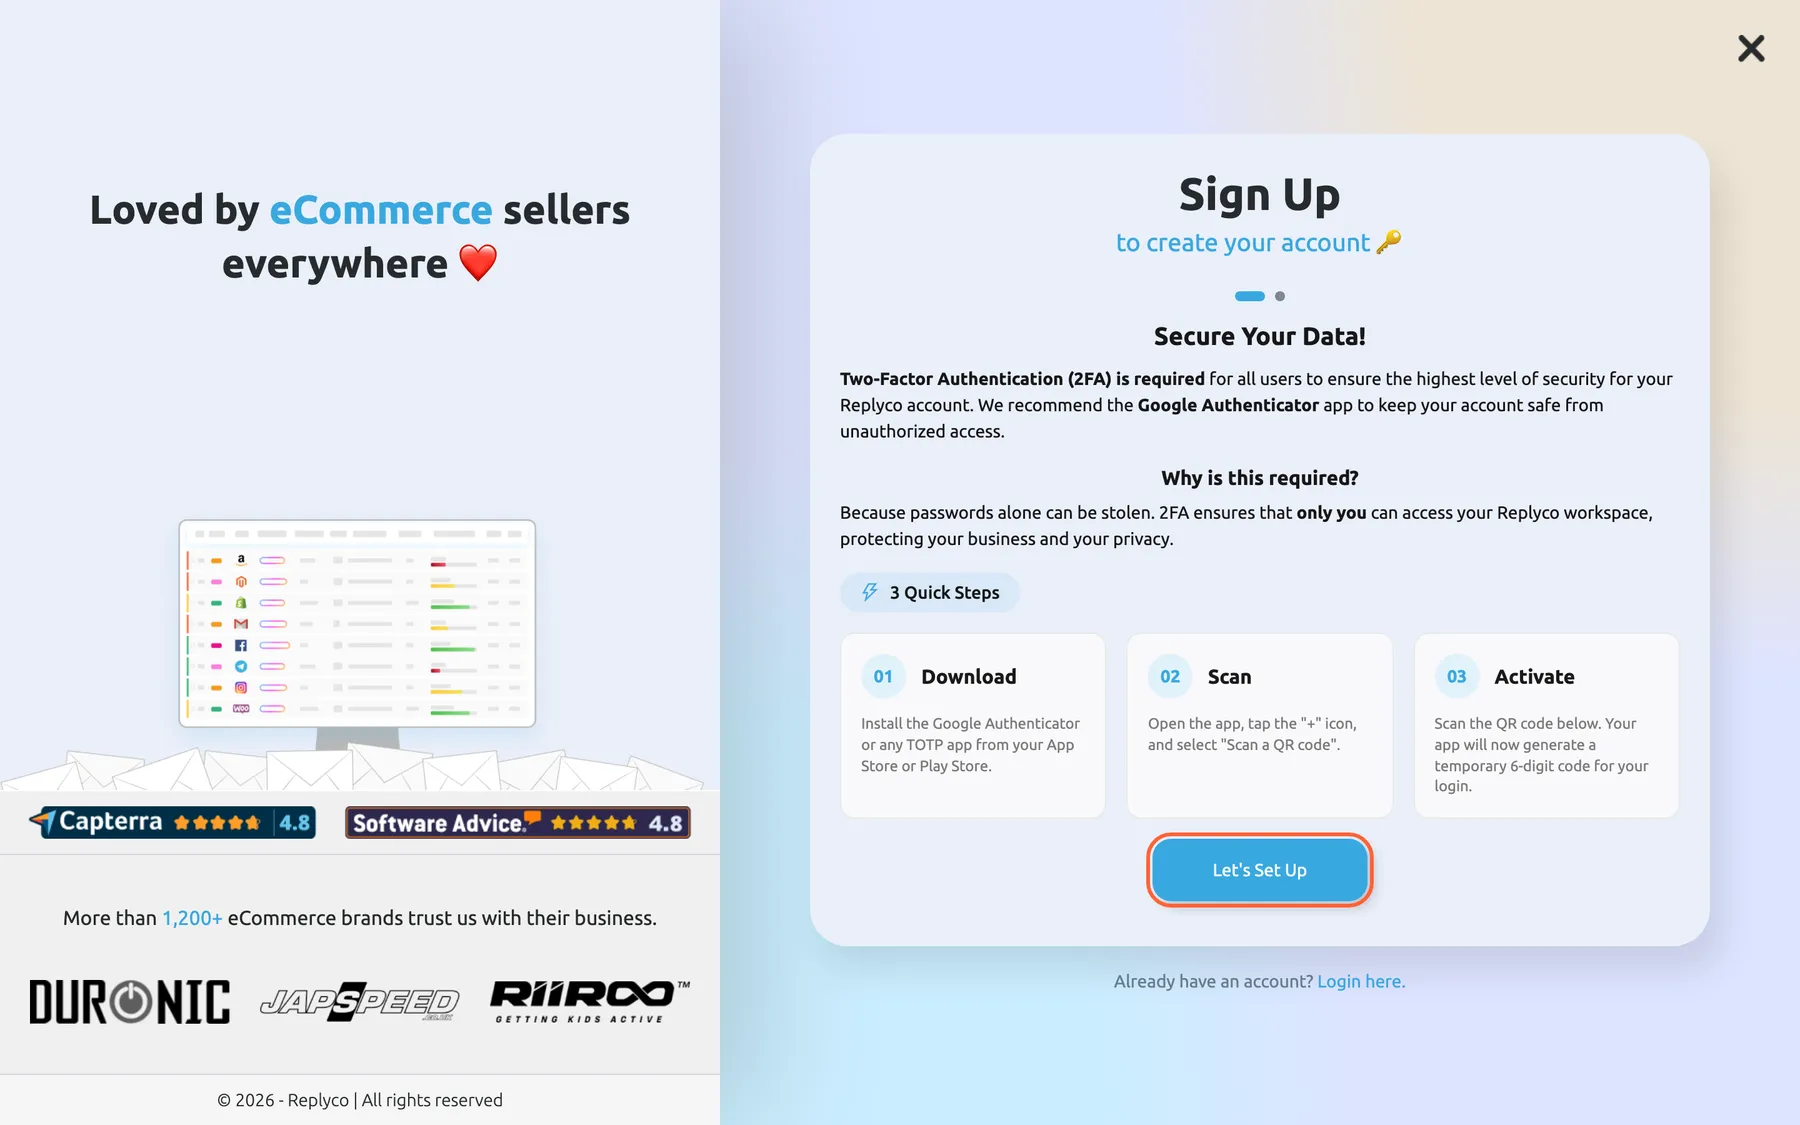
Two-factor authentication is part of sign-up; the first page explains the three steps. What this screenshot shows
- Screen
- Sign Up (/signup)
- Highlighted
- button “Let's Set Up”, card-bottom, enabled. shows the QR code and setup key
- Also visible
- Secure Your Data! heading; 3 Quick Steps: Download, Scan, Activate; page dots, first page active
- Purpose
- second step of creating an account, two-factor setup
-
In the app, add a new entry and scan the code under Scan the QR code. If you cannot scan it, type the key shown under Can’t scan it? into the app instead; Copy copies it. Then select Continue.
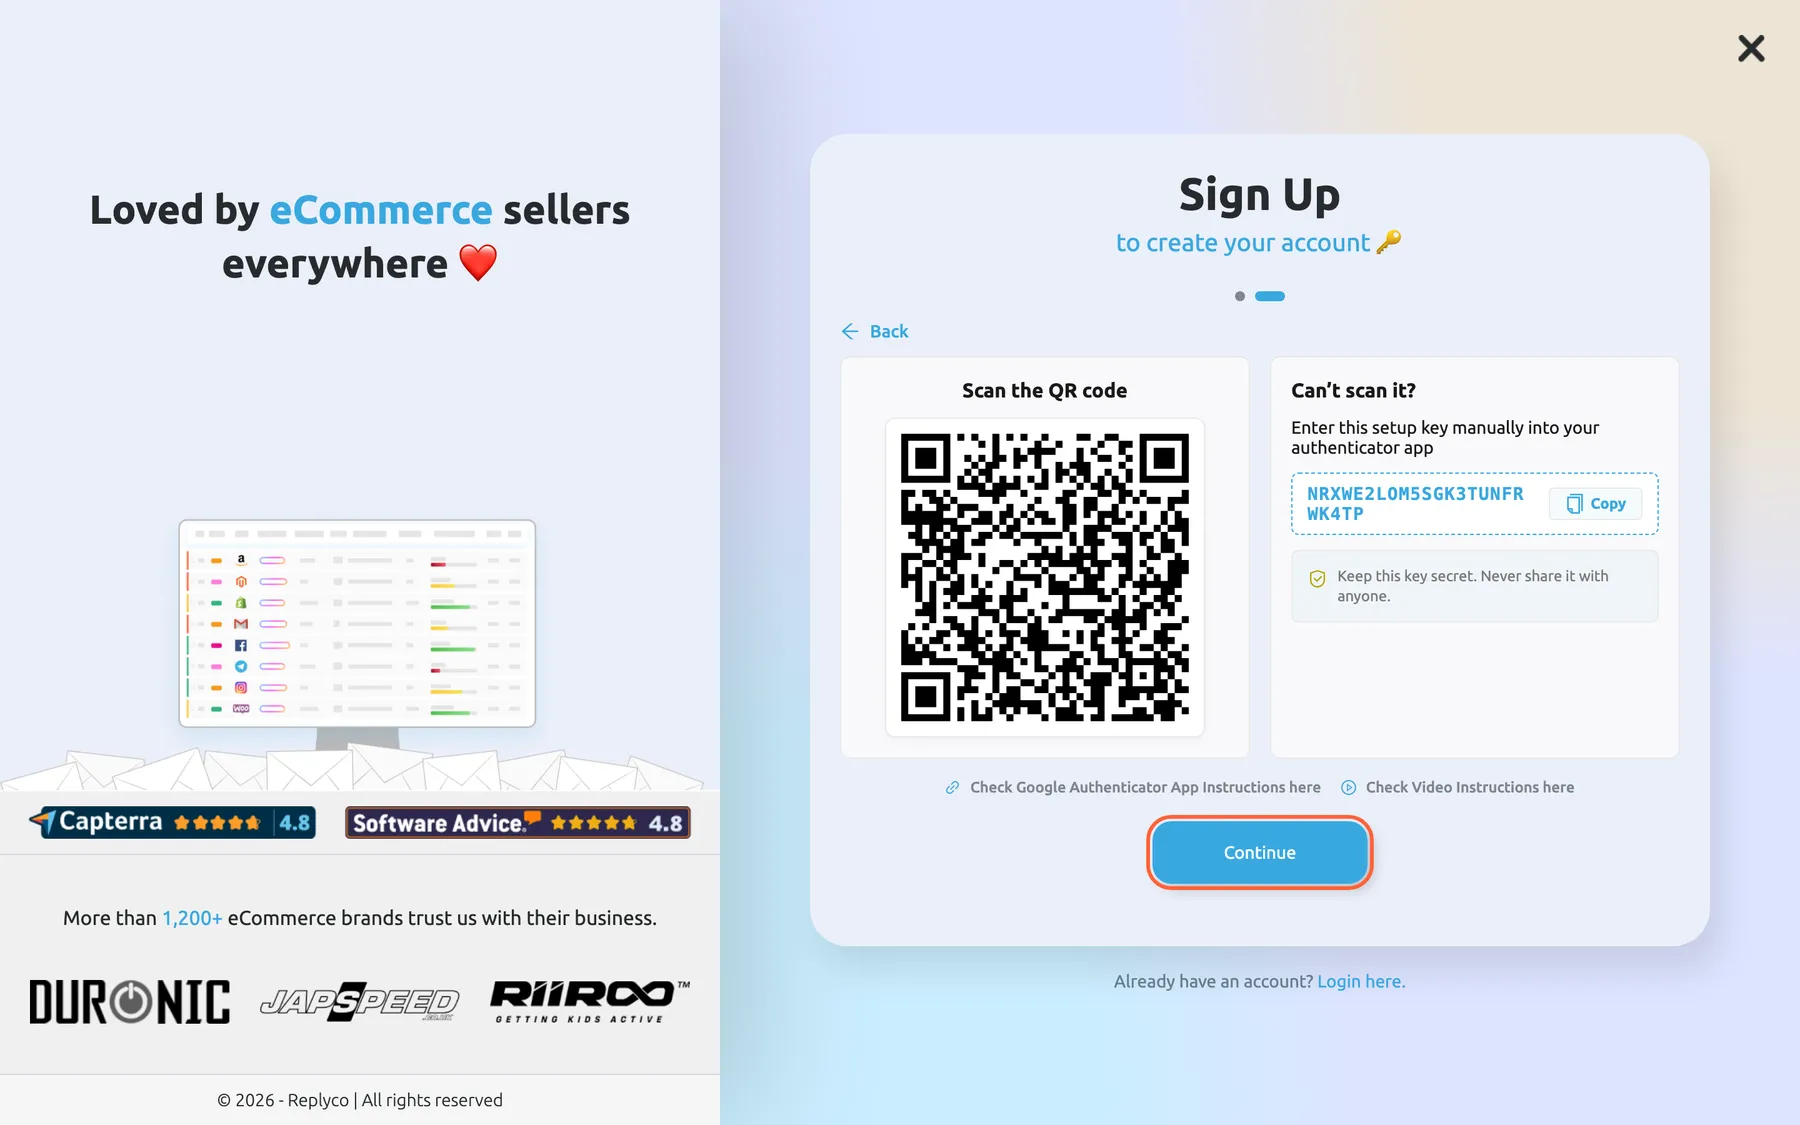
Scan the QR code with your authenticator app, or type the setup key into it, then Continue. What this screenshot shows
- Screen
- Sign Up (/signup)
- Highlighted
- button “Continue”, card-bottom, enabled. opens the verification-code check
- Also visible
- QR code; setup key with Copy button; Keep this key secret notice; Google Authenticator and video instruction links; Back link
- Purpose
- add Replyco to the authenticator app
The app now shows an entry for Replyco with your address and a code that changes every 30 seconds.
-
Type the current code from the app into Verification code and select Confirm.
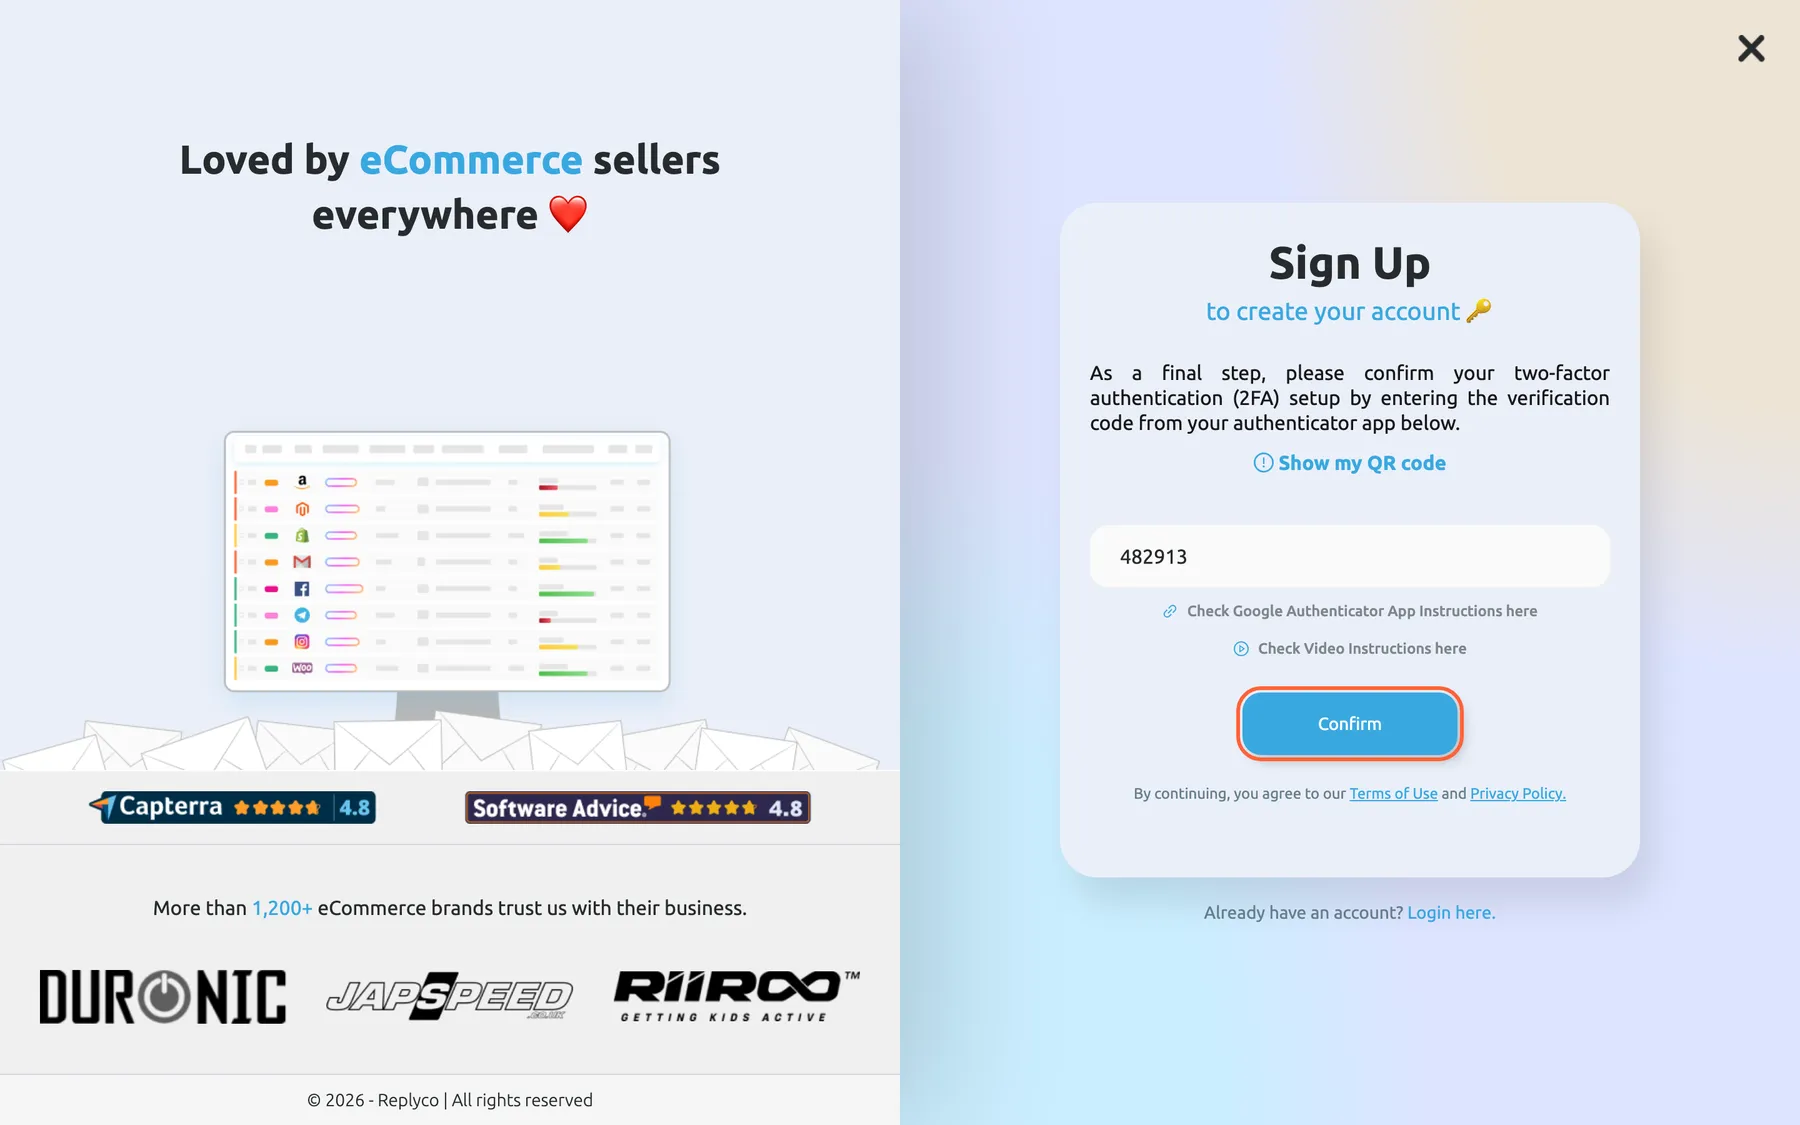
Enter the six-digit code your authenticator app now shows; Confirm checks it and creates your account. What this screenshot shows
- Screen
- Sign Up (/signup)
- Highlighted
- button “Confirm”, card-bottom, enabled. checks the code and creates the company and user
- Also visible
- Show my QR code link; Verification code filled with a sample code; Terms of Use and Privacy Policy line
- Purpose
- confirm two-factor setup and create the account
Replyco checks the code and creates your company and user.
If you pressed Continue before scanning, hover Show my QR code on the last step: it shows the QR code and the key again. The dots at the top of the two-factor pages and Back move between the explanation and the QR code.
If the code is refused, Replyco shows Code is invalid and you stay on the step. Codes are six digits and change every 30 seconds, and your app works them out from the phone’s clock, so set the phone to set its time automatically and type a fresh code. You can try as often as you need.
Keep the key safe. The key under Can’t scan it? is the secret your app makes codes from. Anyone with it can make your codes, so do not send it by email or store it next to your password.
What happens after you sign up
Section titled “What happens after you sign up”-
Your workspace opens with a welcome window. While Replyco creates your company, a window says Welcome to Replyco!. Let’s go! leads you to connect your first account, starting with a choice of channels and Show more integration partners for the full list. Skip for now closes the window and opens the welcome ticket. If you do nothing, the window moves on by itself after 15 seconds. Connecting accounts is explained in Add Account.
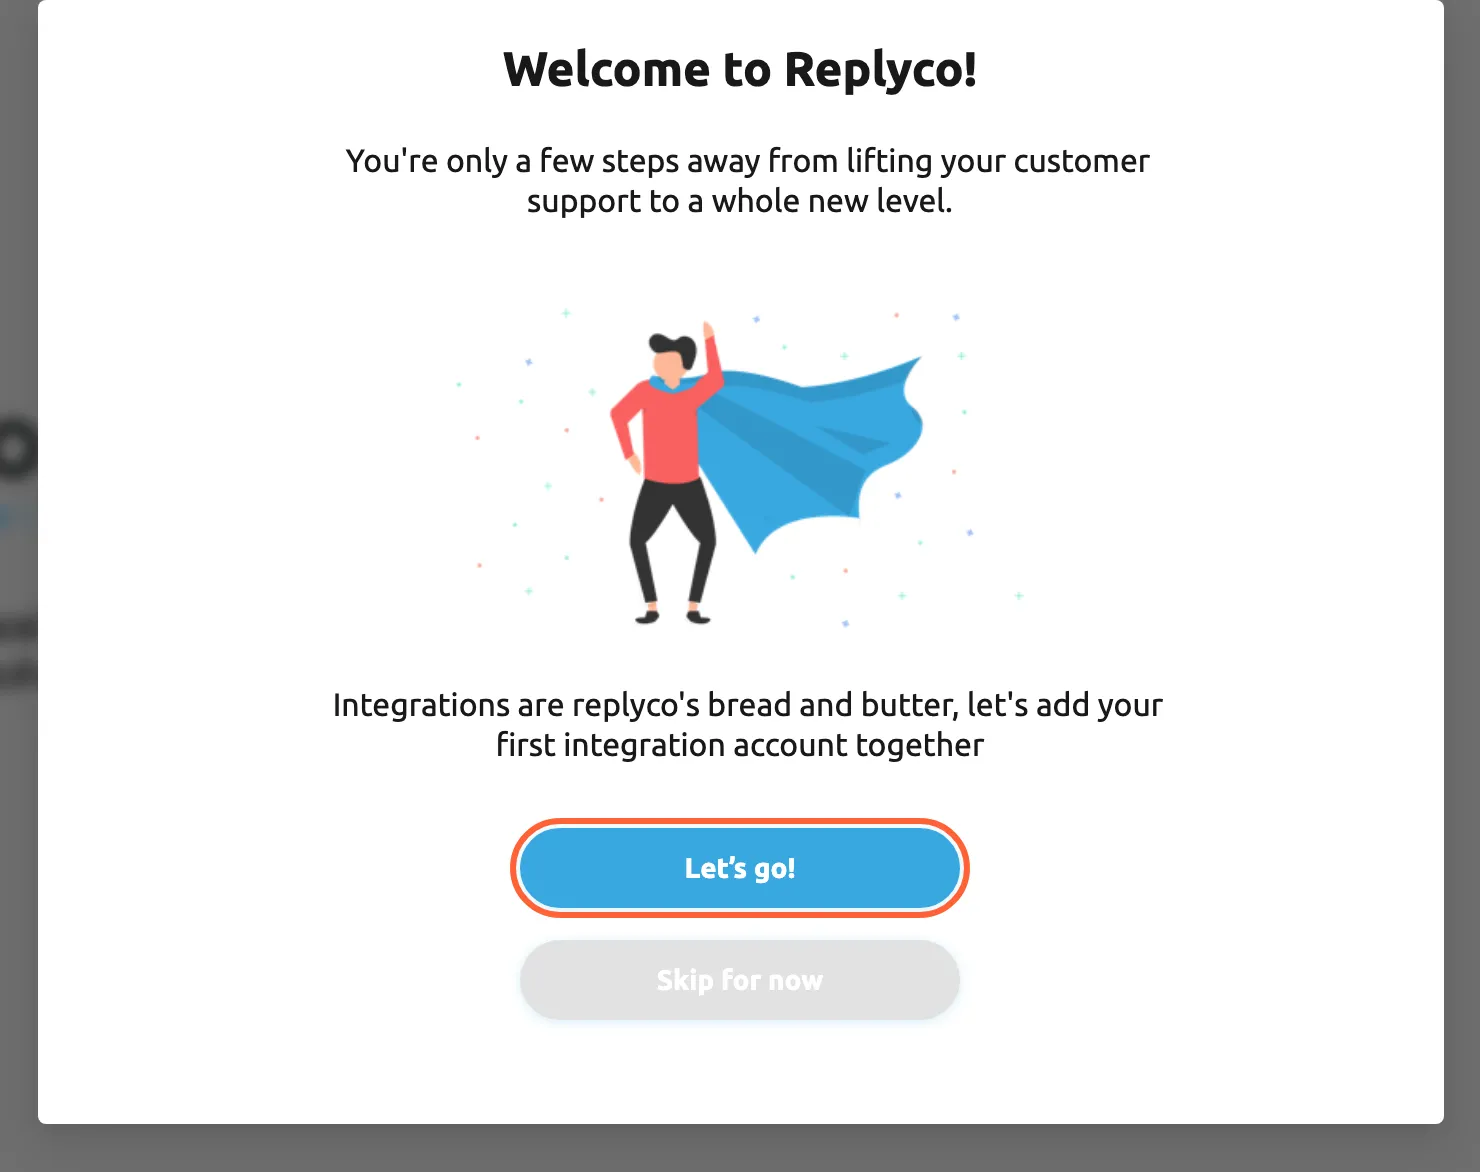
After sign-up, Replyco offers to connect your first account; Skip for now opens the welcome ticket instead. What this screenshot shows
- Screen
- Welcome to Replyco! (/signup)
- Highlighted
- button “Let’s go!”, dialog-bottom, enabled. starts connecting a first account
- Also visible
- Welcome heading; illustration; Skip for now button
- Purpose
- what happens right after the account is created
-
Your company is ready to use. You are its administrator with every permission. It starts with sample content so you can try Replyco before your own messages arrive: a welcome ticket from Replyco, sample templates, orders, products and rules, the default labels and the default Smart Filters. The onboarding checklist in the sidebar leads you through the rest of the setup; see Complete the onboarding checklist.
-
The trial starts. Every feature is switched on during the trial. The sidebar counts the days left, for example 6 Trial day(s) left, with Subscribe now beside it. The trial does not turn into a paid plan by itself; to continue, choose a plan; see Subscribe to a plan.
-
Confirm your email address. Replyco sends a confirmation email to the address you signed up with. Open the link in it; Replyco shows Your email successfully verified.. Until then a yellow banner at the top of every screen says Please verify your email., and Click here to resend the verification email. sends the email again.
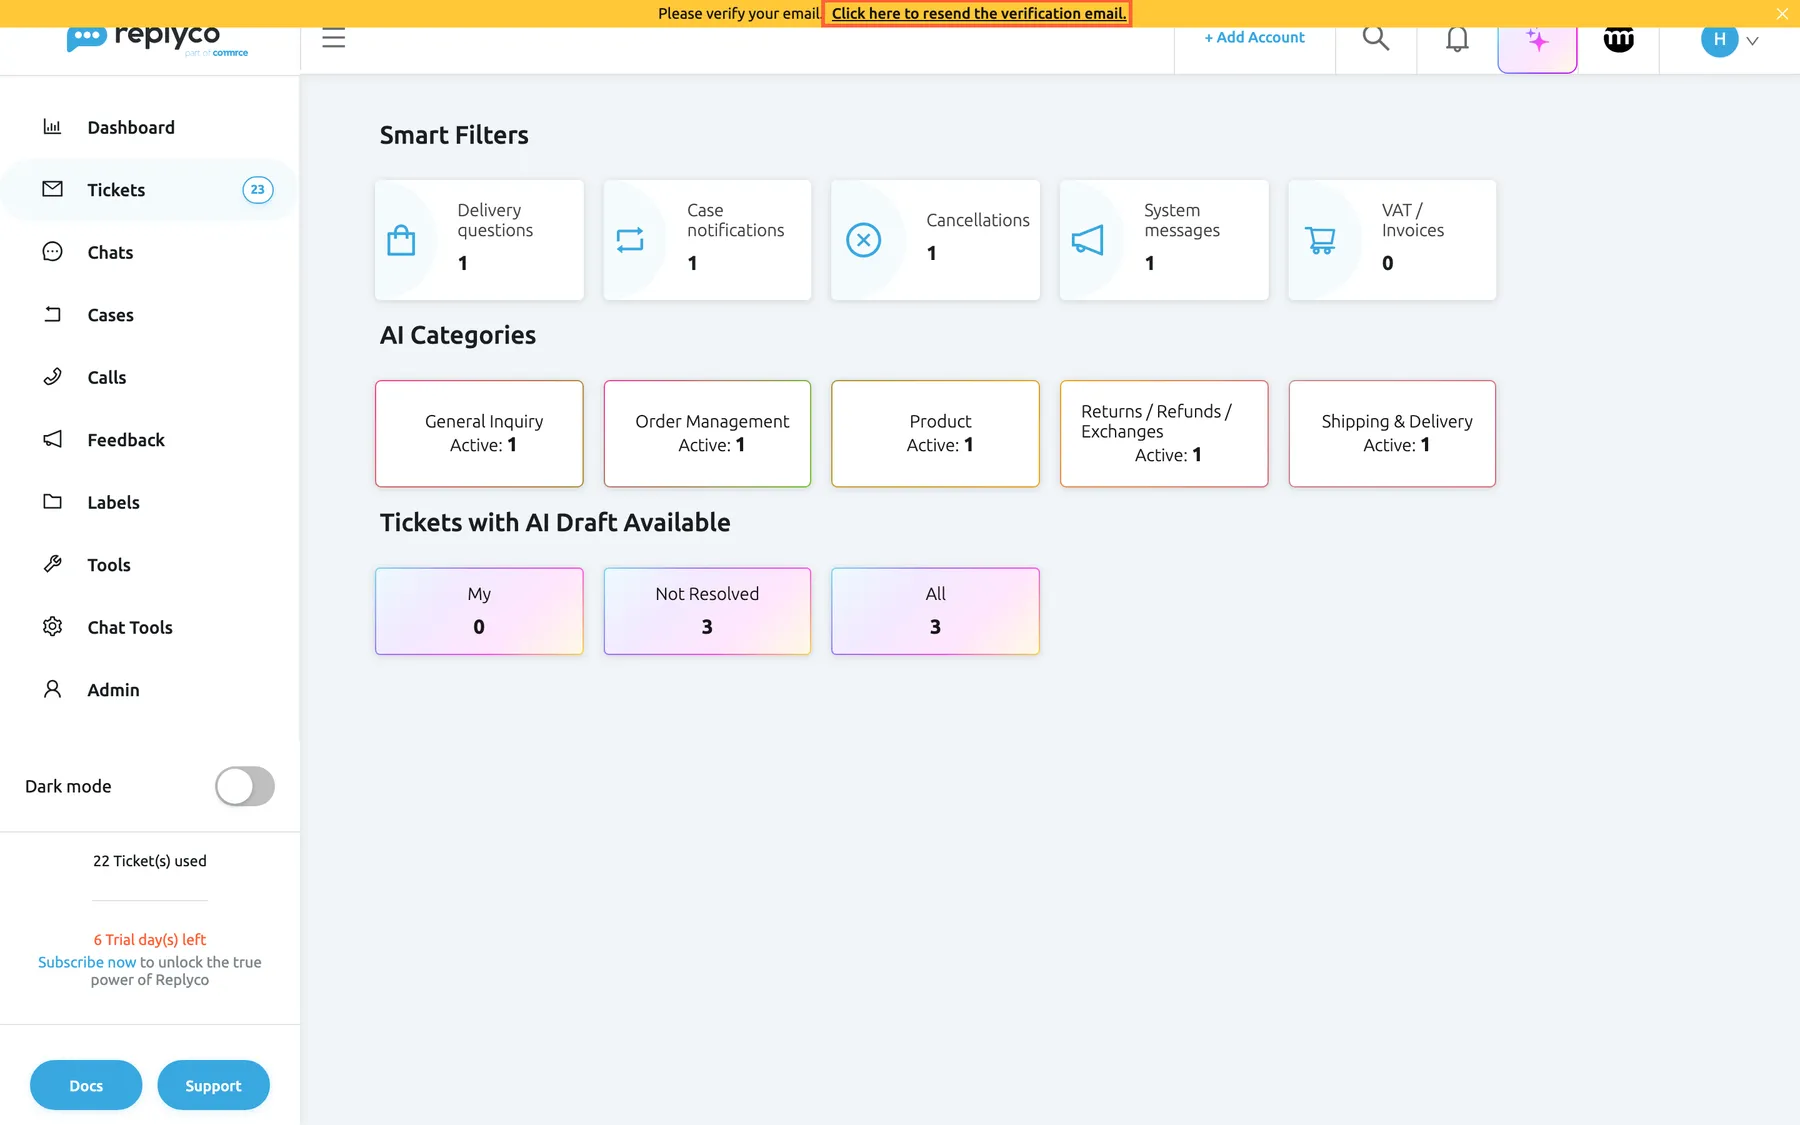
Until you confirm your email address, a yellow banner offers to resend the email; the sidebar counts down the trial. What this screenshot shows
- Screen
- Please verify your email. (/)
- Highlighted
- link “Click here to resend the verification email.”, top-banner, enabled. resends the confirmation email
- Also visible
- yellow banner over the top bar; tickets used and trial counter in the sidebar footer; Subscribe now link; English: no Create Ticket link (UK region during the trial); German: Create Ticket shown (DE region)
- Purpose
- the first days after sign-up
When the trial ends without a plan, you can still sign in, but Replyco opens only the subscription screen and the Help screen, and it stops collecting new messages from your accounts. Choosing a plan brings everything back; see Subscribe to a plan.
Every control, explained
Section titled “Every control, explained”Country list
Section titled “Country list”The first field of the sign-up card; it shows a country name, preset from your computer’s time zone.
Sets your company’s country and region: Germany, Austria, Switzerland and Liechtenstein create a German-region company with a 30-day trial that starts in German; every other country creates a UK-region company with a 7-day trial that starts in English. Choosing a country switches the language of the screen at once. You can type to filter the list.
The region fits your company to its market from the first day, including the trial length and the starting language.
Work email
Section titled “Work email”The second field of the sign-up card.
The address you sign in with and the address of your company. Replyco refuses malformed addresses, addresses ending in .ru, addresses at disposable-mail services and addresses that already belong to a Replyco user, with the messages listed in Fill in the sign-up form. A link to the sign-up screen can carry the address already filled in.
Every recovery path, the password reset and the two-factor reset, sends its email here, so use an inbox you will keep.
Password
Section titled “Password”The third field, with an eye icon at its right end to show or hide what you typed.
Must have at least 12 characters, an uppercase letter, a lowercase letter, a number and a special character. Replyco accepts the special characters ! @ # $ % ^ & * ( ) _ - + = [ ] { } ; : ' " , < . > / ? \ | ~ and the backtick.
Together with two-factor authentication, a long password keeps other people out of your customers’ conversations and orders.
Strength bar and Password requirements:
Section titled “Strength bar and Password requirements:”Under Password.
The bar rates the password in five levels: Very Weak, Weak, Fair, Good and Strong. The five rules below it turn green one by one as the password meets them. Only the rules decide whether Confirm accepts the password.
You see what is missing while you type instead of after a refusal.
Terms of Use and Privacy Policy.
Section titled “Terms of Use and Privacy Policy.”The line above Confirm, repeated on the last two-factor step.
Open Replyco’s terms and privacy policy in a new tab. By continuing you accept them; there is no box to tick.
You know what you agree to before the company is created.
Confirm
Section titled “Confirm”The blue button at the bottom of the card, on the form and again on the last two-factor step.
On the form it checks your details and opens the two-factor setup; nothing is created yet. On the last step it checks the code from your app, then creates your company, your user and the trial, and signs you in. If the company cannot be created, Replyco shows the reason and returns to the form.
Nothing is saved until your two-factor authentication works, so a half-finished sign-up leaves no account behind.
Let's Set Up, Back and the page dots
Section titled “Let's Set Up, Back and the page dots”The first two-factor page and the top of the second one.
Move between the explanation with its 3 Quick Steps and the page with the QR code. While Replyco prepares the QR code, the second page shows Please wait while we generate your QR code...; if that fails, QR code generation failed. Please try again. and a Retry button appear.
You can read the explanation again while your phone is still installing the app.
QR code, setup key and Copy
Section titled “QR code, setup key and Copy”The second two-factor page: Scan the QR code on the left, Can’t scan it? on the right.
Both hold the same secret for your authenticator app. The QR code is for scanning; the key is for typing into an app on a device that cannot scan. Copy copies the key. The links under the panels open Google’s instructions for Google Authenticator and a short video.
The app needs this secret to make the codes Replyco asks for at every sign-in.
Continue
Section titled “Continue”Under the QR code.
Opens the last step, where you confirm the first code. It does not check whether you scanned the code.
The code check on the next step is what proves the app was set up correctly.
Show my QR code and Verification code
Section titled “Show my QR code and Verification code”The last two-factor step.
Hovering Show my QR code shows the QR code and the key again. Verification code takes the six-digit code from your app; anything but six characters, or a wrong code, gives Code is invalid.
If you forgot to scan, you can still finish without starting over.
Login here. and the cross
Section titled “Login here. and the cross”Login here. under the card; the cross in the top corner of the screen.
Login here. opens the sign-in screen. The cross goes back to the page you came from. If you typed an address or a password, your browser may ask whether you want to leave the page.
If you already have a user, you sign in instead of creating a second company.
What you need to know
Section titled “What you need to know”| Topic | Fact |
|---|---|
| One address, one user | An address can belong to one Replyco user only; sign-up refuses an address that is already in use |
| Two-factor authentication | Mandatory for every new user, on every plan; set up during sign-up and required at every sign-in with a password; it cannot be skipped here |
| Region | From the country: German region for Germany, Austria, Switzerland and Liechtenstein, UK region for all others |
| Trial | 7 days in the UK region, 30 days in the German region; every feature is on; no payment details are asked for |
| Your role | The first user is an administrator with every permission, every label and the default Smart Filters |
| Sample content | A welcome ticket, sample templates, orders, products and rules, default labels and Smart Filters |
| Confirmation email | Sent at sign-up; its link works for 7 days in the UK region and 30 days in the German region; resending makes earlier links invalid |
| Before the address is confirmed | A yellow banner on every screen; replies are not sent yet |
| After the trial | Without a plan, only the subscription and Help screens open, and new messages are no longer collected |
Frequently asked questions
Section titled “Frequently asked questions”Signing up
Section titled “Signing up”Do I need a credit card to sign up for Replyco?
Section titled “Do I need a credit card to sign up for Replyco?”No. The sign-up screen asks only for a country, a work email address and a password, then sets up two-factor authentication. The trial starts without payment details, and you choose a plan and payment later; see Subscribe to a plan.
How long is the Replyco trial?
Section titled “How long is the Replyco trial?”It depends on the country you choose at sign-up. Companies in Germany, Austria, Switzerland and Liechtenstein get 30 days; companies in every other country get 7 days. Every feature is switched on during the trial, and the sidebar counts the days left.
What happens when my trial ends?
Section titled “What happens when my trial ends?”The trial never turns into a paid plan by itself. Without a plan you can still sign in, but Replyco opens only the subscription screen and the Help screen, and it stops collecting new messages from your accounts until you subscribe. See Subscribe to a plan.
A colleague already uses Replyco. Should I sign up too?
Section titled “A colleague already uses Replyco. Should I sign up too?”No. Signing up creates a separate company with its own accounts and tickets. Ask an administrator of your company to invite you from AdminUsers; the invitation email lets you set your password and join their company, see Invite users and set what they can do.
Why does Replyco say my email is already registered?
Section titled “Why does Replyco say my email is already registered?”The message This email is already registered means a Replyco user with this address exists, in your company or another one. Sign in with it, or reset its password from the sign-in screen. If you want a new company, sign up with a different address.
Why is my email address refused?
Section titled “Why is my email address refused?”Please enter correct email appears when the address is malformed, ends in .ru, or belongs to a disposable-mail service that Replyco does not accept. Use your normal work address; it also receives password and two-factor resets later.
Which country should I choose?
Section titled “Which country should I choose?”Choose the country your business is based in. Germany, Austria, Switzerland and Liechtenstein put your company in the German region, with a 30-day trial and a German start; every other country puts it in the UK region, with a 7-day trial and an English start.
Two-factor authentication
Section titled “Two-factor authentication”Can I skip two-factor authentication when I sign up?
Section titled “Can I skip two-factor authentication when I sign up?”No. Every new user must use two-factor authentication, on every plan, and the sign-up screen has no way to skip it: your company is only created after you confirm a code from your authenticator app. Replyco then asks for a code from that app every time you sign in with your password.
Which authenticator app can I use?
Section titled “Which authenticator app can I use?”Any app that makes time-based six-digit codes (TOTP) works. The sign-up screen recommends Google Authenticator and links to its instructions and to a video. You scan the QR code, or type the setup key if your device cannot scan.
The code from my app is refused during sign-up. What do I do?
Section titled “The code from my app is refused during sign-up. What do I do?”Replyco shows Code is invalid. Set the date and time on your phone and your computer to update automatically, wait for a fresh code and type all six digits. If you never scanned the QR code, hover Show my QR code to see it again.
I lost the phone with my authenticator. How do I get back in?
Section titled “I lost the phone with my authenticator. How do I get back in?”Select Reset 2FA Access on the code step of the sign-in screen, confirm your email address and password, and enter the code Replyco emails you. You then scan a new QR code. The steps are in Sign in.
After signing up
Section titled “After signing up”Why do I see a yellow banner saying I should verify my email?
Section titled “Why do I see a yellow banner saying I should verify my email?”Replyco sent a confirmation email when you signed up, and your address is not confirmed yet. Open the link in that email. Click here to resend the verification email. in the banner sends a new email and makes the earlier link invalid.
Why are my replies not sent?
Section titled “Why are my replies not sent?”Replyco sends replies only after your company’s email address is confirmed. Open the link in the confirmation email, or resend it from the yellow banner at the top of the screen; replies you wrote in the meantime go out afterwards.
What are the tickets and templates I did not create?
Section titled “What are the tickets and templates I did not create?”New companies start with sample content: a welcome ticket from Replyco, sample templates, orders, products and rules, plus the default labels and Smart Filters. They let you try Replyco before your own accounts are connected, and you can change or delete them.
Why is there no Create Ticket link in my top bar?
Section titled “Why is there no Create Ticket link in my top bar?”Companies in the UK region cannot create tickets during the trial until Replyco has verified the company; the link + Create Ticket appears once that is done or once you choose a plan. Companies in the German region have it from the start. See Create a ticket.
Troubleshooting
Section titled “Troubleshooting”| Symptom | What to check |
|---|---|
| This email is already registered | The address already has a Replyco user; sign in or reset the password on the sign-in screen, or use another address |
| Please enter correct email for an address you use every day | Typos first; then whether it ends in .ru or belongs to a disposable-mail service, which Replyco does not accept |
| Password does not meet the requirements | Which rule under Password requirements: is still grey: length of 12, capital, lower-case letter, number, special character |
| The second two-factor page shows QR code generation failed. Please try again. | Select Retry; check your internet connection |
| Code is invalid on the last step | Automatic time on phone and computer; six digits; a fresh code; the Replyco entry in the app, not an older one |
| The sign-up screen is in the wrong language | The country you chose; the German region shows German, every other country English |
| No confirmation email arrives | Junk folder; the address you signed up with; resend from the yellow banner, which invalidates earlier links |
| The confirmation link says it is expired or already used | Resend the email from the yellow banner and open the newest link |
| Replies stay in the ticket and are not sent | Whether the yellow banner is still shown; confirm the address |