

Live chat widget
A shopper looking at a product page at 21:15 has one question, whether the charger fits a UK socket, and leaves if nobody answers it. The live chat widget puts a chat window on your website, brings each conversation into Replyco as a chat your team answers live, and tells visitors honestly whether someone is there right now or will answer later.
What it does
Section titled “What it does”Email and marketplace messages are slow for questions a shopper wants answered before paying. Without a chat on the page, the question either goes unasked or arrives as a ticket hours later, when the shopper has bought elsewhere.
The widget is a small chat button in a bottom corner of your pages. A visitor opens it, gives an email address, and writes; the conversation appears under Chats as a live chat, next to your WhatsApp and Messenger chats, and your team’s replies show in the visitor’s window as they are sent. You can run several widgets, one per website or brand, each with its own look, texts, hours and code.
- Visitors see your colours, your greeting and a line that says whether you are open. Every setting, explained
- The widget follows your working hours: it changes its status line when you close, and can hide completely. Understanding working hours
- Chats arrive in the Chats screen for the colleagues responsible for the widget, and whoever replies is assigned to the chat. Live chats in Replyco
- You install it once by pasting a short code into your website; later changes need no new code. Install the widget on your website
- Each visitor message can also go to your own system through a webhook. The webhook
Every created and changed widget leaves a row in its Change Logs, with the old and the new value, and every chat keeps the visitor’s name, email and, if you choose, the page each message was written on.
Before you start
Section titled “Before you start”| Requirement | Details |
|---|---|
| Plan | Live chat is part of every plan and of the trial; companies on an older plan may not have it. The widget appears on websites only while your company has live chat. See What each plan includes. |
| Setting up | The Widgets permission under Chat Tools; it shows Chat ToolsLive Chat. Set in AdminUsers; see Users. |
| Answering | The Chats permission under Main, and access to the widget in the Live Chat section of Access Rights. Everyone in the company when a widget is created gets access to it. |
| Your website | Someone who can edit your website’s template or add a script to every page, for example in your shop system’s theme editor. |
| Working time | The widget uses your company working time unless you give it its own. Check the hours in Company Settings first. |
| Cost | No charge per widget or per visitor. The first reply your team sends in a chat is reported as usage of your subscription, as with other conversations; see Billing: Usage. |
Understanding working hours
Section titled “Understanding working hours”The widget is always either open or closed. Open, it shows During business hours message under the greeting; closed, it shows Outside business hours message, or disappears if Widget visibility outside working hours is off. Visitors can write in both states.
Examples for the Northwind Outlet Chat, open Monday to Saturday 08:00–17:30 with 25 December, 26 December and 1 January as holidays:
| Visitor’s moment | Result | Why |
|---|---|---|
| Monday 07:59 | Closed | Before the start |
| Monday 10:00 | Open | Between the start and the end |
| Monday 17:29 | Open | Before the end |
| Monday 17:30 | Closed | The end time itself counts as closed |
| Sunday 11:00 | Closed | Sunday is not a working day |
| Thursday 25 December, 10:00 | Closed | A holiday, in any year |
How Replyco decides
Section titled “How Replyco decides”- Minutes, not seconds. The widget compares the hour and minute of the moment with the start and the end. At the end time it counts as closed, so a span of 08:00–17:30 is open until 17:29.
- Hours across midnight. An end earlier than the start, such as 22:00–06:00, means hours across midnight: the widget counts as open in the late evening and the early morning of the working days.
- A working time range. With Use Working Time Range on, the stretch from Active From to Active To is one block: open after the start time on the first day, all day on the days between, and before the end time on the last day. Monday 08:00 to Saturday 17:30 is open on Wednesday at 03:00 and closed on Saturday at 17:31.
- Holidays win. A date in Holidays is closed all day, every year on that day and month, whatever the weekday says.
- Where the hours come from. With Use Working time from Company Settings on, the widget uses the working days, times, range and holidays from Company Settings, including later changes there. Off, it uses its own.
- Time zone. You enter the times in your browser’s time zone, and the widget applies them to visitors wherever they are: 09:00 in London is 09:00 in London for a visitor in Berlin too.
What does not get a chat window
Section titled “What does not get a chat window”The chat button does not appear on a page:
- when Active is off;
- when the page does not have the widget’s whole code, including the
divwith the IDreplycoChat; - outside working hours, when Widget visibility outside working hours is off;
- on a phone or tablet, when Widget on mobile devices is off;
- when the widget was deleted, or the code names a widget that does not exist;
- when your company no longer has live chat, for example after the trial ended without a plan.
In each case the page shows nothing where the button would be; visitors see no error.
Setting it up in five steps
Section titled “Setting it up in five steps”-
Create the widget. Open Chat ToolsLive Chat and select Create New. The form opens on Appearance.
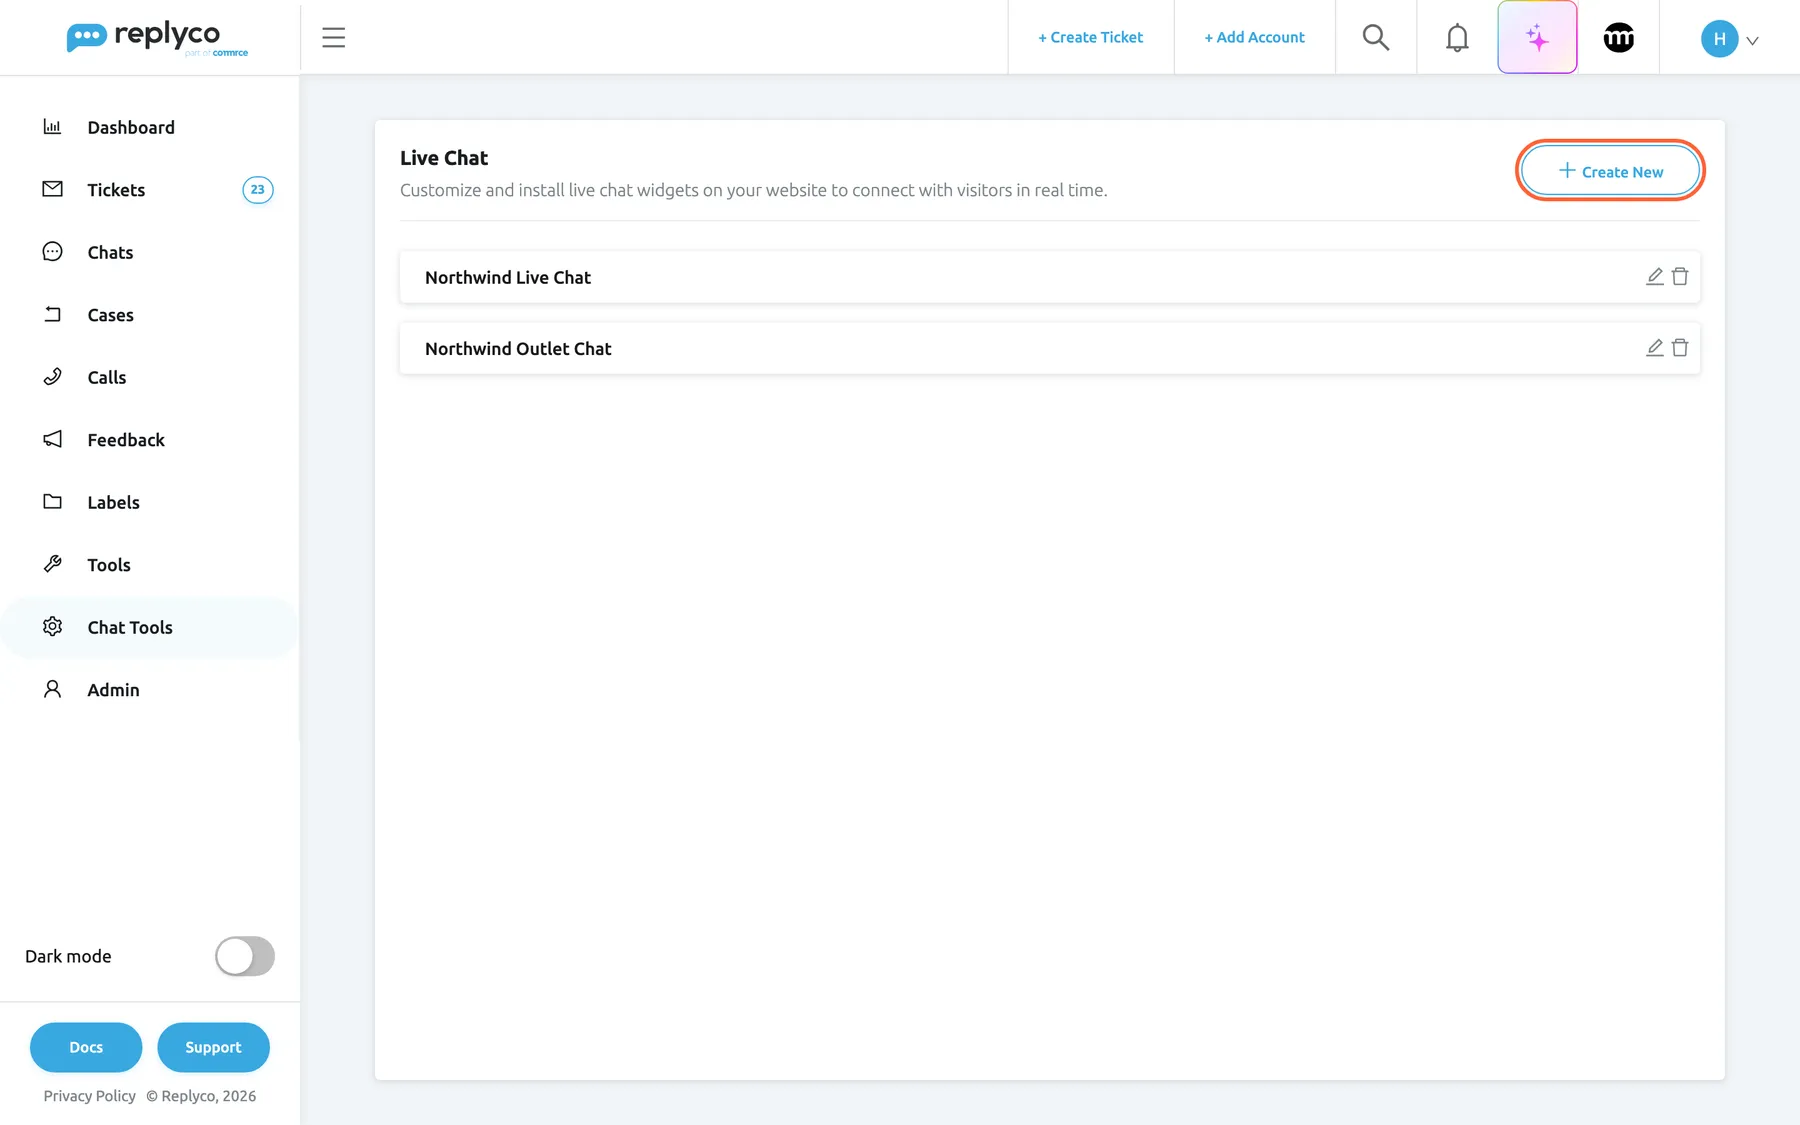
Every chat window on your websites is a widget on the Live Chat screen. What this screenshot shows
- Screen
- Live Chat (/live-chat-settings)
- Highlighted
- button “Create New”, panel-header-right, enabled. starts a new widget
- Also visible
- 2 widgets: Northwind Live Chat, Northwind Outlet Chat; pencil and bin per row
- Purpose
- entry point of the live chat widget
-
Write the four texts. Fill in Chat title, Introductory message, During business hours message and Outside business hours message. All four are required.
-
Check the hours (optional). Leave Use Working time from Company Settings on to use your company hours, or turn it off and set the widget’s own days, times and holidays.
-
Save, then copy the code. Select Save, open the widget again, go to Installation and select Copy.
-
Paste the code into your website. Paste it before the closing
</body>tag of every page that should show the chat, and publish. Open a page of your website: the chat button appears in the bottom corner.
Every setting, explained
Section titled “Every setting, explained”The settings are on the widget’s Appearance and Widget Settings tabs on Chat ToolsLive Chat, in this order; each is described with its effect on visitors. The screen itself, every button and the validation are in Live Chat.
Chat title, the widget’s name
Section titled “Chat title, the widget’s name”Appearance, first text box. Required; saved with Save.
The heading visitors see when they open the chat window, before a conversation starts. The same text is the widget’s name inside Replyco: the account name of its chats in the chat list, the entry in Filter by Account, the row in users’ access rights and the entry in auto-response rules. Changing it renames the widget everywhere at once.
Visitors see whom they are talking to; your team sees which website a chat came from.
Introductory message, the greeting
Section titled “Introductory message, the greeting”Appearance, under the title. Required.
Shown under the title in the welcome view, at the top of the window during the conversation and above the form that asks for the visitor’s email, and in the welcome bubble when Show welcome message is on.
It is the first thing a visitor reads, so it should say what they can ask.
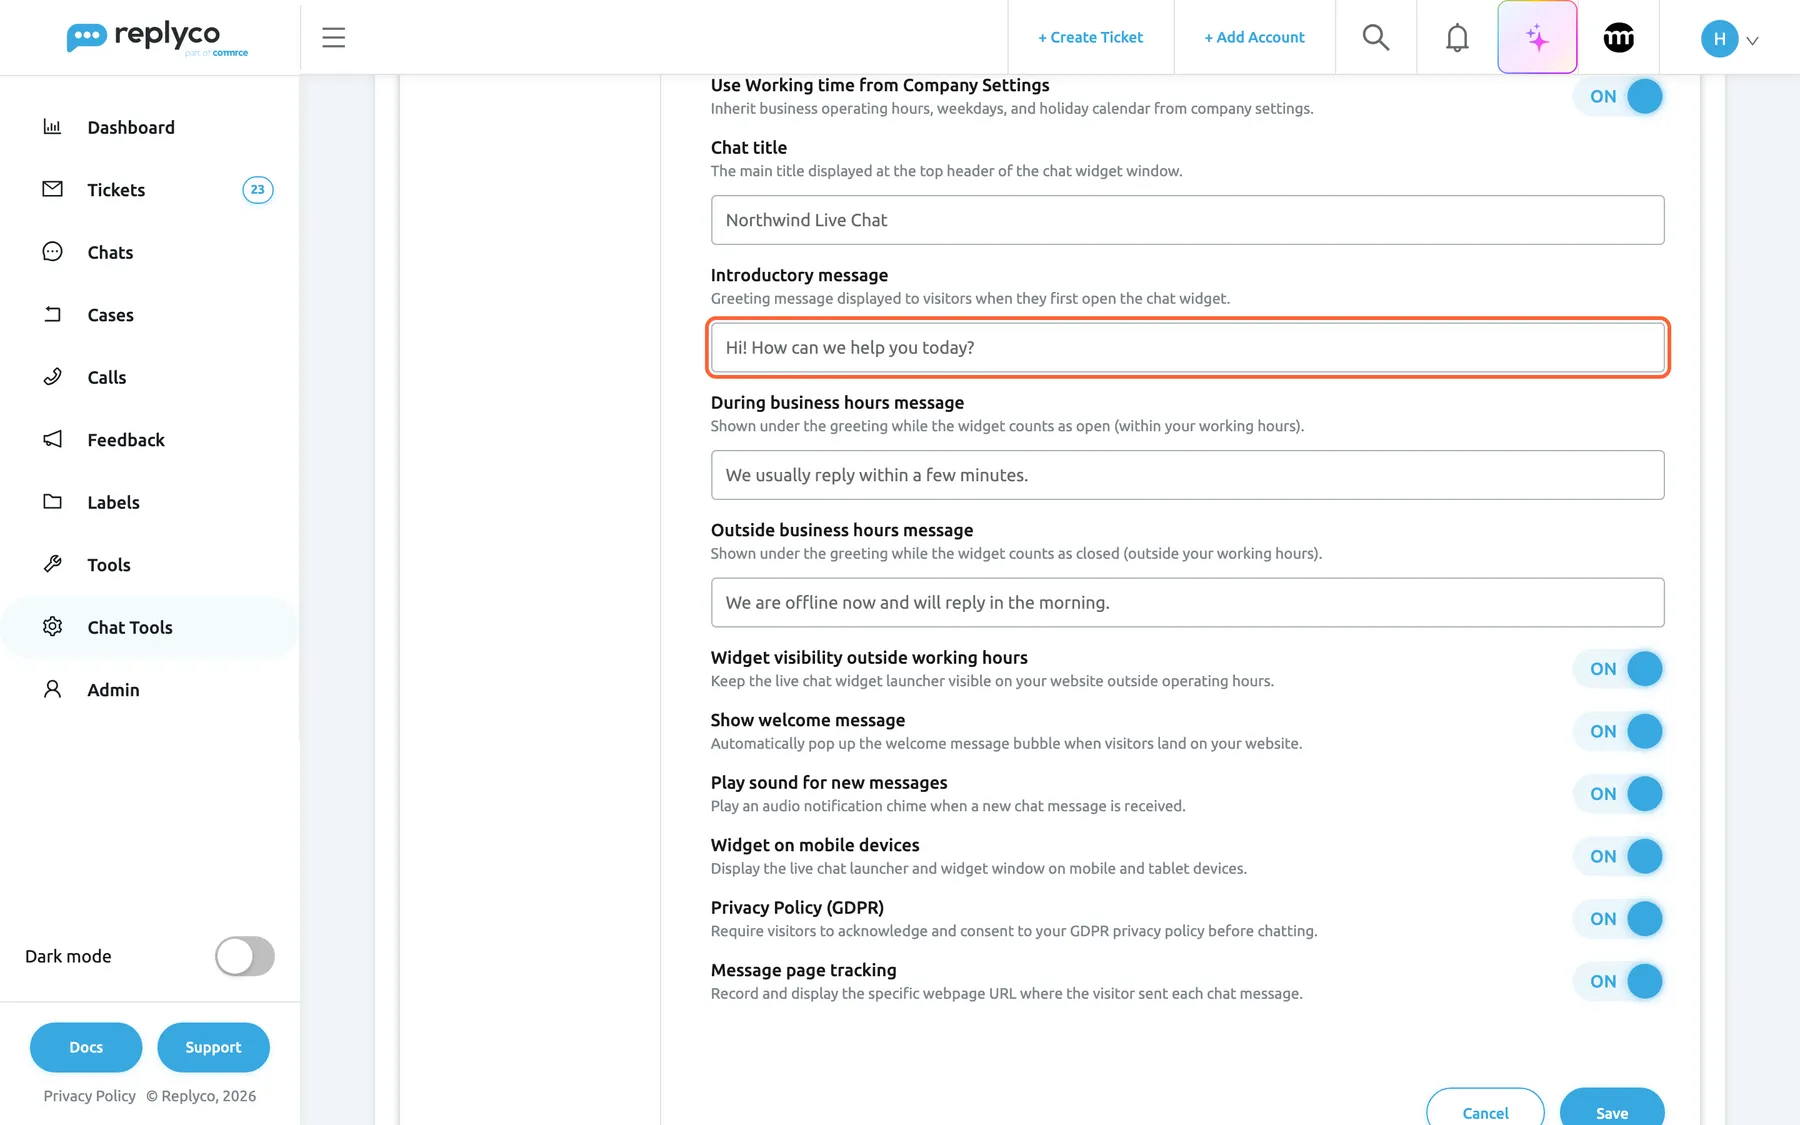
What this screenshot shows
- Screen
- Live Chat (/live-chat-settings)
- Highlighted
- textbox “Introductory message”, editor-texts, Hi! How can we help you today?. sets the greeting visitors see
- Also visible
- Use Working time from Company Settings ON; Chat title Northwind Live Chat; During and Outside business hours messages filled
- Purpose
- the widget's texts
During business hours message and Outside business hours message, the status line
Section titled “During business hours message and Outside business hours message, the status line”Appearance, under the greeting. Both required.
One line under the greeting, chosen by the working time: the first while the widget counts as open, the second while it counts as closed. It is part of the window, not a message: nothing is added to the chat, and your team does not see it. To send an automatic chat message, use Auto-responses for chats.
Visitors decide whether to wait for an answer now or leave their question for later.
| Do | Don’t |
|---|---|
| Say when to expect an answer: We usually reply within a few minutes. | Promise a time you cannot keep: Instant answers, 24/7 |
| In the closed line, say when you are back: We will answer from 08:00. | Tell visitors to come back later; they can write now |
| Keep each line to one sentence; the widget is narrow | Paste opening hours for every weekday |
| Write in your visitors’ language | Mix languages; the widget’s own buttons are in English already |
Theme, Background color and Position, the look
Section titled “Theme, Background color and Position, the look”Appearance, top: two colour swatches and the Left / Right switch.
Theme (new widgets: #39a7e3) colours the chat button, the header of the window, the welcome bubble and the buttons. Background color (white) fills the area behind the messages. Position (Right) puts the button in the bottom right or bottom left corner.
The chat should look like part of your shop and stay clear of other buttons in the same corner.
Use Working time from Company Settings, where the hours come from
Section titled “Use Working time from Company Settings, where the hours come from”Appearance, under Position. On for new widgets. Off opens Use Working Time Range, Working days, Active between (or Active From and Active To) and Holidays.
On: the company’s working days, times, range and holidays apply, including later changes in Company Settings. Off: the widget’s own working time applies; saving needs at least one day and both times, otherwise Replyco shows All fields must be completed.. The widget’s own hours are kept when you switch back. The rules for boundaries, ranges, holidays and time zones are in Understanding working hours.
One set of hours for tickets, auto-responses and the chat is easiest to keep right; an outlet or a second brand with different opening hours needs its own.
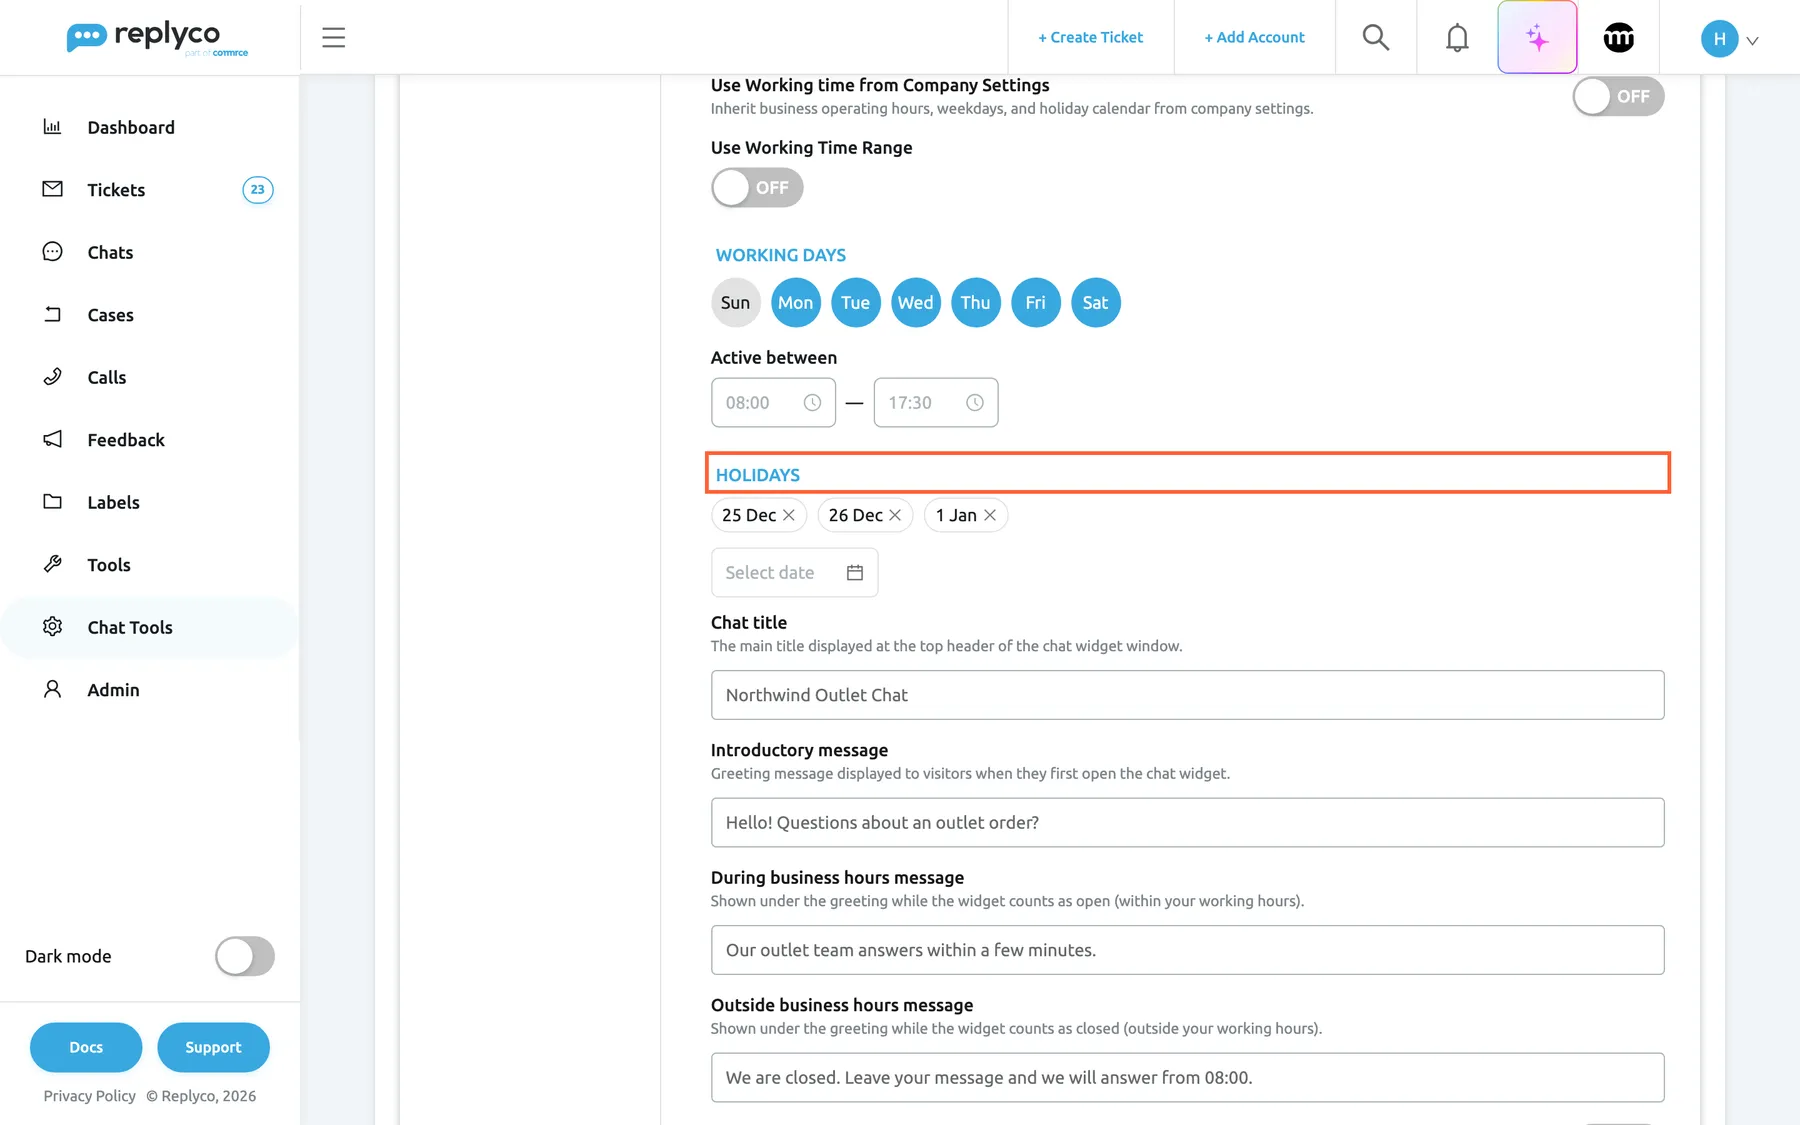
What this screenshot shows
- Screen
- Live Chat (/live-chat-settings)
- Highlighted
- group “Holidays”, editor-working-time, 25 Dec, 26 Dec, 1 Jan. closes the widget on those dates every year
- Also visible
- Use Working time from Company Settings OFF; Working days Mon–Sat; Active between 08:00–17:30
- Purpose
- working hours of a widget
Widget visibility outside working hours, the closed-hours switch
Section titled “Widget visibility outside working hours, the closed-hours switch”Appearance, first switch under the texts. On for new widgets.
On: while the widget counts as closed, the chat button stays on your pages with the closed-hours line, and visitors can still write. Off: the widget is not shown while it counts as closed.
Collect questions overnight and answer them in the morning, or show the chat only when someone can answer at once.
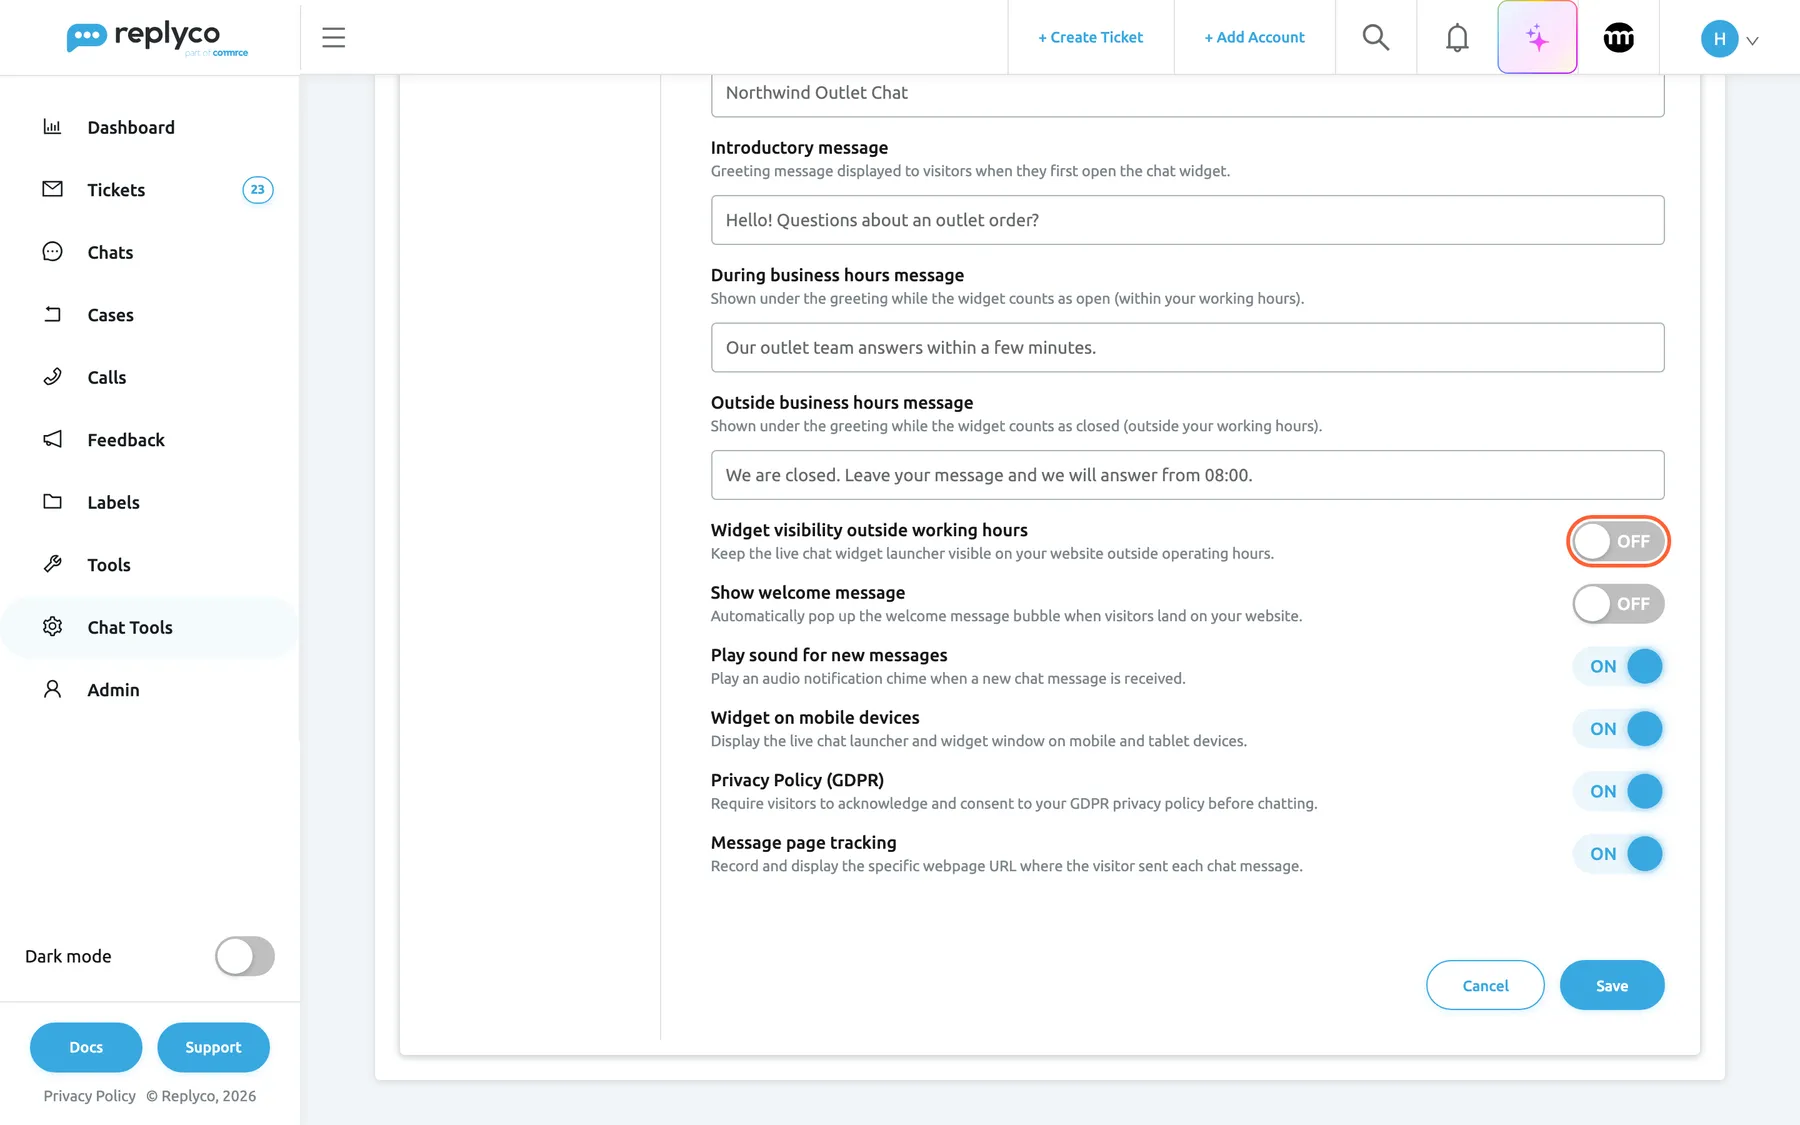
What this screenshot shows
- Screen
- Live Chat (/live-chat-settings)
- Highlighted
- switch “Widget visibility outside working hours”, editor-preferences, off. hides the widget outside working hours
- Also visible
- Show welcome message OFF; Play sound ON; Widget on mobile devices ON; Privacy Policy (GDPR) ON; Message page tracking ON
- Purpose
- the widget's preferences
Show welcome message, the invitation bubble
Section titled “Show welcome message, the invitation bubble”Appearance, second switch. Off for new widgets.
On: a bubble with the Introductory message pops up next to the closed chat button. It goes away when the visitor closes it, and that browser does not show it again; it is not shown once the visitor’s conversation has messages.
A visible greeting invites questions that would otherwise not be asked.
Play sound for new messages, the visitor’s alert
Section titled “Play sound for new messages, the visitor’s alert”Appearance, third switch. On for new widgets.
On: the visitor’s browser plays a short sound when a message from your team arrives in the widget. It does not affect sounds in Replyco; those are each user’s choice in Notifications.
Visitors who switched to another tab notice your answer and come back.
Widget on mobile devices
Section titled “Widget on mobile devices”Appearance, fourth switch. On for new widgets.
Off: the widget does not appear on phones and tablets. The widget recognises them by the browser’s own description of the device (Android, iPhone, iPad and similar).
On a small screen the chat button can cover the basket or checkout button.
Privacy Policy (GDPR), the consent box
Section titled “Privacy Policy (GDPR), the consent box”Appearance, fifth switch. Off for new widgets. Companies registered in Replyco’s German region do not see this switch.
On: the form that asks for the visitor’s email adds a required consent sentence, in English, that begins I authorize Replyco to process my personal data…, with an Agree checkbox under it. In the sentence, the word Replyco links to replyco.com and the closing words link to Replyco’s own privacy policy. The visitor cannot start the chat without the tick; an unticked box is marked red.
Visitors agree actively before they give their name and email. The sentence names Replyco and its policy, not your shop’s, so tell visitors about the chat in your own privacy notice as well.
Message page tracking, the page address
Section titled “Message page tracking, the page address”Appearance, last switch. Off for new widgets.
On: each message a visitor sends carries the full address of the page they were on, including any query string, and your team sees it under the message as from the page followed by the address. Messages sent while the switch was off have none.
You see which product the question is about without asking.
Active, the master switch
Section titled “Active, the master switch”Widget Settings, top. On for new widgets. Saved with Save.
Off: the widget does not appear on any page that loads its code, from the next page load. Settings, code and chats are kept, and chats already open in Replyco can still be answered, but the visitor no longer has the window.
Pause the chat during a closure or a busy sale without touching your website.
How the settings combine
Section titled “How the settings combine”| Active | Working time | Widget visibility outside working hours | Device and Widget on mobile devices | What the visitor sees |
|---|---|---|---|---|
| Off | any | any | any | No chat button |
| On | Open | any | Computer | Chat button; open-hours line |
| On | Closed | On | Computer | Chat button; closed-hours line; can still write |
| On | Closed | Off | Computer | No chat button |
| On | Open | any | Phone, switch off | No chat button |
| On | Open | any | Phone, switch on | Chat button; open-hours line |
The widget on your website
Section titled “The widget on your website”What visitors see depends on whether they have written before in that browser and on the widget’s working time.
| What the visitor sees | When |
|---|---|
| Chat button in a bottom corner, in the theme colour | Always, unless one of the cases in What does not get a chat window applies |
| Number on the chat button, up to 9+ | Messages arrived while the window was closed |
| Welcome bubble with the greeting | Show welcome message on, until closed, and no messages yet |
| Welcome view: title, greeting, status line | The window is opened and no conversation has started |
| Form with name and email | The visitor selects the message box before giving an email |
| Conversation | After the form, and on later visits in the same browser |
| “Powered by Replyco” under the message box | On every widget; Replyco has no setting for it |
The welcome view and the form
Section titled “The welcome view and the form”Opening the chat button shows the Chat title, the Introductory message and the status line. The message box is greyed out: selecting it opens a short form with NAME (optional) and EMAIL ADDRESS (required), the consent box if switched on, and SUBMIT. An address that is not an email is marked red and nothing is sent. This form is the only way into a chat; there is no separate offline form, and outside working hours the visitor uses the same form and conversation.
Why: the email is how your team recognises the customer and how a transcript can reach them later.
The conversation
Section titled “The conversation”After SUBMIT, Replyco creates the chat at once, before the visitor has written a word, and the window switches to the conversation. The visitor’s messages are on one side; your team’s replies show with the colleague’s first and last name and profile picture, and a green dot while that colleague is online in Replyco. A line such as Laura Graf is typing… appears while someone writes. Times follow the visitor’s device clock and format.
Visitors can attach one file at a time, up to 20 MB; pictures and videos show in the window, other files as a document to download. A larger file is refused with File size is more than 20MB. When your team edits or deletes a sent message, the visitor’s window shows the change at once.
Why: a named colleague with a face and a typing line tells the visitor a person is answering.
Coming back
Section titled “Coming back”The widget remembers the visitor in that browser: their email, name and chat. On the next visit, even days later, the window opens on the same conversation with its history, and the visitor can write straight away. In another browser, on another device, or after the visitor clears the site’s storage, they fill in the form again and a new chat starts.
Live chats in Replyco
Section titled “Live chats in Replyco”Live chats are chats like WhatsApp or Messenger conversations: the same lists, the same reply box, the same assignment. How to work with them is in Chat list and conversations and Answer a chat.
In the chat list
Section titled “In the chat list”A new live chat appears under Open for the colleagues responsible for the widget. Its title is the visitor’s name followed by the email in brackets, or the email alone if no name was given; the account name under it is the widget’s Chat title. Filter by Account lists each widget, so a colleague can work through one website’s chats. A chat created by the form stays in the list even if the visitor never writes.
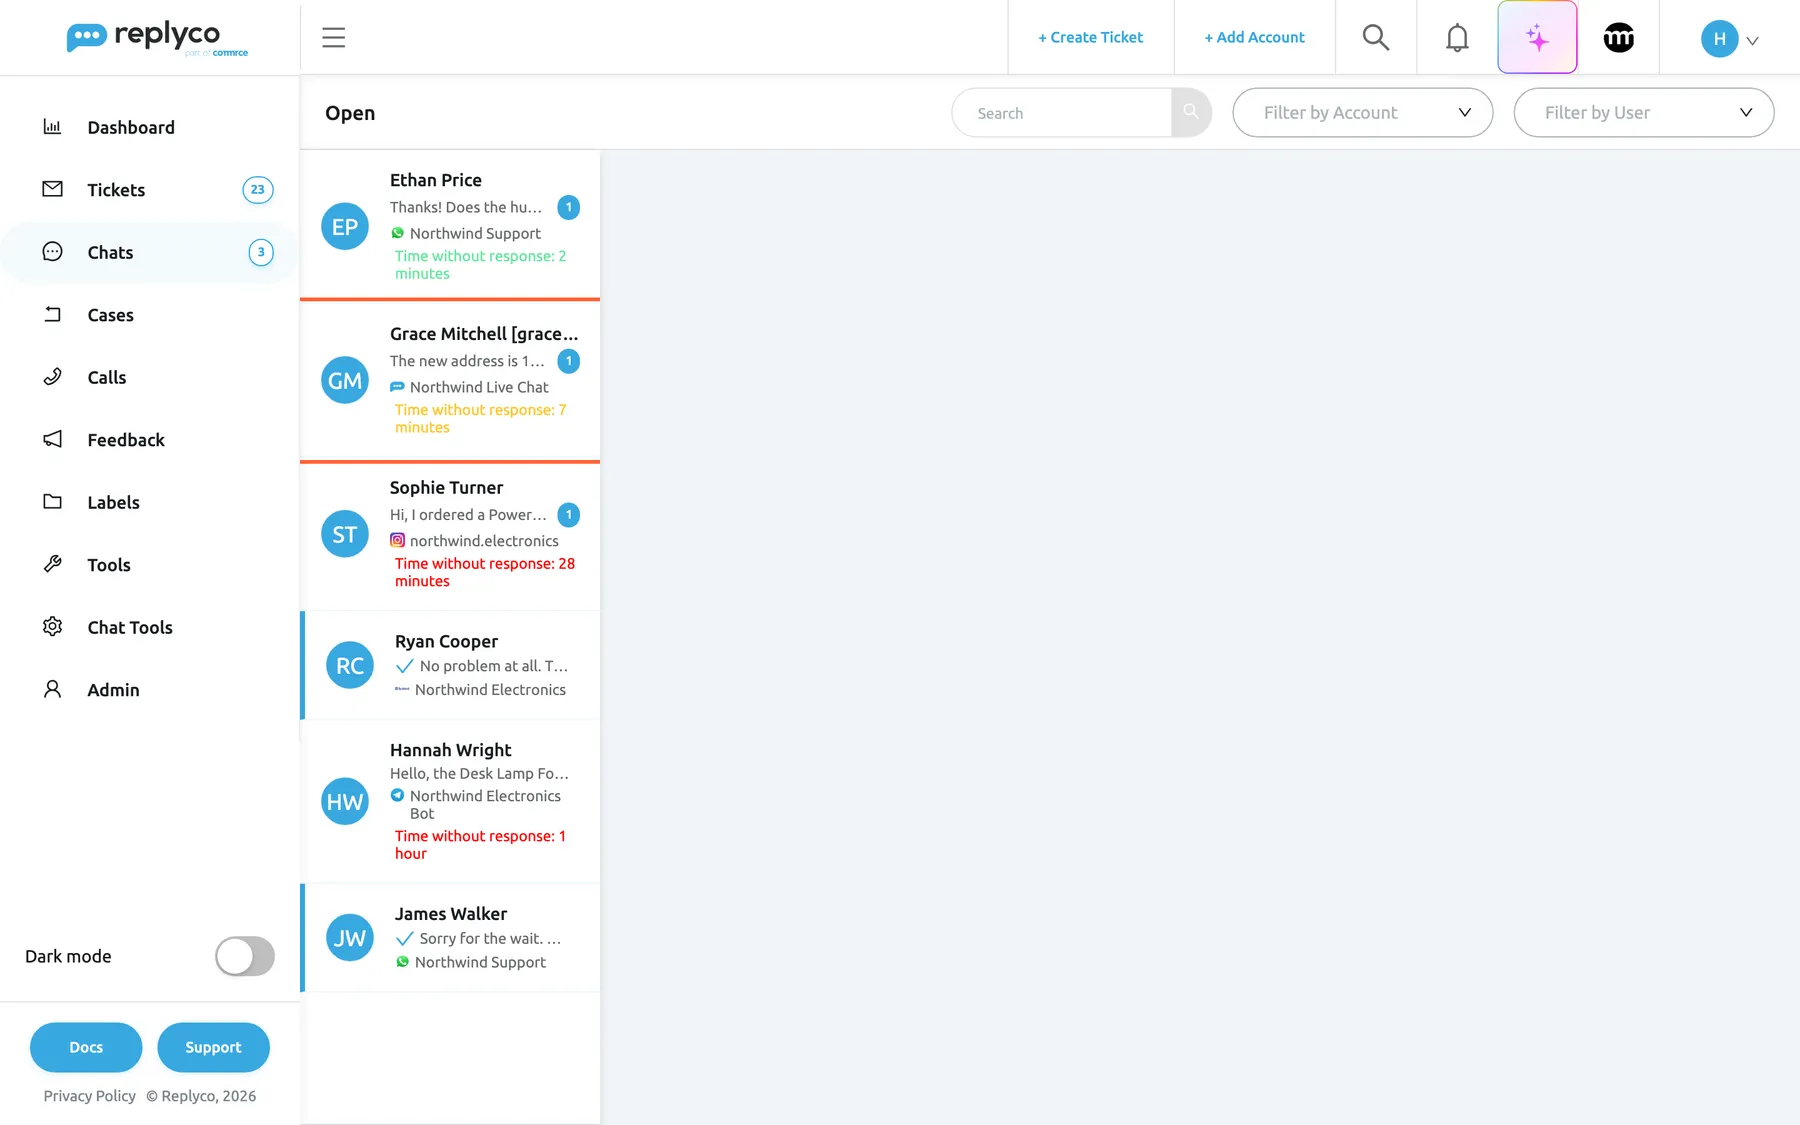
What this screenshot shows
- Screen
- Open (/chats/open)
- Highlighted
- button “”, chat-list, unread. opens the live chat
- Also visible
- 6 open chats; widget name Northwind Live Chat under the live chat; time without response in colour
- Purpose
- the widget's chats in the Chats list
Why: website questions sit in the same queue as your other chats, ordered by the newest message.
Inside the chat
Section titled “Inside the chat”The conversation shows the visitor’s messages with date and time and, with Message page tracking on, from the page and the page address. The side panel shows the visitor as the customer with their email; Replyco links the chat to an existing customer when exactly one has that email. On live chats you can also edit and delete your team’s messages, and send a transcript of the conversation by email; see Transcripts.
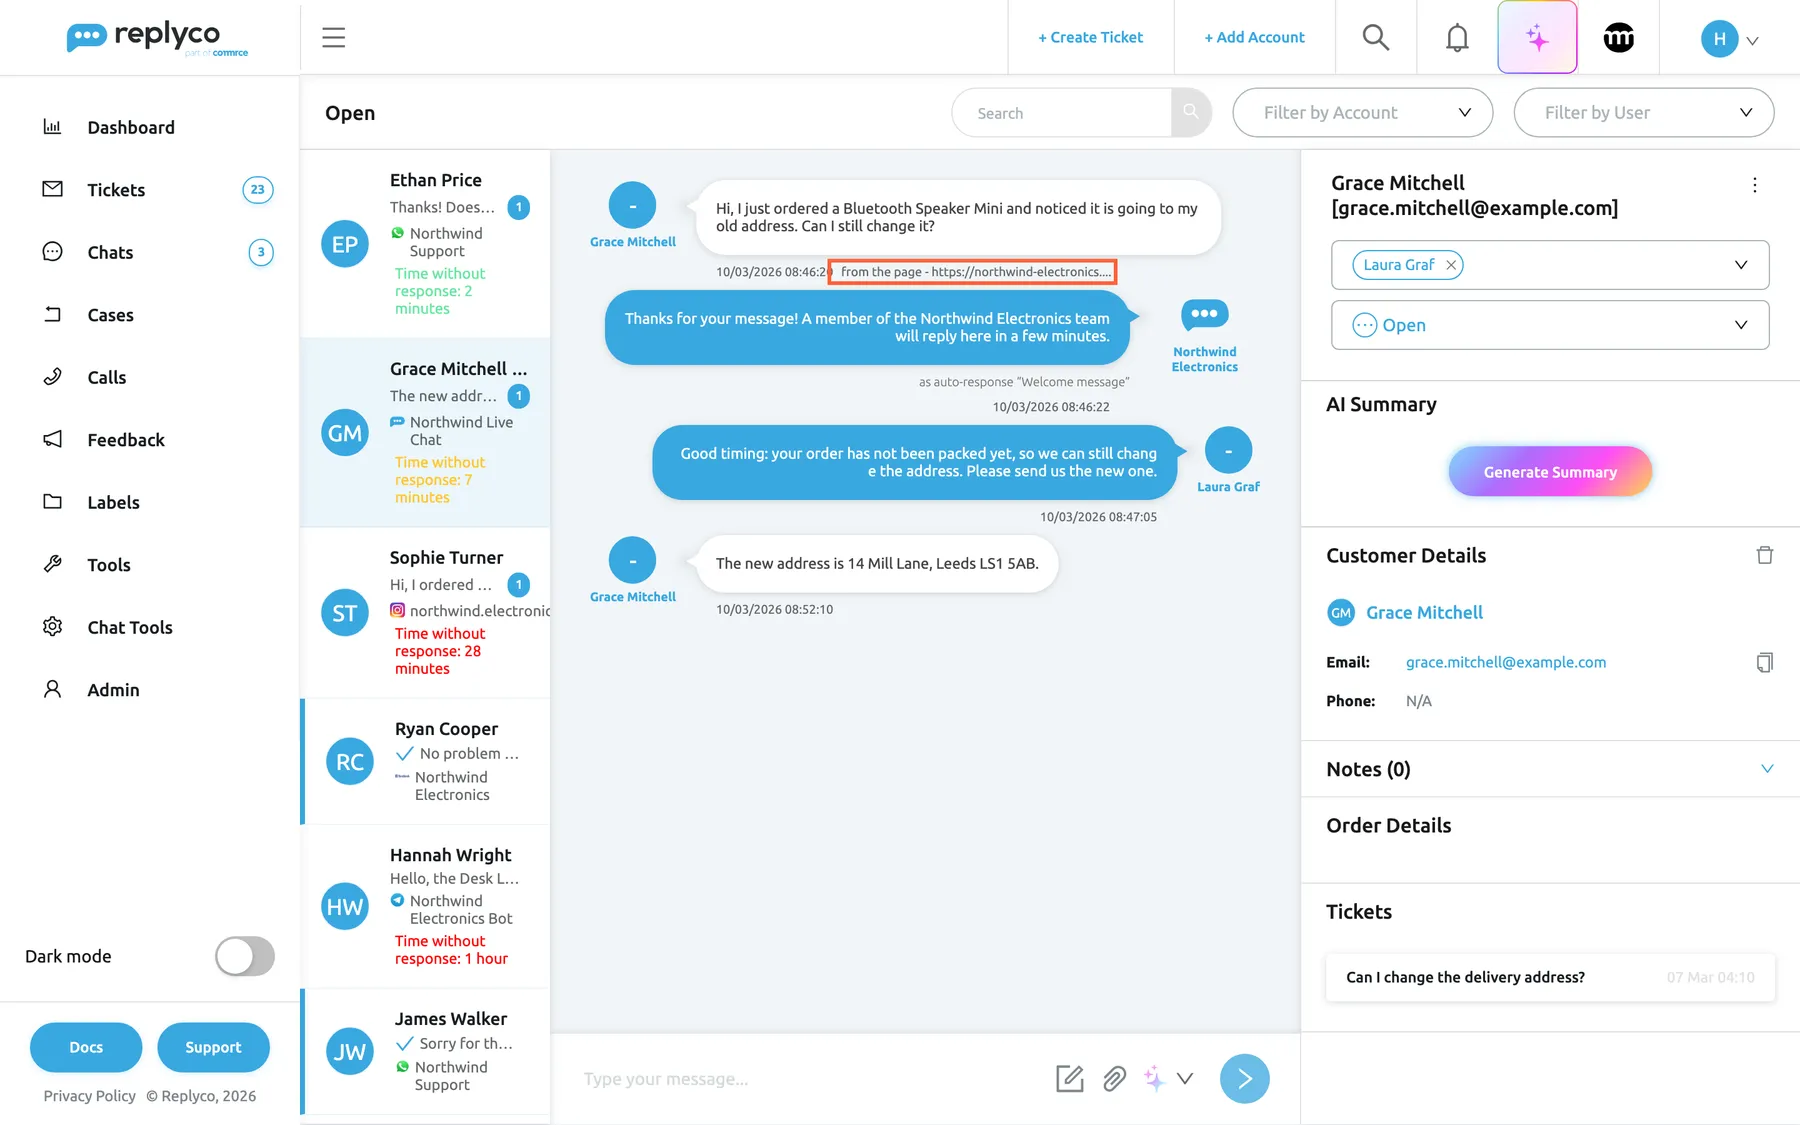
What this screenshot shows
- Screen
- Open (/chats/:type/:chatId)
- Highlighted
- text “from the page”, conversation, shown. names the page the visitor wrote from
- Also visible
- visitor messages left, team reply right; chat title name [email]; Laura Graf assigned; Customer Details with email
- Purpose
- a widget chat inside Replyco
Why: the page and the customer record answer “which product?” and “which order?” before you ask.
Who is responsible and who is assigned
Section titled “Who is responsible and who is assigned”Each colleague ticked for the widget in AdminUsers, Access Rights, section Live Chat, is responsible for its chats: they see them in Open and get the new-chat notification. Replyco fixes the responsible colleagues when a chat starts, so a change in access applies to chats that start afterwards. Nobody is assigned at the start; every colleague who sends a reply is assigned to the chat automatically, if they were not assigned already, and the chat moves into their My Chats. An auto-response assigns nobody. You can also assign colleagues by hand in the chat’s side panel; see Chat list and conversations.
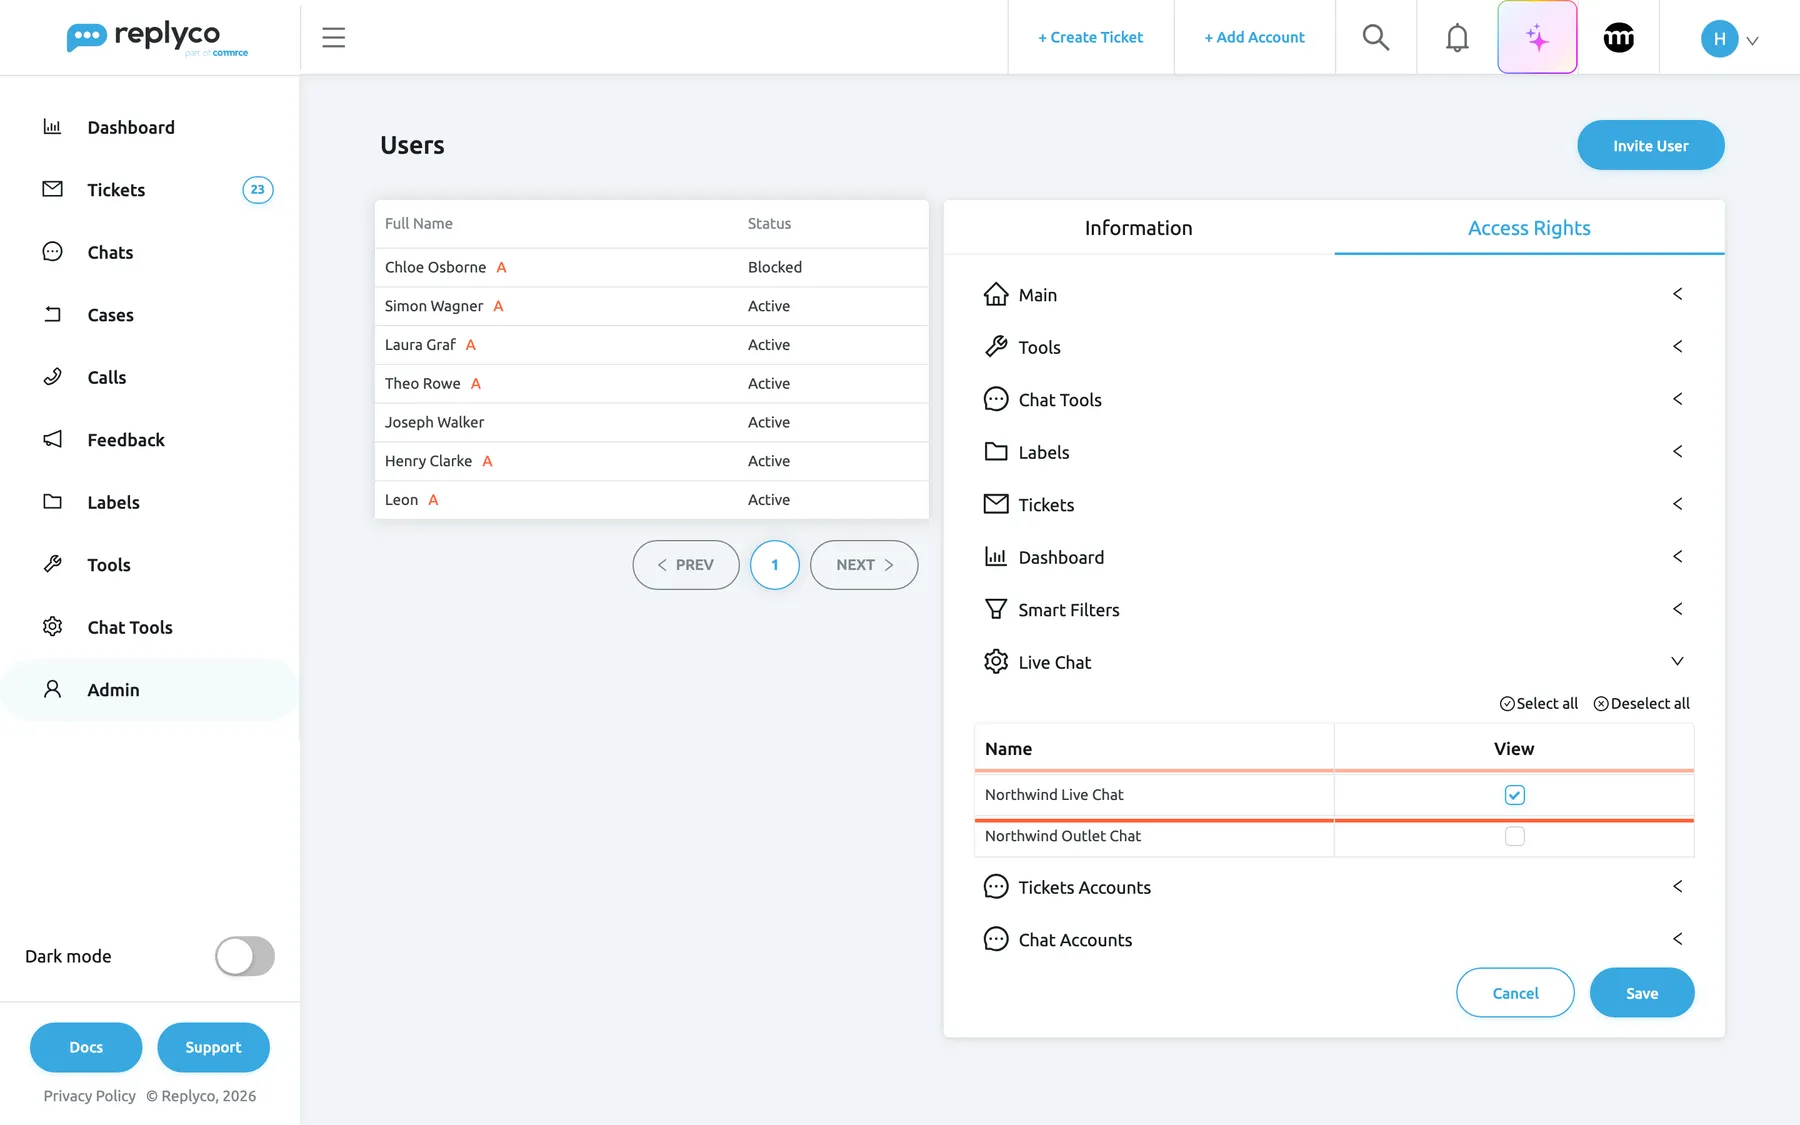
What this screenshot shows
- Screen
- Users (/users)
- Highlighted
- row “Live Chat”, access-rights-live-chat, View ticked. makes the user responsible for the widget's chats
- Also visible
- Laura Graf selected; Access Rights tab; Live Chat section expanded; Northwind Outlet Chat not ticked; Cancel, Save
- Purpose
- who answers a widget's chats
Why: split websites between teams, for example the outlet chat to the outlet team, without anyone picking chats by hand.
Example: one chat from start to finish
Section titled “Example: one chat from start to finish”Grace Mitchell visits the Northwind shop on a Tuesday morning, during the company’s working hours. The Northwind Live Chat widget uses company working time and has every switch on.
| Time | On the website | In Replyco |
|---|---|---|
| 08:44 | The chat button shows in the bottom right corner with the welcome bubble Hi! How can we help you today? Grace opens it and sees We usually reply within a few minutes. | Nothing yet |
| 08:45 | She selects the message box, enters her name and email, ticks Agree and selects SUBMIT | The chat Grace Mitchell [grace.mitchell@example.com] appears under Open for everyone responsible for the widget, still without messages |
| 08:46 | She asks whether she can still change the delivery address of her order | Her message arrives with from the page and the product page; the responsible colleagues get the new-chat notification; the welcome auto-response answers her at once |
| 08:47 | Laura Graf’s reply appears with Laura’s name and picture, and the browser plays a sound | Laura is assigned automatically; the chat moves into her My Chats |
| 08:52 | Grace sends the new address | Laura changes the order and can send a transcript to Grace’s email |
| A week later | Grace opens the shop in the same browser; the window shows the same conversation | Laura closed the chat meanwhile; Grace’s next message reopens it in Open, still assigned to Laura |
The history of a widget
Section titled “The history of a widget”Change Logs on the widget lists who created it and who changed which setting when, with old and new values for texts and colours.
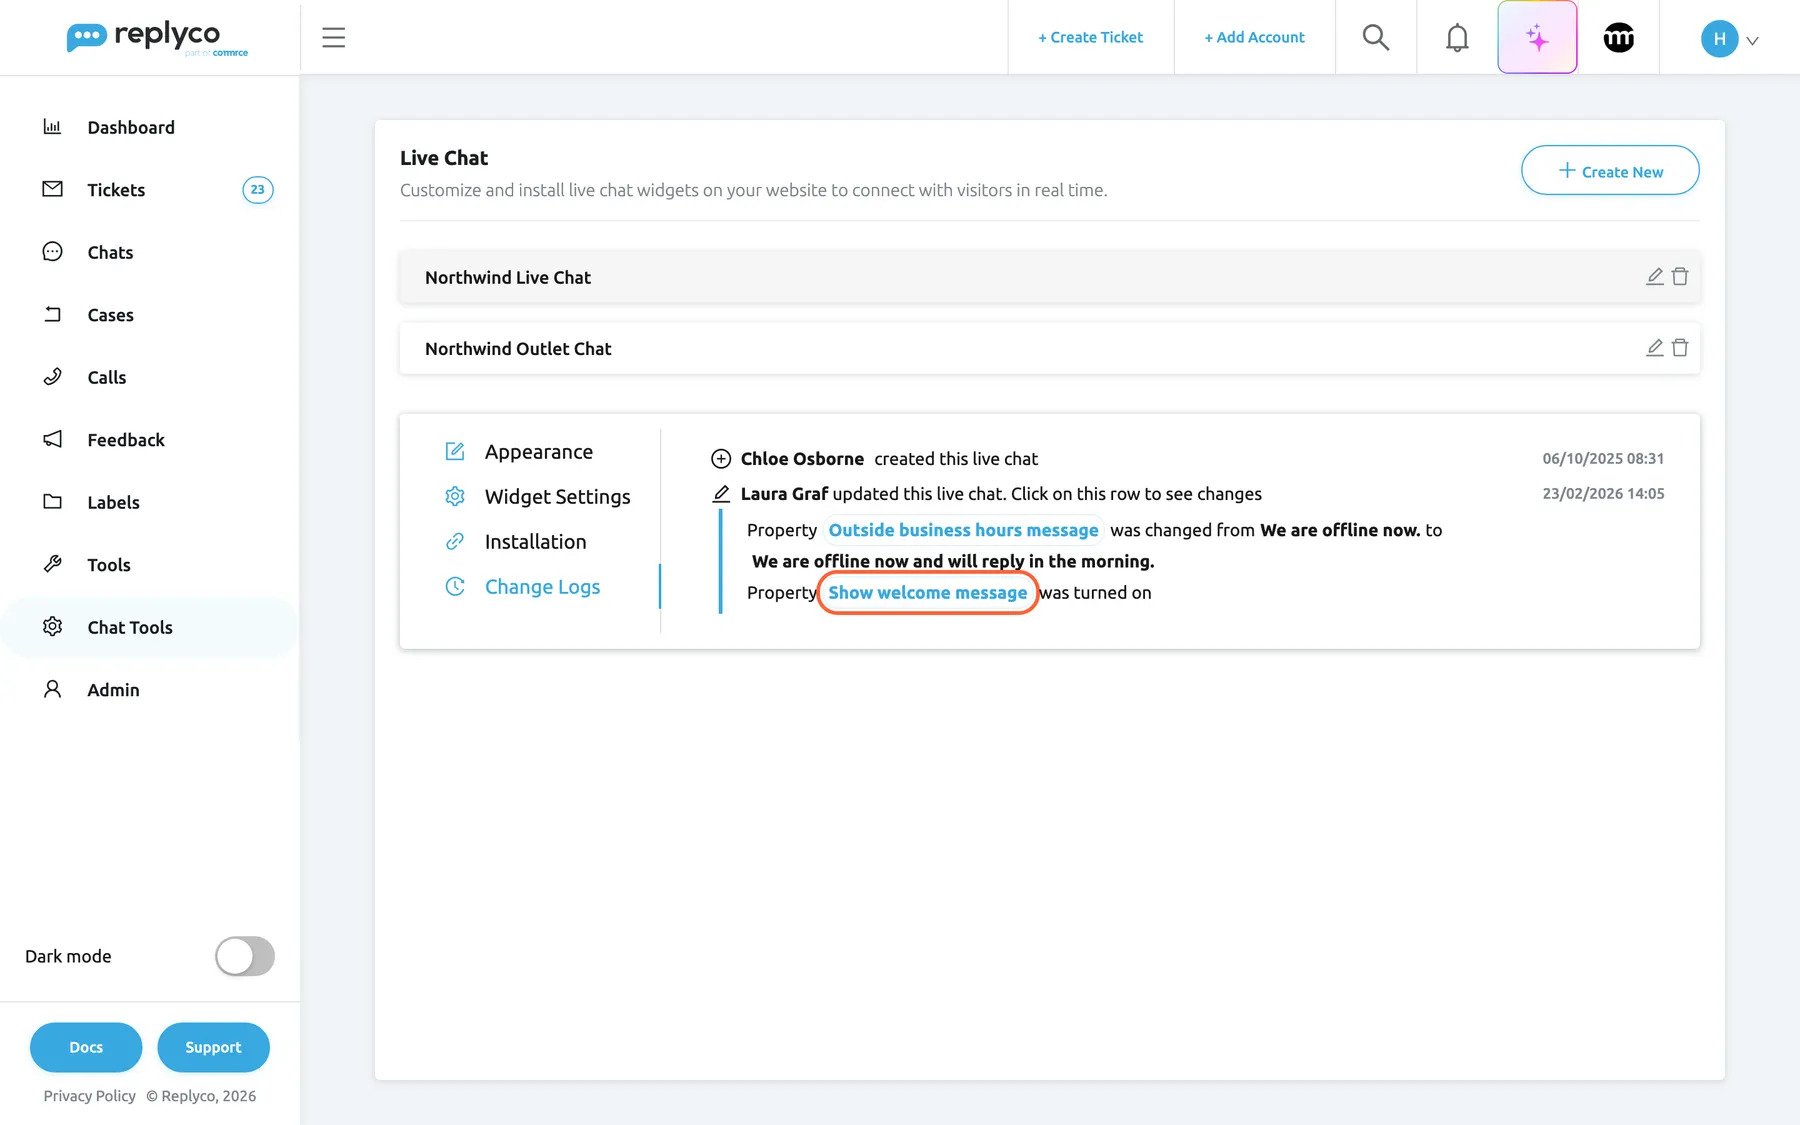
What this screenshot shows
- Screen
- Live Chat (/live-chat-settings)
- Highlighted
- listitem “Show welcome message”, editor-change-logs-tab, turned on. records the change
- Also visible
- Chloe Osborne created this live chat; Laura Graf updated this live chat; Outside business hours message changed
- Purpose
- the widget's audit trail
Why: when the chat suddenly says something different, you see who changed it.
Install the widget on your website
Section titled “Install the widget on your website”Chat ToolsLive Chat, open a saved widget, tab Installation, then Copy.
The code has two parts: an empty div with the ID replycoChat, where the chat is drawn, and a script that sets the widget’s ID and loads the chat from https://app.replyco.com/extensions/widget.js without holding up the rest of the page. Paste both parts, unchanged, before the closing </body> tag of each page that should show the chat; in most shop systems that means the theme’s main layout, so every page gets it at once. The code never changes: later changes to the widget reach the page on its next load.
One short code works with any website you can edit, and the widget stays up to date without further changes.
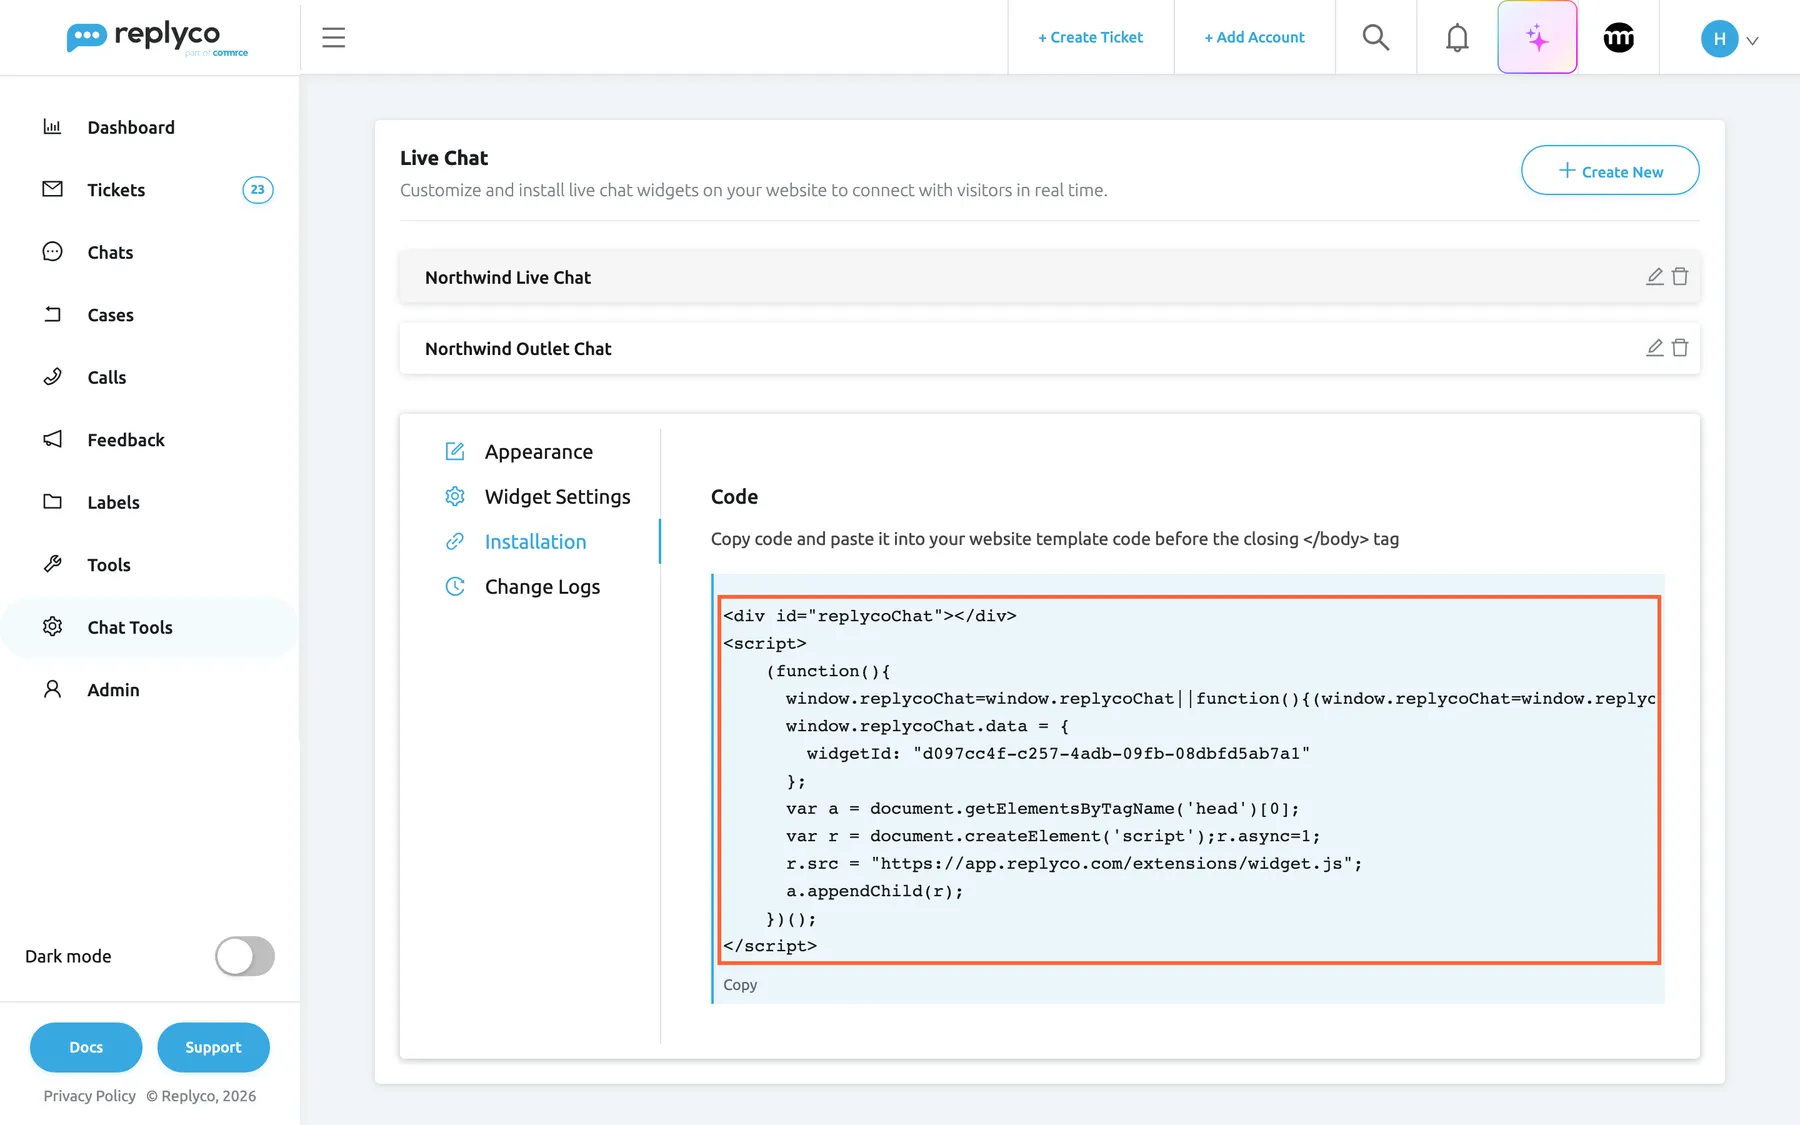
What this screenshot shows
- Screen
- Live Chat (/live-chat-settings)
- Highlighted
- code “Code”, editor-installation-tab, shown. the snippet to paste into the website
- Also visible
- div id replycoChat; widgetId; https://app.replyco.com/extensions/widget.js; Copy
- Purpose
- install the widget
Where to paste the code on common platforms, as the earlier Replyco guides describe them; the menu names are the platforms’ own and can change:
| Platform | Where the code goes |
|---|---|
| Any website | The page template, before </body>, on every page that should show the chat; then upload or publish the pages |
| Shopify | Online Store › Themes › Edit code on the current theme, file theme.liquid under Layout, before </body>; save |
| WordPress | Appearance › Widgets, a Custom HTML widget in the footer area, the code in its content box, the title left empty; save |
| Magento 2 | Content › Design › Configuration, edit the store view, HTML Head › Scripts and Style Sheets; save, then refresh all caches under System › Cache Management |
| Magento 1 | System › Configuration › Design › HTML Head › Miscellaneous Scripts; save, then refresh the caches |
| BigCommerce | Storefront › Script Manager: a script on the footer of all pages, category Functional, type Script, the code in the script box; on older Blueprint themes, footer.html before </body> |
The sections below walk through each platform with the code copied from Installation. The screenshots come from the platforms’ English interfaces and can look different in newer versions.
Any website
Section titled “Any website”For a website you edit as HTML files, in a text editor or in your web host’s online editor:
-
Open the page that should show the chat.
-
Paste the code between the opening
<body>and the closing</body>tag, most simply just before</body>.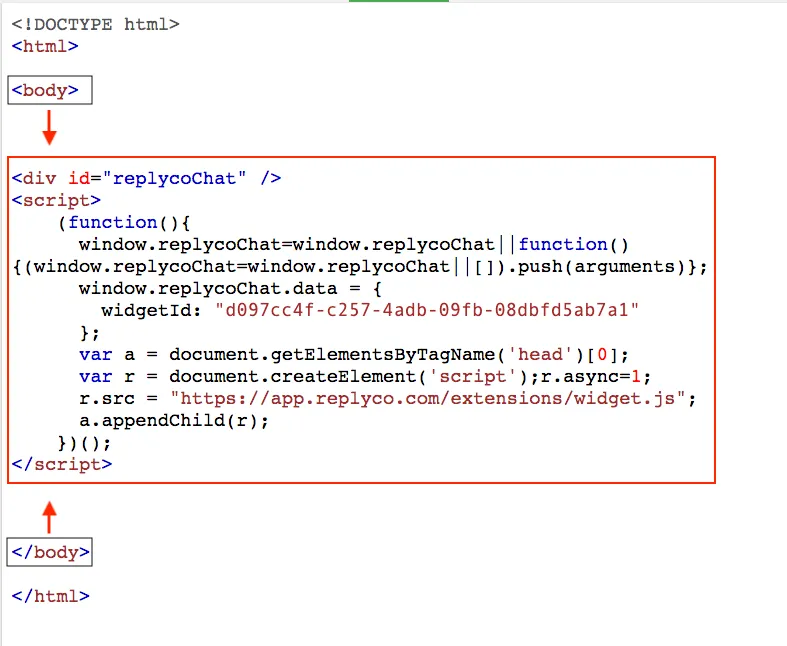
Paste the whole code between the body tags, most simply just before the closing tag. What this screenshot shows
- Screen
- ()
- Highlighted
- “”, , .
- Also visible
- opening body tag; the widget code: div id replycoChat and its script; closing body tag; red arrows to the code
- Purpose
-
Save the page and upload or publish it in place of the previous version. Reload the live page and check that the chat button appears.
Pages built from one shared template need the code only once, in that template; otherwise repeat these steps for every page that should show the chat.
Shopify
Section titled “Shopify”In Shopify, the code goes into the theme’s main layout file, so every page of the shop gets it:
-
In the Shopify admin, under Sales channels, select Online Store, then Themes.
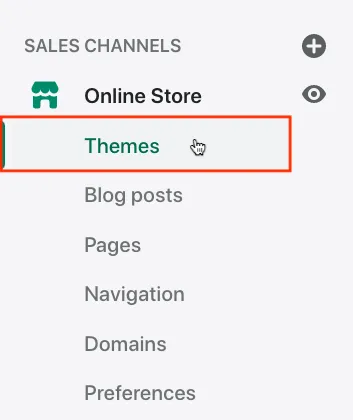
In the Shopify admin, open Online Store › Themes. What this screenshot shows
- Screen
- ()
- Highlighted
- “”, , .
- Also visible
- SALES CHANNELS; Online Store expanded; Themes framed; Blog posts, Pages, Navigation, Domains, Preferences
- Purpose
-
On your current theme, open the actions menu next to Customize and select Edit code.
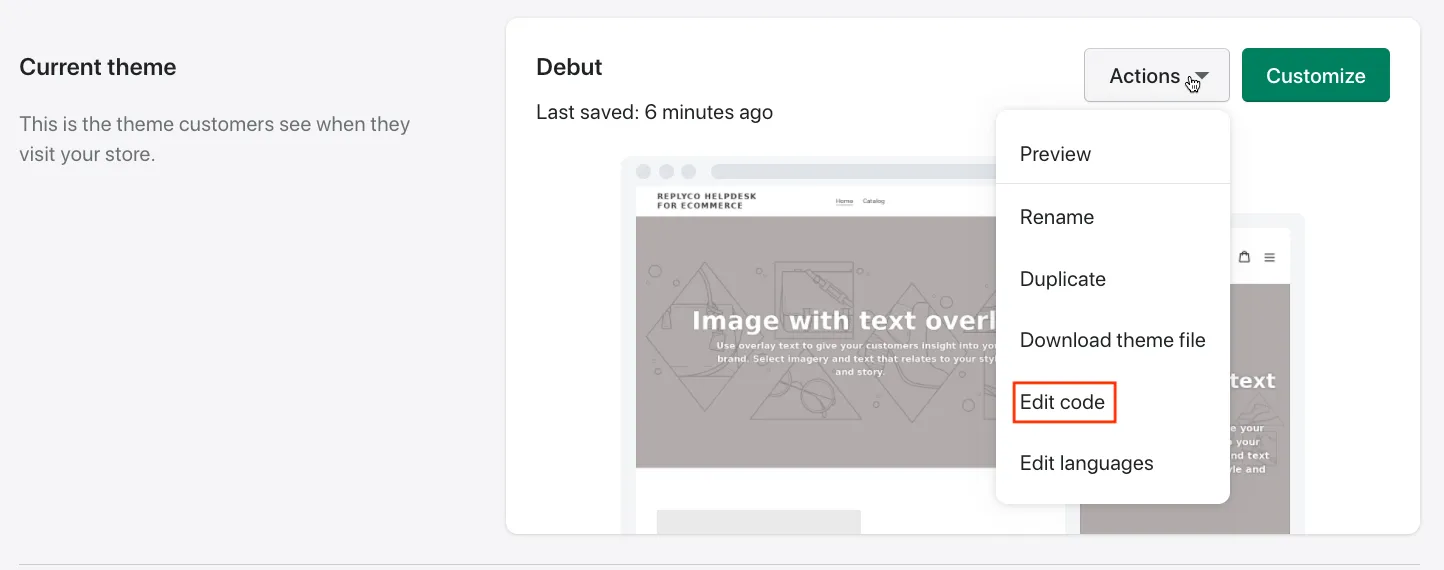
On the current theme, open the actions menu next to Customize and select Edit code. What this screenshot shows
- Screen
- ()
- Highlighted
- “”, , .
- Also visible
- Current theme card Debut; Actions menu open; Preview, Rename, Duplicate, Download theme file, Edit code, Edit languages; Customize button
- Purpose
-
Under Layout, open
theme.liquid; it usually opens by default. Paste the code just before</body>and select Save at the top right.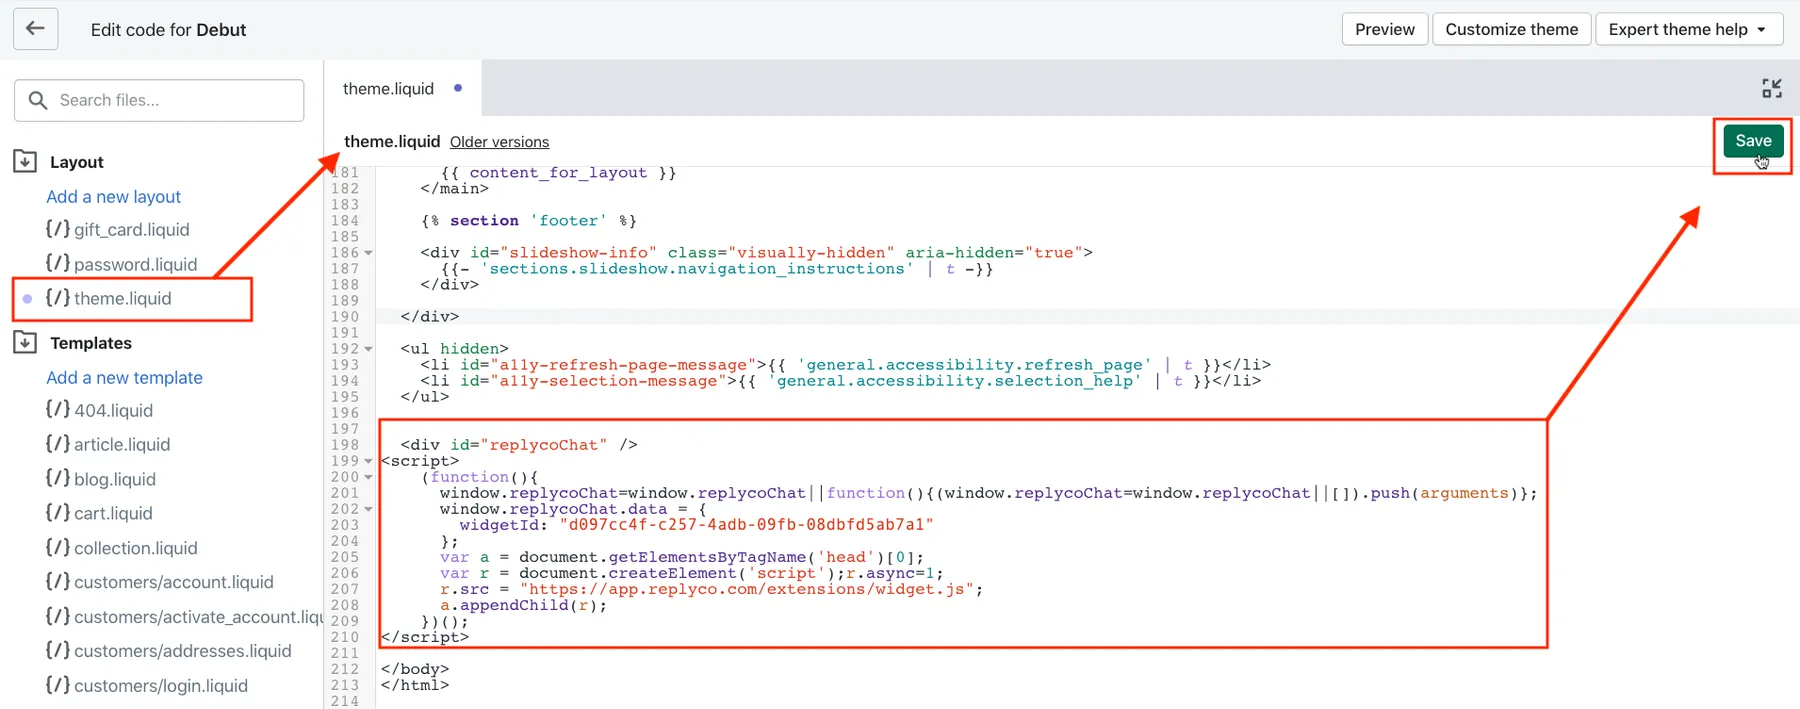
Paste the code into theme.liquid just before the closing body tag, then select Save. What this screenshot shows
- Screen
- ()
- Highlighted
- “”, , .
- Also visible
- file list with theme.liquid under Layout; widget code before the closing body tag; Save button
- Purpose
WordPress
Section titled “WordPress”In WordPress, a Custom HTML widget in the footer puts the code on every page:
-
In the WordPress dashboard, point to Appearance in the left menu and select Widgets.
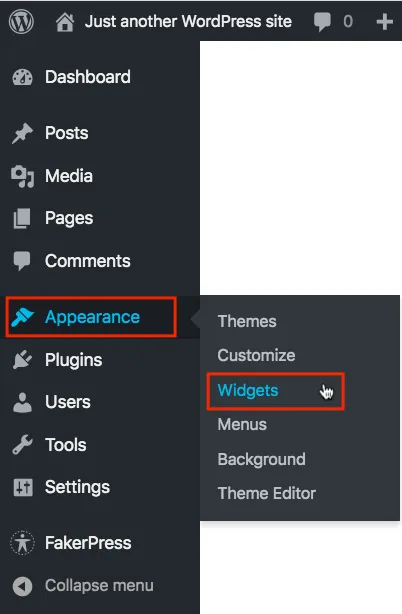
In WordPress, open Appearance › Widgets. What this screenshot shows
- Screen
- ()
- Highlighted
- “”, , .
- Also visible
- Appearance framed; submenu Themes, Customize, Widgets, Menus, Background, Theme Editor; Widgets framed
- Purpose
-
Under Available Widgets, select Custom HTML, choose Footer as the area and select Add Widget.
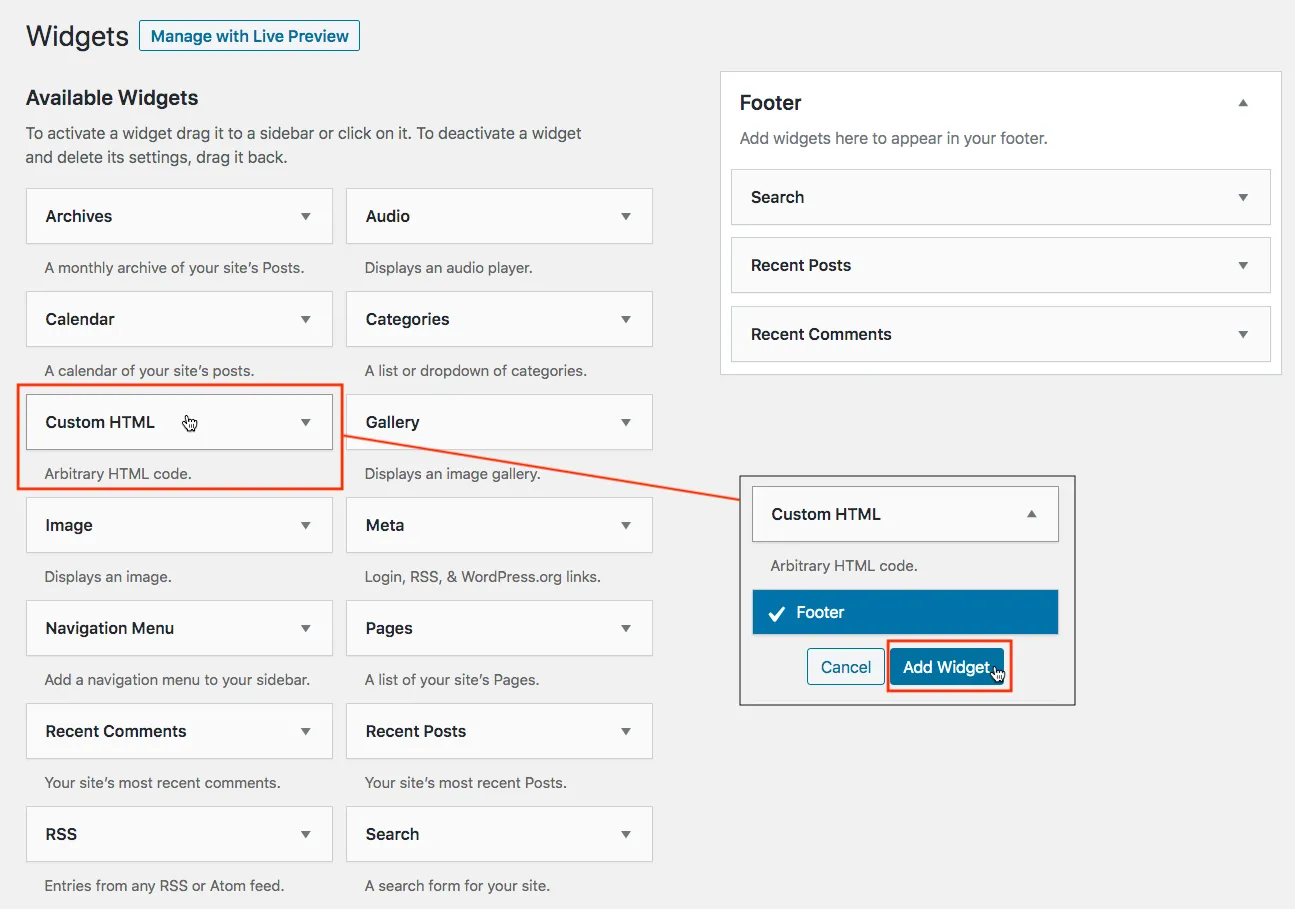
Add a Custom HTML widget to the Footer area. What this screenshot shows
- Screen
- ()
- Highlighted
- “”, , .
- Also visible
- Available Widgets; Custom HTML framed; chooser with Footer ticked; Add Widget button; Footer area on the right
- Purpose
-
In the new Custom HTML widget in the footer, paste the code into Content and select Save. Leave Title empty; a title would only add text to your footer.
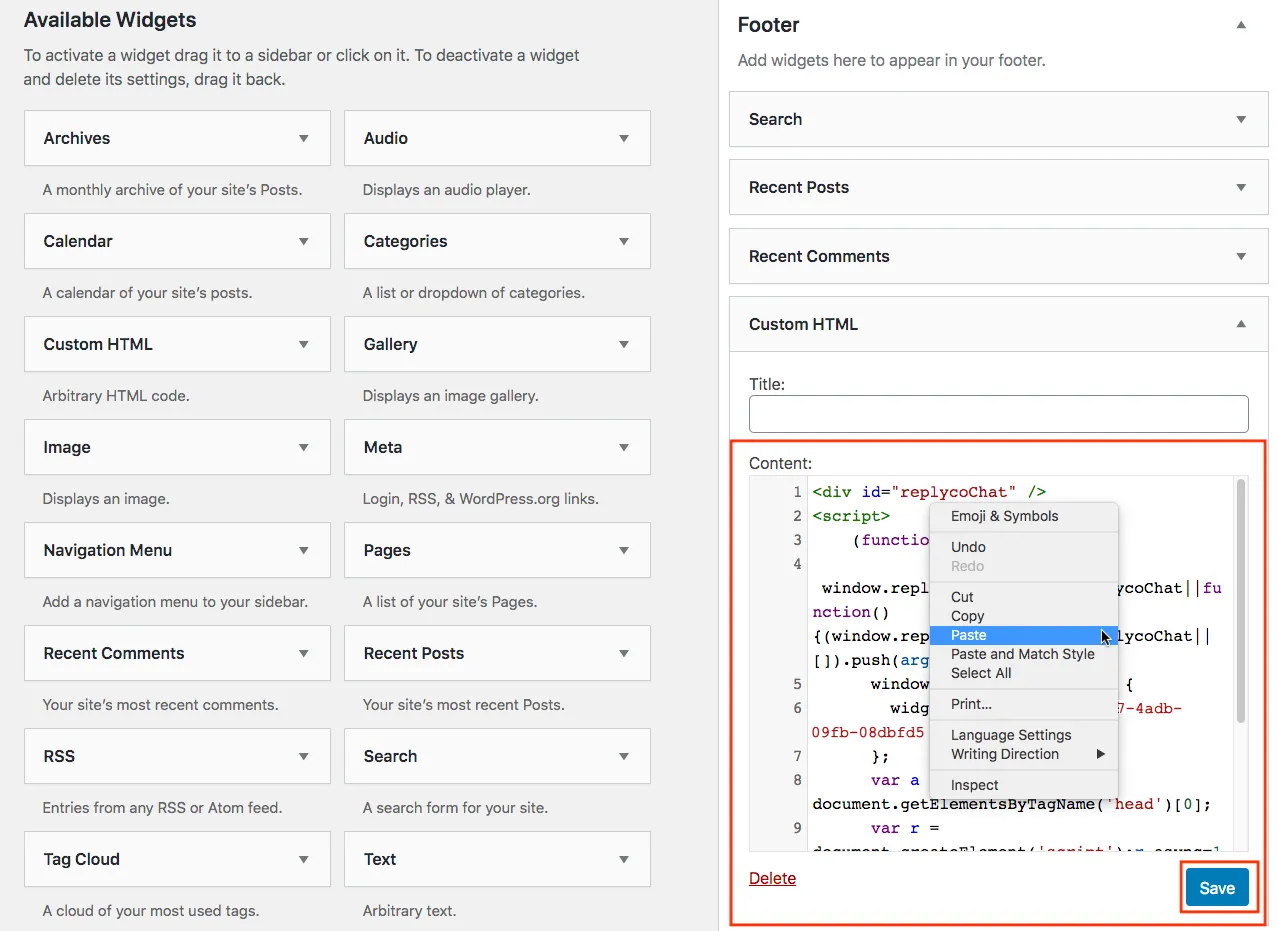
Paste the code into Content, leave Title empty and select Save. What this screenshot shows
- Screen
- ()
- Highlighted
- “”, , .
- Also visible
- Title empty; Content with the widget code; browser context menu with Paste; Save and Delete
- Purpose
If your theme has no Widgets menu, add the code with any tool your site offers for HTML on every page, before </body>.
Magento
Section titled “Magento”In Magento, the code goes into the HTML head settings of the store’s design, and the caches are refreshed afterwards. In Magento 2:
-
In the Magento admin, go to Content › Design › Configuration.
-
Select Edit on the store view that should show the chat.
-
Expand HTML Head, paste the code into Scripts and Style Sheets and save the configuration.
-
Go to System › Cache Management, select all caches and refresh them.
In Magento 1:
-
Go to System › Configuration › Design › HTML Head.
-
Paste the code into Miscellaneous Scripts and select Save Config.
-
Go to System › Cache Management, select all caches and refresh them.
BigCommerce
Section titled “BigCommerce”In BigCommerce, the code goes into Script Manager:
-
In the BigCommerce admin, open Storefront, select Script Manager and create a script.
-
Give it a name and description, such as Replyco and Live chat, and set Location on page to Footer, the pages to All Pages, Script category to Functional and Script type to Script.
-
Paste the code into the script box at the bottom and save.
If your store has no Script Manager, paste the code into Storefront › Footer Scripts and save.
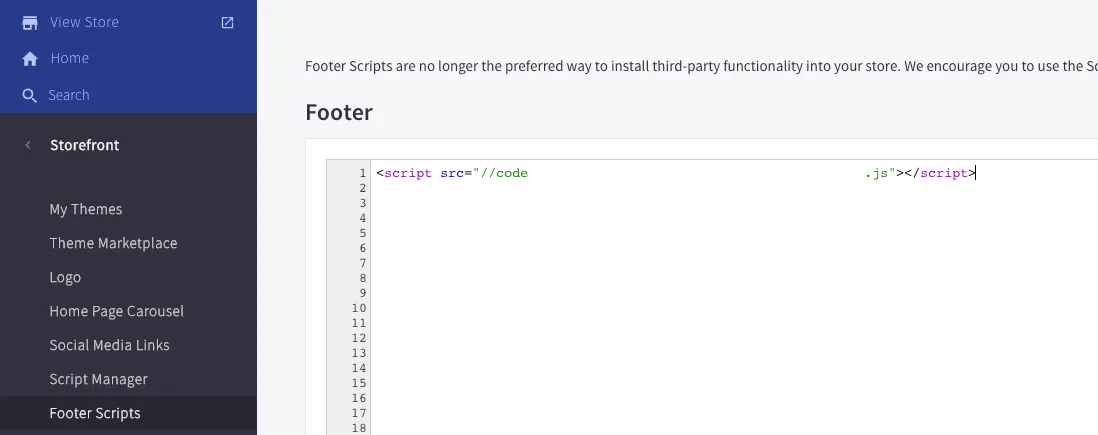
What this screenshot shows
- Screen
- ()
- Highlighted
- “”, , .
- Also visible
- Storefront menu with My Themes, Script Manager, Footer Scripts; notice recommending Script Manager; Footer code box
- Purpose
On an older Blueprint theme, open Storefront › My Themes, choose Edit HTML/CSS, paste the code into footer.html just before </body> and save.
The webhook
Section titled “The webhook”Widget Settings, Webhook, saved with Save. Message Schema for Webhook Transmission shows the fields.
For every message a visitor writes in this widget, Replyco sends an HTTP POST with a JSON body to the address, as the message arrives. It is not called for your team’s replies, for auto-responses, or when the visitor only fills in the form. The address starts with http:// or https://, for example https://hooks.example.com. If your server does not answer with success, Replyco tries once more after two seconds; the message is in the chat either way.
Feed website questions into a CRM, a spreadsheet or an alert channel as they arrive.
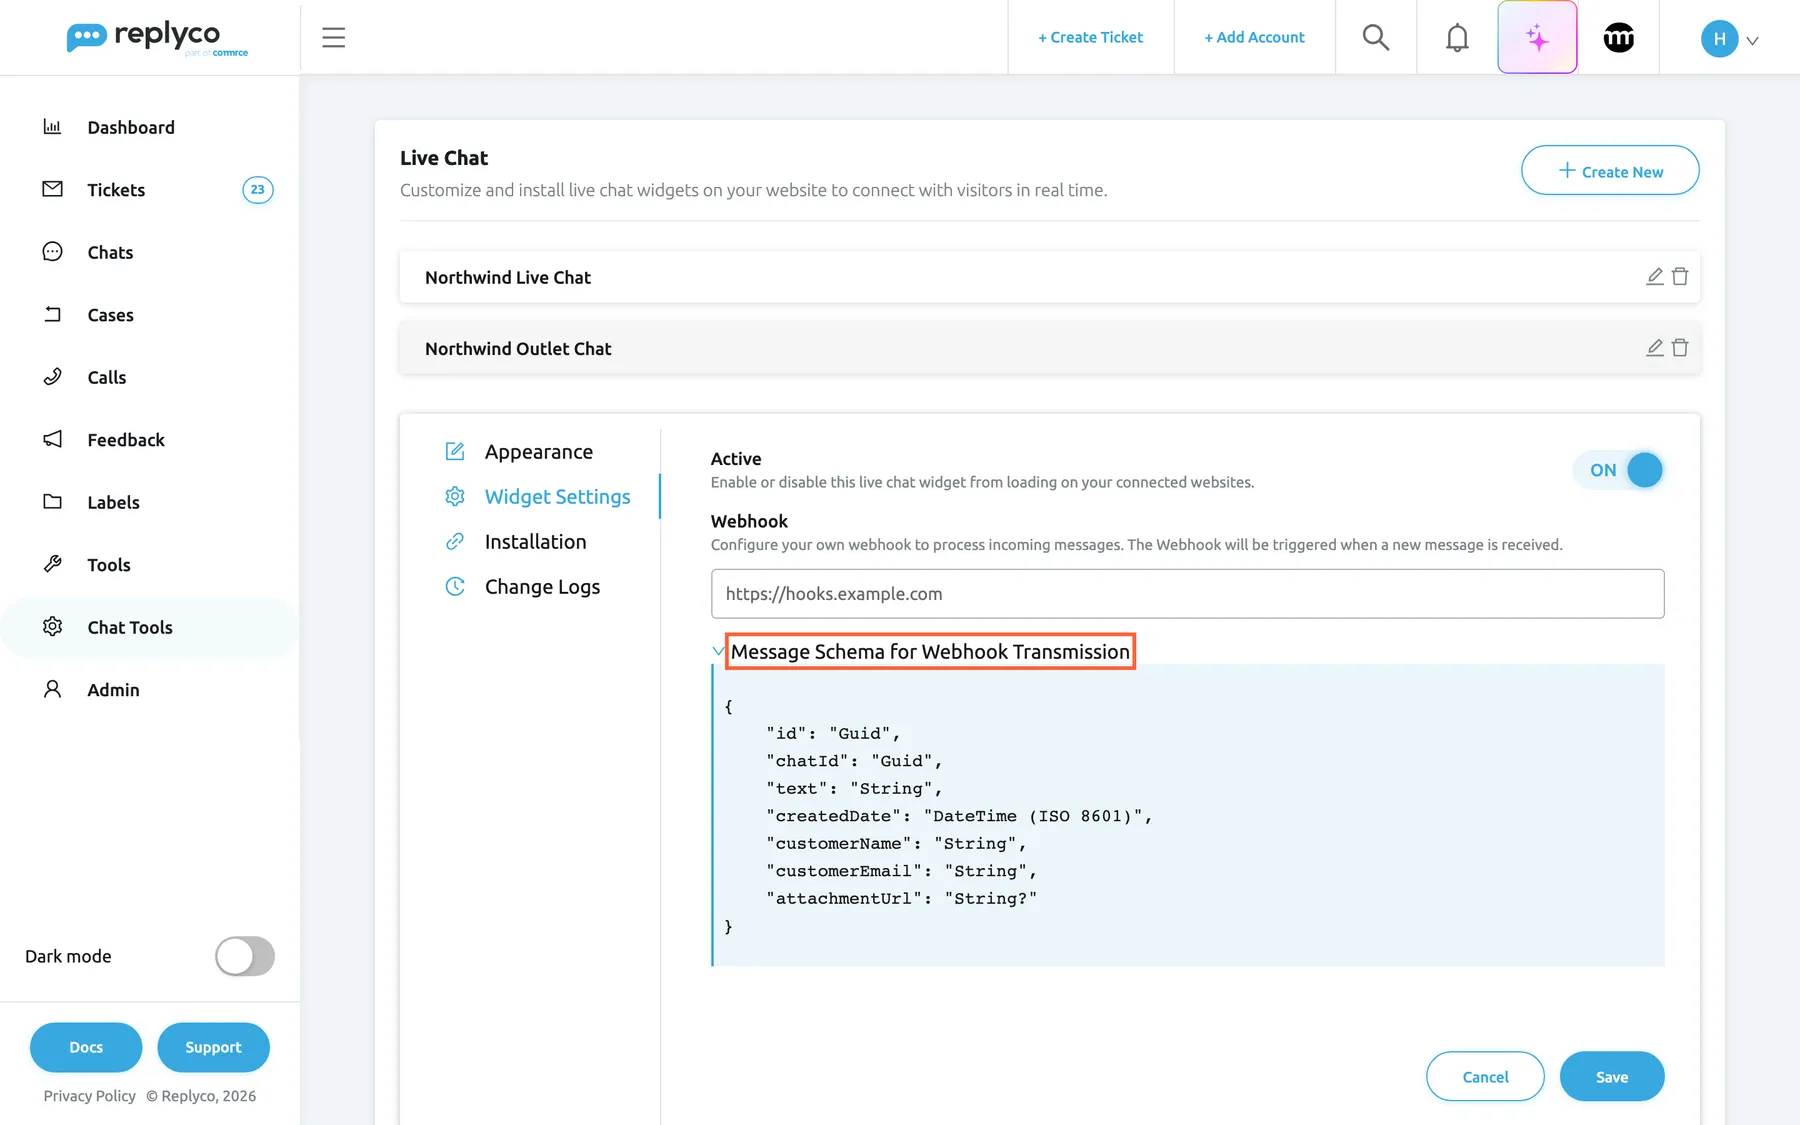
What this screenshot shows
- Screen
- Live Chat (/live-chat-settings)
- Highlighted
- button “Message Schema for Webhook Transmission”, editor-widget-settings-tab, expanded. shows the fields of a webhook call
- Also visible
- Active ON; Webhook https://hooks.example.com; fields id, chatId, text, createdDate, customerName, customerEmail, attachmentUrl
- Purpose
- the webhook integration
The body has the fields shown under Message Schema for Webhook Transmission. A call for Grace Mitchell’s first message looks like this:
{ "id": "5f0c1d2e-0000-4000-8000-000000000101", "chatId": "c4a7c4a7-0000-4000-8000-000000000002", "text": "Hi, I just ordered a Bluetooth Speaker Mini and noticed it is going to my old address. Can I still change it?", "createdDate": "2026-03-10T08:46:20", "customerName": "Grace Mitchell", "customerEmail": "grace.mitchell@example.com", "attachmentUrl": null}The time is in UTC. The name and email are those of the customer linked to the chat. A message with a file has an empty text and a link to the file in attachmentUrl.
Three ways teams use it:
- Every visitor message → a new lead in your CRM with the email and the text.
- A message containing “wholesale” → an alert in your sales team’s channel.
- Every message → a row in a spreadsheet, to count questions per product page.
Auto-responses and transcripts for live chats
Section titled “Auto-responses and transcripts for live chats”Chat auto-response rules, the Widgets field of a rule; Transcripts for the transcript templates.
A chat auto-response rule that names the widget can answer visitor messages automatically, once per chat or on every message, with a delay and conditions. The answer is a chat message that the visitor sees in the window. Live chats, Messenger, Instagram, Telegram and TikTok Shop chats can get auto-responses; WhatsApp chats never do. How Replyco decides which message gets an automatic reply is in Auto-responses for chats. A transcript emails the conversation to the visitor as a new ticket, from the email account the transcript names; an agent sends it from the chat, and only live chats offer it.
The status line only informs; an auto-response answers, and a transcript gives the visitor a record.
Examples: a rule on the Northwind Outlet Chat set to send outside working hours → Thanks, we have your question and will answer from 08:00. A rule with the condition text contains “return” → your returns template. A chat about a delivery address → a transcript to the visitor after the change.
Privacy: what is stored and where
Section titled “Privacy: what is stored and where”| Data | Where | For how long and who sees it |
|---|---|---|
| Visitor’s name and email | In Replyco: the chat title and a customer record | Until you delete them; everyone who can open the chat or Customers |
| Messages and files | In Replyco, in the chat | Like other chats; the colleagues responsible for the widget, and anyone assigned |
| Page address of each message | In Replyco, with the message | Only with Message page tracking on |
| The visitor’s email, name, chat reference and whether they closed the welcome bubble | In the visitor’s browser (local storage, not cookies) | Until the visitor clears the site’s data |
The widget itself sets no cookies. When it is switched on, the visitor’s browser loads the Ubuntu font from Google Fonts, so Google receives the visitor’s IP address, as with any page that uses Google Fonts; mention this in your own privacy notice. Visitors see the first and last name and the profile picture of colleagues with access to the widget, never their email addresses.
Languages
Section titled “Languages”- The widget’s own words are English only: the placeholder Text a message…, the form fields NAME and EMAIL ADDRESS, SUBMIT, Agree, the consent sentence, Send, Download, Powered by Replyco, the typing line and the error line. They do not follow your company language or the visitor’s browser.
- Your four texts show exactly as you type them, so write them in your visitors’ language. A shop with a German and an English website can run two widgets, one per language.
- Visitors can write in any language. Chats show each message as the visitor wrote it; the automatic translation of incoming messages described in Translations works on tickets, not on chats.
- Dates and times in the window follow the visitor’s device.
What you need to know
Section titled “What you need to know”| Topic | Fact |
|---|---|
| Widgets | Any number; one code each; the chat title is the name everywhere |
| Open or closed | Between the start and the end time on working days; closed at the end time; holidays closed all day, every year |
| Time zone | Entered in your browser’s time zone; the same moment for every visitor |
| Offline | No separate form; visitors write the same way, or see no button if visibility outside working hours is off |
| Chat start | A chat is created when the visitor submits the form, before the first message |
| Assignment | Nobody at the start; each colleague who replies is added |
| Files | One at a time, up to 20 MB each |
| Returning visitors | Same browser: same chat; new browser or cleared storage: new chat |
| Changes | Reach visitors on their next page load; the code never changes |
| Webhook | Visitor messages only; the fields of the schema on the screen; one retry after two seconds |
| Switching off | Hides the widget everywhere; settings, code and chats kept |
| Deleting | Removes the widget and its access rights; its chats stay; cannot be undone |
| Language | Widget words English only; your texts as typed |
| Cost | No charge per widget; first replies count as usage like other conversations |
Frequently asked questions
Section titled “Frequently asked questions”General
Section titled “General”Do I need to connect the live chat as an account?
Section titled “Do I need to connect the live chat as an account?”No. The live chat has no tile under Add Account and nothing to connect. Create a widget on Chat ToolsLive Chat, copy its code from the Installation tab and paste it into your website before the closing </body> tag.
Does the live chat cost extra?
Section titled “Does the live chat cost extra?”No. Live chat is part of every plan and of the trial, with no charge per widget or per visitor. As with other conversations, the first reply your team sends in each chat is reported as usage of your subscription.
Can I use the live chat on several websites?
Section titled “Can I use the live chat on several websites?”Yes. Create one widget per website on Chat ToolsLive Chat; each has its own colours, texts, hours and code, and its chats carry its Chat title as the account name under Chats.
Which websites does the widget work on?
Section titled “Which websites does the widget work on?”Any website where you can add HTML and a script to the page template, before the closing </body> tag: Shopify, WordPress, Magento, BigCommerce and hand-built sites. The code must include the empty div with the ID replycoChat, where the chat is drawn.
Where do I find the code for my website?
Section titled “Where do I find the code for my website?”Open Chat ToolsLive Chat, select the widget and open the Installation tab; select Copy under the code. A new widget gets this tab after its first save with Save.
Where do I paste the code in Shopify?
Section titled “Where do I paste the code in Shopify?”In Shopify, go to Online Store › Themes, choose Edit code on your current theme, open theme.liquid under Layout and paste the widget’s code from Installation just before </body>. Save, then open your shop to check the chat button.
How do I add the widget to WordPress?
Section titled “How do I add the widget to WordPress?”In WordPress, go to Appearance › Widgets, add a Custom HTML widget to the footer area, paste the widget’s code from the Installation tab into its content box, leave the title empty and save. Any other way to add HTML before </body> on every page works as well.
Do I have to paste the code again after changing the widget?
Section titled “Do I have to paste the code again after changing the widget?”No. The code only names the widget. Colours, texts, hours and switches you save on Chat ToolsLive Chat reach visitors the next time a page loads the widget. Only deleting the widget and creating a new one needs new code.
I saved new colours, but my website still shows the old ones. Why?
Section titled “I saved new colours, but my website still shows the old ones. Why?”Visitors get changes on their next page load. Reload your website page; if your shop system or a caching plugin caches pages, clear that cache as well. Check on Chat ToolsLive Chat that the widget was saved and the success message appeared.
Working hours
Section titled “Working hours”Why does the widget say we are offline during opening hours?
Section titled “Why does the widget say we are offline during opening hours?”Check whether Use Working time from Company Settings is on and your company hours in Company Settings are right, whether today is in Holidays. The times are the ones you entered in your browser’s time zone, and at the end time the widget counts as closed.
Can visitors write to us when we are closed?
Section titled “Can visitors write to us when we are closed?”Yes, as long as Widget visibility outside working hours is on. The widget shows Outside business hours message and visitors use the same form and conversation; the chat waits under Chats for your team. There is no separate offline form.
Does the widget send an automatic reply when we are closed?
Section titled “Does the widget send an automatic reply when we are closed?”No. Outside business hours message is a line in the widget, not a chat message. To answer automatically, create a rule in Chat auto-response rules with the widget under Widgets; note that its outside-hours option follows company working time.
Can the widget have different hours from our tickets?
Section titled “Can the widget have different hours from our tickets?”Yes. Turn off Use Working time from Company Settings on the widget’s Appearance tab and set its own days, times and holidays. Chat auto-responses set to send outside working hours still follow the company working time.
Visitors
Section titled “Visitors”What does a visitor have to fill in before chatting?
Section titled “What does a visitor have to fill in before chatting?”An email address; the name is optional. Visitors see the form when they select the message box. With Privacy Policy (GDPR) on, they must also tick the consent box. After SUBMIT, the chat starts and they can write.
Can visitors send files?
Section titled “Can visitors send files?”Yes, one file at a time and up to 20 MB each, through the paper clip in the widget. Pictures and videos show in the conversation; other files appear as a document. A larger file is refused in the visitor’s browser with File size is more than 20MB.
Will a returning visitor see their earlier conversation?
Section titled “Will a returning visitor see their earlier conversation?”Yes, in the same browser: the widget remembers their email and chat and continues the conversation with its history. In another browser, on another device or after clearing the site’s data, the visitor fills in the form again and a new chat starts.
What do visitors see about the colleague who answers?
Section titled “What do visitors see about the colleague who answers?”The colleague’s first and last name and profile picture next to each reply, a green dot while they are online in Replyco, and a line such as Laura Graf is typing… while they write. Email addresses of your team are never shown to visitors.
Can the widget be shown in German?
Section titled “Can the widget be shown in German?”Partly. Your texts, such as the title, greeting and the two hours lines, show as you type them, so write them in German. The widget’s own words, such as NAME, EMAIL ADDRESS, SUBMIT and the message box placeholder, are in English only.
Why don’t I see the widget on my phone?
Section titled “Why don’t I see the widget on my phone?”Widget on mobile devices may be off on the widget’s Appearance tab, or the widget counts as closed and Widget visibility outside working hours is off. Also check that the code is on the page your phone opens, for example a separate mobile theme.
In Replyco
Section titled “In Replyco”Where do live chats appear in Replyco?
Section titled “Where do live chats appear in Replyco?”Under Chats, in Open for the colleagues responsible for the widget, and in My Chats once assigned. Each chat shows the visitor’s name and email and the widget’s Chat title as its account.
Who gets new live chats?
Section titled “Who gets new live chats?”The colleagues ticked for the widget in AdminUsers, Access Rights, section Live Chat. Nobody is assigned at first; each colleague who sends a reply is assigned automatically, and the chat moves into their My Chats. Access changes apply to chats that start afterwards.
Why is there a live chat without any messages?
Section titled “Why is there a live chat without any messages?”A visitor filled in the name and email form but did not write. Replyco creates the chat as soon as the form is sent, so it appears under Chats with no messages; you can close it or wait for the first message.
Can I send the visitor a copy of the conversation?
Section titled “Can I send the visitor a copy of the conversation?”Yes. In a live chat under Chats, the three-dot icon next to the chat title sends a transcript of the conversation to the visitor’s email, as a new ticket. The icon appears only when at least one transcript is switched on. Transcripts are set up under Transcripts.
Webhook
Section titled “Webhook”What does the webhook send?
Section titled “What does the webhook send?”For each message a visitor writes, a POST with JSON: id, chatId, text, createdDate in UTC, customerName, customerEmail and attachmentUrl, as Message Schema for Webhook Transmission shows them. Your team’s replies and auto-responses are not sent. The address is set on the widget’s Widget Settings tab.
Why does our webhook receive nothing?
Section titled “Why does our webhook receive nothing?”Check that the address on Widget Settings was saved with Save and starts with http:// or https://, and that your server accepts a POST there. Only visitor messages trigger it, not your team’s replies. Replyco retries once after two seconds, so check your server’s logs for the calls.
Data and privacy
Section titled “Data and privacy”Does the widget set cookies?
Section titled “Does the widget set cookies?”No. The widget keeps the visitor’s email, name, chat reference and whether they closed the welcome bubble in the browser’s local storage. When active, it loads the Ubuntu font from Google Fonts, which passes the visitor’s IP address to Google.
What does Replyco store about a visitor?
Section titled “What does Replyco store about a visitor?”Their name and email, as the chat title and a customer record, every message and file in the chat, and with Message page tracking on the page address of each message. Colleagues with access to the chat or to Customers can see this data.
Whose privacy policy does the consent box link to?
Section titled “Whose privacy policy does the consent box link to?”Replyco’s. With Privacy Policy (GDPR) on, the consent sentence begins I authorize Replyco to process my personal data… and links to replyco.com and to Replyco’s own privacy policy, not to your shop’s. Mention the chat in your own privacy notice too.
Troubleshooting
Section titled “Troubleshooting”| Symptom | What to check |
|---|---|
| The chat button does not appear on the website | In order: Active on and saved? The whole code on this page, including the div with the ID replycoChat, and the page published? Page and shop caches cleared? Closed now, with Widget visibility outside working hours off? A phone with Widget on mobile devices off? The widget deleted, or the code from a deleted widget? Your company still has live chat? A cookie or consent tool on your site that holds scripts back until the visitor accepts, or a browser extension that blocks scripts: try a private window without extensions. |
| The button appears on some pages only | The code is in a template that only some pages use; move it to the main layout. |
| The chat window opens but visitors cannot type | The message box stays grey until the visitor gives an email: they select it, fill in the form and select SUBMIT. |
| The form does not accept the email | It must be a complete address such as name@example.com; the field turns red otherwise. |
| The consent box is missing | Privacy Policy (GDPR) on and saved? It appears in the form, not before. Companies in Replyco’s German region have no such switch. |
| The widget shows the closed-hours line during opening hours | Use Working time from Company Settings and the company hours; today in Holidays? Times entered in your browser’s time zone? See Understanding working hours. |
| Saved changes do not show on the website | Success message after Save? Reload the page; clear your shop’s page cache. |
| Visitors see “Something went wrong… Please reload your page.” | The visitor’s connection to Replyco’s chat service failed. Reloading the page reconnects; messages already in Replyco are kept. |
| Visitors see “File size is more than 20MB.” | The file is over 20 MB; ask for a smaller file or a link. |
| A colleague does not get the widget’s chats | Ticked in AdminUsers, Access Rights, Live Chat? Chats that started before the change reach them only when assigned. |
| A new live chat is not in the list | Reload Chats; check Filter by Account, and that you are responsible for the widget. |
| The webhook receives nothing | Address saved on Widget Settings and starting with http:// or https://? Server accepts a POST at that address? Only visitor messages trigger it. See The webhook. |