

Connect BigCommerce
Connect your BigCommerce store and the emails your customers send to your store’s support address arrive in Replyco as tickets; Replyco also imports your store’s orders, and your replies go back to the customer by email, from your own address. The connection has two parts: you give Replyco the credentials of a BigCommerce API account, and you forward your store’s customer emails to an address Replyco creates for the account. Replyco only reads from your store: orders, products and customers.
Before you start
Section titled “Before you start”| You need | Where it lives |
|---|---|
| The Admin permission in Replyco | AdminUsers; see Invite users and set what they can do |
| A free account on your plan | AdminBilling; see Billing |
| A BigCommerce API account that can read orders, products and customers, with its Access Token, Client ID and API Path | Your BigCommerce control panel |
| The email address your customers write to, and access to its forwarding settings | Your email host |
| Access to your domain’s DNS, to authenticate the domain of your sender address (you can do this later) | Your DNS provider or domain registrar |
Availability: every plan includes BigCommerce, with its orders. Companies on an older plan may not have order sync; see What each plan includes.
Create the API account in BigCommerce
Section titled “Create the API account in BigCommerce”Replyco reads your store through an API account that you create in BigCommerce. Create it first and keep its details at hand for the form in Replyco.
-
Sign in to your BigCommerce control panel and select Advanced Settings in the menu.
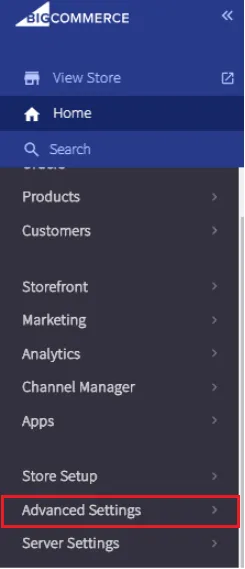
In the BigCommerce control panel, open Advanced Settings. What this screenshot shows
- Screen
- ()
- Highlighted
- “”, , .
- Also visible
- Products; Customers; Store Setup; Advanced Settings, outlined; Server Settings
- Purpose
-
Select API Accounts, then Create API Account.
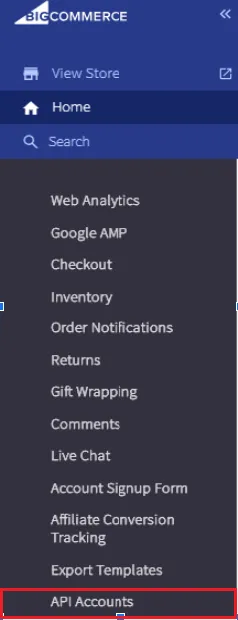
API Accounts is the last entry under Advanced Settings. What this screenshot shows
- Screen
- ()
- Highlighted
- “”, , .
- Also visible
- Advanced Settings sub-menu; API Accounts, outlined
- Purpose
-
Enter Replyco as the name. Under OAuth Scopes, set Content, Customers, Orders, Order Transactions and Products to read-only. Copy the API path shown under the name: you enter it in Replyco as API Path. Then select Save.
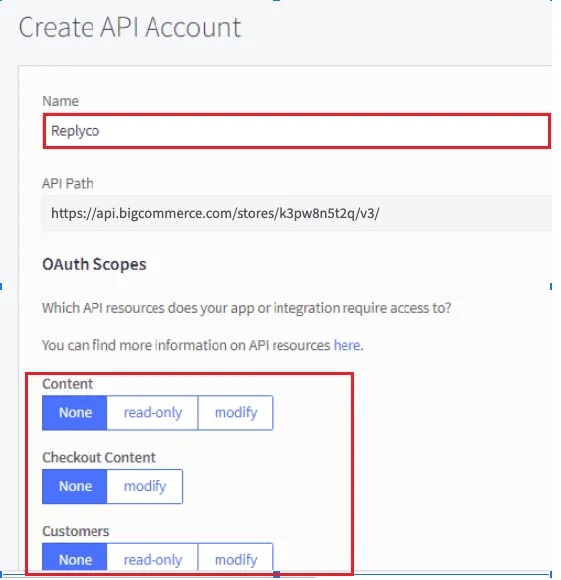
Name the API account Replyco, set its scopes to read-only and note the API path. What this screenshot shows
- Screen
- ()
- Highlighted
- “”, , .
- Also visible
- Name: Replyco; API Path; OAuth Scopes: Content, Checkout Content, Customers
- Purpose
-
BigCommerce shows the BigCommerce API Credentials. Copy the client ID and the access token; Replyco does not need the client secret. BigCommerce shows these values only once, so keep them until you have entered them in Replyco; in Chrome, Firefox and Edge, BigCommerce also downloads a text file with them. Select Done.
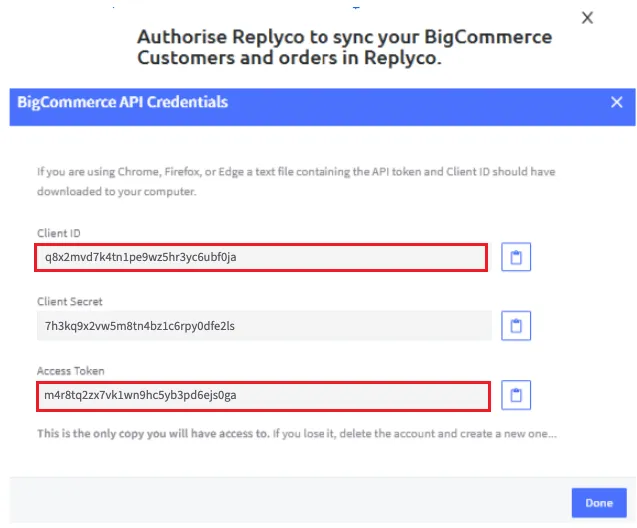
Copy the client ID and the access token now; BigCommerce shows them only once. What this screenshot shows
- Screen
- ()
- Highlighted
- “”, , .
- Also visible
- Client ID, outlined; Client Secret; Access Token, outlined; copy buttons; Done button
- Purpose
-
The API account Replyco now appears under Store API Accounts, with its five scopes set to read-only.
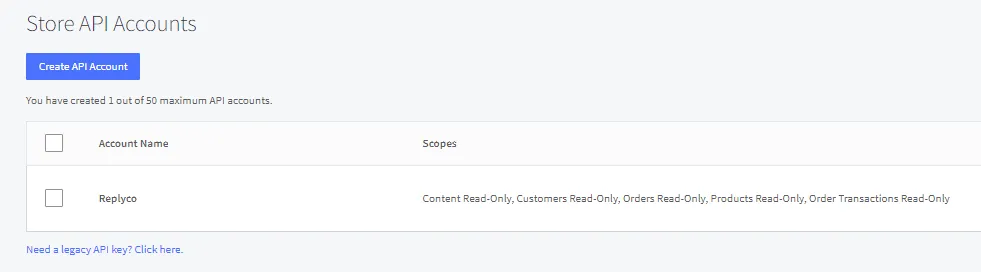
The Replyco API account is listed with five read-only scopes. What this screenshot shows
- Screen
- ()
- Highlighted
- “”, , .
- Also visible
- Create API Account button; account Replyco; scopes: Content, Customers, Orders, Products, Order Transactions, all Read-Only
- Purpose
-
Select + Add Account in the top bar.
The Add Account page opens with one tile per marketplace and webstore. For every other channel, see Add Account.
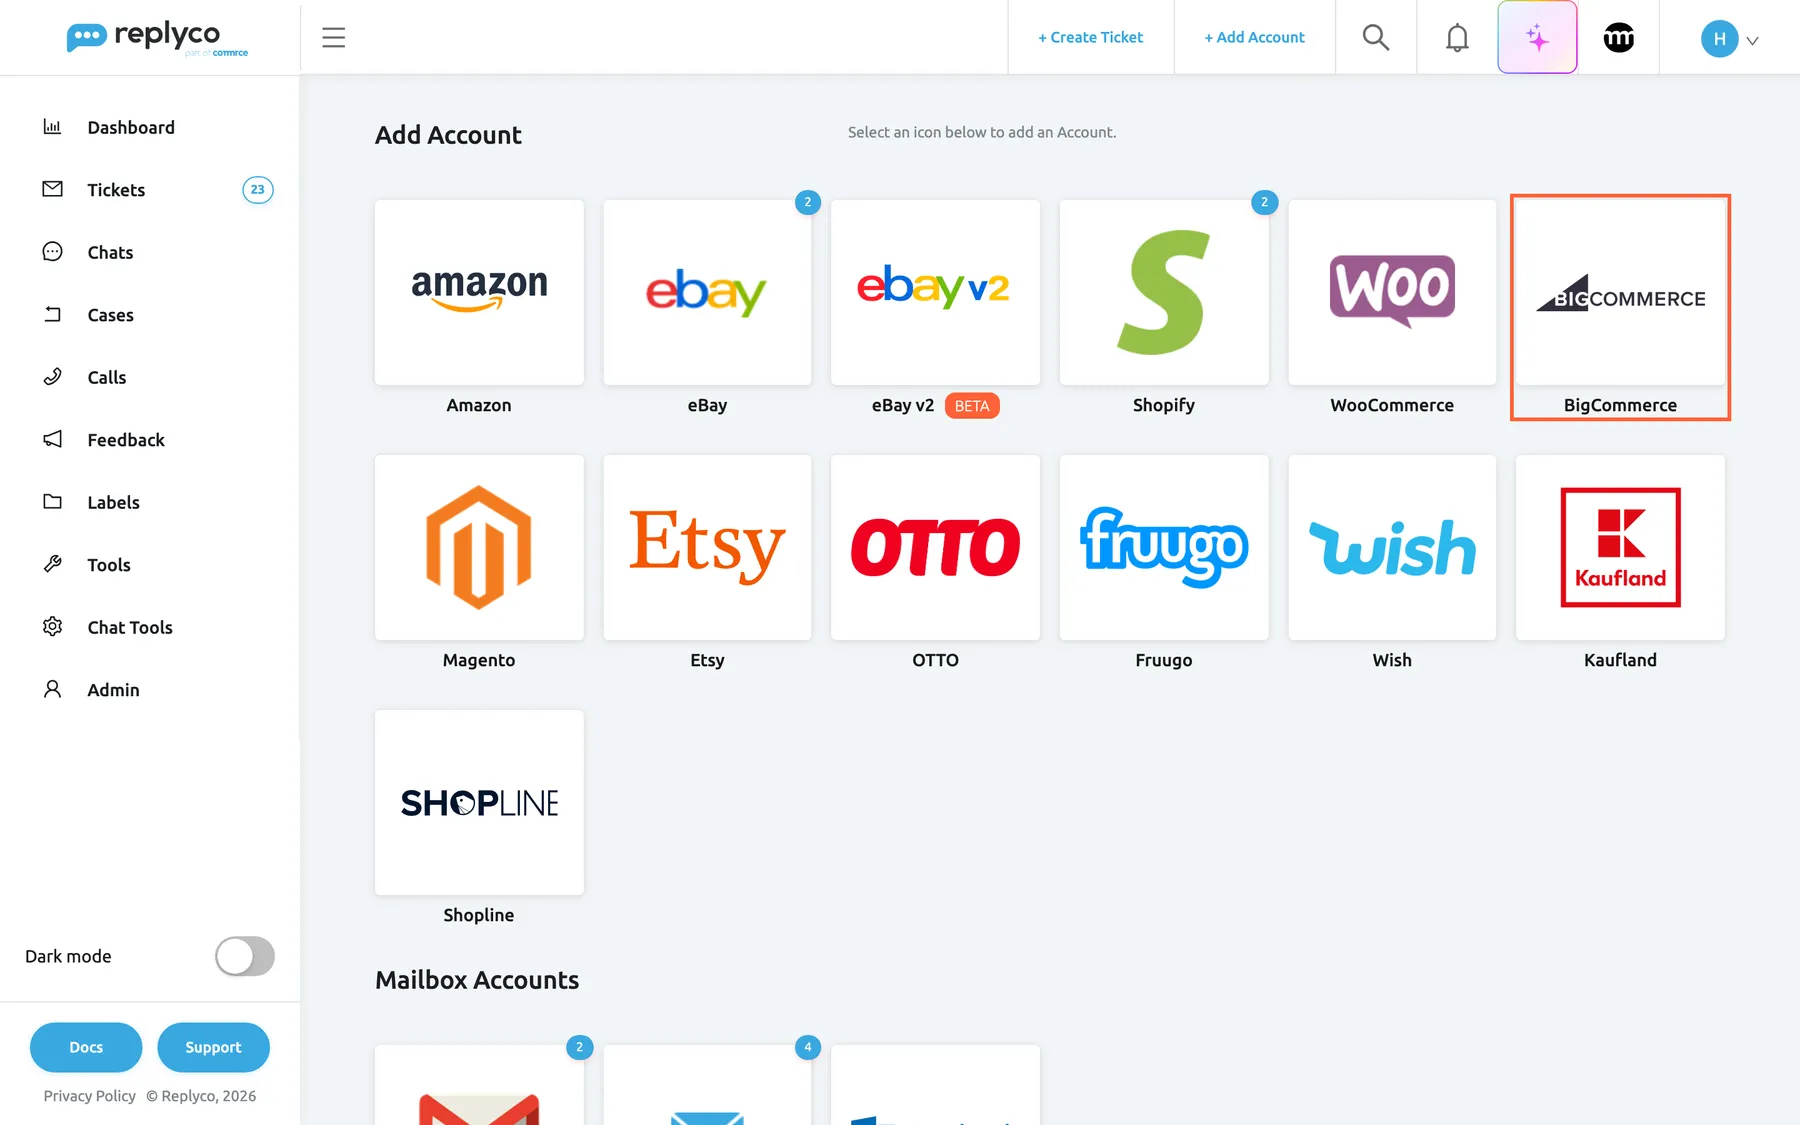
BigCommerce has its own tile among the marketplaces and webstores on the Add Account page. What this screenshot shows
- Screen
- Add Account (/integrations/add)
- Highlighted
- button “”, marketplace-tiles, enabled. opens the BigCommerce connect dialog
- Also visible
- marketplace and webstore tiles; Mailbox Accounts heading below
- Purpose
- start connecting BigCommerce
-
Select the BigCommerce tile. The dialog opens at AUTHORIZE, which says that Replyco will not change or delete your BigCommerce orders, products or customers, and that you enter the account’s details next. Select Authorize to move on to INFO.
-
Fill in the form, then select Authorize:
- Account Name: a name your team recognises, for example your store and the channel. It labels every ticket from this account.
- Access Token and Client ID: the credentials of your BigCommerce API account; see Create the API account in BigCommerce.
- API Path: the API path BigCommerce shows for the API account, in full, starting with
https://and ending with/v3/. Replyco adds the names of the orders, products and customers endpoints to it. - Display Email: the address your customers see on your replies, usually your store’s support address.
- Send Name as (optional): the name your replies are sent as.
Leave Custom SMTP Configuration unticked to send replies through Replyco’s mail server; the choice is explained under Options.
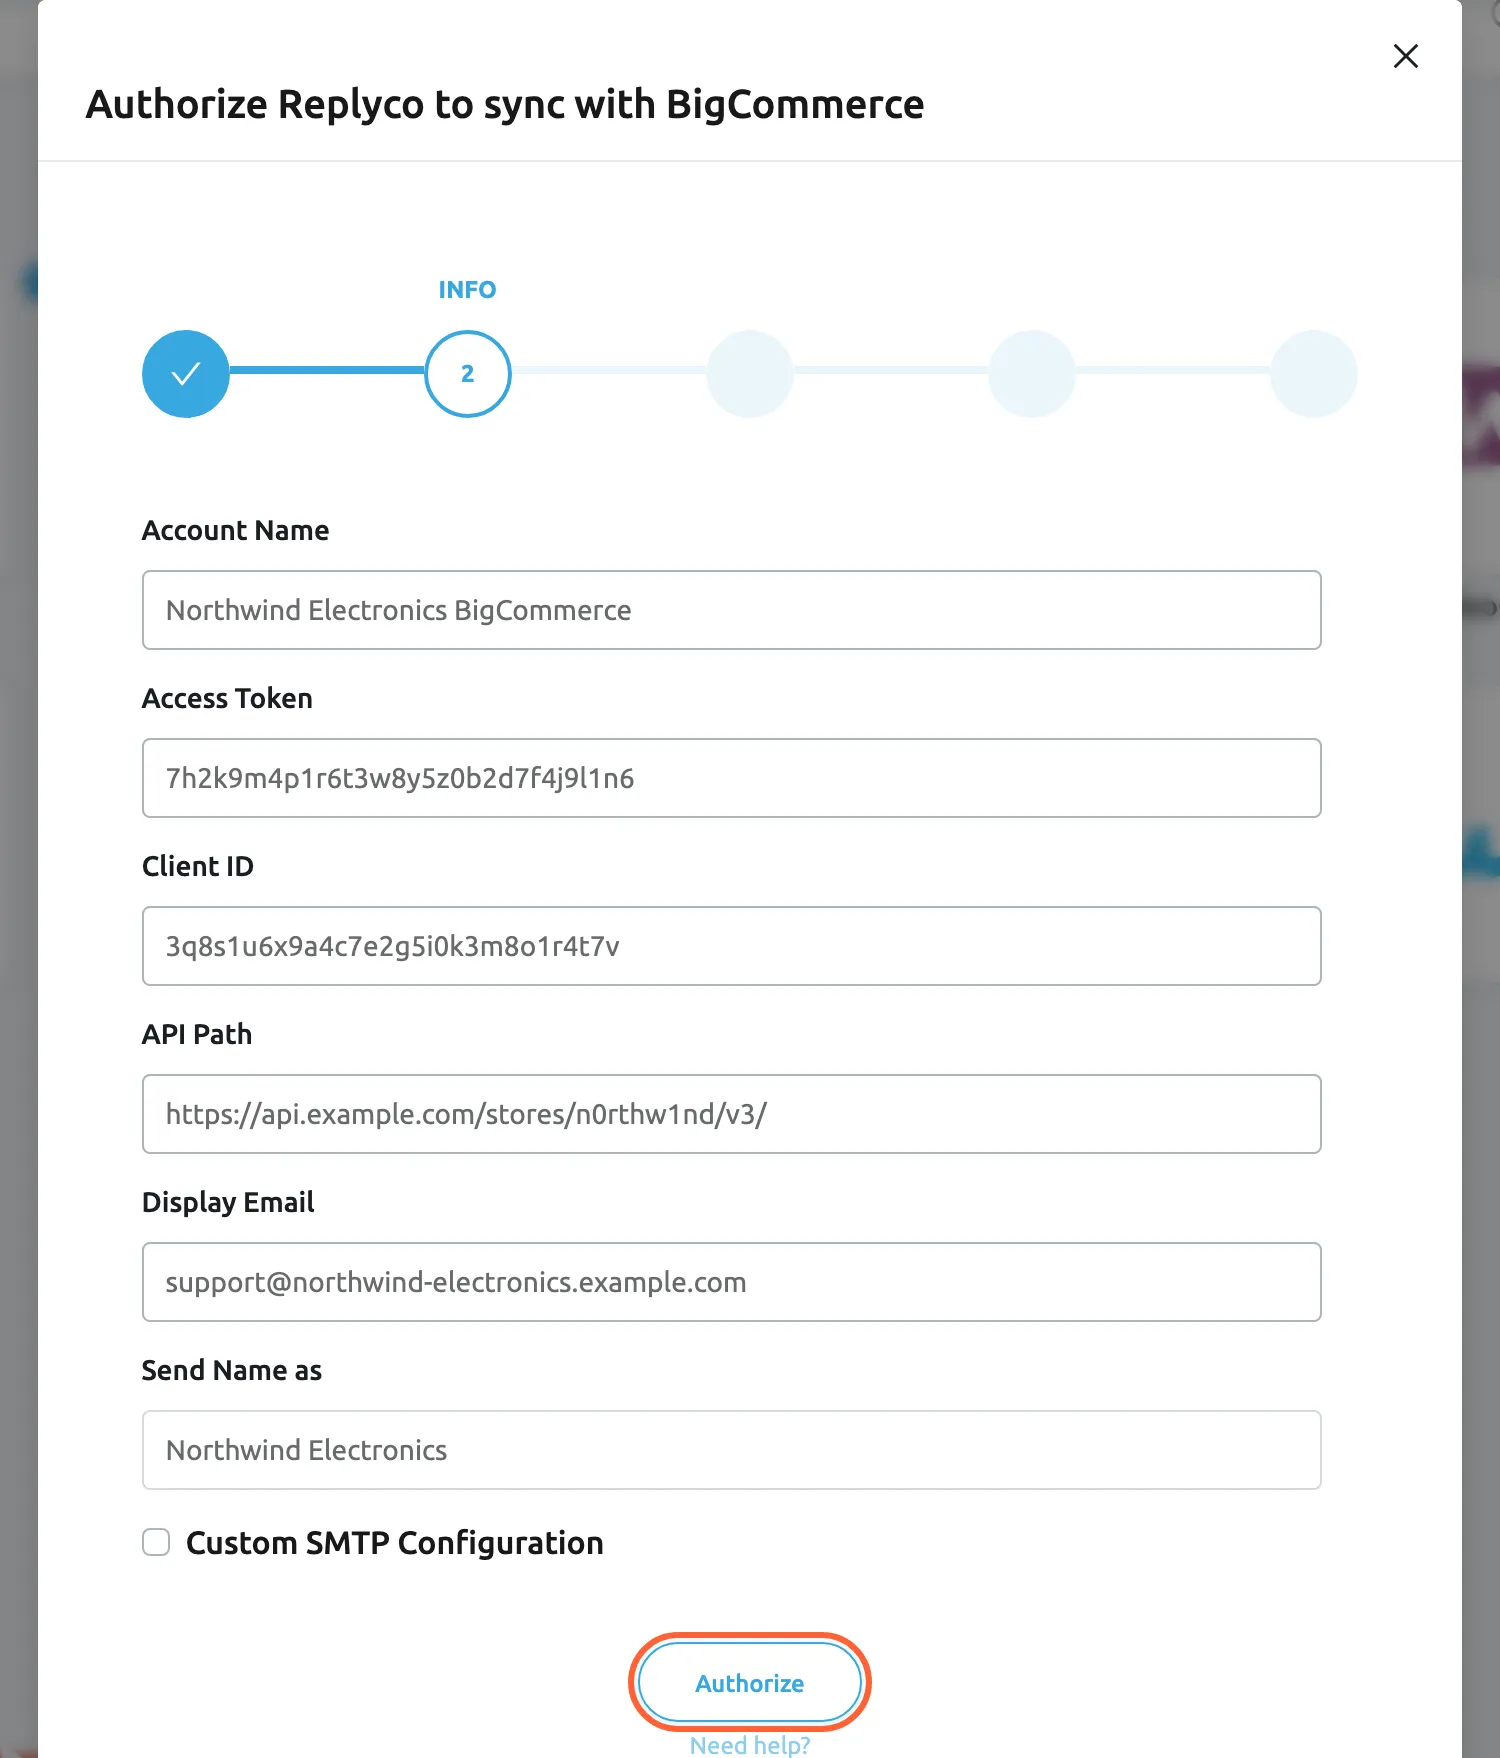
Enter the API account credentials and API path, and the address your replies are sent from. What this screenshot shows
- Screen
- Authorize Replyco to sync with {{name}} (/integrations/add)
- Highlighted
- button “Authorize”, dialog-bottom, enabled. saves the BigCommerce account
- Also visible
- Account Name: Northwind Electronics BigCommerce; Access Token and Client ID filled; API Path: https://api.example.com/stores/n0rthw1nd/v3/; Display Email: support@northwind-electronics.example.com; Send Name as: Northwind Electronics; Custom SMTP Configuration unticked
- Purpose
- enter the BigCommerce credentials, store address and sender details
-
Replyco saves the account, confirms with Account successfully saved. and moves to EMAIL. Select Copy Email Address, then Continue.
In your email host, forward the emails that reach your customer address to the copied address. Only forwarded emails become tickets. You can copy the address again at any time from the account’s details under Setup Email Forwarding:.
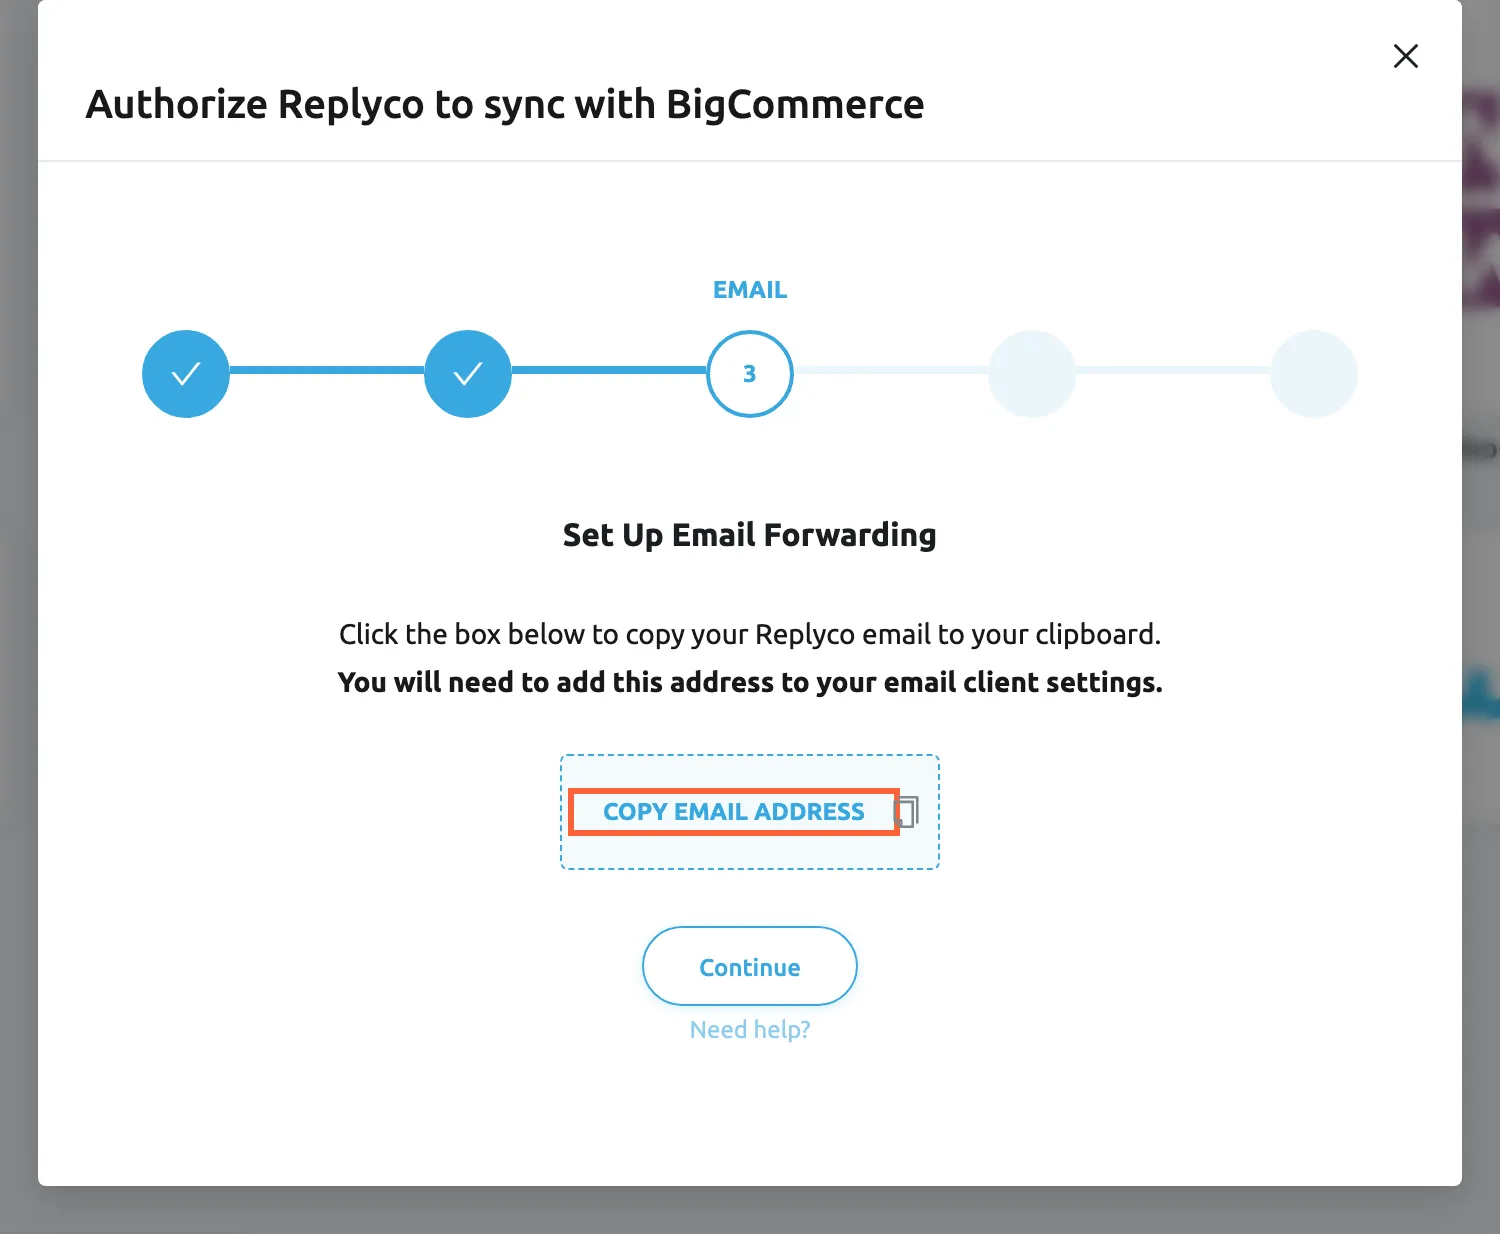
Copy the Replyco address; your store's customer emails must be forwarded to it before any ticket arrives. What this screenshot shows
- Screen
- Authorize Replyco to sync with {{name}} (/integrations/add)
- Highlighted
- button “Copy Email Address”, dialog, enabled. copies the account's Replyco forwarding address
- Also visible
- step EMAIL; Set Up Email Forwarding; Continue button
- Purpose
- copy the address the store's customer emails must be forwarded to
-
At DOMAIN AUTH, Replyco shows a DKIM record for the domain of your Display Email. Add it as a TXT record at your DNS provider and select Verify DNS, or select Skip and confirm with Skip anyway to do it later.
DNS changes can take a few hours to take effect, so you can continue and verify later in the account’s Email settings. For an address on a public mailbox domain, such as gmail.com, domain authentication is not available and the step only offers Continue. See Mailbox by forwarding for what the record does.
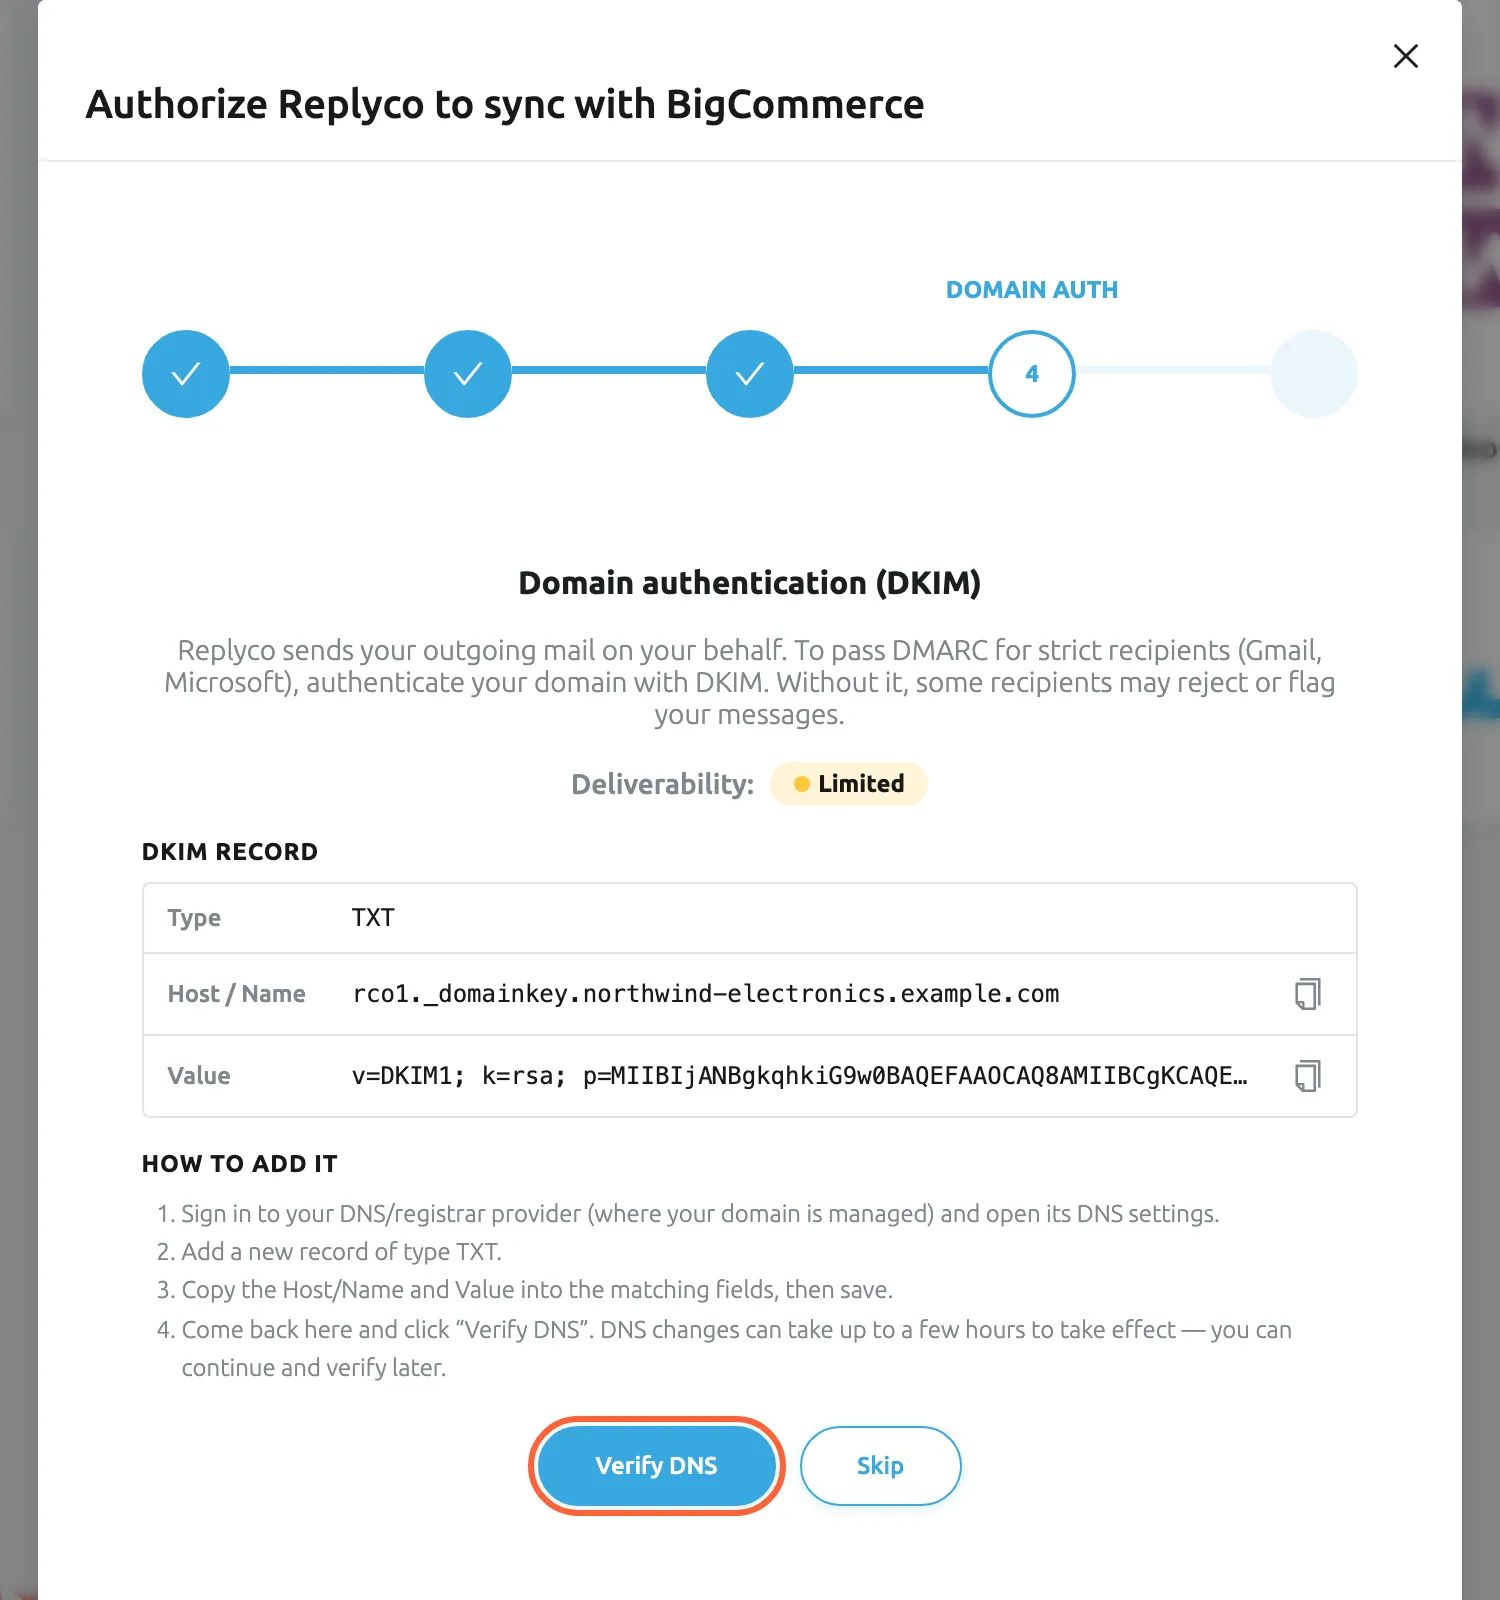
Publish the DKIM record for the domain of your Display Email, or skip the step and set it up later. What this screenshot shows
- Screen
- Authorize Replyco to sync with {{name}} (/integrations/add)
- Highlighted
- button “Verify DNS”, dialog-bottom, enabled. checks whether the DKIM record is published
- Also visible
- step DOMAIN AUTH; Deliverability: Limited; DKIM record: Type TXT, Host / Name, Value with copy icons; How to add it steps; Skip button
- Purpose
- authenticate the sending domain so replies pass DMARC
-
The dialog shows Your account was saved successfully.. Select Finish.
What happens next
Section titled “What happens next”The account appears on AdminAccounts; to check how its sync is going, see Accounts. Every email your email host forwards to the Replyco address becomes a ticket; Replyco checks the address for new mail about every five minutes, and emails from before you set up forwarding are not imported. To check that it works, send a test email to your store’s support address and wait for the ticket in TicketsNot Resolved. To reply to it, see Answer a ticket.
Replyco imports the orders created in your store in the last two days, with the products in them, then checks for new orders every few minutes. They appear in ToolsOrders; see Orders. When a message arrives, Replyco reads the first number in its subject that is not a date as an order number, and shows that order beside the ticket: a subject such as Question about order 1043 brings up order 1043.
Your replies go out by email from the Display Email address, with the Send Name as name, through Replyco’s mail server. Once the DKIM record is verified, Replyco signs them for your domain, so strict recipients such as Gmail and Microsoft accept them.
Options
Section titled “Options”| Choice | When to pick it | Effect |
|---|---|---|
| Custom SMTP Configuration unticked (the default) | You forward your store’s emails to Replyco | Replyco creates the forwarding address and sends your replies through its own mail server |
| Custom SMTP Configuration ticked | Replyco should read and send through your own mailbox | You enter your mailbox’s IMAP and SMTP settings in the form, and Replyco reads and sends through that mailbox. See Mailbox with IMAP and SMTP |
If something goes wrong
Section titled “If something goes wrong”| Symptom | Check | Fix |
|---|---|---|
| You must complete ALL FIELDS in order to save this account! | Every field except Send Name as is required. | Fill in the empty field and select Authorize again. |
| The address must start with "http". | API Path must be a full address. | Copy the whole API path from BigCommerce, with https:// at the start. |
| Email is invalid | Display Email must be a complete email address. | Enter the full address, for example your store’s support address. |
| “Shop already exist” | A BigCommerce account with this API Path is already connected. | Use the existing account on AdminAccounts. |
| “Integration with this name already exists” | Another BigCommerce account in Replyco has the same Account Name. | Choose a different account name. |
| “You reached your current plan maximum integrations count. Contact support for more info.” | Your plan’s number of accounts is used up. | Delete an account you no longer use, or change your plan on AdminBilling. |
| Click the copy icon and save the e-mail address before you proceed. | Continue works only after you have copied the address. | Select Copy Email Address, then Continue. |
| The account is connected, but no tickets arrive | Does your email host forward the store’s customer emails to the Replyco address? | Set up the forwarding again with the address from the account’s details; see Fix a blocked or silent account. |
| Last Orders Sync shows Marketplace data sync is Temporarily Blocked. | Open the account and read the reason after Blocking reason:, for example that BigCommerce refuses the API account’s credentials. Messages still arrive; only the orders stop. | In BigCommerce, check that the API account still exists and can read orders, products and customers. Enter new credentials with Edit in the account’s details; see Accounts. |