

Custom Fields
Custom fields hold what your team records on tickets and Replyco cannot know by itself: a return reason, a returns reference, the type of a complaint. The Custom Fields screen defines those fields, their names, types and choices, for the whole company; agents then fill them in on each ticket, and the values can be exported for reporting. Open it from ToolsCustom Fields.
Availability: every plan includes custom fields, and during a trial every feature is on; companies on an older plan may not have them. The screen is in the menu for users with the Custom Fields permission, and creating, changing and deleting fields needs that permission with Edit. Filling in the fields on a ticket needs no permission. See What each plan includes and User permissions and roles.
What you can do here
Section titled “What you can do here”- See your company’s fields in one list, in the order agents see them on a ticket and the export writes them. The screen at a glance
- Create a field of one of six types: text, yes or no, date and time, date, a list, or a number. Create a field
- Offer a fixed list of answers, one or several per ticket, so every agent records a return reason the same way. Set up a list field
- Rename a field or change its options. The type stays as it was saved. Change a field
- Put the fields in order by dragging them. Put the fields in order
- Delete a field, and with it its values on every ticket. Delete a field
- Fill in the fields on a ticket, in the Custom Fields panel of the ticket’s right panel. Fill in the fields on a ticket · The ticket screen
- Export the values, one column per field, from the reports. Export the values · Reports
The screen at a glance
Section titled “The screen at a glance”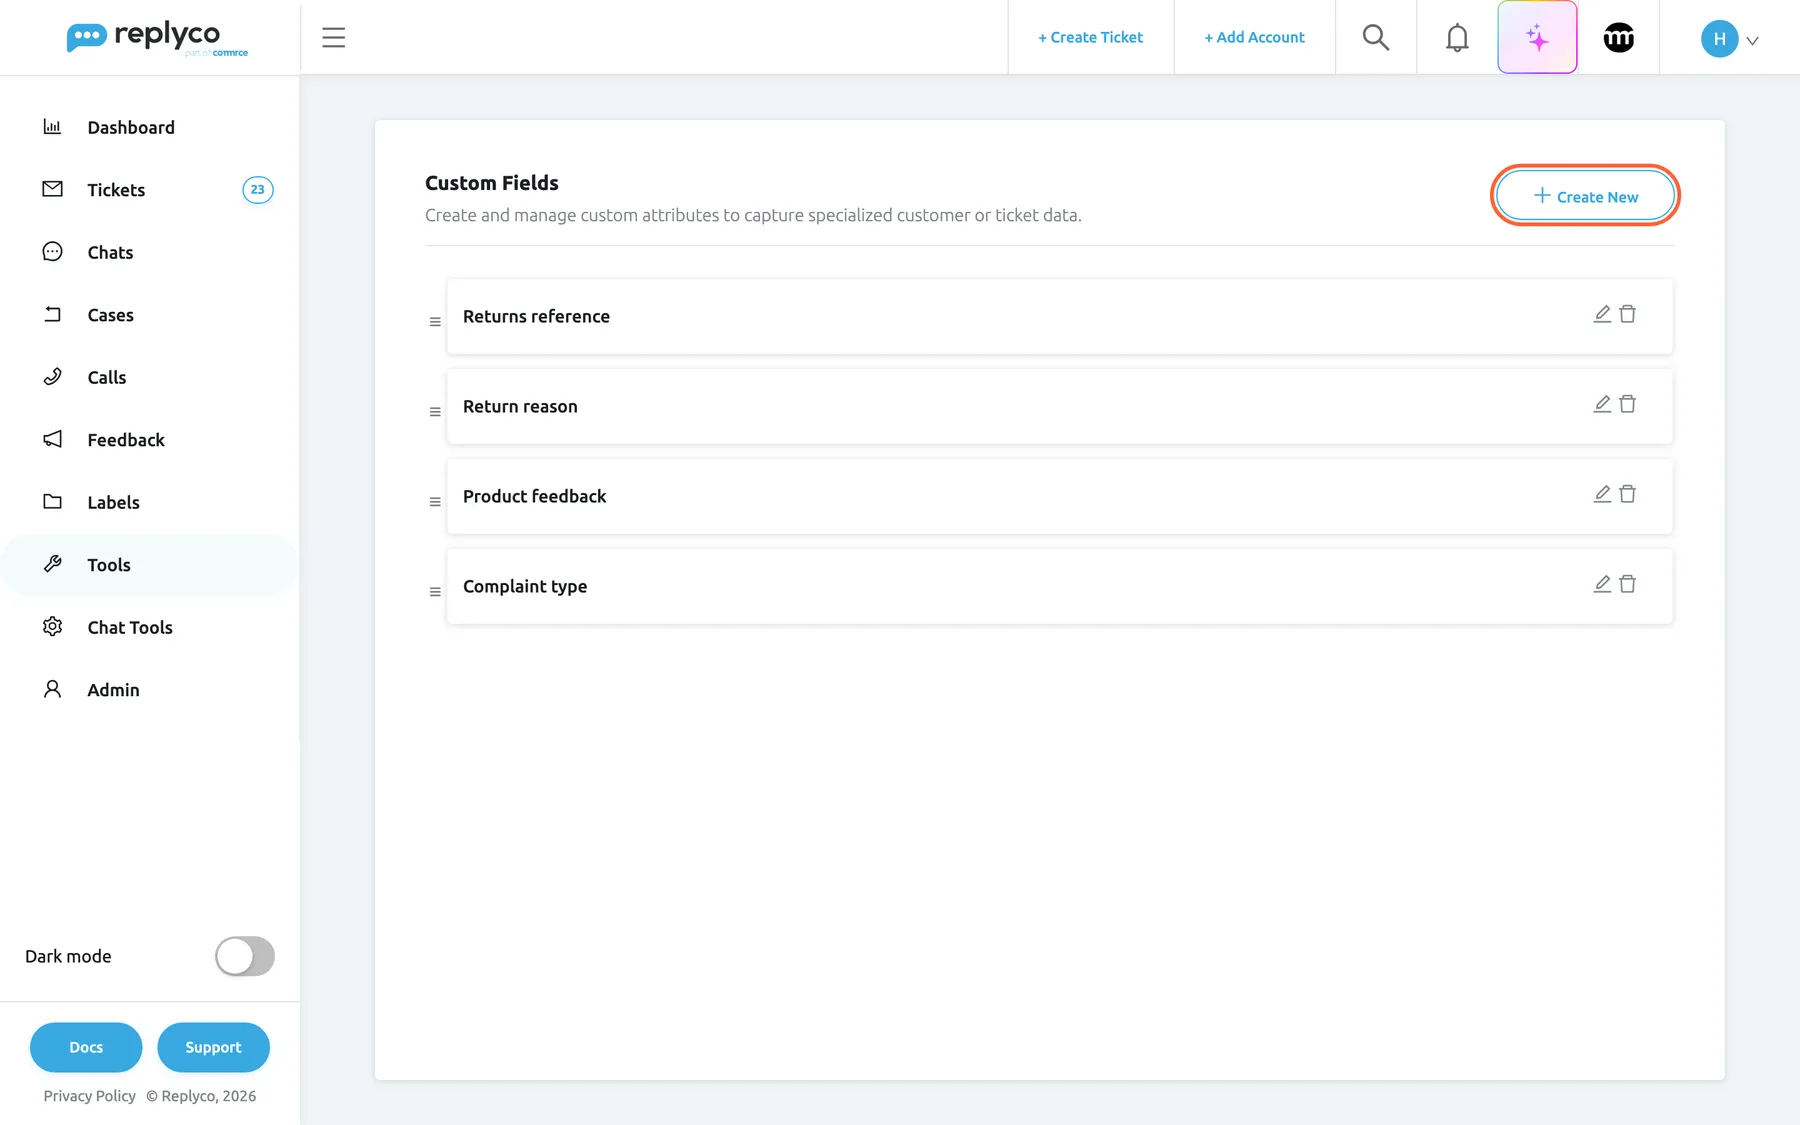
What this screenshot shows
- Screen
- Custom Fields (/customFields)
- Highlighted
- button “Create New”, header-right, enabled. opens the Create Custom Field form on the right
- Also visible
- four field cards: Returns reference, Return reason, Product feedback, Complaint type; drag handle, pencil and bin on each card
- Purpose
- the Custom Fields screen as it opens
| Region | What it shows | What you do there |
|---|---|---|
| Header, top | The heading Custom Fields, the description Create and manage custom attributes to capture specialized customer or ticket data. and Create New | Start a new field |
| The list | One card per field: a drag handle ☰, the name, and the pencil and bin icons | Open, reorder or delete a field |
| Form, right (after a click) | Create Custom Field or Edit Custom Field: Name, Type, and for a list Select options and Allow multiple options; then Cancel and Save | Define the field |
When your company has no fields yet, the list reads No custom fields found.
Create a field
Section titled “Create a field”-
Open ToolsCustom Fields and select Create New at the top right.
The form Create Custom Field opens on the right with the description Define a custom field name, type, and options to attach to tickets.
-
Type the name in Name, for example Serial number. This is the label agents see on the ticket and the column name in the export.
-
Choose the type in Type.
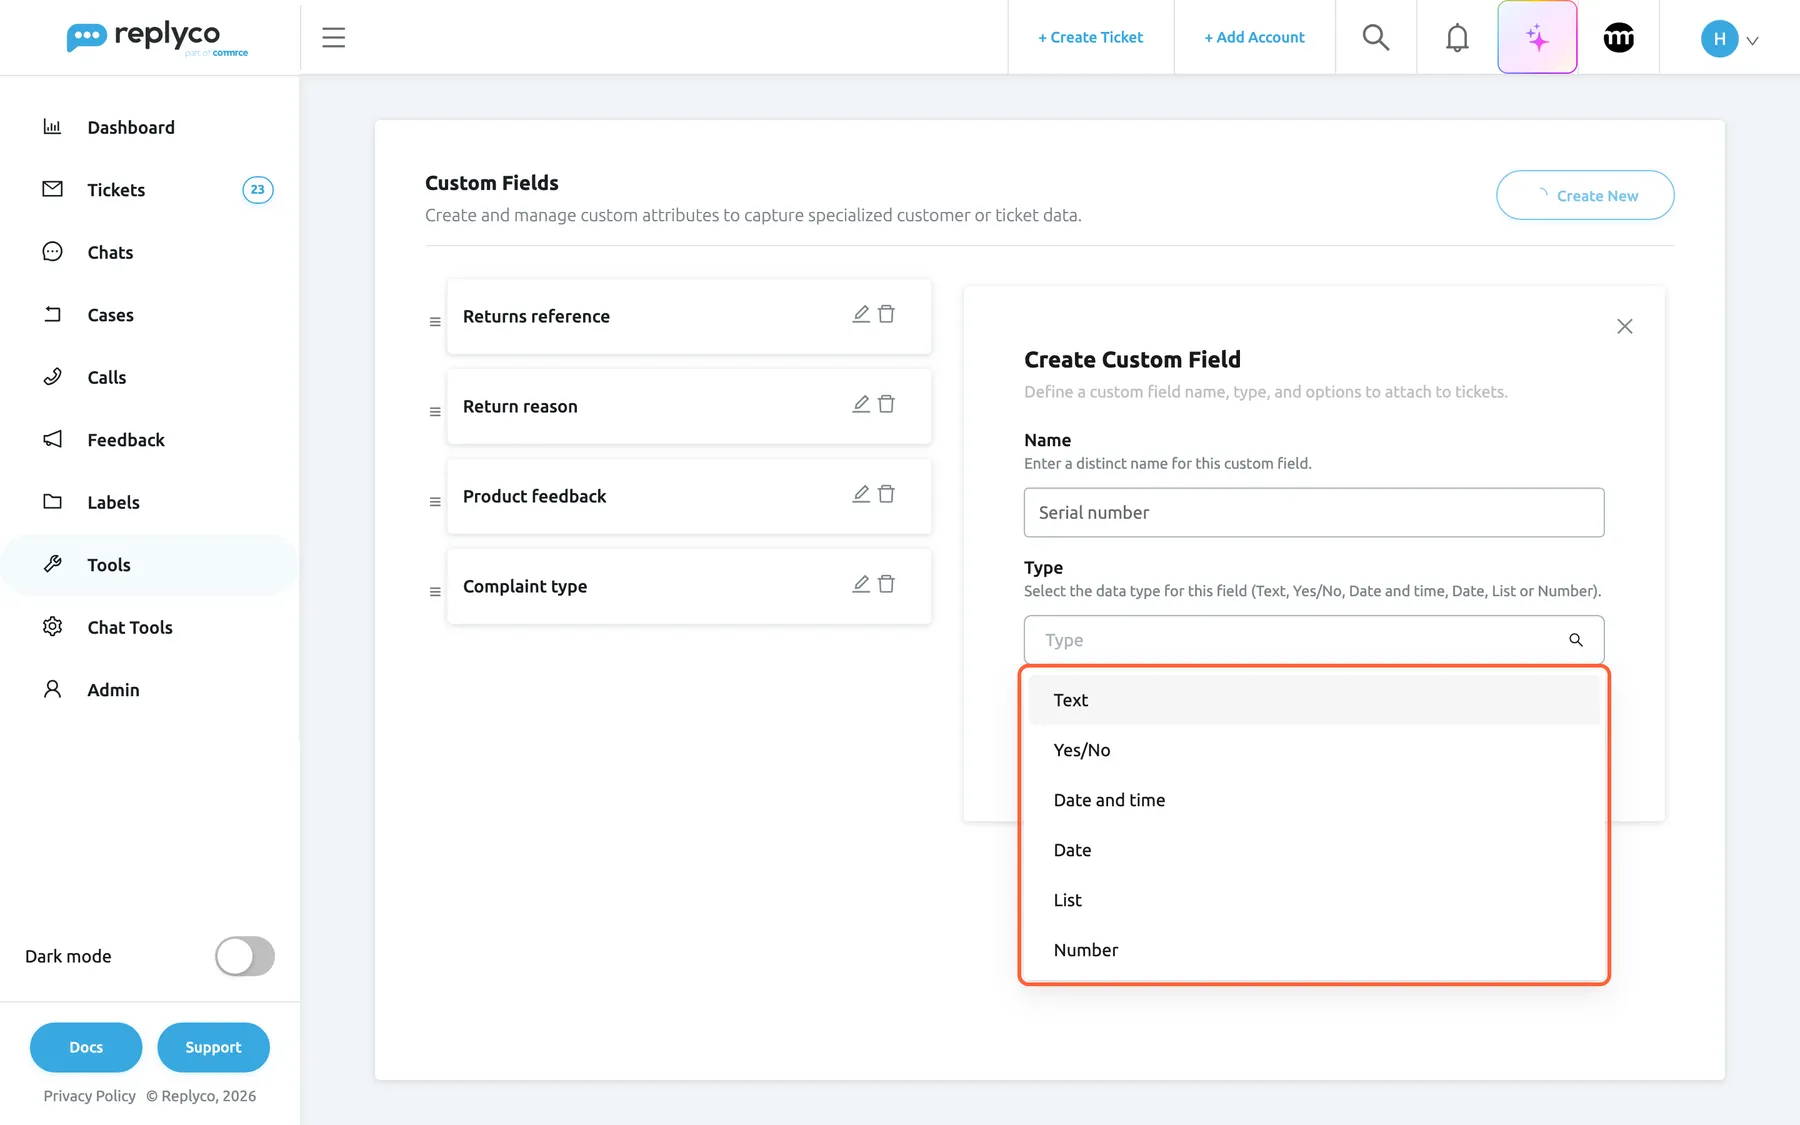
Six field types; the type cannot be changed once the field is saved. What this screenshot shows
- Screen
- Create Custom Field (/customFields)
- Highlighted
- combobox “Type”, form-right, open. sets the field's data type: Text, Yes/No, Date and time, Date, List or Number
- Also visible
- Create Custom Field heading and description; Name: Serial number; Create New with a spinner
- Purpose
- create a field and choose its type
-
For List, enter the answers agents can choose; see Set up a list field.
-
Select Save.
The form closes, Replyco confirms with Success, and the field is added at the end of the list. From now on it is offered on every ticket; tickets have no value in it until an agent fills it in. If the name or the type is missing, Replyco shows All fields must be completed. and keeps the form open.
Choose the type carefully: it cannot be changed after the field is saved. To change a field’s type, create a new field and delete the old one, which deletes its values.
| Type | What an agent enters on the ticket | How the value shows |
|---|---|---|
| Text | Free text, such as a returns reference RET-40517 | As typed |
| Yes/No | Yes or No from a drop-down | Yes or No; Yes or No in the export |
| Date and time | A date and a time from a calendar | The date and time, in your browser’s time zone |
| Date | A date from a calendar | The date |
| List | One answer from your options, or several when Allow multiple options is on | The chosen answers, separated by commas |
| Number | A whole number, such as the number of items returned | The number; text is refused with {{name}} must be a number. |
Every field name must be different. Replyco refuses to save a second field with a name that already exists.
Set up a list field
Section titled “Set up a list field”A field of the type List offers a fixed set of answers, so every agent records the same thing the same way and the export can be counted.
-
In the form, choose List in Type. The section Select options appears with one empty option.
-
Type the first answer, select Add New for the next one, and repeat. The bin icon next to an option removes it; it is shown while there is more than one option.
-
(Optional) Switch Allow multiple options to Yes if agents may choose several answers on one ticket.
-
Select Save.
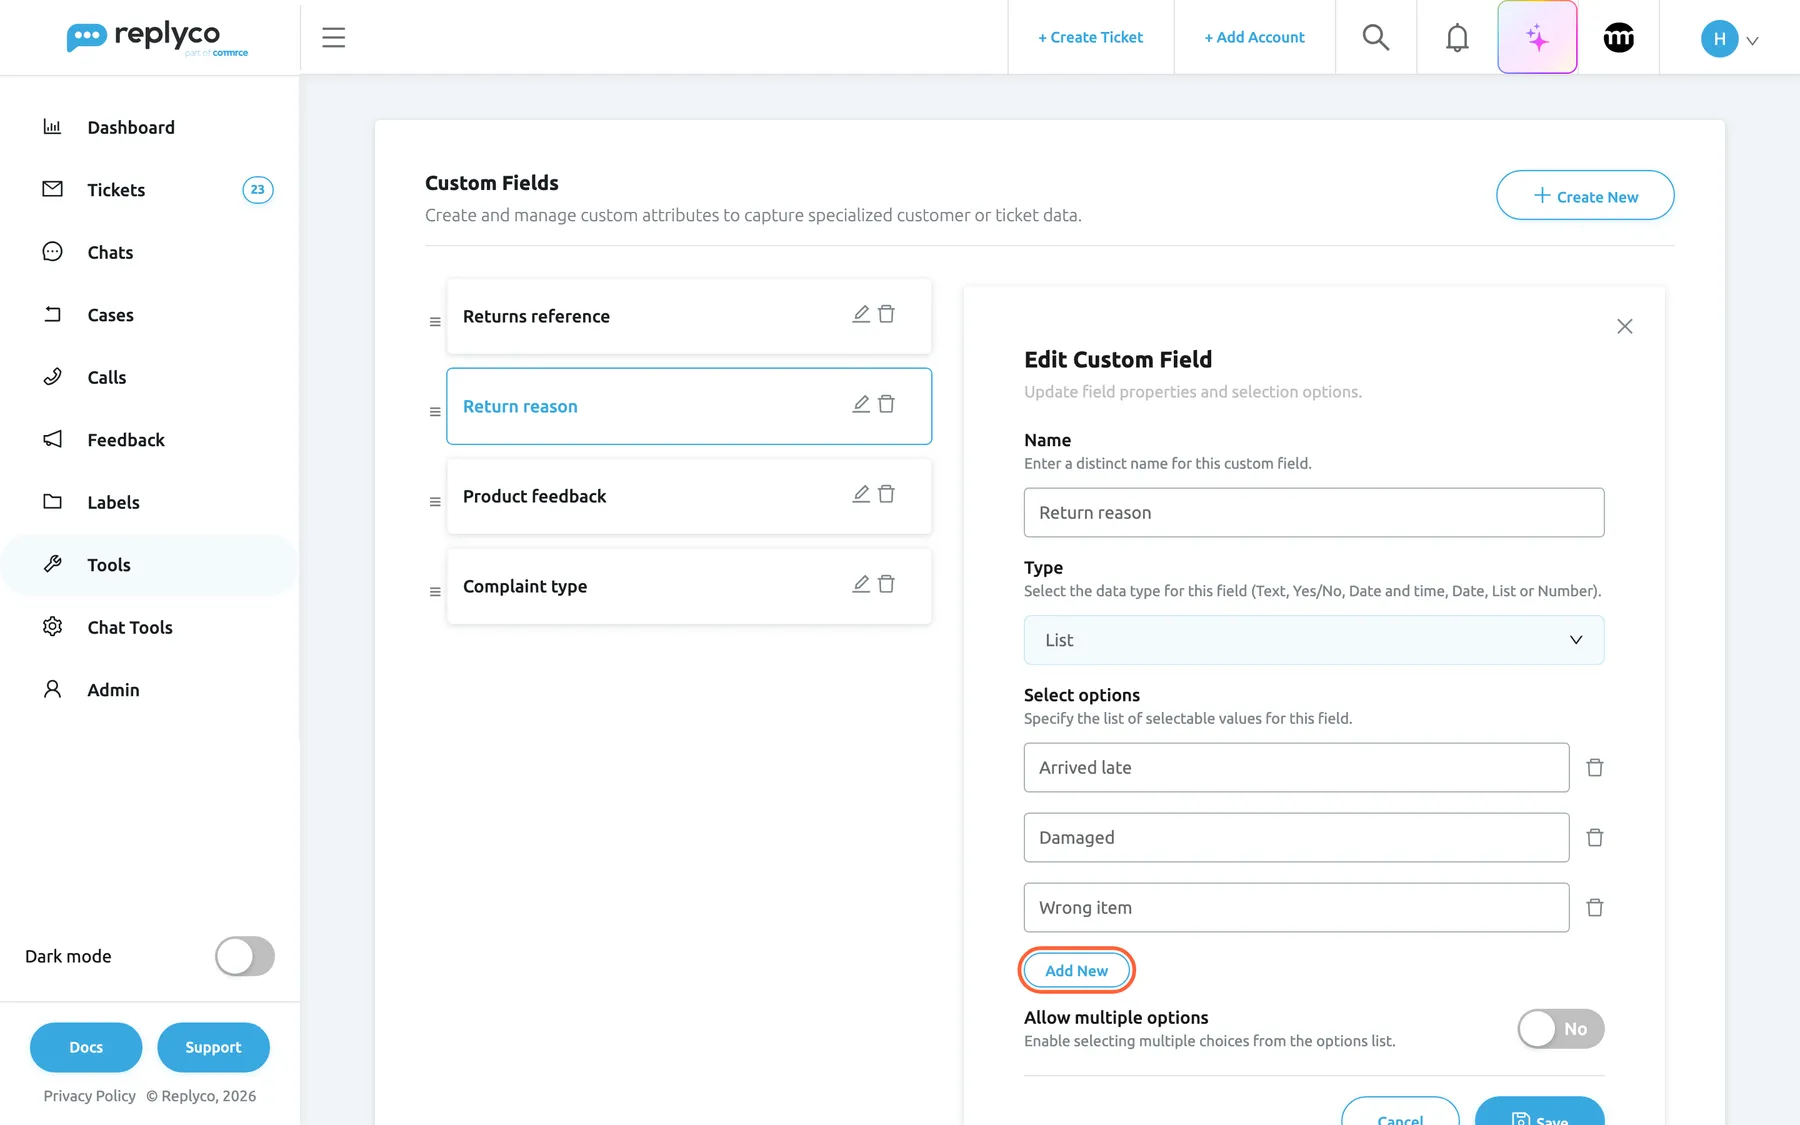
What this screenshot shows
- Screen
- Edit Custom Field (/customFields)
- Highlighted
- button “Add New”, form-right, enabled. adds an empty option field
- Also visible
- Name: Return reason; Type: List (disabled); options Arrived late, Damaged, Wrong item; Allow multiple options: No
- Purpose
- edit a List field and its options
A list needs at least one option, and no option may be empty; otherwise Replyco shows All fields must be completed.. Spaces at the start and end of an option are removed.
Example. Northwind Electronics records why goods come back in the field Return reason, a list with the options Arrived late, Damaged and Wrong item, one per ticket. A second list, Complaint type, offers Not as described, Faulty and Arrived late. A text field, Returns reference, holds the reference of the return, and Product feedback collects Poor quality or Design not as expected.
Change a field
Section titled “Change a field”-
Select the field’s card, or its pencil icon.
The form Edit Custom Field opens with the description Update field properties and selection options.
-
Change the name, the options or Allow multiple options. Type is greyed out.
-
Select Save, or Cancel or the cross to close the form without saving.
What a change does to the values already on tickets:
| Change | Values already on tickets |
|---|---|
| New name | Stay; tickets and the export show them under the new name |
| New option | Nothing changes; the option is offered from now on |
| Option renamed or removed | Stay as they were entered; tickets that had the old answer keep it. The ticket’s panel and the window agents fill in still show the old answer, but the drop-down no longer offers it; saving the window keeps it until an agent chooses another answer |
| Allow multiple options switched on | Become one-item selections; agents can now add more answers |
To move tickets from an old answer to a new one, open each ticket and choose the new answer. Custom fields have no bulk action.
Put the fields in order
Section titled “Put the fields in order”Drag a card by its handle ☰ and drop it where you want it. Replyco saves the order at once, for the whole company. The order is the order of the fields on the ticket, in the Custom Fields panel and in the window agents fill in, and of the columns when you export the values.
Delete a field
Section titled “Delete a field”Select the bin icon on the field’s card and confirm Are you sure? with Yes. The field disappears from the list and from every ticket.
Fill in the fields on a ticket
Section titled “Fill in the fields on a ticket”Agents fill in custom fields in the ticket’s right panel, in the panel Custom Fields. It lists the fields that have a value on that ticket, in the order of this screen.
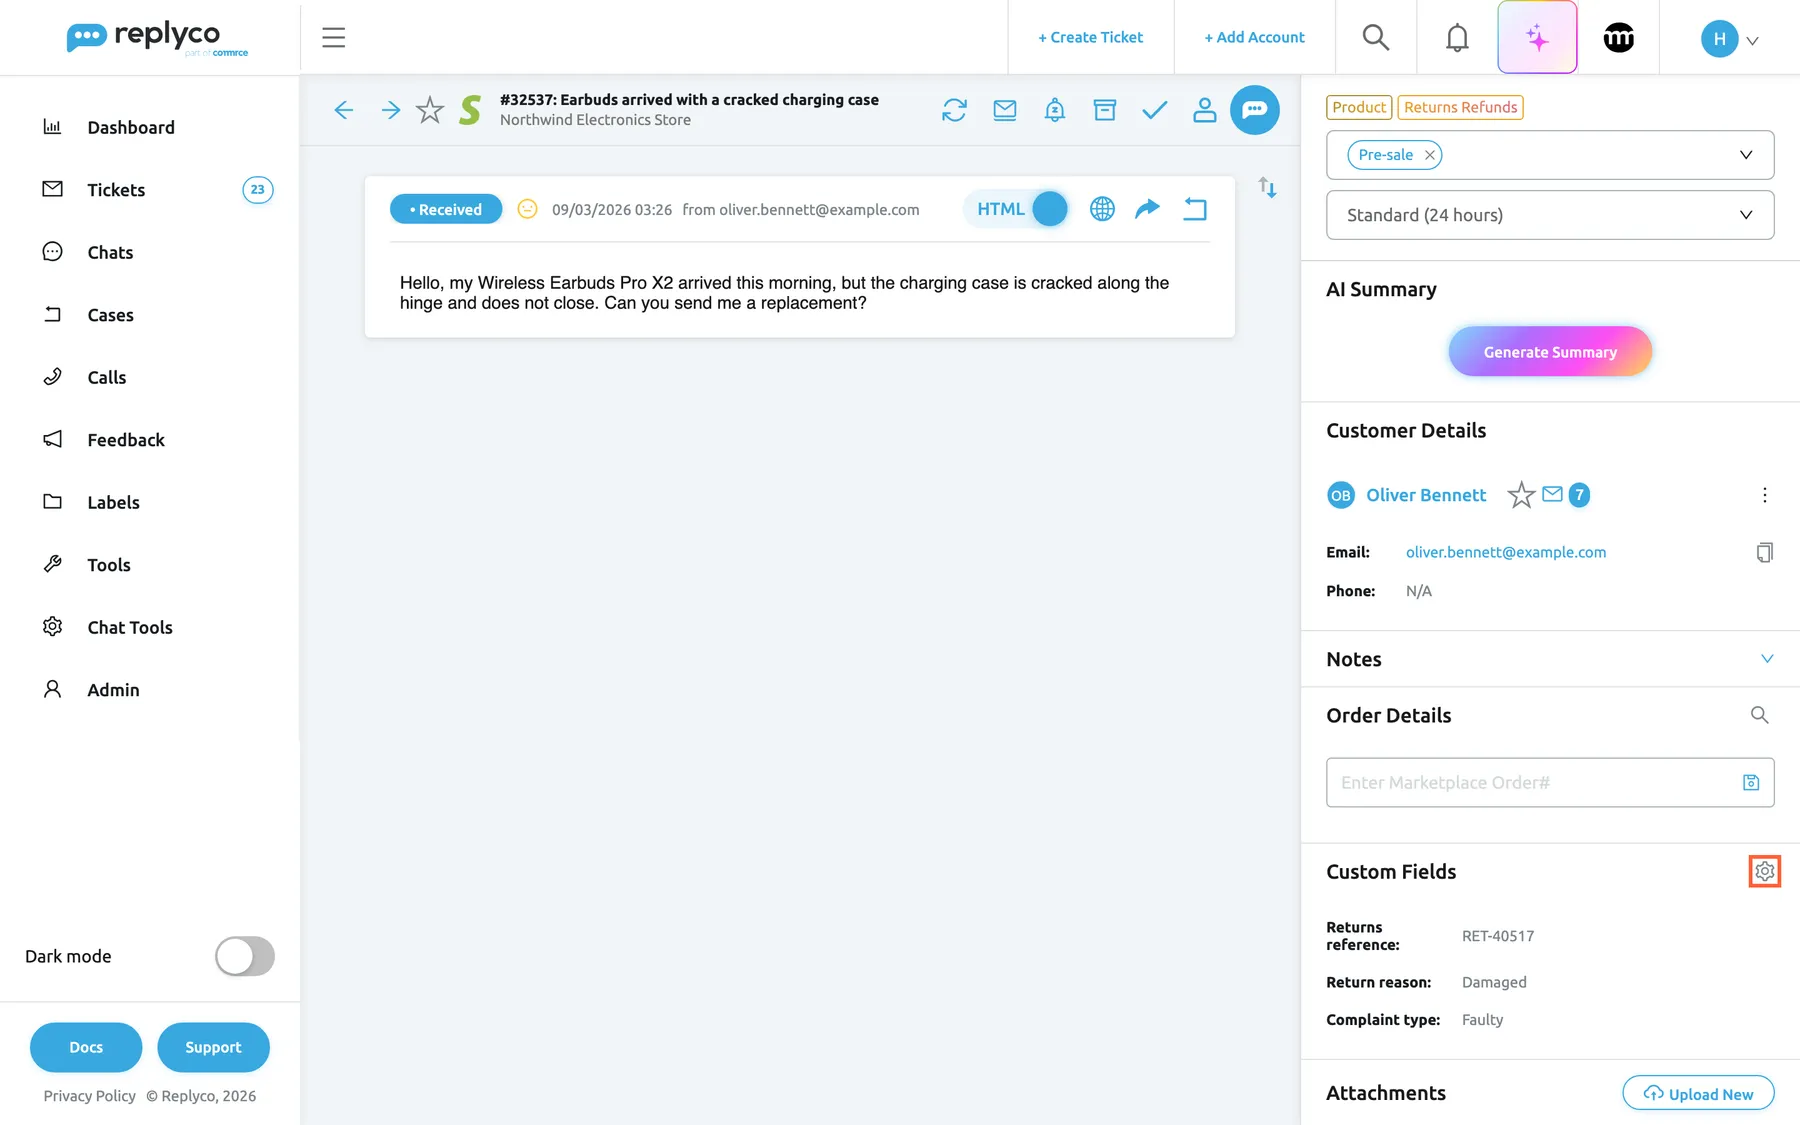
What this screenshot shows
- Screen
- Custom Fields (/ticket/:threadId)
- Highlighted
- img “”, right-panel, enabled. opens the Custom Fields window with every field of the company
- Also visible
- Returns reference RET-40517; Return reason Damaged; Complaint type Faulty; Product feedback not listed (no value)
- Purpose
- where custom field values are filled in and shown
-
In the ticket, find Custom Fields in the right panel. Select the plus icon when no field has a value yet, or the gear icon when some have.
-
The window Custom Fields opens with every field of your company. Fill in the ones that apply.
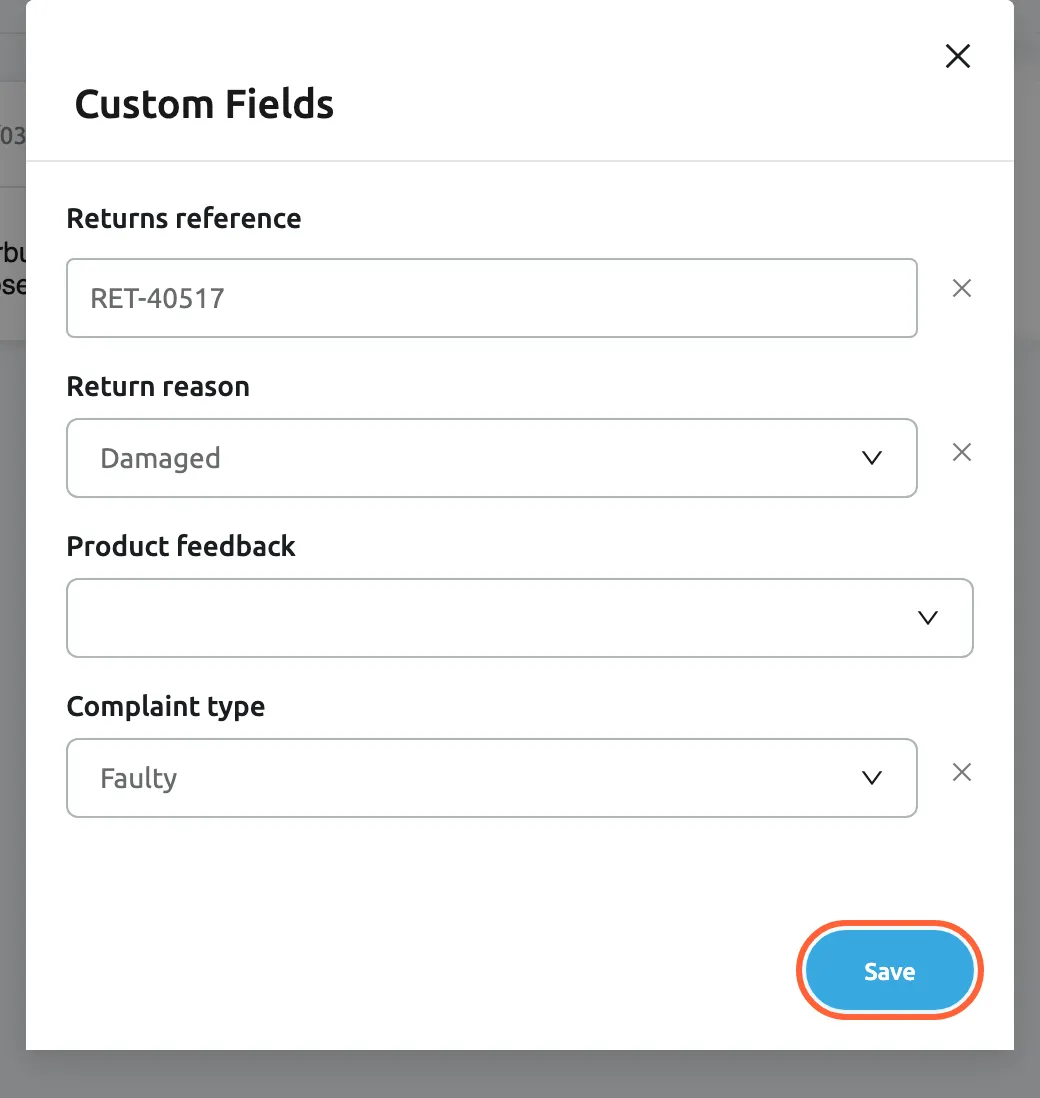
Agents fill in the fields here; each field appears as the type set on the Custom Fields screen. What this screenshot shows
- Screen
- Custom Fields (/ticket/:threadId)
- Highlighted
- button “Save”, dialog-footer, enabled. stores the values on the ticket
- Also visible
- Returns reference: RET-40517; Return reason: Damaged; Product feedback: empty; Complaint type: Faulty
- Purpose
- fill in custom fields on a ticket
-
Select Save. The values appear in the panel for the whole team.
A small cross next to a filled field clears its value after Are you sure?. When your company has no fields, the window instead links to this screen with Create a new field. For the rest of the ticket’s right panel, see The ticket screen.
Custom fields are internal. Customers never see them, and they are not used by rules, Smart Filters or the ticket list filters. When tickets are merged, the kept ticket keeps its own values and those of the other tickets are deleted with them; see Ticket merging.
Export the values
Section titled “Export the values”The values are reported in DashboardReports. In the ticket fields report, Select Custom Fields adds one column per field, named after it, with each ticket’s value; the columns follow the order of this screen. With the list above, a spreadsheet filter on Return reason shows how many returns each reason caused. See Reports.
Every control, explained
Section titled “Every control, explained”Create New
Section titled “Create New”Top right of ToolsCustom Fields.
Opens the form Create Custom Field on the right. It shows a spinner and cannot be selected while that form is open or a field is being saved.
Every field your team records starts here.
Field card and drag handle ☰
Section titled “Field card and drag handle ☰”One card per field in the list; the handle is to its left.
Shows the field’s name. Selecting the card or its pencil opens Edit Custom Field; the bin asks Are you sure? and deletes the field. Dragging a card by its handle changes the order, saved at once for everyone.
The order decides where a field appears on the ticket and in the export.
First field of the form, with the description Enter a distinct name for this custom field.
The field’s label on the ticket and its column name in the export. Required, up to 250 characters, and different from every other field’s name. Shown as typed in every language.
A clear name, such as Return reason, tells every agent what to record.
Under the name, with the description Select the data type for this field (Text, Yes/No, Date and time, Date, List or Number). Greyed out for a saved field.
One of Text, Yes/No, Date and time, Date, List and Number. It decides what agents enter and cannot be changed after saving.
The type keeps values consistent: a list or a yes/no field can be counted, free text cannot.
Select options
Section titled “Select options”Shown for List, with the description Specify the list of selectable values for this field.
One text box per answer; Add New adds one and the bin removes one while there are several. At least one option, none empty.
A fixed set of answers makes the values comparable across agents and months.
Allow multiple options
Section titled “Allow multiple options”Under the options, with the description Enable selecting multiple choices from the options list.
No, the default, allows one answer per ticket; Yes allows several. It can be switched on for a saved list, which turns existing answers into one-item selections, but not off again.
Some questions have more than one true answer, such as a complaint that is both late and faulty.
Save, Cancel and the cross
Section titled “Save, Cancel and the cross”At the bottom of the form; the cross is at its top right.
Save checks the form, sends it and closes it; Replyco confirms with Success. Cancel and the cross close it without saving.
The form sits next to the list, so you can compare fields while you type.
Who sees what
Section titled “Who sees what”| Part | What decides whether you see it or can use it |
|---|---|
| Custom Fields in Tools | The custom fields feature (every plan) and the Custom Fields permission, with View or Edit |
| Creating, changing and deleting fields | The Custom Fields permission with Edit |
| Reordering fields | Everyone who can open the screen: the drag handle is on every card |
| The Custom Fields panel in a ticket | The custom fields feature (every plan) |
| Filling in values | Everyone who can open the ticket, with the custom fields feature |
During a trial every feature is on. See What each plan includes.
What you need to know
Section titled “What you need to know”| Topic | Fact |
|---|---|
| Plans | Every plan, and every feature during a trial; companies on an older plan may not have them |
| Scope | Fields belong to the company and appear on every ticket |
| Types | Text, Yes/No, date and time, date, list (single or multiple choice), whole number |
| Type changes | Not possible after saving |
| Names | Required, unique, up to 250 characters, not translated |
| Order | Set by dragging; used by the ticket panel, the fill-in window and the export columns |
| Old tickets | Have no value in a new field until someone fills it in |
| Deleting a field | Deletes its values on every ticket; no undo |
| Merging tickets | The kept ticket keeps its own values; the others’ are deleted |
| Automation | Not used by rules, Smart Filters or list filters |
| Customers | Never see custom fields |
| Where to report | DashboardReports, ticket fields report |
Frequently asked questions
Section titled “Frequently asked questions”Setting up fields
Section titled “Setting up fields”Which field types can I create?
Section titled “Which field types can I create?”Six: Text for free text, Yes/No, Date and time, Date, List for a fixed set of answers, and Number for whole numbers. You choose the type in Type when you create the field on ToolsCustom Fields.
Can I change the type of a field?
Section titled “Can I change the type of a field?”No. Type is greyed out once a field is saved. Add a new field with the type you need on ToolsCustom Fields, move the values over by hand if necessary, then delete the old field, which also deletes its values on every ticket.
How do I let agents pick more than one answer?
Section titled “How do I let agents pick more than one answer?”Use a field of the type List and switch Allow multiple options to Yes on ToolsCustom Fields. You can do this for a list that is already in use; the answers already on tickets stay as one-item selections. Once saved with several answers allowed, the switch cannot be turned off.
Why can’t I save a field?
Section titled “Why can’t I save a field?”Replyco refuses the form with All fields must be completed. when the name or the type is missing, or when a list has no option or an empty option. A name that another field already uses is refused too. Your user also needs the Custom Fields permission with Edit.
Can I use decimals in a number field?
Section titled “Can I use decimals in a number field?”Replyco stores the value of a Number field as a whole number. Enter whole numbers only, such as the number of items returned. Text in a number field is refused in the ticket with the message {{name}} must be a number., which names the field.
Changing and deleting
Section titled “Changing and deleting”What happens to the values when I rename a field?
Section titled “What happens to the values when I rename a field?”Nothing. The values stay on every ticket and appear under the new name in the ticket’s Custom Fields panel and as the column name in the export. Renaming an option of a list field does not change answers already on tickets; they keep the old text.
What happens when I delete a field?
Section titled “What happens when I delete a field?”Replyco deletes the field and, with it, the value agents entered on every ticket. The values can no longer be exported, and there is no undo. Before deleting a field on ToolsCustom Fields, export its values from the ticket fields report if you need them.
How do I change the order of the fields on the ticket?
Section titled “How do I change the order of the fields on the ticket?”Drag the cards on ToolsCustom Fields by their handle ☰. The order is saved at once for the whole company and is used by the ticket’s Custom Fields panel, the window agents fill in and the columns of the export.
On the ticket and in reports
Section titled “On the ticket and in reports”Where do agents fill in custom fields?
Section titled “Where do agents fill in custom fields?”In the ticket, in the panel Custom Fields of the right panel. The plus icon, or the gear once values exist, opens a window with every field of the company; agents fill in what applies and select Save. The panel then lists the fields that have a value.
Why does the custom fields panel show only some fields?
Section titled “Why does the custom fields panel show only some fields?”The panel in the ticket lists only the fields that have a value on that ticket. Select the gear icon to open the window with every field of your company, including the empty ones. The fields themselves are defined on ToolsCustom Fields.
Can customers see custom fields?
Section titled “Can customers see custom fields?”No. Custom fields are internal and appear only in Replyco: in the ticket’s right panel and in the ticket fields report. They are not sent in replies and are not available as placeholders in templates.
How do I report on custom field values?
Section titled “How do I report on custom field values?”Open DashboardReports, choose the fields in Select Custom Fields of the ticket fields report, set the period and download the file. Each custom field becomes one column; a list field with several answers shows them separated by commas.
Can a rule fill in a custom field?
Section titled “Can a rule fill in a custom field?”No. Custom fields are filled in by people in the ticket. Rules, Smart Filters and the filters of the ticket lists do not use them. To sort tickets automatically, a rule can add a label instead; see Labels.
Troubleshooting
Section titled “Troubleshooting”| Symptom | What to check |
|---|---|
| Custom Fields is missing from Tools | Your user has no Custom Fields permission, or your company is on an older plan without custom fields; see What each plan includes |
| You don't have enough rights after Save on this screen | Your permission is View only; changes need Edit |
| All fields must be completed. | The name or the type is missing, or a list has no option or an empty one |
| A new field is not saved and an error appears | Another field already has that name; choose a different one |
| {{name}} must be a number. in a ticket | The number field contains text; enter a whole number |
| Type cannot be changed | Saved fields keep their type; create a new field |
| Allow multiple options is locked | The field already allows several answers; this cannot be undone |
| A field’s values are missing in the export | The field was not chosen in Select Custom Fields, or it was deleted |