

Connect WhatsApp
Connect your WhatsApp Business number and every WhatsApp message a customer sends to it arrives in Replyco as a chat; the replies you write in Replyco go back to the customer on WhatsApp. The connection runs through Meta’s sign-up window, which opens over Replyco: there you choose your Meta business, the WhatsApp Business Account and its phone number, and Replyco then saves one account for each WhatsApp Business Account you shared. Nothing needs to be typed into Replyco itself.
Before you start
Section titled “Before you start”| You need | Where it lives |
|---|---|
| The Admin permission in Replyco | AdminUsers; see Invite users and set what they can do |
| A Facebook login that manages your Meta business | Meta Business Suite |
| A WhatsApp Business Account in that business, or the details to create one in Meta’s window | Meta’s sign-up window, or WhatsApp Manager in Meta Business Suite |
| A phone number for the WhatsApp Business Account that can receive Meta’s verification code by text message or call | Your phone provider |
| Business verification and a payment method, if Meta asks for them | Meta’s business settings, on the WhatsApp account’s Settings tab |
| Full control of your business’s Facebook page for your own Facebook login | The page’s settings in Facebook, under Page access; see Give yourself full control of the Facebook page |
| A free account on your plan | AdminBilling; see Billing |
Availability: every plan. The WhatsApp tile appears for companies with the WhatsApp feature, which every plan includes; see What each plan includes.
Give yourself full control of the Facebook page
Section titled “Give yourself full control of the Facebook page”Add your own Facebook login to your business’s Facebook page, with full control, before you connect WhatsApp:
-
In Facebook, open the profile menu at the top right and switch to the business page’s profile.
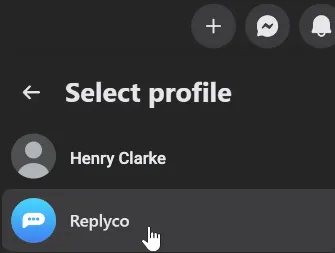
Switch to the business page's profile from the profile menu at the top right. What this screenshot shows
- Screen
- ()
- Highlighted
- “”, , .
- Also visible
- Select profile; personal profile; business page profile, with the pointer
- Purpose
-
Open the menu again and select “Settings & privacy”, then “Settings”.
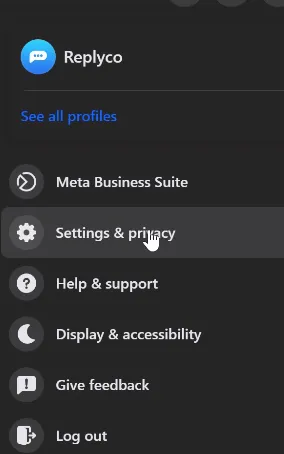
In the page's profile menu, select "Settings & privacy". What this screenshot shows
- Screen
- ()
- Highlighted
- “”, , .
- Also visible
- page profile; See all profiles; Meta Business Suite; Settings & privacy, with the pointer; Log out
- Purpose
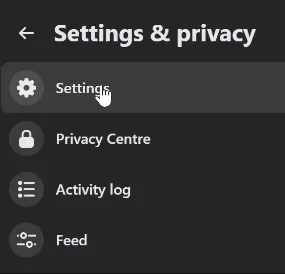
Then select "Settings". What this screenshot shows
- Screen
- ()
- Highlighted
- “”, , .
- Also visible
- Settings, with the pointer; Privacy Centre; Activity log; Feed
- Purpose
-
Search the settings for “Page access” and open it.
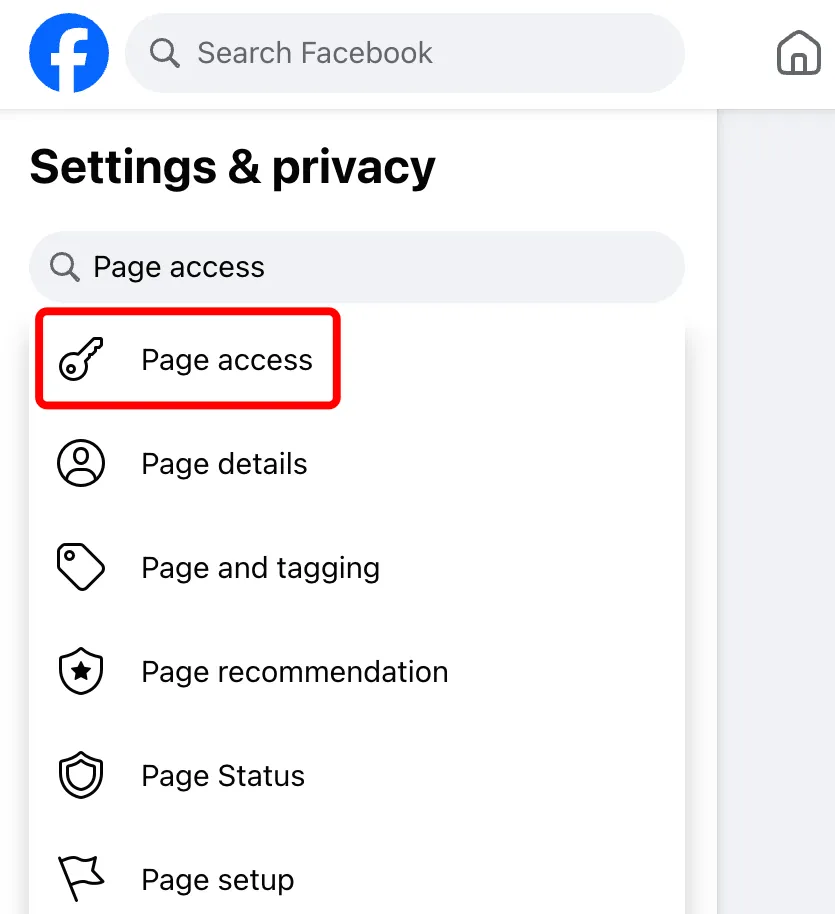
Search the settings for "Page access" and open it. What this screenshot shows
- Screen
- ()
- Highlighted
- “”, , .
- Also visible
- search field with Page access; Page access result, framed in red; Page details, Page and tagging, Page recommendation, Page Status, Page setup
- Purpose
-
Under “People with Facebook access”, select “Add New” and add yourself with full control.
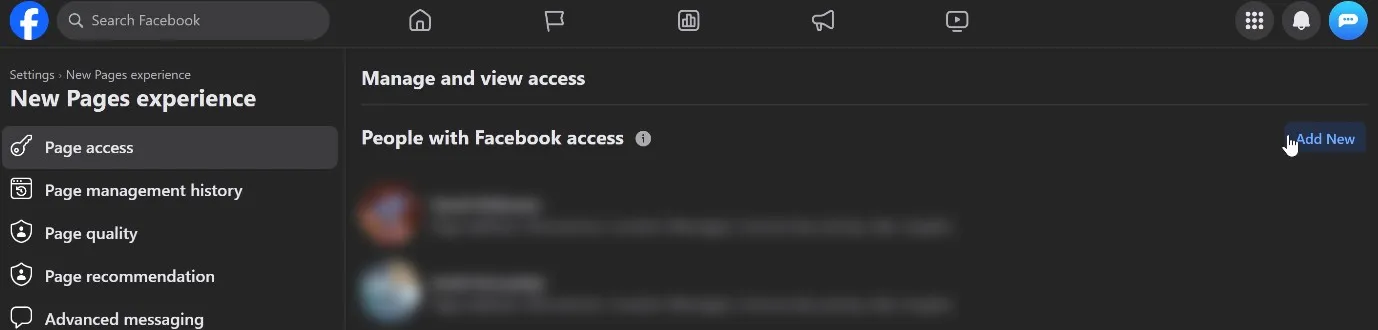
Under "People with Facebook access", select "Add New" and add yourself with full control. What this screenshot shows
- Screen
- ()
- Highlighted
- “”, , .
- Also visible
- Page access, selected; Manage and view access; People with Facebook access, blurred; Add New, with the pointer
- Purpose
If you cannot find yourself under Page access
Section titled “If you cannot find yourself under Page access”If you are an admin of your Meta Business Suite, Facebook may not list you under Page access. Remove your assignment to the page in Meta Business Suite first:
-
In Facebook, while you act as the page, open “Meta Business Suite” from the menu on the left.
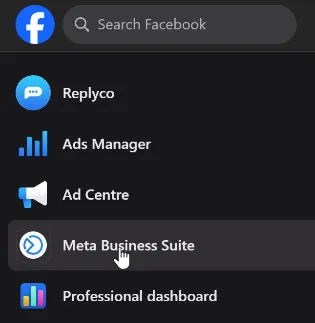
Open Meta Business Suite for the page from Facebook's menu. What this screenshot shows
- Screen
- ()
- Highlighted
- “”, , .
- Also visible
- page profile; Ads Manager; Ad Centre; Meta Business Suite, with the pointer; Professional dashboard
- Purpose
-
Open “Settings” at the bottom left.
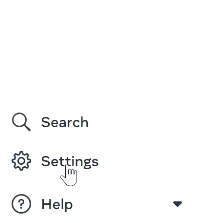
In Meta Business Suite, open "Settings" at the bottom left. What this screenshot shows
- Screen
- ()
- Highlighted
- “”, , .
- Also visible
- Search; Settings, with the pointer; Help
- Purpose
-
Under Accounts › Pages, select the page you connect to Replyco.
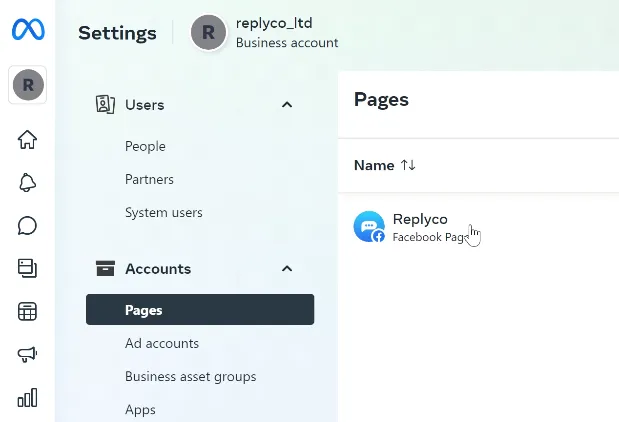
Under Accounts › Pages, select the page you connect to Replyco. What this screenshot shows
- Screen
- ()
- Highlighted
- “”, , .
- Also visible
- Users: People, Partners, System users; Accounts: Pages (selected), Ad accounts, Business asset groups, Apps; Pages list with the business page
- Purpose
-
On the “Page access” tab, find yourself, marked “(You)”, and select “Manage”.
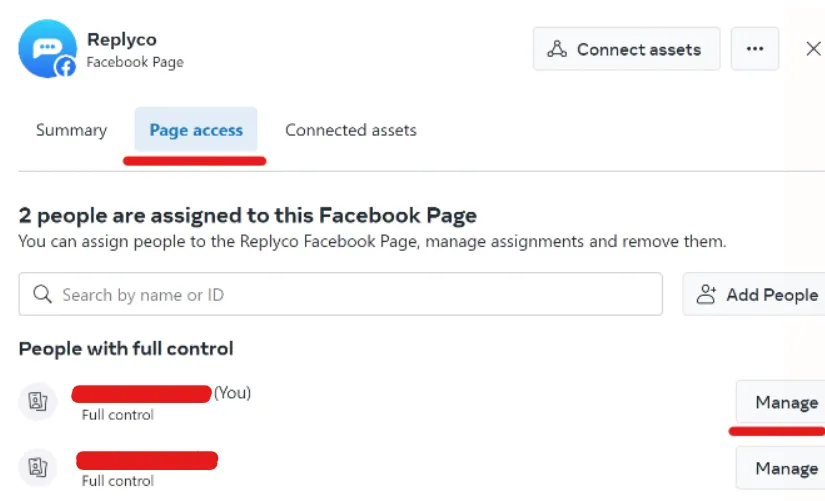
On the Page access tab, find yourself, marked "(You)", and select "Manage". What this screenshot shows
- Screen
- ()
- Highlighted
- “”, , .
- Also visible
- Summary, Page access (underlined), Connected assets; 2 people are assigned to this Facebook Page; People with full control, names hidden; Manage next to (You), underlined
- Purpose
-
Select “Remove Access”.
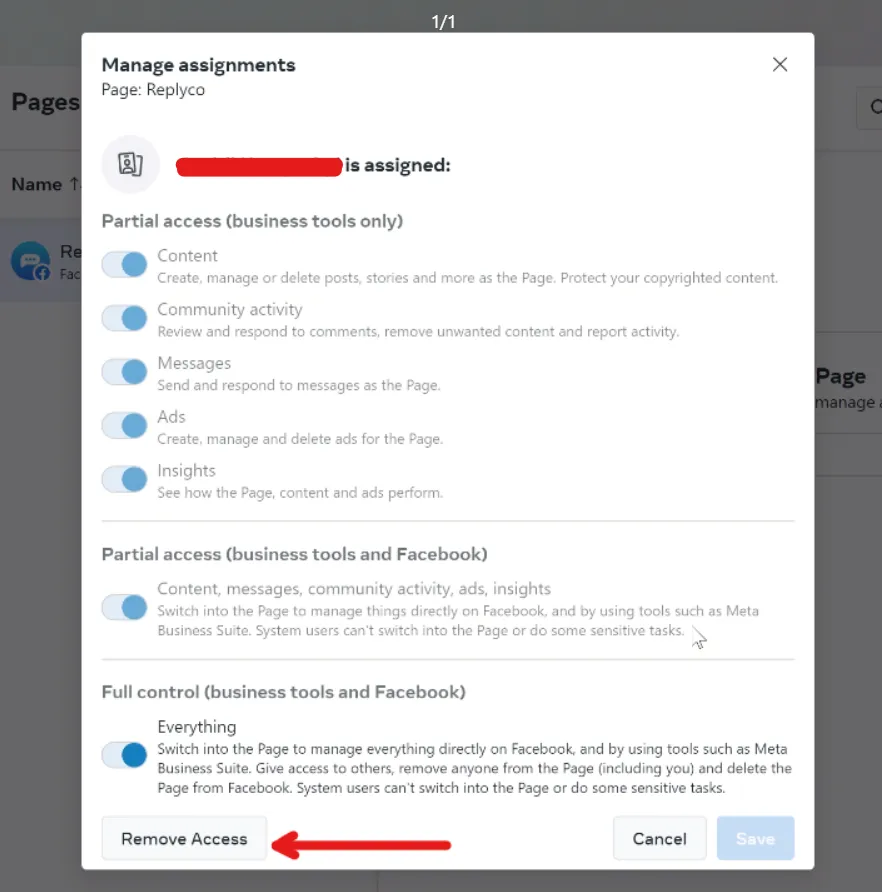
Select "Remove Access"; you then add yourself to the page on Facebook itself. What this screenshot shows
- Screen
- ()
- Highlighted
- “”, , .
- Also visible
- Partial access (business tools only); Partial access (business tools and Facebook); Full control, Everything, on; Remove Access, with an arrow; Cancel, Save
- Purpose
Then add yourself to the page on Facebook, as in Give yourself full control of the Facebook page. You remain an admin of your Meta Business Suite.
-
Select + Add Account in the top bar and scroll down to Social Media and Phone Accounts.
The Add Account page lists every channel Replyco connects; to connect another one, see Add Account.
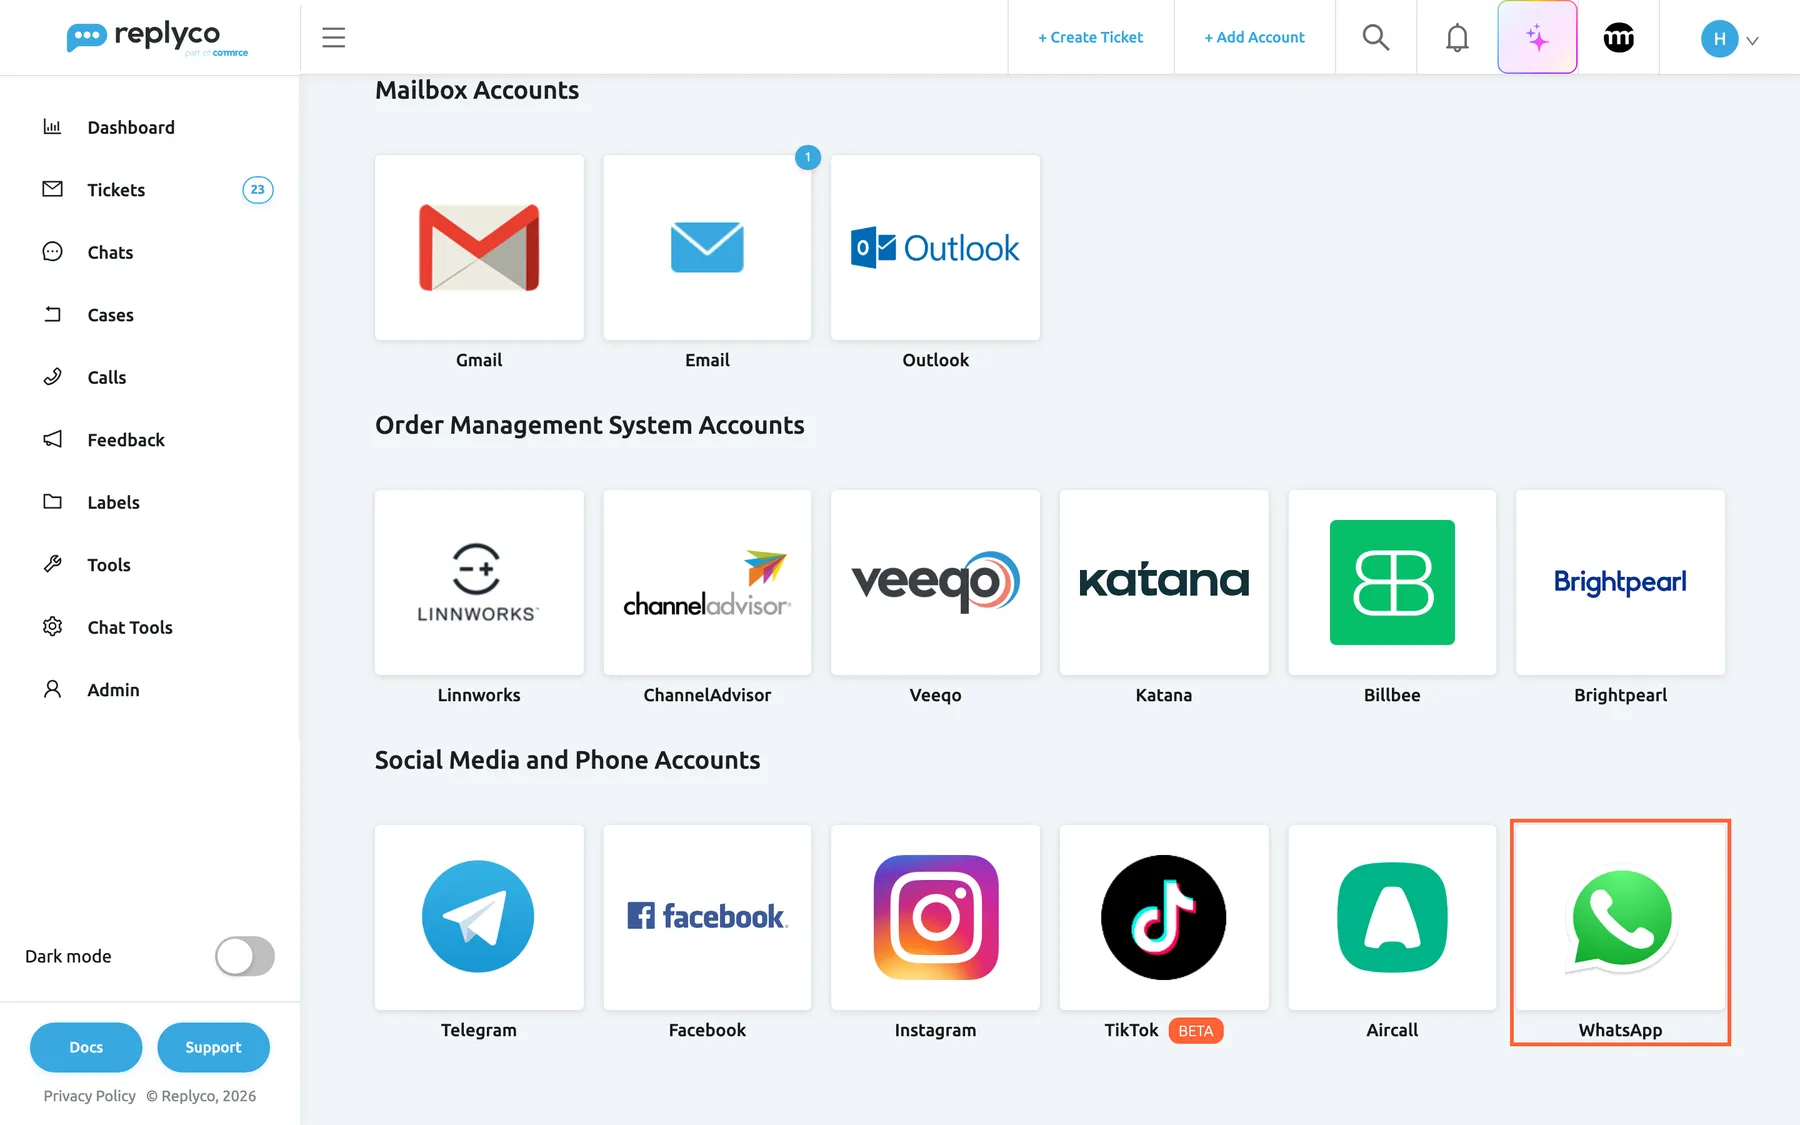
WhatsApp is the last tile under Social Media and Phone Accounts. What this screenshot shows
- Screen
- Add Account (/integrations/add)
- Highlighted
- button “”, social-media-and-phone-tiles, enabled. opens the WhatsApp connect dialog
- Also visible
- Mailbox Accounts and Order Management System Accounts above; Telegram, Facebook, Instagram, TikTok (BETA), Aircall, WhatsApp tiles
- Purpose
- start connecting WhatsApp
-
Select the WhatsApp tile. The dialog Authorize Replyco to sync with WhatsApp opens at its first step, AUTHORIZE. Select Authorize.
Meta’s sign-up window opens over Replyco.
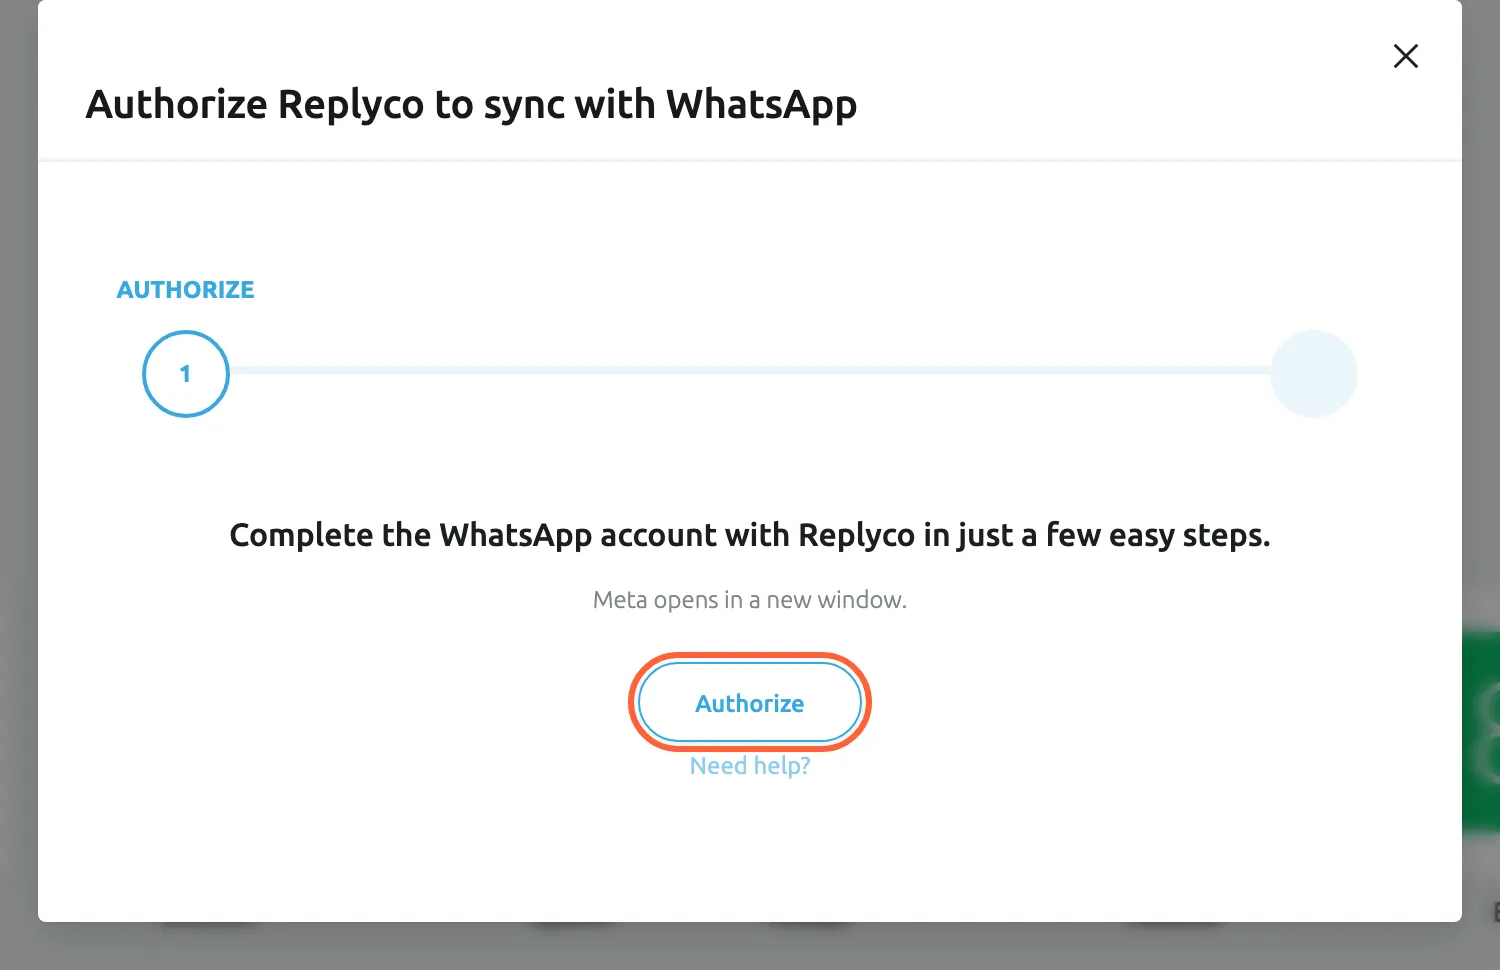
Authorize opens Meta's sign-up window; the WhatsApp account is saved when you finish there. What this screenshot shows
- Screen
- Authorize Replyco to sync with {{name}} (/integrations/add)
- Highlighted
- button “Authorize”, dialog-centre, enabled. opens Meta's embedded sign-up window
- Also visible
- step AUTHORIZE of two; Need help? link
- Purpose
- start Meta's WhatsApp sign-up
-
In Meta’s window, sign in with Facebook and follow Meta’s steps: choose the Meta business, choose or create the WhatsApp Business Account and its profile, add the phone number and enter the code Meta sends to it, then allow the access Replyco asks for. Meta first lists the permissions you share with Replyco; select “Get Started”.
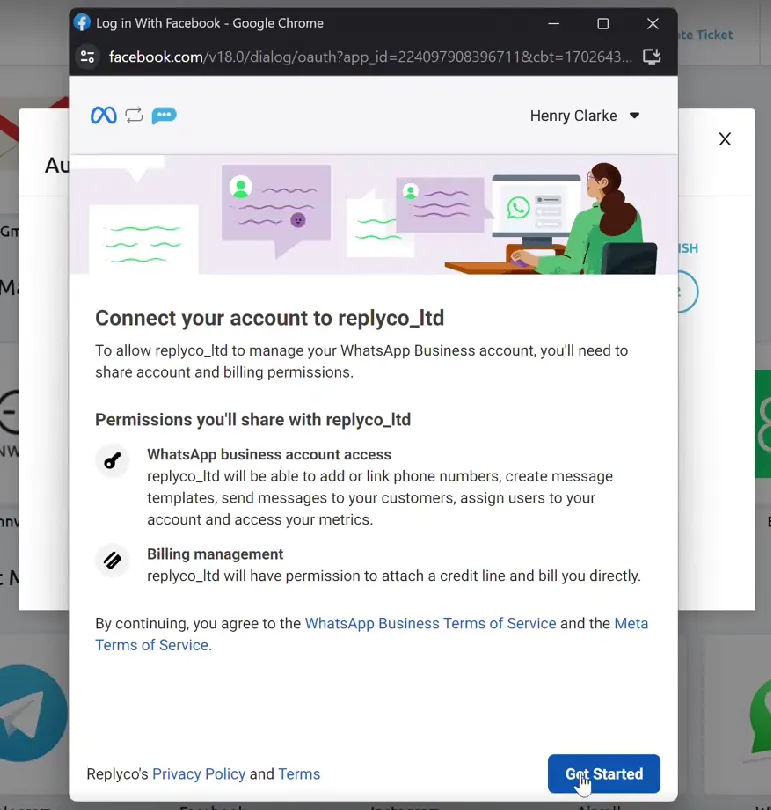
Meta's window lists the permissions you share with Replyco; select "Get Started". What this screenshot shows
- Screen
- ()
- Highlighted
- “”, , .
- Also visible
- Permissions you'll share with replyco_ltd; WhatsApp business account access; Billing management; Get Started
- Purpose
Under “Fill in your business information”, choose the Meta business account that owns your WhatsApp Business Account and select “Next”.
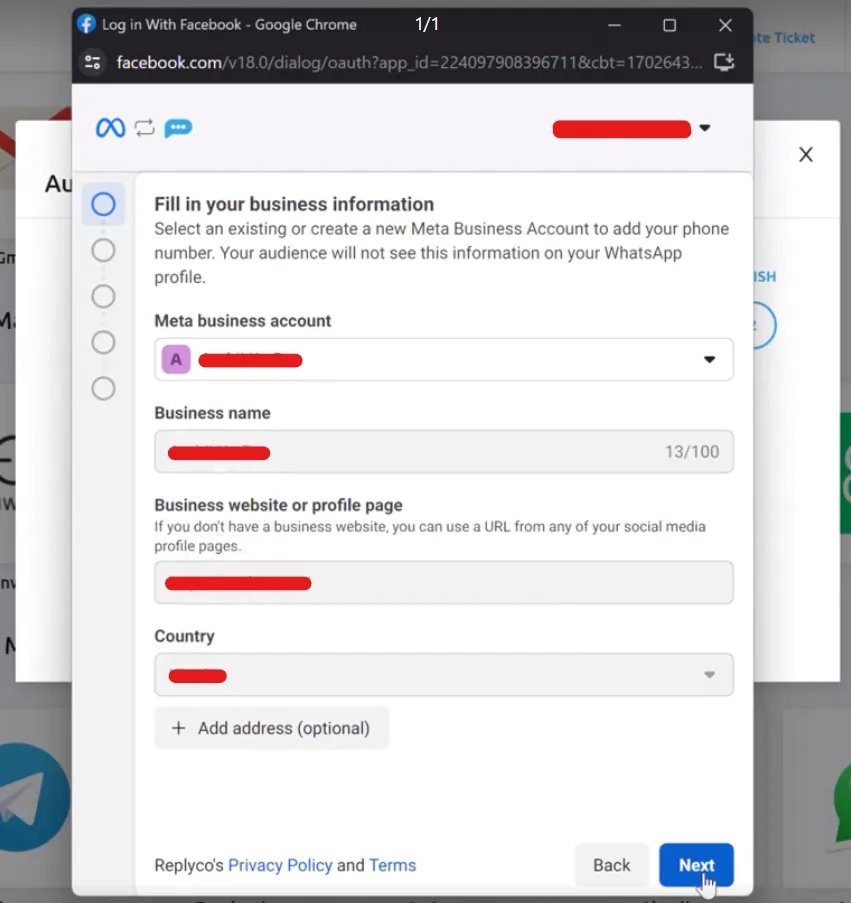
Choose the Meta business account that owns your WhatsApp Business Account and select "Next". What this screenshot shows
- Screen
- ()
- Highlighted
- “”, , .
- Also visible
- Meta business account; Business name; Business website or profile page; Country; Add address (optional); Back, Next
- Purpose
If Meta asks you to verify your business or to add a payment method for the WhatsApp Business Account, you find both on the WhatsApp account’s Settings tab in Meta’s business settings, under “Business verification” and “Payment method”.
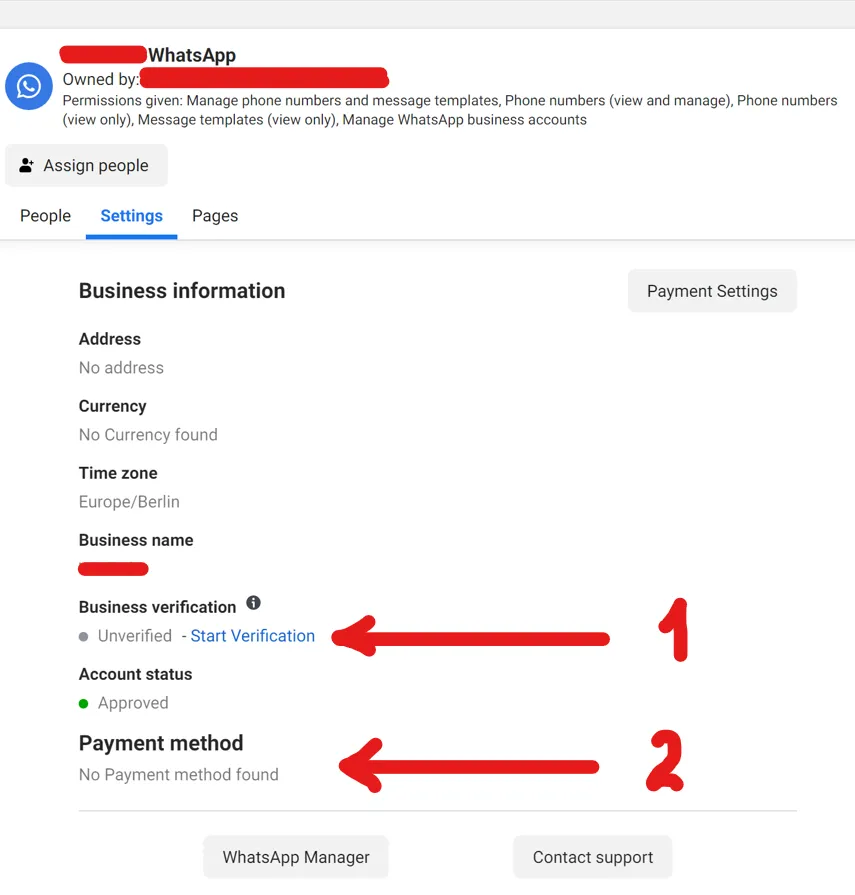
Your business must be verified (1), and the WhatsApp Business Account needs a payment method (2). What this screenshot shows
- Screen
- ()
- Highlighted
- “”, , .
- Also visible
- Business information; Business verification: Unverified - Start Verification (1); Account status: Approved; Payment method: No Payment method found (2); WhatsApp Manager, Contact support
- Purpose
Choose or create the WhatsApp Business Account and its profile, and select “Next”.
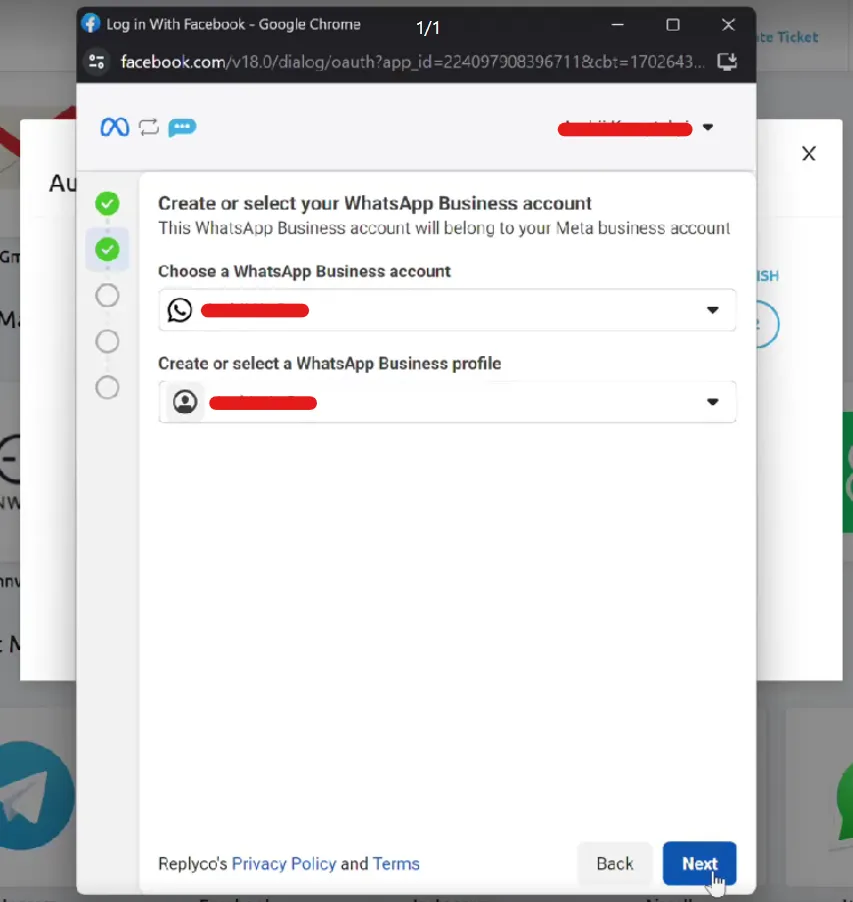
Choose or create the WhatsApp Business Account and its profile, then select "Next". What this screenshot shows
- Screen
- ()
- Highlighted
- “”, , .
- Also visible
- Choose a WhatsApp Business account; Create or select a WhatsApp Business profile; Back, Next
- Purpose
Choose how Meta sends the verification code, by text message or phone call, select “Next” and enter the code.
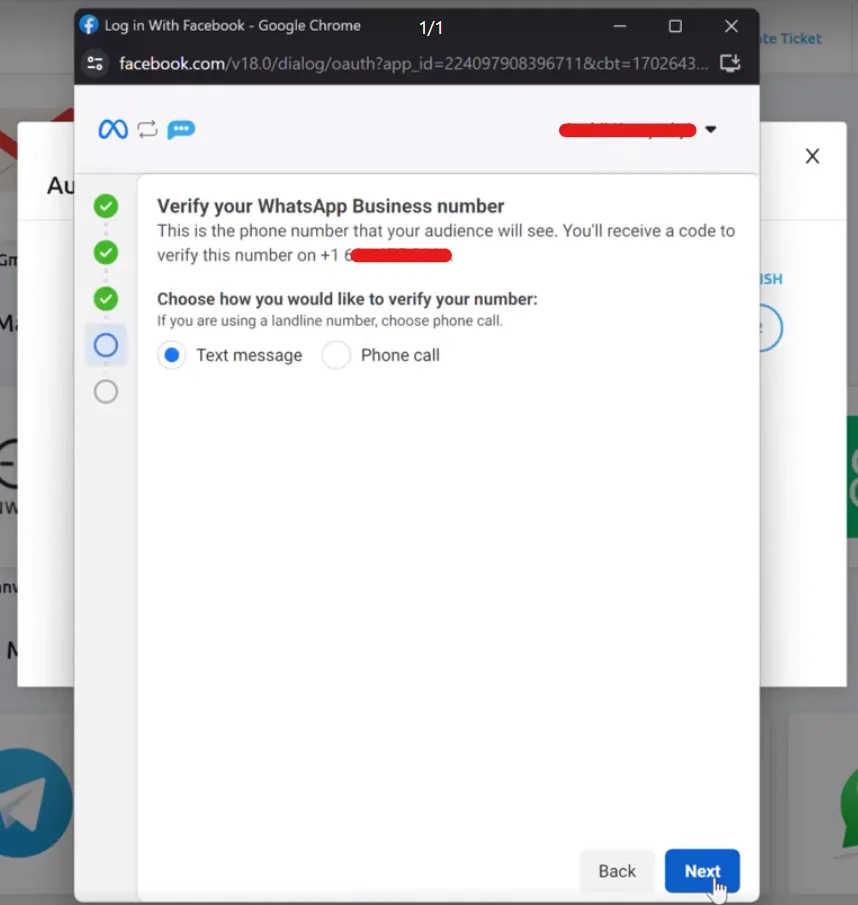
Choose text message or phone call for the verification code and select "Next". What this screenshot shows
- Screen
- ()
- Highlighted
- “”, , .
- Also visible
- number hidden; Text message (selected); Phone call; Back, Next
- Purpose
Review what Replyco asks permission to do and select “Continue”. Replyco needs access to your WhatsApp Business Account’s messaging; without it, Meta’s window finishes but no account can be connected.
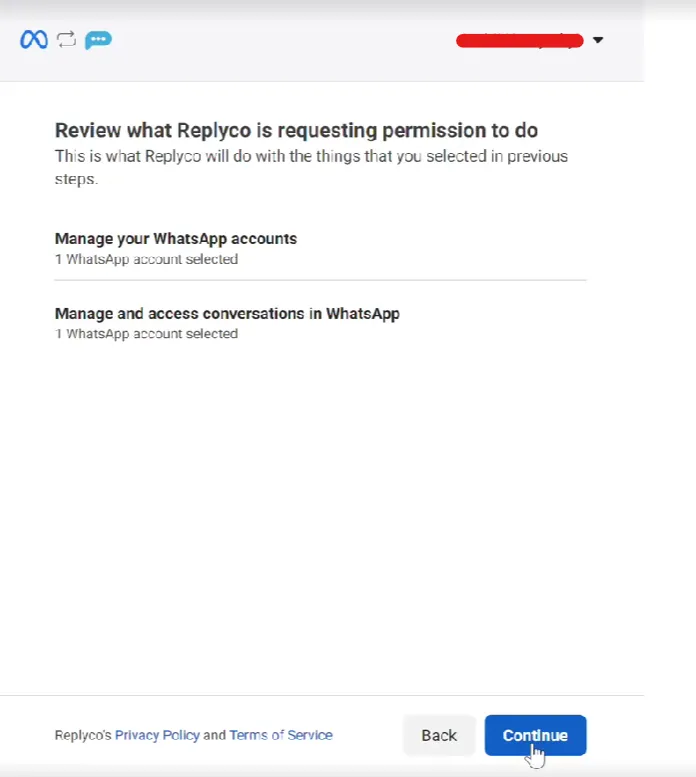
Review the two permissions Replyco asks for and select "Continue". What this screenshot shows
- Screen
- ()
- Highlighted
- “”, , .
- Also visible
- Manage your WhatsApp accounts; Manage and access conversations in WhatsApp; Back, Continue
- Purpose
After a few seconds, Meta says you are ready to chat on WhatsApp. Select “Finish”.
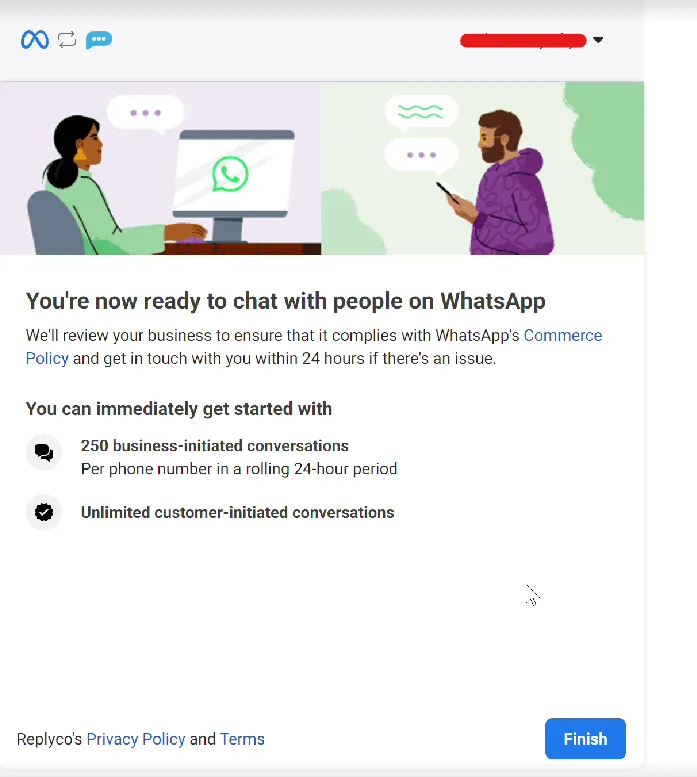
When Meta says you are ready to chat on WhatsApp, select "Finish". What this screenshot shows
- Screen
- ()
- Highlighted
- “”, , .
- Also visible
- Commerce Policy review note; 250 business-initiated conversations; Unlimited customer-initiated conversations; Finish
- Purpose
-
When you finish, Meta’s window closes. Replyco connects the number and confirms with Account successfully saved. Then select Finish in the dialog.
What happens next
Section titled “What happens next”The account appears on AdminAccounts under the name of the WhatsApp Business Account; to check it or rename it, see Accounts. If you shared several WhatsApp Business Accounts in Meta’s window, each one that has a phone number becomes its own account.
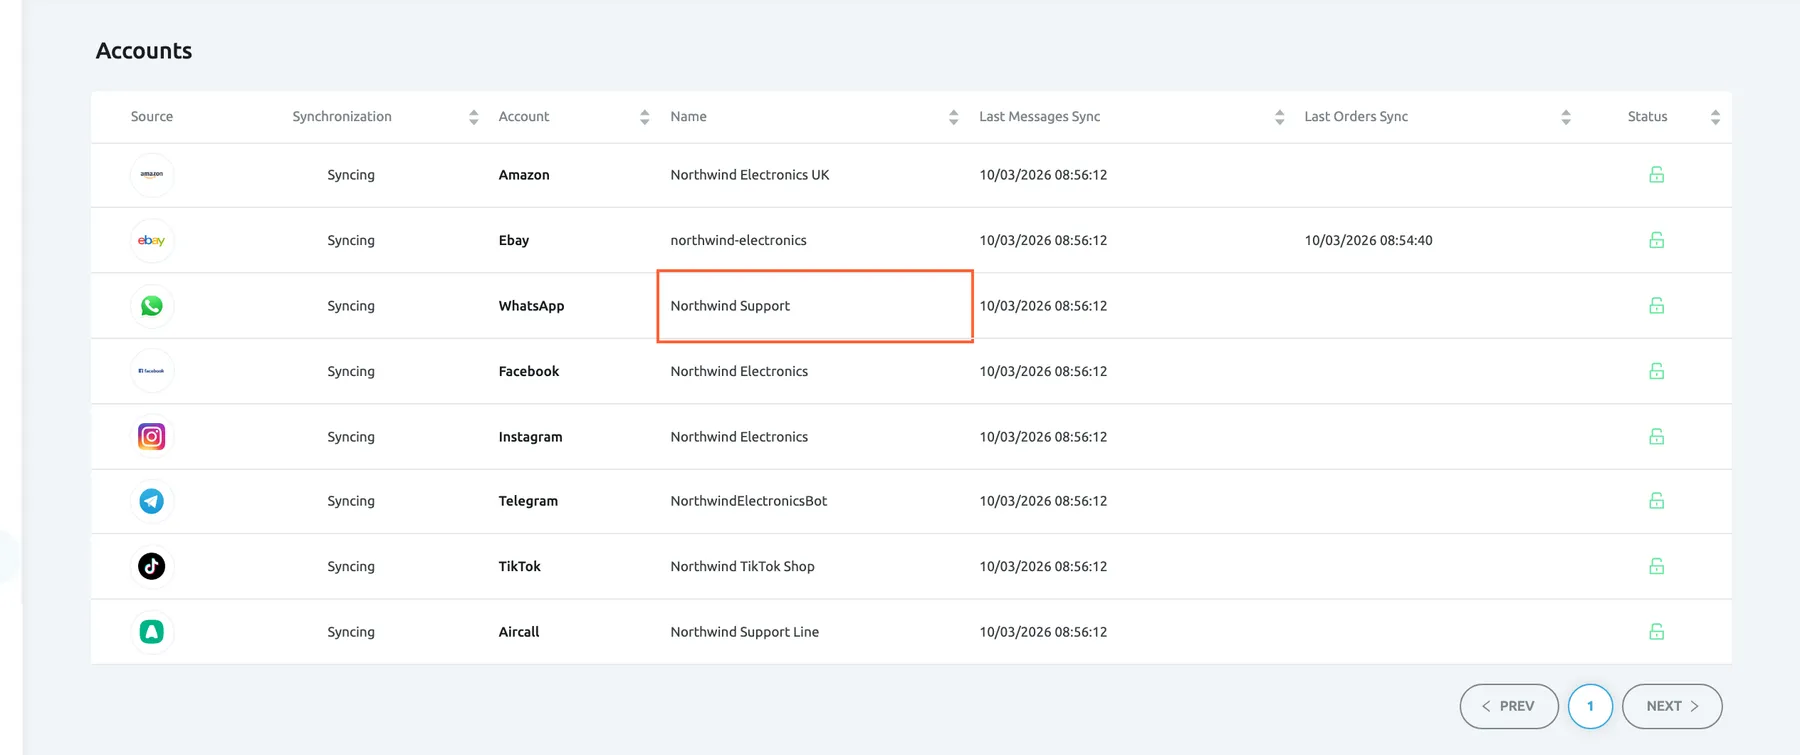
What this screenshot shows
- Screen
- Accounts (/integrations)
- Highlighted
- cell “”, table-third-row, enabled. opens the account's details
- Also visible
- 8 accounts, all Syncing, green open locks; WhatsApp, Facebook, Instagram, Telegram, TikTok and Aircall rows
- Purpose
- check that the WhatsApp account was saved
From now on, every WhatsApp message to the number reaches Replyco as it arrives and opens or continues a chat under ChatsOpen; see Chat list and conversations. Every user of your company gets access to the new account, so its chats appear for everyone with the Chats permission. To decide who is responsible for the account’s chats, see Invite users and set what they can do.
Two WhatsApp rules shape how you work with these chats:
- Reply within 24 hours of the customer’s last message. After that, WhatsApp accepts no ordinary reply until the customer writes again. How to reply and what happens when WhatsApp refuses a reply is in Answer a chat.
- WhatsApp chats never get chat auto-responses, so a WhatsApp customer hears nothing until your team replies. See Auto-responses for chats.
If something goes wrong
Section titled “If something goes wrong”| Symptom | Check | Fix |
|---|---|---|
| “Didn’t find any connected WhatsApp business accounts” | In Meta’s window, no WhatsApp Business Account was shared with Replyco. | Start again from the WhatsApp tile and choose the WhatsApp Business Account in Meta’s window. |
| Meta’s window closed before you finished, and Replyco shows The WhatsApp sign-up at Meta was not completed. Please try again. | Nothing was saved. | Close the dialog and start again from the WhatsApp tile. |
| A WhatsApp Business Account you shared is not on AdminAccounts | Does it have a phone number? Is it already connected under the same name? | Add and verify a number in Meta, then connect again; an account that is already connected needs no second connection. |
| “You reached your current plan maximum integrations count. Contact support for more info.” | Your plan has no free account; + Add Account is then also missing from the top bar. | Delete an account you no longer use, or change your plan on AdminBilling. |
| There is no WhatsApp tile under Social Media and Phone Accounts | Your company is on an older plan without the WhatsApp feature; every current plan includes it. | Check your subscription on AdminBilling; see What each plan includes. |
| A reply to a WhatsApp chat was not delivered | Is the customer’s last message more than 24 hours old? | See Answer a chat. |